English Owners Guide
Page 2
... EN55103-2 immunity requirements for E2 electromagnetic environment. Use only with the cart, stand, tripod, bracket, or table specified by Bose Corporation could result in indoor water facility areas (including, without limitation, indoor pools, indoor water parks, hot tub rooms, ...such as fireplaces, radiators, heat registers or other apparatus (including amplifiers) that produce heat. • Do not use the ToneMatch® T4S/T8S mixer with a tripod/stand that may cause harmful interference to maintain regulatory compliance. NOTES: • The speaker wire and interconnect cables...
... EN55103-2 immunity requirements for E2 electromagnetic environment. Use only with the cart, stand, tripod, bracket, or table specified by Bose Corporation could result in indoor water facility areas (including, without limitation, indoor pools, indoor water parks, hot tub rooms, ...such as fireplaces, radiators, heat registers or other apparatus (including amplifiers) that produce heat. • Do not use the ToneMatch® T4S/T8S mixer with a tripod/stand that may cause harmful interference to maintain regulatory compliance. NOTES: • The speaker wire and interconnect cables...
English Owners Guide
Page 3
... Connection Panels T4S ToneMatch® Mixer 6 Control Panel 6 Connection Panel 7 T8S ToneMatch® Mixer 8 Control Panel 8 Connection Panel 9 System Setup Removing/Attaching the Cover 10 Mounting Options 11 Mounting the T4S/T8S on a Camera Tripod Stand 11 Connecting the T4S via Digital Connection 12 Connecting the T4S/T8S via Analog Connection 13 Connecting the ToneMatch® Power Supply 14 Connecting the T4S/T8S to...
... Connection Panels T4S ToneMatch® Mixer 6 Control Panel 6 Connection Panel 7 T8S ToneMatch® Mixer 8 Control Panel 8 Connection Panel 9 System Setup Removing/Attaching the Cover 10 Mounting Options 11 Mounting the T4S/T8S on a Camera Tripod Stand 11 Connecting the T4S via Digital Connection 12 Connecting the T4S/T8S via Analog Connection 13 Connecting the ToneMatch® Power Supply 14 Connecting the T4S/T8S to...
English Owners Guide
Page 5
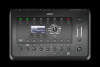
...; zEQ focuses the sound of optional equipment and accessories, please visit www.Bose.com. ToneMatch mixers, the ultimate on -stage use by musicians and DJs • Fast-learning user interface • Built-in a small digital stereo mixer • Four (T4S) or eight (T8S) high-quality audio preamps with XLR-combo jacks for microphones or instruments, and...
...; zEQ focuses the sound of optional equipment and accessories, please visit www.Bose.com. ToneMatch mixers, the ultimate on -stage use by musicians and DJs • Fast-learning user interface • Built-in a small digital stereo mixer • Four (T4S) or eight (T8S) high-quality audio preamps with XLR-combo jacks for microphones or instruments, and...

English Owners Guide
Page 6
... phantom power is on the display. For use with headphones only, with a minimum impedance of an input signal Red: Indicates input source clipping w TRIM CONTROLS (1-4) - T4S Control Panel q w d e s r t a y f u o i q INPUT SIGNAL/CLIP LEDs (1-4) - e DISPLAY - These three rotary/push-button controls allow you want to...VOLUME CONTROL - y FX MUTE BUTTONS (1-4) - English s ROTARY SELECTOR - Provides function menus and system information. Control and Connection Panels T4S ToneMatch® Mixer Control Panel Figure 1. Selects the channel you to modify.
... phantom power is on the display. For use with headphones only, with a minimum impedance of an input signal Red: Indicates input source clipping w TRIM CONTROLS (1-4) - T4S Control Panel q w d e s r t a y f u o i q INPUT SIGNAL/CLIP LEDs (1-4) - e DISPLAY - These three rotary/push-button controls allow you want to...VOLUME CONTROL - y FX MUTE BUTTONS (1-4) - English s ROTARY SELECTOR - Provides function menus and system information. Control and Connection Panels T4S ToneMatch® Mixer Control Panel Figure 1. Selects the channel you to modify.

English Owners Guide
Page 7
...balanced or TS unbalanced cables for line-level inputs. Delivers power to the T4S mixer from your computer. CAUTION: Although the ToneMatch port accepts a standard RJ-45 connector, do NOT connect the T4S to two L1® Model 1S/II systems. Note: Only used ...for stereo input signals. i DIGITAL MAIN OUTPUT L - Turns the mixer on or off. y AUX IN - u INPUTS 1-4 - Connect digitally in stereo with the T4S). Analog input channels 1-4. Main analog output. o POWER PORT/DIGITAL MAIN OUTPUT R - Accepts the included ToneMatch® cable. Connection Panel Figure 2. English - 7
...balanced or TS unbalanced cables for line-level inputs. Delivers power to the T4S mixer from your computer. CAUTION: Although the ToneMatch port accepts a standard RJ-45 connector, do NOT connect the T4S to two L1® Model 1S/II systems. Note: Only used ...for stereo input signals. i DIGITAL MAIN OUTPUT L - Turns the mixer on or off. y AUX IN - u INPUTS 1-4 - Connect digitally in stereo with the T4S). Analog input channels 1-4. Main analog output. o POWER PORT/DIGITAL MAIN OUTPUT R - Accepts the included ToneMatch® cable. Connection Panel Figure 2. English - 7
English Owners Guide
Page 10
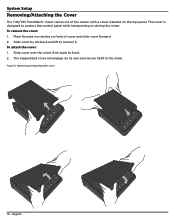
... own and secure itself to remove it. Figure 5. English Grab cover by the back and lift to the mixer. The cover is designed to front. 2. System Setup Removing/Attaching the Cover The T4S/T8S ToneMatch® mixer comes out of the carton with a cover installed on front of cover and slide cover forward. 2. To attach...
... own and secure itself to remove it. Figure 5. English Grab cover by the back and lift to the mixer. The cover is designed to front. 2. System Setup Removing/Attaching the Cover The T4S/T8S ToneMatch® mixer comes out of the carton with a cover installed on front of cover and slide cover forward. 2. To attach...

English Owners Guide
Page 11
... x 83 mm (8.4 x 12.25 x 3.25 inches). See Figure 6. 3. See Figure 8. The mixer is not designed to an unstable and hazardous condition that is only designed for use the ToneMatch® T4S/T8S mixer with the screw. English - 11 Remove the bracket from the top of the camera tripod stand and... secure the bracket to tripod stand using bracket Figure 7. Using a tripod/stand that could result in injury. Mounting the T4S/T8S on the bracket are...
... x 83 mm (8.4 x 12.25 x 3.25 inches). See Figure 6. 3. See Figure 8. The mixer is not designed to an unstable and hazardous condition that is only designed for use the ToneMatch® T4S/T8S mixer with the screw. English - 11 Remove the bracket from the top of the camera tripod stand and... secure the bracket to tripod stand using bracket Figure 7. Using a tripod/stand that could result in injury. Mounting the T4S/T8S on the bracket are...

English Owners Guide
Page 12
...Turn on the mixer and then turn on the T4S. Connect your instruments and adjust levels. Two L1 model II systems connected to "Optimizing Input Gain and Output Volume" on page 17. Figure 9. Make sure the L1 Model 1S/II and T4S are powered off and the T4S Master volume ...a second power stand to minimum. 2. Plug the other end of the ToneMatch® cable into the ToneMatch port on the T4S using a ToneMatch cable. 3. English System Setup Connecting the T4S via digital connection USB AUDIO MONO M () Note: The T8S cannot be connected digitally and cannot be powered by the L1 Model 1S...
...Turn on the mixer and then turn on the T4S. Connect your instruments and adjust levels. Two L1 model II systems connected to "Optimizing Input Gain and Output Volume" on page 17. Figure 9. Make sure the L1 Model 1S/II and T4S are powered off and the T4S Master volume ...a second power stand to minimum. 2. Plug the other end of the ToneMatch® cable into the ToneMatch port on the T4S using a ToneMatch cable. 3. English System Setup Connecting the T4S via digital connection USB AUDIO MONO M () Note: The T8S cannot be connected digitally and cannot be powered by the L1 Model 1S...
English Owners Guide
Page 13
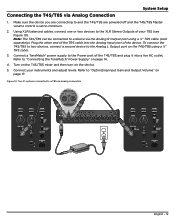
... 1. Figure 10. Refer to the Analog L Output port on the device. 5. Two F1 systems connected to minimum. 2. To connect the T4S/T8S to two devices, connect a second device to "Connecting the ToneMatch® Power Supply" on page 17. Turn on the T4S/T8S mixer and then turn on the T4S/T8S using a 1/4" TRS cable (sold separately). Connect your...
... 1. Figure 10. Refer to the Analog L Output port on the device. 5. Two F1 systems connected to minimum. 2. To connect the T4S/T8S to two devices, connect a second device to "Connecting the ToneMatch® Power Supply" on page 17. Turn on the T4S/T8S mixer and then turn on the T4S/T8S using a 1/4" TRS cable (sold separately). Connect your...

English Owners Guide
Page 14
... outlet. 4. Power supply is not included with T8S is not required for the T4S/T8S mixer. 1. English Switch the T4S/T8S power switch to power supply 14 - System Setup Connecting the ToneMatch® Power Supply The ToneMatch power supply provides power for operation of the T8S. Note: Power supply included with the T4S and is required for operation of the...
... outlet. 4. Power supply is not included with T8S is not required for the T4S/T8S mixer. 1. English Switch the T4S/T8S power switch to power supply 14 - System Setup Connecting the ToneMatch® Power Supply The ToneMatch power supply provides power for operation of the T8S. Note: Power supply included with the T4S and is required for operation of the...

English Owners Guide
Page 15
... the software settings for 48 kHz/24-bit operation. Visit www.Bose.com/livesound for recording/playback. Note: The T4S/T8S operates at 48 kHz/24-bit. Connecting a flash drive to -USB connection ToneMatch port - Turn on updating your mixer. Figure 12. When connected to a computer, you to download... performance scenes to a computer or install system updates. Connect the mixer to a power source (ToneMatch® power supply for T4S/T8S or an L1 Model 1S/II for connecting it to a computer. Plug the other end of the USB cable into...
... the software settings for 48 kHz/24-bit operation. Visit www.Bose.com/livesound for recording/playback. Note: The T4S/T8S operates at 48 kHz/24-bit. Connecting a flash drive to -USB connection ToneMatch port - Turn on updating your mixer. Figure 12. When connected to a computer, you to download... performance scenes to a computer or install system updates. Connect the mixer to a power source (ToneMatch® power supply for T4S/T8S or an L1 Model 1S/II for connecting it to a computer. Plug the other end of the USB cable into...

English Owners Guide
Page 16
The content of the parameter Rotary/pushbutton controls Asterisk indicates that the loaded scene was modified All Channels Scenes *Bose Scene 01 Load Shared Save Indicates that pressing the control activates the function 16 - Indicates that rotating the control changes... representation of the value of the display depends on the rotary selector position. Operation Reading the T4S/T8S Display The display provides you with an interface for operating the mixer. Sample display and operating conventions Identifies the selected channel This symbol indicates that pressing the control ...
The content of the parameter Rotary/pushbutton controls Asterisk indicates that the loaded scene was modified All Channels Scenes *Bose Scene 01 Load Shared Save Indicates that pressing the control activates the function 16 - Indicates that rotating the control changes... representation of the value of the display depends on the rotary selector position. Operation Reading the T4S/T8S Display The display provides you with an interface for operating the mixer. Sample display and operating conventions Identifies the selected channel This symbol indicates that pressing the control ...
English Owners Guide
Page 18
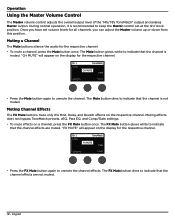
... on a channel, press the FX Mute button once. "FX MUTE" will appear on the display for the respective channel. Ch 1 Utility ToneMatch CH MUTE Flat Category Preset • Press the Mute button again to unmute the channel effects. The FX Mute button glows white to indicate ...Mute button again to unmute the channel. Operation Using the Master Volume Control The Master volume control adjusts the overall output level of the T4S/T8S ToneMatch® output and analog Master output. Muting a Channel The Mute buttons silence the audio for all channels, you can adjust the ...
... on a channel, press the FX Mute button once. "FX MUTE" will appear on the display for the respective channel. Ch 1 Utility ToneMatch CH MUTE Flat Category Preset • Press the Mute button again to unmute the channel effects. The FX Mute button glows white to indicate ...Mute button again to unmute the channel. Operation Using the Master Volume Control The Master volume control adjusts the overall output level of the T4S/T8S ToneMatch® output and analog Master output. Muting a Channel The Mute buttons silence the audio for all channels, you can adjust the ...

English Owners Guide
Page 20
... the line output from the menu. 2. Pressing a CH Edit button enables editing for that affect selected channels. The CH Edit functions are Pan/ Aux, Tuner, ToneMatch®, zEQ, Para EQ, Comp/Gate, Mod, Delay, and Reverb. Rotate the 5 Lvl or 6 Lvl control to settings that function using the rotary selector. 3. Note... the Pan control to R. Press or rotate the left corner of either the master out L or R, control aux in a stereo mix. Press the CH Edit 1, 2, 3, 4, (T4S and T8S) 5, 6, 7, or 8 (T8S only) button.
... the line output from the menu. 2. Pressing a CH Edit button enables editing for that affect selected channels. The CH Edit functions are Pan/ Aux, Tuner, ToneMatch®, zEQ, Para EQ, Comp/Gate, Mod, Delay, and Reverb. Rotate the 5 Lvl or 6 Lvl control to settings that function using the rotary selector. 3. Note... the Pan control to R. Press or rotate the left corner of either the master out L or R, control aux in a stereo mix. Press the CH Edit 1, 2, 3, 4, (T4S and T8S) 5, 6, 7, or 8 (T8S only) button.

English Owners Guide
Page 21
... adjustable for each input channel. Press the Select control to select the tap point, or press the Cancel control to two Aux outputs (T4S only) or four Aux outputs (T8S only) for the applicable channel. A. Post: After Fader - The display indicates the note being played at the bottom of the currently selected...
... adjustable for each input channel. Press the Select control to select the tap point, or press the Cancel control to two Aux outputs (T4S only) or four Aux outputs (T8S only) for the applicable channel. A. Post: After Fader - The display indicates the note being played at the bottom of the currently selected...
English Owners Guide
Page 30
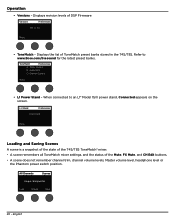
... Connected Menu Loading and Saving Scenes A scene is a snapshot of the state of the T4S/T8S ToneMatch® mixer. • A scene remembers all ToneMatch mixer settings, and the status of DSP Firmware. ToneMatch Preferences A: Taylor Guitars B: Audix Mics. English When connected to www.Bose.com/livesound for the latest preset banks. Refer to an L1® Model 1S...
... Connected Menu Loading and Saving Scenes A scene is a snapshot of the state of the T4S/T8S ToneMatch® mixer. • A scene remembers all ToneMatch mixer settings, and the status of DSP Firmware. ToneMatch Preferences A: Taylor Guitars B: Audix Mics. English When connected to www.Bose.com/livesound for the latest preset banks. Refer to an L1® Model 1S...

English Owners Guide
Page 31
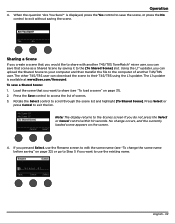
... for saving settings you wish to share with other T4S/T8S ToneMatch® mixer users. You can be uploaded to exit the list. Operation The T4S/T8S includes three types of the currently loaded scene appears in bold type. 3. The name of scenes: • (5) Bose scenes: Read-only factory-preset scenes. is displayed.... Cancel control within 10 seconds. Press Select, or press Cancel to a computer using the L1® updater software available at www.Bose.com/livesound. Rotate the Load control to the Scenes screen if you sure?" The currently loaded scene is displayed.
... for saving settings you wish to share with other T4S/T8S ToneMatch® mixer users. You can be uploaded to exit the list. Operation The T4S/T8S includes three types of the currently loaded scene appears in bold type. 3. The name of scenes: • (5) Bose scenes: Read-only factory-preset scenes. is displayed.... Cancel control within 10 seconds. Press Select, or press Cancel to a computer using the L1® updater software available at www.Bose.com/livesound. Rotate the Load control to the Scenes screen if you sure?" The currently loaded scene is displayed.
English Owners Guide
Page 33
...Bose.com/livesound. Using the L1® updater, you can upload the Shared Scene to your computer and then transfer the file to save a Shared Scene: 1. To save the scene, or press the No control to their T4S/T8S using the L1 updater. Press the Save control to access the list of another T4S/T8S ToneMatch...® mixer user, you want to share (see "To change occurs, and the currently loaded scene ...
...Bose.com/livesound. Using the L1® updater, you can upload the Shared Scene to your computer and then transfer the file to save a Shared Scene: 1. To save the scene, or press the No control to their T4S/T8S using the L1 updater. Press the Save control to access the list of another T4S/T8S ToneMatch...® mixer user, you want to share (see "To change occurs, and the currently loaded scene ...

English Owners Guide
Page 34
..., and the currently loaded scene appears on using the L1® updater application for a Shared Scene. Saving a scene as a Shared Scene. Please visit www.Bose.com/livesound for details on the screen. 7. English When the question "Are you do not press the Yes or No control within 10 seconds. All... Channels Scenes Singer/Songwriter Load Shared Save All Channels Scenes Current Shared Scene: My Scene 07 Back Press Note: The T4S/T8S provides only one storage location for downloading and uploading scenes to and from your computer. 34 -
..., and the currently loaded scene appears on using the L1® updater application for a Shared Scene. Saving a scene as a Shared Scene. Please visit www.Bose.com/livesound for details on the screen. 7. English When the question "Are you do not press the Yes or No control within 10 seconds. All... Channels Scenes Singer/Songwriter Load Shared Save All Channels Scenes Current Shared Scene: My Scene 07 Back Press Note: The T4S/T8S provides only one storage location for downloading and uploading scenes to and from your computer. 34 -

English Owners Guide
Page 35
After loading a Bose scene, you previously made to the currently loaded scene. CH 1-4 (T4S/T8S) CH 5-8 (T8S) Active ToneMatch Utility Flat Bypass zEQ Low Mid High 0 dB 0 dB 0 dB Para EQ Bypass Comp/Gate Bypass Chorus1 Mod Bypass Chorus1 Delay Bypass Digital Reverb ... the factory. Loading this scene erases any changes you can modify the settings and then save the settings as a My Scene or Shared Scene. Bose Scenes Operation The five Bose scenes are provided as examples for all effects, see "Factory Settings" on page 42. Factory Settings This scene restores the...
After loading a Bose scene, you previously made to the currently loaded scene. CH 1-4 (T4S/T8S) CH 5-8 (T8S) Active ToneMatch Utility Flat Bypass zEQ Low Mid High 0 dB 0 dB 0 dB Para EQ Bypass Comp/Gate Bypass Chorus1 Mod Bypass Chorus1 Delay Bypass Digital Reverb ... the factory. Loading this scene erases any changes you can modify the settings and then save the settings as a My Scene or Shared Scene. Bose Scenes Operation The five Bose scenes are provided as examples for all effects, see "Factory Settings" on page 42. Factory Settings This scene restores the...
