
Owners Guide
Page 3
..., particularly at plugs, convenience receptacles, and the point where they may cause harmful interference to Part 15 of the receiver or radio remote control could result in the operating instructions or as radiators, heat registers, stoves or other electric light or power circuits, nor where an antenna can radiate radio frequency energy and, if not installed and used in wire Ground clamp Electric service equipment Antenna discharge unit...
..., particularly at plugs, convenience receptacles, and the point where they may cause harmful interference to Part 15 of the receiver or radio remote control could result in the operating instructions or as radiators, heat registers, stoves or other electric light or power circuits, nor where an antenna can radiate radio frequency energy and, if not installed and used in wire Ground clamp Electric service equipment Antenna discharge unit...
Owners Guide
Page 5
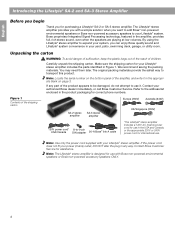
...; stereo amplifier 9 Model AV-18/38/48 media center setup 10 Model AV-28 media center setup 12 Multi-room interface setup 14 Model 20 music center setup 16 Model 5 music center setup 18 Connecting speakers to find... Introducing the Lifestyle® SA-2 and SA-3 Stereo Amplifier 4 Before you keep your sales receipt and a copy of your product registration card together with this owner's guide. 3 The serial number is located on the bottom panel of a local source (SA...
...; stereo amplifier 9 Model AV-18/38/48 media center setup 10 Model AV-28 media center setup 12 Multi-room interface setup 14 Model 20 music center setup 16 Model 5 music center setup 18 Connecting speakers to find... Introducing the Lifestyle® SA-2 and SA-3 Stereo Amplifier 4 Before you keep your sales receipt and a copy of your product registration card together with this owner's guide. 3 The serial number is located on the bottom panel of a local source (SA...
Owners Guide
Page 6
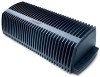
... the address list enclosed in the amplifier, provides full, rich stereo sound, even when the speakers are playing at low volumes. Note: Locate the serial number on page 3. We recommend saving the packing materials. If any way. Note: Use only the power cord supplied with your yard, patio, swimming deck, garage, or utility room. If the power cord does not fit your Lifestyle®...
... the address list enclosed in the amplifier, provides full, rich stereo sound, even when the speakers are playing at low volumes. Note: Locate the serial number on page 3. We recommend saving the packing materials. If any way. Note: Use only the power cord supplied with your yard, patio, swimming deck, garage, or utility room. If the power cord does not fit your Lifestyle®...
Owners Guide
Page 7
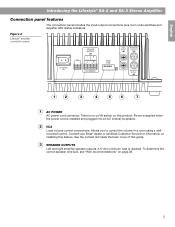
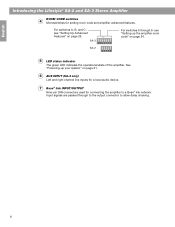
... this feature. Figure 2 Lifestyle® amplifier connection panel 1 2 3 4 5 6 7 1 AC POWER AC power cord connector. Power is applied when the power cord is required. Contact your Bose® dealer or call Bose Customer Service for information on installing this guide. 3 SPEAKER OUTPUTS Left and right amplifier speaker outputs. A 6-ohm minimum load is installed and plugged into an AC (mains) receptacle. 2 VCA Local volume control connections. To determine the correct speaker wire size, see "Wire recommendations" on this product. English...
... this feature. Figure 2 Lifestyle® amplifier connection panel 1 2 3 4 5 6 7 1 AC POWER AC power cord connector. Power is applied when the power cord is required. Contact your Bose® dealer or call Bose Customer Service for information on installing this guide. 3 SPEAKER OUTPUTS Left and right amplifier speaker outputs. A 6-ohm minimum load is installed and plugged into an AC (mains) receptacle. 2 VCA Local volume control connections. To determine the correct speaker wire size, see "Wire recommendations" on this product. English...
Owners Guide
Page 8
... switches 6 through to the output connector to a Bose® link network. Input signals are passed through 9, see "Setting Up Advanced Features" on page 21. 6 AUX INPUT (SA-3 only) Left and right channel line inputs for a local audio device. 7 Bose® link INPUT/OUTPUT Nine-pin DIN connectors used for setting room code and amplifier advanced features. English Introducing the Lifestyle® SA-2 and SA-3 Stereo Amplifier ROOM CODE switches 4 Microswitches for connecting the amplifier...
... switches 6 through to the output connector to a Bose® link network. Input signals are passed through 9, see "Setting Up Advanced Features" on page 21. 6 AUX INPUT (SA-3 only) Left and right channel line inputs for a local audio device. 7 Bose® link INPUT/OUTPUT Nine-pin DIN connectors used for setting room code and amplifier advanced features. English Introducing the Lifestyle® SA-2 and SA-3 Stereo Amplifier ROOM CODE switches 4 Microswitches for connecting the amplifier...

Owners Guide
Page 9
... instructions for the Lifestyle® stereo amplifier. Model AV-28 media center For the multi-room interface, see "Model AV-28 media center setup" on page 14. See "Setting Up Additional Rooms For Sound" on page 10. The set up the amplifier with your system The Lifestyle® stereo amplifier and additional remote come ready to be installed and used in the amplifier and remote. English Setting Up Your Lifestyle® Stereo Amplifier...
... instructions for the Lifestyle® stereo amplifier. Model AV-28 media center For the multi-room interface, see "Model AV-28 media center setup" on page 14. See "Setting Up Additional Rooms For Sound" on page 10. The set up the amplifier with your system The Lifestyle® stereo amplifier and additional remote come ready to be installed and used in the amplifier and remote. English Setting Up Your Lifestyle® Stereo Amplifier...
Owners Guide
Page 12
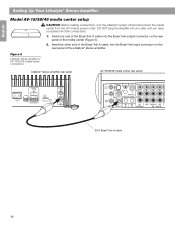
... OUTPUT BoseLink INPUT 20-ft Bose® link A cable 10 Insert the other end of the media center (Figure 5). 2. DO NOT plug the amplifier into the Bose® link input connector on the rear panel of the Bose® link A cable, into an outlet until you have completed all other connections. 1. English Setting Up Your Lifestyle® Stereo Amplifier Model AV-18/38/48 media center setup CAUTION: Before making connections, turn...
... OUTPUT BoseLink INPUT 20-ft Bose® link A cable 10 Insert the other end of the media center (Figure 5). 2. DO NOT plug the amplifier into the Bose® link input connector on the rear panel of the Bose® link A cable, into an outlet until you have completed all other connections. 1. English Setting Up Your Lifestyle® Stereo Amplifier Model AV-18/38/48 media center setup CAUTION: Before making connections, turn...

Owners Guide
Page 13
... be changed. Verify that the house code settings (switches 1, 2, 3, and 4) match the house code settings in your system For the Lifestyle® stereo amplifier to work with your home entertainment system, the expansion protocol menu item must match main room remote ON Check the expansion protocol setting in your main room remote. Remove the remote control battery cover and locate the microswitches (Figure 6). 2. Press the System button...
... be changed. Verify that the house code settings (switches 1, 2, 3, and 4) match the house code settings in your system For the Lifestyle® stereo amplifier to work with your home entertainment system, the expansion protocol menu item must match main room remote ON Check the expansion protocol setting in your main room remote. Remove the remote control battery cover and locate the microswitches (Figure 6). 2. Press the System button...
Owners Guide
Page 14
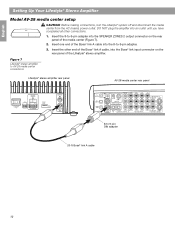
... center connections Lifestyle® stereo amplifier rear panel AV-28 media center rear panel BoseLink OUTPUT BoseLink INPUT 8-to -9-pin adapter. 3. English Setting Up Your Lifestyle® Stereo Amplifier Model AV-28 media center setup CAUTION: Before making connections, turn the Lifestyle® system off and disconnect the media center from the AC (mains) power outlet. DO NOT plug the amplifier into an outlet until you have completed all other end of the Bose...
... center connections Lifestyle® stereo amplifier rear panel AV-28 media center rear panel BoseLink OUTPUT BoseLink INPUT 8-to -9-pin adapter. 3. English Setting Up Your Lifestyle® Stereo Amplifier Model AV-28 media center setup CAUTION: Before making connections, turn the Lifestyle® system off and disconnect the media center from the AC (mains) power outlet. DO NOT plug the amplifier into an outlet until you have completed all other end of the Bose...
Owners Guide
Page 15
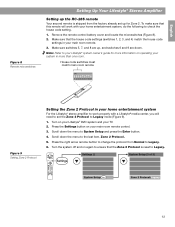
... Lifestyle® stereo amplifier to check the house code setting. 1. Turn on operating your home entertainment system, do the following to work properly with a Lifestyle® media center, you will work with your system in your main room remote control. 3. Turn the system off and on your main room remote. 3. Scroll down . Press the right arrow remote button to change the protocol from the factory already set the Zone 2 Protocol...
... Lifestyle® stereo amplifier to check the house code setting. 1. Turn on operating your home entertainment system, do the following to work properly with a Lifestyle® media center, you will work with your system in your main room remote control. 3. Turn the system off and on your main room remote. 3. Scroll down . Press the right arrow remote button to change the protocol from the factory already set the Zone 2 Protocol...

Owners Guide
Page 17
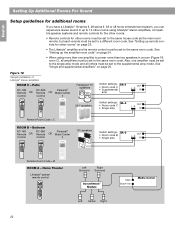
...; music center for a tworoom system Setting Up Your Lifestyle® Stereo Amplifier Setting up to control more rooms are controlled by the Personal® music center which requires no internal switch settings before it allows you what was selected by the ROOM or HOUSE button. 15 The room indicators tell you to four sets of speakers. If two or more than one room of Bose® powered speakers placed...
...; music center for a tworoom system Setting Up Your Lifestyle® Stereo Amplifier Setting up to control more rooms are controlled by the Personal® music center which requires no internal switch settings before it allows you what was selected by the ROOM or HOUSE button. 15 The room indicators tell you to four sets of speakers. If two or more than one room of Bose® powered speakers placed...
Owners Guide
Page 18
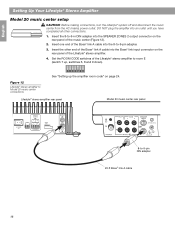
... music center rear panel BoseLink OUTPUT BoseLink INPUT 8-to room E (switch 7 up the amplifier room code" on page 24. Insert the other connections. 1. Set the ROOM CODE switches of the Lifestyle® stereo amplifier. 4. Insert the 8-to Model 20 music center connections See "Setting up , switches 6, 8 and 9 down). Figure 12 Lifestyle® stereo amplifier to -9-in DIN adapter into the SPEAKER ZONES 2 output connector on the rear panel of the Lifestyle® stereo amplifier to -9-pin DIN adapter 20-ft Bose...
... music center rear panel BoseLink OUTPUT BoseLink INPUT 8-to room E (switch 7 up the amplifier room code" on page 24. Insert the other connections. 1. Set the ROOM CODE switches of the Lifestyle® stereo amplifier. 4. Insert the 8-to Model 20 music center connections See "Setting up , switches 6, 8 and 9 down). Figure 12 Lifestyle® stereo amplifier to -9-in DIN adapter into the SPEAKER ZONES 2 output connector on the rear panel of the Lifestyle® stereo amplifier to -9-pin DIN adapter 20-ft Bose...

Owners Guide
Page 19
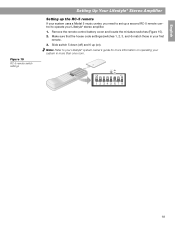
... house code settings (switches 1, 2, 3, and 4) match those in more information on ). Note: Refer to your Lifestyle® system owner's guide for Zone 2 If your first remote. 3. Slide switch 5 down (off), and switches 6 and 8 up (on operating your system in your system uses a Model 20 music center, you need to set up a second RC-20 remote control to operate the ZONE 2 outputs. 1. English Figure 13 RC-20 remote Zone 2 switch settings Setting Up Your Lifestyle® Stereo Amplifier Setting...
... house code settings (switches 1, 2, 3, and 4) match those in more information on ). Note: Refer to your Lifestyle® system owner's guide for Zone 2 If your first remote. 3. Slide switch 5 down (off), and switches 6 and 8 up (on operating your system in your system uses a Model 20 music center, you need to set up a second RC-20 remote control to operate the ZONE 2 outputs. 1. English Figure 13 RC-20 remote Zone 2 switch settings Setting Up Your Lifestyle® Stereo Amplifier Setting...
Owners Guide
Page 20
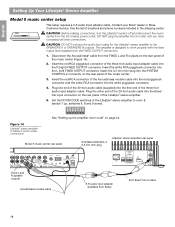
... Setting Up Your Lifestyle® Stereo Amplifier Model 5 music center setup This setup requires a 3-ft audio input adapter cable. See the list of the music center (Figure 14). 2. DO NOT plug the amplifier into the L (left) FIXED OUTPUT connector. CAUTION: DO NOT connect the audio input cable for the Lifestyle® stereo amplifier to room E (switch 7 up the amplifier room code" on the rear panel of locations and phone numbers included in the shipping carton. ® CAUTION: Before making connections, turn...
... Setting Up Your Lifestyle® Stereo Amplifier Model 5 music center setup This setup requires a 3-ft audio input adapter cable. See the list of the music center (Figure 14). 2. DO NOT plug the amplifier into the L (left) FIXED OUTPUT connector. CAUTION: DO NOT connect the audio input cable for the Lifestyle® stereo amplifier to room E (switch 7 up the amplifier room code" on the rear panel of locations and phone numbers included in the shipping carton. ® CAUTION: Before making connections, turn...
Owners Guide
Page 21
...® system owner's guide for more than one room. 19 Make sure that the house code settings (switches 1, 2, 3, and 4) match those in more information on ). English Figure 15 RC-5 remote switch settings Setting Up Your Lifestyle® Stereo Amplifier Setting up the RC-5 remote If your system uses a Model 5 music center, you need to set up (on operating your system in your first remote. 3. Note: Refer to operate your Lifestyle® stereo amplifier. 1.
...® system owner's guide for more than one room. 19 Make sure that the house code settings (switches 1, 2, 3, and 4) match those in more information on ). English Figure 15 RC-5 remote switch settings Setting Up Your Lifestyle® Stereo Amplifier Setting up the RC-5 remote If your system uses a Model 5 music center, you need to set up (on operating your system in your first remote. 3. Note: Refer to operate your Lifestyle® stereo amplifier. 1.
Owners Guide
Page 23
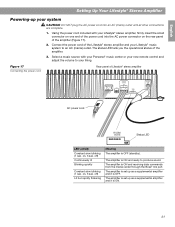
... Your Lifestyle® Stereo Amplifier Powering-up your system CAUTION: DO NOT plug the AC power cord into the AC power connector on the rear panel of the amplifier (Figure 17). 2. Figure 17 Connecting the power cord Rear panel of the amplifier. 3. The amplifier is OFF. Using the power cord included with your Personal® music center or your new remote control and adjust the volume to an AC (mains) outlet. on , 3 sec. Select a music source with your Lifestyle...
... Your Lifestyle® Stereo Amplifier Powering-up your system CAUTION: DO NOT plug the AC power cord into the AC power connector on the rear panel of the amplifier (Figure 17). 2. Figure 17 Connecting the power cord Rear panel of the amplifier. 3. The amplifier is OFF. Using the power cord included with your Personal® music center or your new remote control and adjust the volume to an AC (mains) outlet. on , 3 sec. Select a music source with your Lifestyle...
Owners Guide
Page 24
... room code. Home Theater Lifestyle® system remote control Left Right Surround Surround Acoustimass® Module Main Bose® link Media Center Left Center Right 22 Figure 18 Sample installation of Lifestyle® stereo amplifiers ROOM C - Patio RC-18S Remote OR Control RC-38S Remote Control Personal® OR Music Center II Freespace® 51 speakers Switch settings: SA-3 • Room code C • Supplemental amp OUT L R IN On Off Mute All Mute CD·DVD...
... room code. Home Theater Lifestyle® system remote control Left Right Surround Surround Acoustimass® Module Main Bose® link Media Center Left Center Right 22 Figure 18 Sample installation of Lifestyle® stereo amplifiers ROOM C - Patio RC-18S Remote OR Control RC-38S Remote Control Personal® OR Music Center II Freespace® 51 speakers Switch settings: SA-3 • Room code C • Supplemental amp OUT L R IN On Off Mute All Mute CD·DVD...
Owners Guide
Page 27
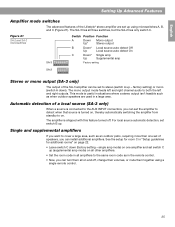
... (factory setting - Automatic detection of a local source (SA-3 only) When a source is connected to the AUX INPUT connectors, you can be set the amplifier to detect when that source is turned on, thereby automatically switching the amplifier from standby to cover a large area, such as in "Setup guidelines for room C in the remote control. • Now, you can set to both the left and right channel audio to stereo (switch A up using a single remote control...
... (factory setting - Automatic detection of a local source (SA-3 only) When a source is connected to the AUX INPUT connectors, you can be set the amplifier to detect when that source is turned on, thereby automatically switching the amplifier from standby to cover a large area, such as in "Setup guidelines for room C in the remote control. • Now, you can set to both the left and right channel audio to stereo (switch A up using a single remote control...

Owners Guide
Page 28
... home theater (Lifestyle® 12 or Lifestyle® 8 systems), make sure the amplifier audio input cable is plugged into SPEAKER ZONE 2. • If using a Model 5 music center for correct phone numbers. You may use , may use any headphones. • Make sure the remote control switch settings are firmly connected at the other cable from its speaker, and connect that does not play , the problem is a CD in the original cable that was connected to protect speaker wire connections. For additional help, see the troubleshooting...
... home theater (Lifestyle® 12 or Lifestyle® 8 systems), make sure the amplifier audio input cable is plugged into SPEAKER ZONE 2. • If using a Model 5 music center for correct phone numbers. You may use , may use any headphones. • Make sure the remote control switch settings are firmly connected at the other cable from its speaker, and connect that does not play , the problem is a CD in the original cable that was connected to protect speaker wire connections. For additional help, see the troubleshooting...
Owners Guide
Page 29
... of the amplifier's overload protection feature. Remote does not adjust the volume • Be sure the 1/8 in (3.5 mm) mini-plug is firmly inserted in the SYSTEM CONTROL 2 connector (Model 5 music center only). • If you are using an RC-20 or RC-5 remote control, make sure the remote control switch settings are correct. • If you are using a Lifestyle® DVD system, the stereo amplifier will not affect your Lifestyle® stereo amplifier" on...
... of the amplifier's overload protection feature. Remote does not adjust the volume • Be sure the 1/8 in (3.5 mm) mini-plug is firmly inserted in the SYSTEM CONTROL 2 connector (Model 5 music center only). • If you are using an RC-20 or RC-5 remote control, make sure the remote control switch settings are correct. • If you are using a Lifestyle® DVD system, the stereo amplifier will not affect your Lifestyle® stereo amplifier" on...

