Owner's guide
Page 3
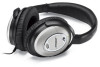
Enjoy them when you for purchasing the QuietComfort® 15 Acoustic Noise Cancelling® headphones from Bose®. The QuietComfort 15 headphones offer this noise reduction technology while maintaining our acclaimed lifelike audio performance and comfort. Three decades of research have resulted in the most advanced Bose consumer noise reduction technology ever to be developed. English TAB 2, 10 TAB 3, 11 TAB 4, 12 TAB 5, 13...
Enjoy them when you for purchasing the QuietComfort® 15 Acoustic Noise Cancelling® headphones from Bose®. The QuietComfort 15 headphones offer this noise reduction technology while maintaining our acclaimed lifelike audio performance and comfort. Three decades of research have resulted in the most advanced Bose consumer noise reduction technology ever to be developed. English TAB 2, 10 TAB 3, 11 TAB 4, 12 TAB 5, 13...
Owner's guide
Page 4
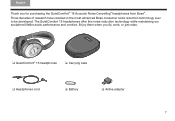
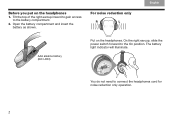
On the right earcup, slide the power switch forward to the battery compartment. 2. TAB 8, 16 TAB 7, 15 TAB 6, 14 TAB 5, 13 TAB 4, 12 TAB 3, 1E1nglish TAB 2, 10 English Before you put on the headphones. Tilt the top of the right earcup inward to gain access to the On position. Open the battery compartment and insert the battery as shown. The battery light indicator will illuminate. For noise reduction only R L AAA alkaline battery (IEC LR03) Put on the headphones 1. You do not need to connect the headphones cord for noise reduction only operation. 2
On the right earcup, slide the power switch forward to the battery compartment. 2. TAB 8, 16 TAB 7, 15 TAB 6, 14 TAB 5, 13 TAB 4, 12 TAB 3, 1E1nglish TAB 2, 10 English Before you put on the headphones. Tilt the top of the right earcup inward to gain access to the On position. Open the battery compartment and insert the battery as shown. The battery light indicator will illuminate. For noise reduction only R L AAA alkaline battery (IEC LR03) Put on the headphones 1. You do not need to connect the headphones cord for noise reduction only operation. 2
Owner's guide
Page 5
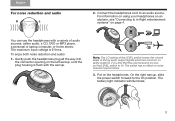
...13 TAB 6, 14 TAB 7, 15 TAB 8, 16 For noise reduction and audio R L 2. Connect the headphones cord to the On position. Gently push the headphones plug all the way into the connector opening on the left earcup, until the plug housing is 9 Vrms. To enjoy both noise reduction and audio: 1. Put on page...source. The maximum input voltage is flush with a variety of strong audio output signals which are common on noise reduction performance. 3. For information on using your headphones on an airplane, see "Connecting to HI. Note: The LO setting of the LEVEL switch lowers the ...
...13 TAB 6, 14 TAB 7, 15 TAB 8, 16 For noise reduction and audio R L 2. Connect the headphones cord to the On position. Gently push the headphones plug all the way into the connector opening on the left earcup, until the plug housing is 9 Vrms. To enjoy both noise reduction and audio: 1. Put on page...source. The maximum input voltage is flush with a variety of strong audio output signals which are common on noise reduction performance. 3. For information on using your headphones on an airplane, see "Connecting to HI. Note: The LO setting of the LEVEL switch lowers the ...
Owner's guide
Page 8
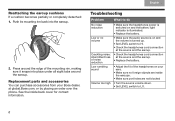
...noise reduction Low or no foreign objects are not blocked • Turn the source volume down. • Set LEVEL switch to LO. 6 Press around the earcup. Troubleshooting Problem What to HI. • Check the headphones cord connection at the source and the earcup. • Check the headphones cord connection at global.Bose....com, or by placing an order over the phone. TAB 8, 16 TAB 7, 15 TAB 6, 14 TAB 5, 13 TAB 4, 12...
...noise reduction Low or no foreign objects are not blocked • Turn the source volume down. • Set LEVEL switch to LO. 6 Press around the earcup. Troubleshooting Problem What to HI. • Check the headphones cord connection at the source and the earcup. • Check the headphones cord connection at global.Bose....com, or by placing an order over the phone. TAB 8, 16 TAB 7, 15 TAB 6, 14 TAB 5, 13 TAB 4, 12...


