SL2 wireless surround link - Owner's guide
Page 4
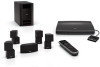
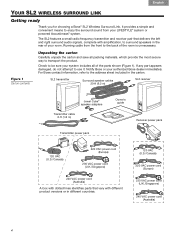
... radio frequency transmitter and receiver pair that vary with amplification, to transport the product. Check to the back of your LIFESTYLE® system or powered Acoustimass® system. SL2 transmitter Surround speaker cables 20-ft (6.2 m) SL2 receiver Jewel Cube® speaker adapters Transmitter cable 6-ft (1.8 m) Transmitter power ... the carton and save all of the parts shown (Figure 1). It provides a simple and convenient means to enjoy the surround sound from the front to be sure your authorized Bose dealer immediately. For Bose contact information, refer to use it.
... radio frequency transmitter and receiver pair that vary with amplification, to transport the product. Check to the back of your LIFESTYLE® system or powered Acoustimass® system. SL2 transmitter Surround speaker cables 20-ft (6.2 m) SL2 receiver Jewel Cube® speaker adapters Transmitter cable 6-ft (1.8 m) Transmitter power ... the carton and save all of the parts shown (Figure 1). It provides a simple and convenient means to enjoy the surround sound from the front to be sure your authorized Bose dealer immediately. For Bose contact information, refer to use it.
SL2 wireless surround link - Owner's guide
Page 5
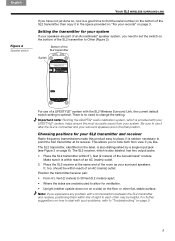
Be sure to use of a LIFESTYLE® system with your LIFESTYLE® system, helps ensure the most accurate sound from view if you experience any problem with such problems, refer to each other flat, stable surface. Place the SL2 transmitter within reach of...between the SL2 transmitter and receiver, positioning them within reach of an AC (mains) outlet. The SL2 receiver, which is provided with the SL2 Wireless Surround Link, the current default switch setting is optimal. Make sure it is within line of sight to "Troubleshooting" on page 9. 5 Choosing positions for ...
Be sure to use of a LIFESTYLE® system with your LIFESTYLE® system, helps ensure the most accurate sound from view if you experience any problem with such problems, refer to each other flat, stable surface. Place the SL2 transmitter within reach of...between the SL2 transmitter and receiver, positioning them within reach of an AC (mains) outlet. The SL2 receiver, which is provided with the SL2 Wireless Surround Link, the current default switch setting is optimal. Make sure it is within line of sight to "Troubleshooting" on page 9. 5 Choosing positions for ...
SL2 wireless surround link - Owner's guide
Page 7
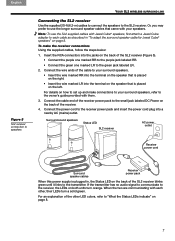
... with them. 3. When the two are communicating with each cable as described in , the Status LED on the back of the cable to your surround speakers. • Insert the wire marked RR into the terminal on the speaker that is placed on the right. • Insert the wire marked...on how to the small jack labeled DC Power on the back of the other , their LEDs turn orange. Surround sound speakers Status LED SL2 receiver AC power outlet Receiver power cord Surround speaker cables Receiver power pack When this power supply is placed on page 8. Connect the wire ends of the ...
... with them. 3. When the two are communicating with each cable as described in , the Status LED on the back of the cable to your surround speakers. • Insert the wire marked RR into the terminal on the speaker that is placed on the right. • Insert the wire marked...on how to the small jack labeled DC Power on the back of the other , their LEDs turn orange. Surround sound speakers Status LED SL2 receiver AC power outlet Receiver power cord Surround speaker cables Receiver power pack When this power supply is placed on page 8. Connect the wire ends of the ...
SL2 wireless surround link - Owner's guide
Page 9
... cool before reconnecting it to the AC power outlet. • If it continues to blink red, unplug the unit from the power outlet and contact Bose® Customer Service. Refer to "Making the connections" on page 6. • Make sure that cables are no less than 61/2 feet (2 meters) and no more... distance from each SL2 unit to the phone. • Press the channel button on the phone (if one is playing and the program selected includes surround sound audio. • Check to be inserted securely in the same way press inside the opening on the transmitter. Reconnect the unit to the AC power...
... cool before reconnecting it to the AC power outlet. • If it continues to blink red, unplug the unit from the power outlet and contact Bose® Customer Service. Refer to "Making the connections" on page 6. • Make sure that cables are no less than 61/2 feet (2 meters) and no more... distance from each SL2 unit to the phone. • Press the channel button on the phone (if one is playing and the program selected includes surround sound audio. • Check to be inserted securely in the same way press inside the opening on the transmitter. Reconnect the unit to the AC power...

Operating guide
Page 22
... which can hear movie dialogs more distinctly Smart Volume.......... Plays simulated surround sound when monaural audio is received from the source Allow Stereo Allows stereo sound from the source Enhanced Mono ..... Enhances sound output so you can help when tuning to a weak radio station... TAB 6 TAB 5 TAB 4 TAB 3 TAB 2 English MORE BUTTONS AND SYSTEM OPTIONS OPTIONS menu Option Available Settings Sound Current Station (V35/V25 only) RDS (V35/V25 only) Game Mode Audio Compression Audio Track Volume Offset Source Overscan System Bass Original Plays stereo audio when stereo audio...
... which can hear movie dialogs more distinctly Smart Volume.......... Plays simulated surround sound when monaural audio is received from the source Allow Stereo Allows stereo sound from the source Enhanced Mono ..... Enhances sound output so you can help when tuning to a weak radio station... TAB 6 TAB 5 TAB 4 TAB 3 TAB 2 English MORE BUTTONS AND SYSTEM OPTIONS OPTIONS menu Option Available Settings Sound Current Station (V35/V25 only) RDS (V35/V25 only) Game Mode Audio Compression Audio Track Volume Offset Source Overscan System Bass Original Plays stereo audio when stereo audio...
Operating guide
Page 28
... too loud • Decrease the Rear Speakers volume setting in the OPTIONS menu for the current source. • Make sure the video sound source is stereo-encoded or surround-encoded, and the device used (DVD, VCR, DVR, etc.) is stereo. • For stereo inputs, make sure the... hum or buzz, which may be electrical in nature (not harmonic) • Contact Bose® Customer Service to determine if and how other electronic equipment. • Select another station. Radio does not work (V25 and V35 systems only) • Make sure antennas are connected to reduce interference. (V25 and...
... too loud • Decrease the Rear Speakers volume setting in the OPTIONS menu for the current source. • Make sure the video sound source is stereo-encoded or surround-encoded, and the device used (DVD, VCR, DVR, etc.) is stereo. • For stereo inputs, make sure the... hum or buzz, which may be electrical in nature (not harmonic) • Contact Bose® Customer Service to determine if and how other electronic equipment. • Select another station. Radio does not work (V25 and V35 systems only) • Make sure antennas are connected to reduce interference. (V25 and...
Operating guide
Page 29
... digital audio digital audio connection. Select the device options and follow the on the control console. No sound from any external devices connected to Front(3) or Surround(5) (V25 and V35 systems only) • Weak FM stations will produce static in the OPTIONS menu to request a composite.... inputs 23 Set Speakers option to Stereo(2) in the rear speakers. remote commands Intermittent audio dropouts • Contact Bose® Customer Service to minimize noise. Sound is correct for the coaxial heard on the control console. • Make sure that can be used for the ...
... digital audio digital audio connection. Select the device options and follow the on the control console. No sound from any external devices connected to Front(3) or Surround(5) (V25 and V35 systems only) • Weak FM stations will produce static in the OPTIONS menu to request a composite.... inputs 23 Set Speakers option to Stereo(2) in the rear speakers. remote commands Intermittent audio dropouts • Contact Bose® Customer Service to minimize noise. Sound is correct for the coaxial heard on the control console. • Make sure that can be used for the ...


