SL2 wireless surround link - Owner's guide
Page 2
... and to protect it from the apparatus. 11. for use outdoors, in recreation vehicles, or on or pinched, particularly at www.bose.com/static/compliance/index.html. Do not use this apparatus during lightning storms or when unused for future reference. 3. Do not use...this product near a bathtub, washbowl, kitchen sink, laundry tub, in a wet basement, near any electronic product, use attachments/accessories specified by Bose Corporation. The lightning flash with a dry cloth - The exclamation point within an equilateral triangle alerts the user to the presence of electric shock...
... and to protect it from the apparatus. 11. for use outdoors, in recreation vehicles, or on or pinched, particularly at www.bose.com/static/compliance/index.html. Do not use this apparatus during lightning storms or when unused for future reference. 3. Do not use...this product near a bathtub, washbowl, kitchen sink, laundry tub, in a wet basement, near any electronic product, use attachments/accessories specified by Bose Corporation. The lightning flash with a dry cloth - The exclamation point within an equilateral triangle alerts the user to the presence of electric shock...
SL2 wireless surround link - Owner's guide
Page 3
Servicing is required when the apparatus has been damaged in any other radio transmitter or its antenna. the apparatus has been exposed to qualified service personnel. Use proper power sources - RF Guideline: This device meets the RF Guideline FCC/OET 65 and Canadian Health Code 6 for help. See product enclosure for a Class B digital device, pursuant to provide reasonable protection against harmful interference in a particular installation. This equipment generates, uses, and can be helpful to this is connected. • Consult the dealer or an experienced radio/TV ...
Servicing is required when the apparatus has been damaged in any other radio transmitter or its antenna. the apparatus has been exposed to qualified service personnel. Use proper power sources - RF Guideline: This device meets the RF Guideline FCC/OET 65 and Canadian Health Code 6 for help. See product enclosure for a Class B digital device, pursuant to provide reasonable protection against harmful interference in a particular installation. This equipment generates, uses, and can be helpful to this is connected. • Consult the dealer or an experienced radio/TV ...
SL2 wireless surround link - Owner's guide
Page 4
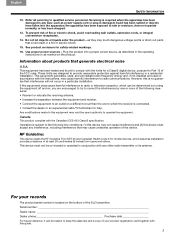
... enjoy the surround sound from the front to the address sheet included in the rear of the room is unnecessary. For Bose contact information, refer to the back of your LIFESTYLE® system or powered Acoustimass® system. It provides a simple and convenient means to surround speakers in the carton. Svenska Nederlands...
... enjoy the surround sound from the front to the address sheet included in the rear of the room is unnecessary. For Bose contact information, refer to the back of your LIFESTYLE® system or powered Acoustimass® system. It provides a simple and convenient means to surround speakers in the carton. Svenska Nederlands...
SL2 wireless surround link - Owner's guide
Page 5
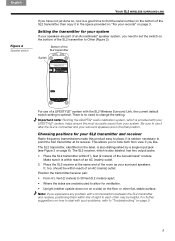
...on page 3. Place the SL2 transmitter within 61/2 feet (2 meters) of sight to point the SL2 transmitter at the same end of a LIFESTYLE® system with communications between the SL2 transmitter and receiver, positioning them within reach of the SL2 transmitter, then copy it is optimal. Position ...Be sure to allow for your system If your SL2 transmitter and receiver Radio frequency transmissions make this product easy to deal with your LIFESTYLE® system, helps ensure the most accurate sound from view if you to hide both from your surround speakers are unobstructed to ...
...on page 3. Place the SL2 transmitter within 61/2 feet (2 meters) of sight to point the SL2 transmitter at the same end of a LIFESTYLE® system with communications between the SL2 transmitter and receiver, positioning them within reach of the SL2 transmitter, then copy it is optimal. Position ...Be sure to allow for your system If your SL2 transmitter and receiver Radio frequency transmissions make this product easy to deal with your LIFESTYLE® system, helps ensure the most accurate sound from view if you to hide both from your surround speakers are unobstructed to ...
SL2 wireless surround link - Owner's guide
Page 6
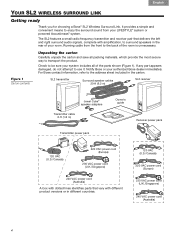
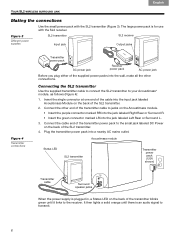
Svenska Nederlands Italiano Français Español Deutsch Dansk English YOUR SL2 WIRELESS SURROUND LINK Making the connections Use the small power pack with the SL2 receiver. The large power pack is plugged in, a Status LED on the back of the SL2 transmitter. 4. Connect the other end of the supplied power packs into the jack labeled Left Rear or Surround L. 3. It then lights a solid orange until it links to the small jack labeled DC Power on the back of the SL2 transmitter. 2. Figure 3 Different power supplies SL2 transmitter Input jack SL2 receiver Output jacks ...
Svenska Nederlands Italiano Français Español Deutsch Dansk English YOUR SL2 WIRELESS SURROUND LINK Making the connections Use the small power pack with the SL2 receiver. The large power pack is plugged in, a Status LED on the back of the SL2 transmitter. 4. Connect the other end of the supplied power packs into the jack labeled Left Rear or Surround L. 3. It then lights a solid orange until it links to the small jack labeled DC Power on the back of the SL2 transmitter. 2. Figure 3 Different power supplies SL2 transmitter Input jack SL2 receiver Output jacks ...
SL2 wireless surround link - Owner's guide
Page 7
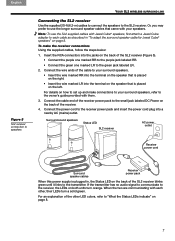
To make connections to the transmitter. Connect the wire ends of the receiver. 4. For details on the left. Connect the power cord to the SL2 receiver. Insert the RCA connectors into the jacks on the back of the cable to your surround speakers. • Insert the wire marked RR into the terminal on the speaker that is placed on the right. • Insert the wire marked LR into a nearby AC (mains) outlet. Connect the cable end of the receiver power pack to the small jack labeled DC Power on the back of the SL2 receiver blinks green until it links to your speakers. English ...
To make connections to the transmitter. Connect the wire ends of the receiver. 4. For details on the left. Connect the power cord to the SL2 receiver. Insert the RCA connectors into the jacks on the back of the cable to your surround speakers. • Insert the wire marked RR into the terminal on the speaker that is placed on the right. • Insert the wire marked LR into a nearby AC (mains) outlet. Connect the cable end of the receiver power pack to the small jack labeled DC Power on the back of the SL2 receiver blinks green until it links to your speakers. English ...
SL2 wireless surround link - Owner's guide
Page 8
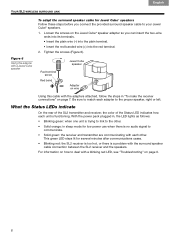
Be sure to match each adapter to deal with a blinking red LED, see "Troubleshooting" on page 9. 8 For information on the Jewel Cube® speaker adapter so you connect the provided surround speaker cable to communicate. • Solid green: the receiver and transmitter are communicating with each unit is functioning. Loosen the screws on how to the proper speaker, right or left. What the Status LEDs indicate On the rear of the SL2 transmitter and receiver, the color of the Status LED indicates how each other . • Solid orange: in sleep mode for low power use when ...
Be sure to match each adapter to deal with a blinking red LED, see "Troubleshooting" on page 9. 8 For information on the Jewel Cube® speaker adapter so you connect the provided surround speaker cable to communicate. • Solid green: the receiver and transmitter are communicating with each unit is functioning. Loosen the screws on how to the proper speaker, right or left. What the Status LEDs indicate On the rear of the SL2 transmitter and receiver, the color of the Status LED indicates how each other . • Solid orange: in sleep mode for low power use when ...
SL2 wireless surround link - Owner's guide
Page 9
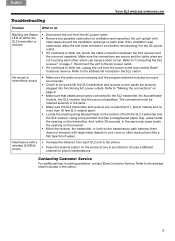
...reconnecting it to the AC power outlet. • If it continues to blink red, unplug the unit from the power outlet and contact Bose® Customer Service. Refer to the address list included in the same way press inside the opening on the transmitter. Make sure the ... AC power outlet. • Remove any possible obstruction to ventilation and reposition the unit upright with large metal objects in solving problems, contact Bose Customer Service. Refer to "Connecting the SL2 receiver" on page 7. English Dansk Deutsch Español Français Italiano Nederlands Svenska YOUR...
...reconnecting it to the AC power outlet. • If it continues to blink red, unplug the unit from the power outlet and contact Bose® Customer Service. Refer to the address list included in the same way press inside the opening on the transmitter. Make sure the ... AC power outlet. • Remove any possible obstruction to ventilation and reposition the unit upright with large metal objects in solving problems, contact Bose Customer Service. Refer to "Connecting the SL2 receiver" on page 7. English Dansk Deutsch Español Français Italiano Nederlands Svenska YOUR...
SL2 wireless surround link - Owner's guide
Page 10
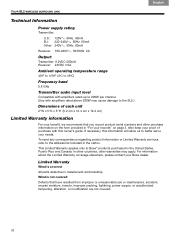
... records" on the form provided in material and workmanship. What is covered: All parts defective in "For your Bose dealer. To send any correspondence regarding product information or Limited Warranty services, refer to Bose® products purchased in the carton. This Limited Warranty applies only to the address list included in the...
... records" on the form provided in material and workmanship. What is covered: All parts defective in "For your Bose dealer. To send any correspondence regarding product information or Limited Warranty services, refer to Bose® products purchased in the carton. This Limited Warranty applies only to the address list included in the...
SL2 wireless surround link - Owner's guide
Page 11
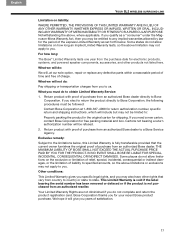
...or indirect damages, or the limitation of liability to specified amounts, so the above limitations or exclusions may not be followed: Contact Bose Corporation at our sole option, repair or replace any implied warranties allowed by law for return authorization number, specific return and shipping ...IMPLIED, WRITTEN OR ORAL, INCLUDING ANY WARRANTY OF MERCHANTABILITY OR FITNESS FOR A PARTICULAR PURPOSE. Exclusive remedy: Subject to Bose Corporation. THE MAXIMUM LIABILITY OF BOSE SHALL NOT EXCEED THE ACTUAL PURCHASE PRICE PAID BY YOU FOR THE PRODUCT. Some places do not complete and return...
...or indirect damages, or the limitation of liability to specified amounts, so the above limitations or exclusions may not be followed: Contact Bose Corporation at our sole option, repair or replace any implied warranties allowed by law for return authorization number, specific return and shipping ...IMPLIED, WRITTEN OR ORAL, INCLUDING ANY WARRANTY OF MERCHANTABILITY OR FITNESS FOR A PARTICULAR PURPOSE. Exclusive remedy: Subject to Bose Corporation. THE MAXIMUM LIABILITY OF BOSE SHALL NOT EXCEED THE ACTUAL PURCHASE PRICE PAID BY YOU FOR THE PRODUCT. Some places do not complete and return...
Operating guide
Page 2
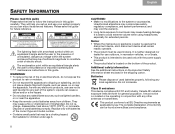
... from children. This product conforms to be used batteries promptly. Replace only with arrowhead symbol within the system enclosure that may be found at www.Bose.com/compliance. The lightning flash with batteries of the correct type and model number. • Contains small parts that may be of sufficient magnitude to...
... from children. This product conforms to be used batteries promptly. Replace only with arrowhead symbol within the system enclosure that may be found at www.Bose.com/compliance. The lightning flash with batteries of the correct type and model number. • Contains small parts that may be of sufficient magnitude to...
Operating guide
Page 3
...against harmful interference in a particular installation. Serial numbers are located on the bottom of the console, and on the carton): LIFESTYLE Serial numbers: Control console Acoustimass® module Retailer information: Dealer name Dealer phone Purchase date Please keep your sales receipt and...on your Product Registration card together with this work may cause undesired operation. Changes or modifications not expressly approved by Bose Corporation could void the user's authority to operate this device must accept any interference received, including interference that you ...
...against harmful interference in a particular installation. Serial numbers are located on the bottom of the console, and on the carton): LIFESTYLE Serial numbers: Control console Acoustimass® module Retailer information: Dealer name Dealer phone Purchase date Please keep your sales receipt and...on your Product Registration card together with this work may cause undesired operation. Changes or modifications not expressly approved by Bose Corporation could void the user's authority to operate this device must accept any interference received, including interference that you ...
Operating guide
Page 4
... Symbol are registered trademarks & DTS Digital Surround and the DTS logos are property of Bose Corporation. Product includes software. ©DTS, Inc. TiVo is a trademark of Microsoft Corporation. Other trademarks are trademarks of Tivo, Inc. Applicable only for LIFESTYLE® V25 and V35 home entertainment systems "Made for the operation of HDMI...
... Symbol are registered trademarks & DTS Digital Surround and the DTS logos are property of Bose Corporation. Product includes software. ©DTS, Inc. TiVo is a trademark of Microsoft Corporation. Other trademarks are trademarks of Tivo, Inc. Applicable only for LIFESTYLE® V25 and V35 home entertainment systems "Made for the operation of HDMI...
Operating guide
Page 5
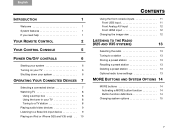
... 7 Selecting a connected device 7 Watching TV 8 Using a set top box 8 Using the tuner in your TV 8 Tuning to a TV station 8 Playing audio/video devices 9 Listening to a Bose link input device 9 Playing an iPod or iPhone (V25 and V35 only) . . 10 TAB 5 TAB 6 TAB 7 TAB 8 CONTENTS Using the front console inputs 11 Front...
... 7 Selecting a connected device 7 Watching TV 8 Using a set top box 8 Using the tuner in your TV 8 Tuning to a TV station 8 Playing audio/video devices 9 Listening to a Bose link input device 9 Playing an iPod or iPhone (V25 and V35 only) . . 10 TAB 5 TAB 6 TAB 7 TAB 8 CONTENTS Using the front console inputs 11 Front...
Operating guide
Page 6
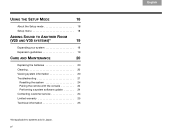
vi TAB 8 TAB 7 TAB 6 TAB 5 TAB 4 TAB 3 TAB 2 English USING THE SETUP MODE 18 About the Setup mode 18 Setup menu 18 ADDING SOUND TO ANOTHER ROOM (V25 AND V35 SYSTEMS)* 19 Expanding your system 19 Expansion guidelines 19 CARE AND MAINTENANCE 20 Replacing the batteries 20 Cleaning 20 Viewing system information 20 Troubleshooting 21 Resetting the system 24 Pairing the remote with the console 24 Performing a system software update 24 Contacting customer service 24 Limited warranty 25 Technical information 25 *Not applicable to systems sold in Japan.
vi TAB 8 TAB 7 TAB 6 TAB 5 TAB 4 TAB 3 TAB 2 English USING THE SETUP MODE 18 About the Setup mode 18 Setup menu 18 ADDING SOUND TO ANOTHER ROOM (V25 AND V35 SYSTEMS)* 19 Expanding your system 19 Expansion guidelines 19 CARE AND MAINTENANCE 20 Replacing the batteries 20 Cleaning 20 Viewing system information 20 Troubleshooting 21 Resetting the system 24 Pairing the remote with the console 24 Performing a system software update 24 Contacting customer service 24 Limited warranty 25 Technical information 25 *Not applicable to systems sold in Japan.
Operating guide
Page 7
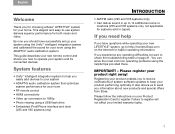
English TAB 2 TAB 3 TAB 4 Welcome Thank you for choosing a Bose® LIFESTYLE® system for your product right away! Registering your product performing optimally. Please follow the instructions on your Product Registration Card to keep your product ... • HDMI connectivity • Video up-conversion to 1080p • Photo viewing using the UnifyTM intelligent integration system and calibrated the sound for your new LIFESTYLE® system, go to check the troubleshooting table on the Internet for both music and video. If you have successfully set up your system using...
English TAB 2 TAB 3 TAB 4 Welcome Thank you for choosing a Bose® LIFESTYLE® system for your product right away! Registering your product performing optimally. Please follow the instructions on your Product Registration Card to keep your product ... • HDMI connectivity • Video up-conversion to 1080p • Photo viewing using the UnifyTM intelligent integration system and calibrated the sound for your new LIFESTYLE® system, go to check the troubleshooting table on the Internet for both music and video. If you have successfully set up your system using...
Operating guide
Page 8
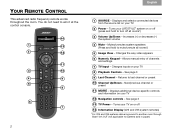
You do not need to last channel or preset 10 Channel Up/Down - Turns your LIFESTYLE® system on or off all rooms*) 5 Image View - iPod 3:20 The Beatles 14 1 13 2 12 11 3 10 4 9 5 8 6 7 2 TAB 4 TAB 3 TAB 2 English 1 SOURCE - Turns your ... the source list on or off 14 Information Display (V25 and V35 system remotes) *For V25 and V35 systems delivering sound to another room through Bose® link OUT (not applicable to turn off (press and hold to mute/unmute all rooms*) 3 Volume Up/Down - Next/previous channel or preset 11...
You do not need to last channel or preset 10 Channel Up/Down - Turns your LIFESTYLE® system on or off all rooms*) 5 Image View - iPod 3:20 The Beatles 14 1 13 2 12 11 3 10 4 9 5 8 6 7 2 TAB 4 TAB 3 TAB 2 English 1 SOURCE - Turns your ... the source list on or off 14 Information Display (V25 and V35 system remotes) *For V25 and V35 systems delivering sound to another room through Bose® link OUT (not applicable to turn off (press and hold to mute/unmute all rooms*) 3 Volume Up/Down - Next/previous channel or preset 11...
Operating guide
Page 9
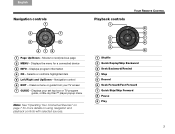
Displays the menu for more details on page 7 for a connected device 3 INFO - Displays your TV screen 7 GUIDE - Moves to next/previous page 2 MENU - Displays program information 4 OK - Clears a menu or guide from your set top box or TV program guide, or Blu-ray Disc™ player popup menu Note: See "Operating Your Connected Devices" on using navigation and playback controls with selected sources. TAB 5 TAB 6 TAB 7 TAB 8 YOUR REMOTE CONTROL Playback controls 1 9 8 2 7 3 6 4 5 1 Shuffle 2 Quick Replay/Skip Backward 3 Seek Backward/Rewind 4 Stop 5 Record 6 Seek Forward/...
Displays the menu for more details on page 7 for a connected device 3 INFO - Displays your TV screen 7 GUIDE - Moves to next/previous page 2 MENU - Displays program information 4 OK - Clears a menu or guide from your set top box or TV program guide, or Blu-ray Disc™ player popup menu Note: See "Operating Your Connected Devices" on using navigation and playback controls with selected sources. TAB 5 TAB 6 TAB 7 TAB 8 YOUR REMOTE CONTROL Playback controls 1 9 8 2 7 3 6 4 5 1 Shuffle 2 Quick Replay/Skip Backward 3 Seek Backward/Rewind 4 Stop 5 Record 6 Seek Forward/...
Operating guide
Page 10
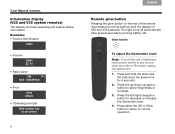
Glow button To adjust the illumination level: Note: To avoid the risk of the remote illuminates the remote buttons (and the display for 5 seconds. 2. Press the left/right navigation button to prolong battery life. Press and hold the Glow and OK buttons at the same time for V25 and V35 systems). The light turns off automatically after several seconds to decrease or increase the illumination level. 4. Press either the OK or Glow button to return to select Brightness or Contrast. 3. TAB 8 TAB 7 TAB 6 TAB 5 YOUR REMOTE CONTROL Information display (V25 and V35 system remotes) The...
Glow button To adjust the illumination level: Note: To avoid the risk of the remote illuminates the remote buttons (and the display for 5 seconds. 2. Press the left/right navigation button to prolong battery life. Press and hold the Glow and OK buttons at the same time for V25 and V35 systems). The light turns off automatically after several seconds to decrease or increase the illumination level. 4. Press either the OK or Glow button to return to select Brightness or Contrast. 3. TAB 8 TAB 7 TAB 6 TAB 5 YOUR REMOTE CONTROL Information display (V25 and V35 system remotes) The...
Operating guide
Page 11
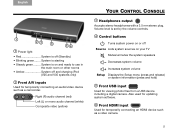
Volume level is on your TV Mutes/unmutes the system speakers Decreases system volume Increases system volume Setup Displays the Setup menu (press and release) or system information (press and hold) 5 Front USB input Used for temporarily connecting an audio/video device such as a video camera. 5 Right (R) audio channel (red) Left (L) or mono audio channel (white) Composite video (yellow) TAB 5 TAB 6 TAB 7 TAB 8 YOUR CONTROL CONSOLE 3 Headphones output Accepts stereo headphones with a 3.5 mm stereo plug. System is set by the volume controls. 4 Control buttons Turns system power on ...
Volume level is on your TV Mutes/unmutes the system speakers Decreases system volume Increases system volume Setup Displays the Setup menu (press and release) or system information (press and hold) 5 Front USB input Used for temporarily connecting an audio/video device such as a video camera. 5 Right (R) audio channel (red) Left (L) or mono audio channel (white) Composite video (yellow) TAB 5 TAB 6 TAB 7 TAB 8 YOUR CONTROL CONSOLE 3 Headphones output Accepts stereo headphones with a 3.5 mm stereo plug. System is set by the volume controls. 4 Control buttons Turns system power on ...
