
The Bose® Lifestyle® amplifier - Owner's guide
Page 5
... to a multi-room interface 7 Connecting the Lifestyle® stereo amplifier to a Lifestyle® media center 9 Setting up the remote control 10 Setting Zone 2 Protocol 10 Connecting the Lifestyle® stereo amplifier to a Model 20 music center 11 Connecting the Lifestyle® stereo amplifier to a Model 5 music center 13 Connecting speakers to your Lifestyle® stereo amplifier 14 Checking to see...
... to a multi-room interface 7 Connecting the Lifestyle® stereo amplifier to a Lifestyle® media center 9 Setting up the remote control 10 Setting Zone 2 Protocol 10 Connecting the Lifestyle® stereo amplifier to a Model 20 music center 11 Connecting the Lifestyle® stereo amplifier to a Model 5 music center 13 Connecting speakers to your Lifestyle® stereo amplifier 14 Checking to see...

The Bose® Lifestyle® amplifier - Owner's guide
Page 9
... all other connections. 1. SPSEPAEKAEKREROOUUTPTUPUTSTS INPUT 30-ft audio input cable (supplied) AM262840_00_V.pdf January 4, 2002 7 Setting Up Your Lifestyle® Stereo Amplifier Connecting the Lifestyle® stereo amplifier to a multi-room interface CAUTION: Before making any connections, turn the Lifestyle® system off and disconnect the music center from the AC (mains) power outlet...
... all other connections. 1. SPSEPAEKAEKREROOUUTPTUPUTSTS INPUT 30-ft audio input cable (supplied) AM262840_00_V.pdf January 4, 2002 7 Setting Up Your Lifestyle® Stereo Amplifier Connecting the Lifestyle® stereo amplifier to a multi-room interface CAUTION: Before making any connections, turn the Lifestyle® system off and disconnect the music center from the AC (mains) power outlet...

The Bose® Lifestyle® amplifier - Owner's guide
Page 10
... room. If two or more than one room of Bose® powered speakers placed in more rooms are referred to as one The room indicators tell you must follow the procedure for setting up to control up the Personal music center for a two-room system. Figure 7 shows an ...more than one -room system). The Personal music center allows you to four sets of speakers. However, if you purchase a second Personal music center, you what was selected by the ROOM or HOUSE button 8 January 4, 2002 AM262840_00_V.pdf Note: Refer to your Lifestyle® system owner's guide for more information...
... room. If two or more than one room of Bose® powered speakers placed in more rooms are referred to as one The room indicators tell you must follow the procedure for setting up to control up the Personal music center for a two-room system. Figure 7 shows an ...more than one -room system). The Personal music center allows you to four sets of speakers. However, if you purchase a second Personal music center, you what was selected by the ROOM or HOUSE button 8 January 4, 2002 AM262840_00_V.pdf Note: Refer to your Lifestyle® system owner's guide for more information...

The Bose® Lifestyle® amplifier - Owner's guide
Page 13
... until you have completed all other end of the amplifier. SPEAKER OUTPUTS INPUT Model 20 music center rear panel 30-ft audio input cable (supplied) AM262840_00_V.pdf January 4, 2002 11 At the other connections. 1. Lifestyle® stereo amplifier rear panel 4 Ω MINIMUM LL R L SYSTEM RR CONTROL L R +- Insert the single multi...
... until you have completed all other end of the amplifier. SPEAKER OUTPUTS INPUT Model 20 music center rear panel 30-ft audio input cable (supplied) AM262840_00_V.pdf January 4, 2002 11 At the other connections. 1. Lifestyle® stereo amplifier rear panel 4 Ω MINIMUM LL R L SYSTEM RR CONTROL L R +- Insert the single multi...

The Bose® Lifestyle® amplifier - Owner's guide
Page 14
... in your system uses a Model 20 music center, you need to set up a second RC-20 remote control to your system in more information on ). ON K40 l 2345678 12 January 4, 2002 AM262840_00_V.pdf Slide switch 5 down (off), and switches 6 and 8 up (on operating your Lifestyle® system owner's guide for Zone ...2 If your first remote. 3. Note: Refer to operate the ZONE 2 outputs. 1. Setting Up Your Lifestyle® Stereo Amplifier Figure 11 Setting up a Zone 2 remote control Setting up the RC-20 remote control for more than one room. Remove ...
... in your system uses a Model 20 music center, you need to set up a second RC-20 remote control to your system in more information on ). ON K40 l 2345678 12 January 4, 2002 AM262840_00_V.pdf Slide switch 5 down (off), and switches 6 and 8 up (on operating your Lifestyle® system owner's guide for Zone ...2 If your first remote. 3. Note: Refer to operate the ZONE 2 outputs. 1. Setting Up Your Lifestyle® Stereo Amplifier Figure 11 Setting up a Zone 2 remote control Setting up the RC-20 remote control for more than one room. Remove ...

The Bose® Lifestyle® amplifier - Owner's guide
Page 15
... speaker outputs 30-ft audio input cable (supplied) Acoustimass module cable AM262840_00_V.pdf January 4, 2002 13 Insert the single multi-pin connector at one end of the amplifier (Figure 12). 2. Figure 12 Cable connections between the Model 5 music center and the Lifestyle® stereo amplifier Model 5 music center rear panel Lifestyle® stereo...
... speaker outputs 30-ft audio input cable (supplied) Acoustimass module cable AM262840_00_V.pdf January 4, 2002 13 Insert the single multi-pin connector at one end of the amplifier (Figure 12). 2. Figure 12 Cable connections between the Model 5 music center and the Lifestyle® stereo amplifier Model 5 music center rear panel Lifestyle® stereo...

The Bose® Lifestyle® amplifier - Owner's guide
Page 16
Setting Up Your Lifestyle® Stereo Amplifier ® Figure 13 RC-5 remote switch settings Setting up the RC-5 remote control If your system uses a Model 5 music center, you face it should always be connected to the positive (+ or red) terminal. Slide switch 5 down (off) and 6 up a ...second RC-5 remote control to any amplified music sources. Insert the wire coming from the speaker's positive...
Setting Up Your Lifestyle® Stereo Amplifier ® Figure 13 RC-5 remote switch settings Setting up the RC-5 remote control If your system uses a Model 5 music center, you face it should always be connected to the positive (+ or red) terminal. Slide switch 5 down (off) and 6 up a ...second RC-5 remote control to any amplified music sources. Insert the wire coming from the speaker's positive...

The Bose® Lifestyle® amplifier - Owner's guide
Page 17
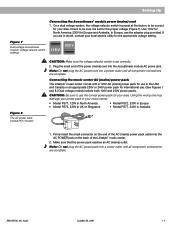
...This switch is a power switch on the rear panel (Figure 15). If you plan to connect your Lifestyle® music system to an AC (mains) outlet. 3. ume to see if you have a dual voltage Lifestyle® amplifier • Dual voltage units have a voltage selection switch on the rear panel...preset at the factory to 230V. Using the power cord included with your Personal® music center or your Lifestyle® stereo amplifier, firmly insert the small connector on one end of the Lifestyle® stereo amplifier and your amplifier to 115V (North America), ...
...This switch is a power switch on the rear panel (Figure 15). If you plan to connect your Lifestyle® music system to an AC (mains) outlet. 3. ume to see if you have a dual voltage Lifestyle® amplifier • Dual voltage units have a voltage selection switch on the rear panel...preset at the factory to 230V. Using the power cord included with your Personal® music center or your Lifestyle® stereo amplifier, firmly insert the small connector on one end of the Lifestyle® stereo amplifier and your amplifier to 115V (North America), ...

The Bose® Lifestyle® amplifier - Owner's guide
Page 18
...a soft, dry cloth to your Bose dealer to do use caulking, apply it only after installing the Lifestyle® stereo amplifier, follow the guidelines below. Troubleshooting If you do Neither speaker plays • Make sure the Lifestyle® music center and the amplifier are ...connected to the piggyback jacks on . • If using a Model 20 music center, make sure the audio input cable is inserted into SPEAKER ZONE 2. • If using a Model 5 music center for home theater (Lifestyle® 12 or Lifestyle® 8 systems), make sure the amplifier audio input cable ...
...a soft, dry cloth to your Bose dealer to do use caulking, apply it only after installing the Lifestyle® stereo amplifier, follow the guidelines below. Troubleshooting If you do Neither speaker plays • Make sure the Lifestyle® music center and the amplifier are ...connected to the piggyback jacks on . • If using a Model 20 music center, make sure the audio input cable is inserted into SPEAKER ZONE 2. • If using a Model 5 music center for home theater (Lifestyle® 12 or Lifestyle® 8 systems), make sure the amplifier audio input cable ...
Owner's guide
Page 2
These CAUTION marks may be located on the back panel and bottom of your Lifestyle® music center and the bottom panel of your system properly, and enjoy all requirements of plug to the presence of the unit. Class 1 laser product This compact ...
These CAUTION marks may be located on the back panel and bottom of your Lifestyle® music center and the bottom panel of your system properly, and enjoy all requirements of plug to the presence of the unit. Class 1 laser product This compact ...

Owner's guide
Page 5
... begin ...4 Unpacking the carton 5 Selecting the locations for your Lifestyle® 30 Series II system 6 Connecting the speakers and Lifestyle® music center 9 Connecting your home theater components to the Lifestyle® 30 system 12 Connecting the antennas 16 Installing the batteries in the ...the music center and the bottom panel of your Lifestyle® 30 system 33 Troubleshooting ...34 Warranty period ...35 Customer service ...35 Product Information Technical information 36 Accessories ...36 Index ...37 Bose® Corporation inside back cover For your Lifestyle® 30 ...
... begin ...4 Unpacking the carton 5 Selecting the locations for your Lifestyle® 30 Series II system 6 Connecting the speakers and Lifestyle® music center 9 Connecting your home theater components to the Lifestyle® 30 system 12 Connecting the antennas 16 Installing the batteries in the ...the music center and the bottom panel of your Lifestyle® 30 system 33 Troubleshooting ...34 Warranty period ...35 Customer service ...35 Product Information Technical information 36 Accessories ...36 Index ...37 Bose® Corporation inside back cover For your Lifestyle® 30 ...

Owner's guide
Page 6
...digital audio signals. up to -use remote control Realism and impact Your Lifestyle® 30 Series II system is fully compatible with digital program material and includes: • A Lifestyle® music center with an all new Videostage® decoder that of the movies right...a tape deck (or other auxiliary source) • Capability for purchasing the Bose® Lifestyle® 30 Series II system. Compatibility Your system is especially useful for movie soundtracks and music recordings. Videostage decoding directs stereo information to the surround channels, so the sound...
...digital audio signals. up to -use remote control Realism and impact Your Lifestyle® 30 Series II system is fully compatible with digital program material and includes: • A Lifestyle® music center with an all new Videostage® decoder that of the movies right...a tape deck (or other auxiliary source) • Capability for purchasing the Bose® Lifestyle® 30 Series II system. Compatibility Your system is especially useful for movie soundtracks and music recordings. Videostage decoding directs stereo information to the surround channels, so the sound...

Owner's guide
Page 7
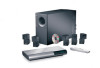
Notify Bose® or your Lifestyle® 30 Series II system: Acoustimass module • Lifestyle® music center • AC power (mains) pack* • FM antenna • AM loop antenna • Antenna base • Remote control • 3 AA batteries • Acoustimass module • 5 ...
Notify Bose® or your Lifestyle® 30 Series II system: Acoustimass module • Lifestyle® music center • AC power (mains) pack* • FM antenna • AM loop antenna • Antenna base • Remote control • 3 AA batteries • Acoustimass module • 5 ...

Owner's guide
Page 10
...30 feet (9.1 m) of the Acoustimass module (the length of the audio input cable, speaker cables, and an AC power (mains) outlet. 4. The slots on either end, as shown by the last two views in Figure 4. ® Preferred ® position Treble Bass Alternate position ® RIGHT REAR LEFT REAR RIGHT FRONT CENTER...two walls or from scratches. 6. Select a position for the music center. 1. CAUTION: Do not cover the ventilation openings of the Acoustimass... position is not an immediate risk to your dealer or call Bose®. 3. Note: To avoid interference with the bass and treble...
...30 feet (9.1 m) of the Acoustimass module (the length of the audio input cable, speaker cables, and an AC power (mains) outlet. 4. The slots on either end, as shown by the last two views in Figure 4. ® Preferred ® position Treble Bass Alternate position ® RIGHT REAR LEFT REAR RIGHT FRONT CENTER...two walls or from scratches. 6. Select a position for the music center. 1. CAUTION: Do not cover the ventilation openings of the Acoustimass... position is not an immediate risk to your dealer or call Bose®. 3. Note: To avoid interference with the bass and treble...
Owner's guide
Page 11
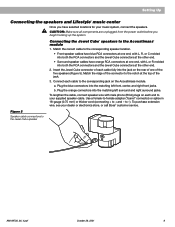
...Figure 5). a. to the Acoustimass® module 1. Plug the blue connectors into the matching left front, center, and right front jacks. b. To purchase extension wire, see your music system, connect the speakers. Connecting the Jewel Cube® speakers to -). Connect each end to your ...dealer or electronics store, or call Bose® customer service. Match the ridge of the jack. 3. Plug the orange connectors into the matching left surround and right surround jacks. Setting Up Connecting the speakers and Lifestyle® music center Once you begin hooking up the ...
...Figure 5). a. to the Acoustimass® module 1. Plug the blue connectors into the matching left front, center, and right front jacks. b. To purchase extension wire, see your music system, connect the speakers. Connecting the Jewel Cube® speakers to -). Connect each end to your ...dealer or electronics store, or call Bose® customer service. Match the ridge of the jack. 3. Plug the orange connectors into the matching left surround and right surround jacks. Setting Up Connecting the speakers and Lifestyle® music center Once you begin hooking up the ...
Owner's guide
Page 12
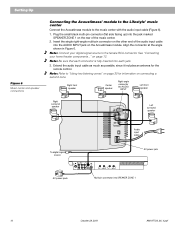
...30 for the remote control. on connecting a second zone. Note: Refer to "Using two listening zones" on the rear of the audio input cable into each connector is fully inserted into the AUDIO INPUT jack on the Acoustimass module. Note: Connect your home theater components..." Setting Up Figure 6 Music center... and speaker connections Connecting the Acoustimass® module to the Lifestyle® music center Connect the Acoustimass module to the female RCA connector. Extend the audio...
...30 for the remote control. on connecting a second zone. Note: Refer to "Using two listening zones" on the rear of the audio input cable into each connector is fully inserted into the AUDIO INPUT jack on the Acoustimass module. Note: Connect your home theater components..." Setting Up Figure 6 Music center... and speaker connections Connecting the Acoustimass® module to the Lifestyle® music center Connect the Acoustimass module to the female RCA connector. Extend the audio...
Owner's guide
Page 13
... and 8.) Dual voltage models include both 120V and 230V power packs. Plug the small end of the Lifestyle® music center. 2. Connecting the music center AC (mains) power pack The Lifestyle® music center comes with a 120V AC (mains) power pack for use in the USA and Canada or an appropriate ...230V or 240V power pack for your music center. • Model PS71, 120V in North America • Model PS74...
... and 8.) Dual voltage models include both 120V and 230V power packs. Plug the small end of the Lifestyle® music center. 2. Connecting the music center AC (mains) power pack The Lifestyle® music center comes with a 120V AC (mains) power pack for use in the USA and Canada or an appropriate ...230V or 240V power pack for your music center. • Model PS71, 120V in North America • Model PS74...
Owner's guide
Page 14
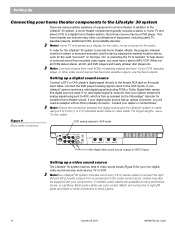
...and DVD players and nearly all laser disc players do. Note: Ensure the connection between the digital source and the Lifestyle® system is used. Figure 9 Music center connectors DVD analog outputs to AUX inputs Non-digital video sound source outputs to VIDEO inputs Setting up a digital ... your home theater components to the Lifestyle® 30 system There are available at many electronics stores, or call Bose. If no valid digital signal is r eceived, then your components. To hear stereo or surround sound from a component to the music center inputs. If your digital audio source...
...and DVD players and nearly all laser disc players do. Note: Ensure the connection between the digital source and the Lifestyle® system is used. Figure 9 Music center connectors DVD analog outputs to AUX inputs Non-digital video sound source outputs to VIDEO inputs Setting up a digital ... your home theater components to the Lifestyle® 30 system There are available at many electronics stores, or call Bose. If no valid digital signal is r eceived, then your components. To hear stereo or surround sound from a component to the music center inputs. If your digital audio source...

Owner's guide
Page 15
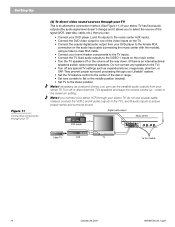
...to the AUX inputs. In each example, the analog outputs from the DVD player (or other digital device) ar e connected to the Lifestyle® 30 system inputs DVD player L R V Music center Cable TV L TAPE IN RL R TAPE OUT L L R R V VCR To the module TV AM199736_06_V.pdf October 29, 2001... A second option is r eceived, it selects the backup analog signal being sent to the Lifestyle® 30 music center, and select the source from your DVD player to the female RCA connection on the music center. • Turn the TV speakers off any speakers to the TV.) • Turn off...
...to the AUX inputs. In each example, the analog outputs from the DVD player (or other digital device) ar e connected to the Lifestyle® 30 system inputs DVD player L R V Music center Cable TV L TAPE IN RL R TAPE OUT L L R R V VCR To the module TV AM199736_06_V.pdf October 29, 2001... A second option is r eceived, it selects the backup analog signal being sent to the Lifestyle® 30 music center, and select the source from your DVD player to the female RCA connection on the music center. • Turn the TV speakers off any speakers to the TV.) • Turn off...
Owner's guide
Page 16
...second choice, you connect your stereo VCR through your Lifestyle® system. • Set the TV balance control to the center of the video inputs on the TV. • Connect the coaxial digital audio output from your DVD player L and R outputs to the music center AUX inputs. • Connect the DVD video ...stereo TV, do not use the variable audio outputs from your DVD player to the female RCA connection on the audio input cable (connecting the music center with the module), using a male-to-male RCA cable. • Connect your home theater components to the TV inputs. • Connect the...
...second choice, you connect your stereo VCR through your Lifestyle® system. • Set the TV balance control to the center of the video inputs on the TV. • Connect the coaxial digital audio output from your DVD player L and R outputs to the music center AUX inputs. • Connect the DVD video ...stereo TV, do not use the variable audio outputs from your DVD player to the female RCA connection on the audio input cable (connecting the music center with the module), using a male-to-male RCA cable. • Connect your home theater components to the TV inputs. • Connect the...


