Installation guide
Page 13
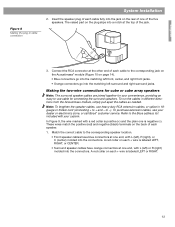
Note: To lengthen the speaker cables, use cable for connecting the surround speakers. These wires match the positive (red) and negative (black) terminals on the back of each cable to the corresponding jack on the Acoustimass® module (Figure 10 on each + wire is ... joined together for your convenience, providing an easy-to-use heavy-duty RCA extension cables, or splice in 18gauge or thicker cord (connecting + to the Bose address list included with L (left), R (right), or C (center) molded into the connectors. Refer to + and - Match the correct cable to -). In Figure ...
Note: To lengthen the speaker cables, use cable for connecting the surround speakers. These wires match the positive (red) and negative (black) terminals on the back of each cable to the corresponding jack on the Acoustimass® module (Figure 10 on each + wire is ... joined together for your convenience, providing an easy-to-use heavy-duty RCA extension cables, or splice in 18gauge or thicker cord (connecting + to the Bose address list included with L (left), R (right), or C (center) molded into the connectors. Refer to + and - Match the correct cable to -). In Figure ...
Installation guide
Page 14
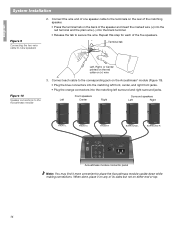
... (+) into the red terminal and the plain wire (-) into the matching left front, center, and right front jacks. • Plug the orange connectors into the black terminal. • Release the tab to cube speakers 2. When done, place it more convenient to the Acoustimass module 3. Connect the wire end of one speaker...
... (+) into the red terminal and the plain wire (-) into the matching left front, center, and right front jacks. • Plug the orange connectors into the black terminal. • Release the tab to cube speakers 2. When done, place it more convenient to the Acoustimass module 3. Connect the wire end of one speaker...

Installation guide
Page 15
... the Acoustimass module, be sure to unwrap the power cord for information on the connection to the connection at the Acoustimass module. Plug the small black multi-pin connector (flat side up) into the Audio INPUT jack on the cable may find it locks in place. When properly inserted, it easier...
... the Acoustimass module, be sure to unwrap the power cord for information on the connection to the connection at the Acoustimass module. Plug the small black multi-pin connector (flat side up) into the Audio INPUT jack on the cable may find it locks in place. When properly inserted, it easier...

Installation guide
Page 29
... components such as an audio CD changer can be connected to the AUX or other components Use standard RCA audio cables, matching the white (or black) connector to the L (left) channel and the red connector to the R (right) channel. English Reference Connecting other unused inputs on the rear panel of analog...
... components such as an audio CD changer can be connected to the AUX or other components Use standard RCA audio cables, matching the white (or black) connector to the L (left) channel and the red connector to the R (right) channel. English Reference Connecting other unused inputs on the rear panel of analog...
