
The Bose® Lifestyle® amplifier - Owner's guide
Page 5
...-up the remote control 10 Setting Zone 2 Protocol 10 Connecting the Lifestyle® stereo amplifier to a Model 20 music center 11 Connecting the Lifestyle® stereo amplifier to a Model 5 music center 13 Connecting speakers to your Lifestyle® stereo amplifier 14 Checking to see if you keep your Lifestyle® stereo amplifier. Contents Setting up your...
...-up the remote control 10 Setting Zone 2 Protocol 10 Connecting the Lifestyle® stereo amplifier to a Model 20 music center 11 Connecting the Lifestyle® stereo amplifier to a Model 5 music center 13 Connecting speakers to your Lifestyle® stereo amplifier 14 Checking to see if you keep your Lifestyle® stereo amplifier. Contents Setting up your...

The Bose® Lifestyle® amplifier - Owner's guide
Page 9
...-ft audio input cable (supplied) AM262840_00_V.pdf January 4, 2002 7 Setting Up Your Lifestyle® Stereo Amplifier Connecting the Lifestyle® stereo amplifier to a multi-room interface CAUTION: Before making any connections, turn the Lifestyle® system off and disconnect the music center from the AC (mains) power outlet. At the other connections. 1. Figure...
...-ft audio input cable (supplied) AM262840_00_V.pdf January 4, 2002 7 Setting Up Your Lifestyle® Stereo Amplifier Connecting the Lifestyle® stereo amplifier to a multi-room interface CAUTION: Before making any connections, turn the Lifestyle® system off and disconnect the music center from the AC (mains) power outlet. At the other connections. 1. Figure...

The Bose® Lifestyle® amplifier - Owner's guide
Page 10
Setting Up Your Lifestyle® Stereo Amplifier Figure 7 Sample display for a tworoom system Operating speakers in other rooms with the Personal® music center Systems that share a source Press the HOUSE button to control all connected rooms as room A, B, C, and D, with room A being ...room indicators (A, B, C, and/or D). The Personal music center allows you must follow the procedure for setting up to your Lifestyle® system owner's guide for a two-room system. Note: Refer to control more than one room of Bose® powered speakers placed in more than one The room...
Setting Up Your Lifestyle® Stereo Amplifier Figure 7 Sample display for a tworoom system Operating speakers in other rooms with the Personal® music center Systems that share a source Press the HOUSE button to control all connected rooms as room A, B, C, and D, with room A being ...room indicators (A, B, C, and/or D). The Personal music center allows you must follow the procedure for setting up to your Lifestyle® system owner's guide for a two-room system. Note: Refer to control more than one room of Bose® powered speakers placed in more than one The room...

The Bose® Lifestyle® amplifier - Owner's guide
Page 13
... until you have completed all other end of the audio input cable, insert the 3.5 mm mini-plug into the R (right) INPUT jack of the music center (Figure 10). 2. Lifestyle® stereo amplifier rear panel 4 Ω MINIMUM LL R L SYSTEM RR CONTROL L R +- Insert the white RCA piggyback connector of the supplied cable into...
... until you have completed all other end of the audio input cable, insert the 3.5 mm mini-plug into the R (right) INPUT jack of the music center (Figure 10). 2. Lifestyle® stereo amplifier rear panel 4 Ω MINIMUM LL R L SYSTEM RR CONTROL L R +- Insert the white RCA piggyback connector of the supplied cable into...

The Bose® Lifestyle® amplifier - Owner's guide
Page 14
... control Setting up a second RC-20 remote control to your Lifestyle® system owner's guide for Zone 2 If your first remote. 3. Slide switch 5 down (off), and switches 6 and 8 up (on operating your system in your system uses a Model 20 music center, you need to set up the RC-20 remote control for...
... control Setting up a second RC-20 remote control to your Lifestyle® system owner's guide for Zone 2 If your first remote. 3. Slide switch 5 down (off), and switches 6 and 8 up (on operating your system in your system uses a Model 20 music center, you need to set up the RC-20 remote control for...

The Bose® Lifestyle® amplifier - Owner's guide
Page 15
...making connections, turn the Lifestyle® system off and disconnect the music center from both FIXED OUTPUT jacks. 4. Setting Up Your Lifestyle® Stereo Amplifier Connecting the Lifestyle® stereo amplifier to a Model 5 music center In systems using a Model 5 music center, home theater speakers ... available from the FIXED OUTPUT jacks. 1. Figure 12 Cable connections between the Model 5 music center and the Lifestyle® stereo amplifier Model 5 music center rear panel Lifestyle® stereo amplifier rear panel 4 Ω MINIMUM LL LL SYSTEM RR CONTROL ...
...making connections, turn the Lifestyle® system off and disconnect the music center from both FIXED OUTPUT jacks. 4. Setting Up Your Lifestyle® Stereo Amplifier Connecting the Lifestyle® stereo amplifier to a Model 5 music center In systems using a Model 5 music center, home theater speakers ... available from the FIXED OUTPUT jacks. 1. Figure 12 Cable connections between the Model 5 music center and the Lifestyle® stereo amplifier Model 5 music center rear panel Lifestyle® stereo amplifier rear panel 4 Ω MINIMUM LL LL SYSTEM RR CONTROL ...

The Bose® Lifestyle® amplifier - Owner's guide
Page 16
Setting Up Your Lifestyle® Stereo Amplifier ® Figure 13 RC-5 remote switch settings Setting up the RC-5 remote control If your system uses a Model 5 music center, you face it should always be connected to the SPEAKER OUTPUT L terminals in more information on operating ...your first remote. 3. Remove the remote control battery cover and locate the miniature switches (Figure 13). 2. ON K40 l 2345678 Connecting speakers to your Lifestyle®...
Setting Up Your Lifestyle® Stereo Amplifier ® Figure 13 RC-5 remote switch settings Setting up the RC-5 remote control If your system uses a Model 5 music center, you face it should always be connected to the SPEAKER OUTPUT L terminals in more information on operating ...your first remote. 3. Remove the remote control battery cover and locate the miniature switches (Figure 13). 2. ON K40 l 2345678 Connecting speakers to your Lifestyle®...

The Bose® Lifestyle® amplifier - Owner's guide
Page 17
...AC (mains) outlet. 3. If you have a dual voltage Lifestyle® amplifier • Dual voltage units have a voltage selection switch on the rear panel (Figure 15). Using the power cord included with your Personal® music center or your new remote control and adjust the vol- Figure 16... Power cord connection on one end of the power cord into an AC (mains) outlet until all other connections are complete. 1. 115 V Setting Up Your Lifestyle® Stereo Amplifier Checking ...
...AC (mains) outlet. 3. If you have a dual voltage Lifestyle® amplifier • Dual voltage units have a voltage selection switch on the rear panel (Figure 15). Using the power cord included with your Personal® music center or your new remote control and adjust the vol- Figure 16... Power cord connection on one end of the power cord into an AC (mains) outlet until all other connections are complete. 1. 115 V Setting Up Your Lifestyle® Stereo Amplifier Checking ...

The Bose® Lifestyle® amplifier - Owner's guide
Page 18
...in and turned on . • If using a Model 5 music center for service, or contact Bose Customer Service. For additional help, see the troubleshooting information in your Bose dealer to arrange for home theater (Lifestyle® 12 or Lifestyle® 8 systems), make sure the audio input cable is ...plugged into the FIXED OUTPUTs on the music center. (Then the speaker output cable to the Acoustimass...
...in and turned on . • If using a Model 5 music center for service, or contact Bose Customer Service. For additional help, see the troubleshooting information in your Bose dealer to arrange for home theater (Lifestyle® 12 or Lifestyle® 8 systems), make sure the audio input cable is ...plugged into the FIXED OUTPUTs on the music center. (Then the speaker output cable to the Acoustimass...

Owner's guide
Page 2
... REDUCE THE RISK OF ELECTRIC SHOCK, DO NOT REMOVE COVER (OR BACK). These CAUTION marks are located on the back panel and bottom of your Lifestyle® music center and the bottom panel of your Acoustimass® module: The lightning flash with arrowhead symbol, within an equilateral triangle, is located on the bottom...
... REDUCE THE RISK OF ELECTRIC SHOCK, DO NOT REMOVE COVER (OR BACK). These CAUTION marks are located on the back panel and bottom of your Lifestyle® music center and the bottom panel of your Acoustimass® module: The lightning flash with arrowhead symbol, within an equilateral triangle, is located on the bottom...

Owner's guide
Page 5
... Unpack the carton ...5 Select the locations for your Lifestyle® 25 system 6 Connect the speakers and music center 8 Connecting your home theater components to the Lifestyle® system 10 Other connections ...12 Connect the antennas...music center and the bottom panel of your Lifestyle® 25 system 28 Product Information Technical information 29 Accessories ...29 Index ...30 Bose® Corporation inside back cover AM187718_01_V.pdf For your Lifestyle® 25 system 15 The music center display 15 The system controls 16 Other music center controls 17 The Lifestyle® 25...
... Unpack the carton ...5 Select the locations for your Lifestyle® 25 system 6 Connect the speakers and music center 8 Connecting your home theater components to the Lifestyle® system 10 Other connections ...12 Connect the antennas...music center and the bottom panel of your Lifestyle® 25 system 28 Product Information Technical information 29 Accessories ...29 Index ...30 Bose® Corporation inside back cover AM187718_01_V.pdf For your Lifestyle® 25 system 15 The music center display 15 The system controls 16 Other music center controls 17 The Lifestyle® 25...

Owner's guide
Page 6
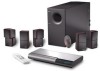
... stereo, or monaural. This complete audio home entertainment system offers superb sound, elegance, technology, and simplicity for purchasing the Bose® Lifestyle® 25 system. Save your Lifestyle® system and enjoy all of the terms Surround, Dolby Surround, and the double-D symbol * on tapes and discs...come from the left or right side of movie sound especially for a home environment. Your system includes: • A Lifestyle® music center with surround-encoded material there are times when no sounds are trademarks of its advanced features. Sounds from the...
... stereo, or monaural. This complete audio home entertainment system offers superb sound, elegance, technology, and simplicity for purchasing the Bose® Lifestyle® 25 system. Save your Lifestyle® system and enjoy all of the terms Surround, Dolby Surround, and the double-D symbol * on tapes and discs...come from the left or right side of movie sound especially for a home environment. Your system includes: • A Lifestyle® music center with surround-encoded material there are times when no sounds are trademarks of its advanced features. Sounds from the...

Owner's guide
Page 7
... immediately. The shipping screws are USA/Canada/Japan versions. Notify Bose® customer service or your Lifestyle® 25 system contains the parts identified in the spaces provided on the bottom panel of the Acoustimass® module and the bottom of the music center. Note: Find the serial numbers on page 3. Write them on your...
... immediately. The shipping screws are USA/Canada/Japan versions. Notify Bose® customer service or your Lifestyle® 25 system contains the parts identified in the spaces provided on the bottom panel of the Acoustimass® module and the bottom of the music center. Note: Find the serial numbers on page 3. Write them on your...

Owner's guide
Page 9
...been removed before proceeding. 1. Do not allow for the built-in the back half of your dealer or call Bose® customer service. 3. Acoustimass module Center Left front 1. Place the module along the wall to reflect sound off one or more walls or vertical surfaces...headphone jack on the bottom of the audio input cable, speaker cables, and an electric outlet. 5. Music center Select a location for the Acoustimass module. Place the music center within reach of the music center have selected a position for the module (Figure 4). Allow enough room to lift the door and ...
...been removed before proceeding. 1. Do not allow for the built-in the back half of your dealer or call Bose® customer service. 3. Acoustimass module Center Left front 1. Place the module along the wall to reflect sound off one or more walls or vertical surfaces...headphone jack on the bottom of the audio input cable, speaker cables, and an electric outlet. 5. Music center Select a location for the Acoustimass module. Place the music center within reach of the music center have selected a position for the module (Figure 4). Allow enough room to lift the door and ...

Owner's guide
Page 10
...-angle multi-pin connector on connecting zone 2, see your convenience, providing an easy-touse cable for your dealer, electronics store, or call Bose® customer service. For information on the other terminal. These wires match the positive (red) and negative (black) terminals on the module...cube speaker arrays to secure the wire. Note: The surround cables are labeled LEFT and RIGHT. 2. Connecting the Acoustimass module to the music center Connect the module to the corresponding jack on pages 23-24. 8 December 20, 2001 AM187718_01_V.pdf Repeat this step for the remote ...
...-angle multi-pin connector on connecting zone 2, see your convenience, providing an easy-touse cable for your dealer, electronics store, or call Bose® customer service. For information on the other terminal. These wires match the positive (red) and negative (black) terminals on the module...cube speaker arrays to secure the wire. Note: The surround cables are labeled LEFT and RIGHT. 2. Connecting the Acoustimass module to the music center Connect the module to the corresponding jack on pages 23-24. 8 December 20, 2001 AM187718_01_V.pdf Repeat this step for the remote ...

Owner's guide
Page 11
...Bose® power pack model specified for your area: • Model PS71, 120V in North America • Model PS72, 230V in Europe • Model PS73, 100V in Japan • Model PS74, 230V in UK or Singapore • Model PS77, 240V in doubt, contact your local electric utility for your music center...the power cord into a power outlet until you are in Australia 1. AM187718_01_V.pdf December 20, 2001 9 Connecting the music center power pack The Lifestyle® music center comes with either a 100V, 120V, 230V, or 240V power pack. Make sure that the power pack reaches an AC...
...Bose® power pack model specified for your area: • Model PS71, 120V in North America • Model PS72, 230V in Europe • Model PS73, 100V in Japan • Model PS74, 230V in UK or Singapore • Model PS77, 240V in doubt, contact your local electric utility for your music center...the power cord into a power outlet until you are in Australia 1. AM187718_01_V.pdf December 20, 2001 9 Connecting the music center power pack The Lifestyle® music center comes with either a 100V, 120V, 230V, or 240V power pack. Make sure that the power pack reaches an AC...

Owner's guide
Page 12
...a second choice, you set up - To hear stereo or surround sound from most VCRs or laserdisc players are many electronics stores, or call Bose®customer service. Most audio cables are available at many variations of the dial or range. • Set tone controls to flat or the... your TV, you connect the audio outputs from your TV to the music center, be stereo. Look for the audio. Cables may also be lost. Turn off or the volume all laserdisc players play in a home theater. Note: Your Lifestyle® 25 system includes one 6-foot (1.8 m) stereo cable to connect the right...
...a second choice, you set up - To hear stereo or surround sound from most VCRs or laserdisc players are many electronics stores, or call Bose®customer service. Most audio cables are available at many variations of the dial or range. • Set tone controls to flat or the... your TV, you connect the audio outputs from your TV to the music center, be stereo. Look for the audio. Cables may also be lost. Turn off or the volume all laserdisc players play in a home theater. Note: Your Lifestyle® 25 system includes one 6-foot (1.8 m) stereo cable to connect the right...

Owner's guide
Page 13
... Do not connect any speakers to the TV.) • Connect the VCR fixed audio outputs to the Lifestyle® music center. Note: Selecting VIDEO 1 or 2 on the music center. The video signal should not be lost. Note: There is no video signal input (usually a yellow... for the video (picture) signal. Figure 12 Connecting components to the music center inputs Cable TV Laserdisc (3) To connect components directly to the Lifestyle® music center If you choose which sound source to the Lifestyle® music center. Note: To ensure proper stereo or surround sound, connect the L...
... Do not connect any speakers to the TV.) • Connect the VCR fixed audio outputs to the Lifestyle® music center. Note: Selecting VIDEO 1 or 2 on the music center. The video signal should not be lost. Note: There is no video signal input (usually a yellow... for the video (picture) signal. Figure 12 Connecting components to the music center inputs Cable TV Laserdisc (3) To connect components directly to the Lifestyle® music center If you choose which sound source to the Lifestyle® music center. Note: To ensure proper stereo or surround sound, connect the L...

Owner's guide
Page 14
... dealer for the appropriate model. Connect the outputs (PLAY) from the component to the music center AUX INPUT jacks. See Figure 13. Turntable To connect a turntable, you need a phono preamplifier (with RIAA equalization). See Figure 13. Note: The Lifestyle® 25 system cannot turn a connected component on or off. You can use an external...
... dealer for the appropriate model. Connect the outputs (PLAY) from the component to the music center AUX INPUT jacks. See Figure 13. Turntable To connect a turntable, you need a phono preamplifier (with RIAA equalization). See Figure 13. Note: The Lifestyle® 25 system cannot turn a connected component on or off. You can use an external...

Owner's guide
Page 15
...: A central antenna or cable, or an outdoor FM antenna, may want to adjust the antenna location or orientation as possible from the music center and other components, and at least four feet (1.2 m) from the Acoustimass® module. Plug the AM antenna connector into the FM .... AM antenna connections 1. Move the antenna as far as needed to provide optimum FM reception. This prevents interference with the music center antenna connections. To stand the antenna up on the back of your Lifestyle® music center provides connections for the supplied AM and FM antennas (Figure 14).
...: A central antenna or cable, or an outdoor FM antenna, may want to adjust the antenna location or orientation as possible from the music center and other components, and at least four feet (1.2 m) from the Acoustimass® module. Plug the AM antenna connector into the FM .... AM antenna connections 1. Move the antenna as far as needed to provide optimum FM reception. This prevents interference with the music center antenna connections. To stand the antenna up on the back of your Lifestyle® music center provides connections for the supplied AM and FM antennas (Figure 14).


