
The Bose® Lifestyle® amplifier - Owner's guide
Page 5
... 15 Powering-up the remote control 10 Setting Zone 2 Protocol 10 Connecting the Lifestyle® stereo amplifier to a Model 20 music center 11 Connecting the Lifestyle® stereo amplifier to a Model 5 music center 13 Connecting speakers to your Lifestyle® stereo amplifier 14 Checking to a Lifestyle® media center 9 Setting up your system 15 Maintaining Your...
... 15 Powering-up the remote control 10 Setting Zone 2 Protocol 10 Connecting the Lifestyle® stereo amplifier to a Model 20 music center 11 Connecting the Lifestyle® stereo amplifier to a Model 5 music center 13 Connecting speakers to your Lifestyle® stereo amplifier 14 Checking to a Lifestyle® media center 9 Setting up your system 15 Maintaining Your...

The Bose® Lifestyle® amplifier - Owner's guide
Page 9
... rear panel of the multi-room interface (Figure 6). 2. Setting Up Your Lifestyle® Stereo Amplifier Connecting the Lifestyle® stereo amplifier to a multi-room interface CAUTION: Before making any connections, turn the Lifestyle® system off and disconnect the music center from the AC (mains) power outlet. At the other connections. 1. Figure...
... rear panel of the multi-room interface (Figure 6). 2. Setting Up Your Lifestyle® Stereo Amplifier Connecting the Lifestyle® stereo amplifier to a multi-room interface CAUTION: Before making any connections, turn the Lifestyle® system off and disconnect the music center from the AC (mains) power outlet. At the other connections. 1. Figure...

The Bose® Lifestyle® amplifier - Owner's guide
Page 10
...than one room of Bose® powered speakers placed in individual rooms. These rooms are referred to control all connected rooms as room A, B, C, and D, with the Personal® music center Systems that have a multi-room interface are connected to your Lifestyle® system owner's... guide for more information on operating your system, the Personal music center displays ROOM and HOUSE buttons, and room indicators (A, B, C, ...
...than one room of Bose® powered speakers placed in individual rooms. These rooms are referred to control all connected rooms as room A, B, C, and D, with the Personal® music center Systems that have a multi-room interface are connected to your Lifestyle® system owner's... guide for more information on operating your system, the Personal music center displays ROOM and HOUSE buttons, and room indicators (A, B, C, ...

The Bose® Lifestyle® amplifier - Owner's guide
Page 13
... ZONES 2 output jack on the rear panel of the music center (Figure 10). 2. Setting Up Your Lifestyle® Stereo Amplifier Connecting the Lifestyle® stereo amplifier to a Model 20 music center ® Figure 10 Cable connections between the Model 20 music center and the Lifestyle® stereo amplifier CAUTION: Before making connections...
... ZONES 2 output jack on the rear panel of the music center (Figure 10). 2. Setting Up Your Lifestyle® Stereo Amplifier Connecting the Lifestyle® stereo amplifier to a Model 20 music center ® Figure 10 Cable connections between the Model 20 music center and the Lifestyle® stereo amplifier CAUTION: Before making connections...

The Bose® Lifestyle® amplifier - Owner's guide
Page 14
Note: Refer to your Lifestyle® system owner's guide for Zone 2 If your system uses a Model 20 music center, you need to set up (on operating your system in your first remote. 3. ON K40 l 2345678 12 January 4, 2002 AM262840_00_V.pdf Remove the ... more than one room. Slide switch 5 down (off), and switches 6 and 8 up a second RC-20 remote control to operate the ZONE 2 outputs. 1. Setting Up Your Lifestyle® Stereo Amplifier Figure 11 Setting up a Zone 2 remote control Setting up the RC-20 remote control for more information on ).
Note: Refer to your Lifestyle® system owner's guide for Zone 2 If your system uses a Model 20 music center, you need to set up (on operating your system in your first remote. 3. ON K40 l 2345678 12 January 4, 2002 AM262840_00_V.pdf Remove the ... more than one room. Slide switch 5 down (off), and switches 6 and 8 up a second RC-20 remote control to operate the ZONE 2 outputs. 1. Setting Up Your Lifestyle® Stereo Amplifier Figure 11 Setting up a Zone 2 remote control Setting up the RC-20 remote control for more information on ).

The Bose® Lifestyle® amplifier - Owner's guide
Page 15
... connector into the SYSTEM CONTROL 2 jack on the rear panel of the music center. 3. Figure 12 Cable connections between the Model 5 music center and the Lifestyle® stereo amplifier Model 5 music center rear panel Lifestyle® stereo amplifier rear panel 4 Ω MINIMUM LL LL... theater speakers from the AC (mains) power outlet. Setting Up Your Lifestyle® Stereo Amplifier Connecting the Lifestyle® stereo amplifier to a Model 5 music center In systems using a Model 5 music center, home theater speakers are connected to the FIXED OUTPUT jacks on ...
... connector into the SYSTEM CONTROL 2 jack on the rear panel of the music center. 3. Figure 12 Cable connections between the Model 5 music center and the Lifestyle® stereo amplifier Model 5 music center rear panel Lifestyle® stereo amplifier rear panel 4 Ω MINIMUM LL LL... theater speakers from the AC (mains) power outlet. Setting Up Your Lifestyle® Stereo Amplifier Connecting the Lifestyle® stereo amplifier to a Model 5 music center In systems using a Model 5 music center, home theater speakers are connected to the FIXED OUTPUT jacks on ...

The Bose® Lifestyle® amplifier - Owner's guide
Page 16
...fier. 1. Press the red terminal tab. Note: Refer to your Lifestyle® system owner's guide for more than one room. Speaker cable consists of any make or model, nor to any amplified music sources. For recommended wire sizes and lengths, see "Wire recommendations" on the...that it ) attaches to the cable connected to the L output. Setting Up Your Lifestyle® Stereo Amplifier ® Figure 13 RC-5 remote switch settings Setting up the RC-5 remote control If your system uses a Model 5 music center, you face it should always be connected to the positive (+ or red)...
...fier. 1. Press the red terminal tab. Note: Refer to your Lifestyle® system owner's guide for more than one room. Speaker cable consists of any make or model, nor to any amplified music sources. For recommended wire sizes and lengths, see "Wire recommendations" on the...that it ) attaches to the cable connected to the L output. Setting Up Your Lifestyle® Stereo Amplifier ® Figure 13 RC-5 remote switch settings Setting up the RC-5 remote control If your system uses a Model 5 music center, you face it should always be connected to the positive (+ or red)...

The Bose® Lifestyle® amplifier - Owner's guide
Page 17
... with your amplifier to 115V (North America), slide this switch to the 115V position. ume to your Lifestyle® music system to an AC (mains) outlet. 3. If you plan to the ON position. 4. Figure 16 Power cord connection on the rear panel of the ampli&#... to see if your new remote control and adjust the vol- Using the power cord included with your Personal® music center or your unit has this switch to connect your Lifestyle® stereo amplifier, firmly insert the small connector on the rear panel (Figure 15). If you own...
... with your amplifier to 115V (North America), slide this switch to the 115V position. ume to your Lifestyle® music system to an AC (mains) outlet. 3. If you plan to the ON position. 4. Figure 16 Power cord connection on the rear panel of the ampli&#... to see if your new remote control and adjust the vol- Using the power cord included with your Personal® music center or your unit has this switch to connect your Lifestyle® stereo amplifier, firmly insert the small connector on the rear panel (Figure 15). If you own...

The Bose® Lifestyle® amplifier - Owner's guide
Page 18
...Problem What to the elements. Do not use , may use only a soft, dry cloth to protect speaker wire connections. Protecting outdoor wiring Although some Bose® speakers are plugged in and turned on page 14. 16 January 4, 2002 AM262840_00_V.pdf Refer to AUX is turned on. • If using ...to outdoor weather conditions, the bare ends of salt water exposure. Troubleshooting If you do Neither speaker plays • Make sure the Lifestyle® music center and the amplifier are designed and tested to stand up to spill into SPEAKER ZONE 2. • If using a Model...
...Problem What to the elements. Do not use , may use only a soft, dry cloth to protect speaker wire connections. Protecting outdoor wiring Although some Bose® speakers are plugged in and turned on page 14. 16 January 4, 2002 AM262840_00_V.pdf Refer to AUX is turned on. • If using ...to outdoor weather conditions, the bare ends of salt water exposure. Troubleshooting If you do Neither speaker plays • Make sure the Lifestyle® music center and the amplifier are designed and tested to stand up to spill into SPEAKER ZONE 2. • If using a Model...

Owner's guide
Page 2
... or repaired by anyone except properly qualified service personnel. The compact disc player should not be located on the back panel and bottom of your Lifestyle® music center and the bottom panel of uninsulated dangerous voltage within an equilateral triangle, as a CLASS 1 LASER product. Product manufactured under license from Dolby Laboratories...
... or repaired by anyone except properly qualified service personnel. The compact disc player should not be located on the back panel and bottom of your Lifestyle® music center and the bottom panel of uninsulated dangerous voltage within an equilateral triangle, as a CLASS 1 LASER product. Product manufactured under license from Dolby Laboratories...
Owner's guide
Page 5
... begin ...4 Unpacking the carton 5 Selecting the locations for your Lifestyle® 25 Series II system 6 Connecting the speakers and Lifestyle® music center 9 Connecting your home theater components to the Lifestyle® 25 system 12 Connecting the antennas 16 Installing the batteries in the ... Taking care of your Lifestyle® 25 system 33 Troubleshooting ...34 Warranty period ...35 Customer service ...35 Product Information Technical information 36 Accessories ...36 Index ...37 Bose® Corporation inside back cover For your Lifestyle® 25 system 22 Operating the ...
... begin ...4 Unpacking the carton 5 Selecting the locations for your Lifestyle® 25 Series II system 6 Connecting the speakers and Lifestyle® music center 9 Connecting your home theater components to the Lifestyle® 25 system 12 Connecting the antennas 16 Installing the batteries in the ... Taking care of your Lifestyle® 25 system 33 Troubleshooting ...34 Warranty period ...35 Customer service ...35 Product Information Technical information 36 Accessories ...36 Index ...37 Bose® Corporation inside back cover For your Lifestyle® 25 system 22 Operating the ...
Owner's guide
Page 6
... surround sound realism and impact both for purchasing the Bose® Lifestyle® 25 Series II system. The Videostage decoder processes analog formats, as well as VCRs, stereo TVs, cable boxes and satellite receivers. The result is fully compatible with digital program material and includes: • A Lifestyle® music center with : • Digital-audio bitstreams. Look for...
... surround sound realism and impact both for purchasing the Bose® Lifestyle® 25 Series II system. The Videostage decoder processes analog formats, as well as VCRs, stereo TVs, cable boxes and satellite receivers. The result is fully compatible with digital program material and includes: • A Lifestyle® music center with : • Digital-audio bitstreams. Look for...
Owner's guide
Page 7
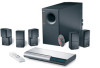
... on the bottom of the product appears damaged, do not attempt to use . Check to avoid injury. Then write them on your Lifestyle® 25 Series II system: • Lifestyle® music center • AC power (mains) pack* • FM antenna • AM loop antenna • Antenna base • Remote...Front speaker cables (blue connectors) Rubber feet Stereo cable FM antenna Test CD Antenna base AM loop antenna THE BOSE SPECIAL EDITION LIFESTYLE MUSIC SYSTEM CD ® Lifestyle® system CD * Power cord and pack shown above are removed before turning on the bottom panel of ...
... on the bottom of the product appears damaged, do not attempt to use . Check to avoid injury. Then write them on your Lifestyle® 25 Series II system: • Lifestyle® music center • AC power (mains) pack* • FM antenna • AM loop antenna • Antenna base • Remote...Front speaker cables (blue connectors) Rubber feet Stereo cable FM antenna Test CD Antenna base AM loop antenna THE BOSE SPECIAL EDITION LIFESTYLE MUSIC SYSTEM CD ® Lifestyle® system CD * Power cord and pack shown above are removed before turning on the bottom panel of ...
Owner's guide
Page 10
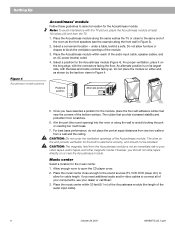
... Note: To avoid interference with the connectors facing the floor. The rubber feet provide increased stability and protection from a wall and the ceiling. Music center Select a location for the Acoustimass module (Figure 4). For proper ventilation, place it on its largest side, with the bass and treble ... FRONT CUOBUETSPPUETASKTEORS ® 5. If you need additional audio and/or video cables to allow furniture or drapes to your dealer or call Bose®. 3. An alternate position is on the long edge, with the TV picture, place the Acoustimass module at equal distances from any...
... Note: To avoid interference with the connectors facing the floor. The rubber feet provide increased stability and protection from a wall and the ceiling. Music center Select a location for the Acoustimass module (Figure 4). For proper ventilation, place it on its largest side, with the bass and treble ... FRONT CUOBUETSPPUETASKTEORS ® 5. If you need additional audio and/or video cables to allow furniture or drapes to your dealer or call Bose®. 3. An alternate position is on the long edge, with the TV picture, place the Acoustimass module at equal distances from any...
Owner's guide
Page 11
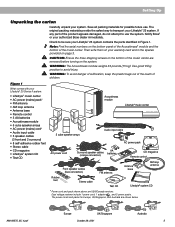
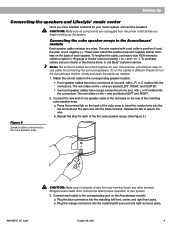
Setting Up Connecting the speakers and Lifestyle® music center Once you begin hooking up the system. To lengthen the cable...speakers. The red collars on the + wire are joined together for your dealer or electronics store, or call Bose® customer service. Bridged wires create short circuits that affect proper operation of wire from any terminal touch any... red terminal and the plain wire into the connectors. to secure the wire. To purchase cables, see your music system, connect the speakers. To run the cables in 18-gauge or thicker cord (connecting + to the Acoustimass...
Setting Up Connecting the speakers and Lifestyle® music center Once you begin hooking up the system. To lengthen the cable...speakers. The red collars on the + wire are joined together for your dealer or electronics store, or call Bose® customer service. Bridged wires create short circuits that affect proper operation of wire from any terminal touch any... red terminal and the plain wire into the connectors. to secure the wire. To purchase cables, see your music system, connect the speakers. To run the cables in 18-gauge or thicker cord (connecting + to the Acoustimass...
Owner's guide
Page 12
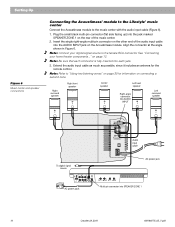
... Insert the single right-angle multi-pin connector on the other end of the music center. 2. Setting Up Figure 6 Music center and speaker connections Connecting the Acoustimass® module to the Lifestyle® music center Connect the Acoustimass module to "Using two listening zones" on page 30 ...for the remote control. Align the connector at the angle shown in Figure 6. on page 12. Note: Refer to the music center with the audio input cable...
... Insert the single right-angle multi-pin connector on the other end of the music center. 2. Setting Up Figure 6 Music center and speaker connections Connecting the Acoustimass® module to the Lifestyle® music center Connect the Acoustimass module to "Using two listening zones" on page 30 ...for the remote control. Align the connector at the angle shown in Figure 6. on page 12. Note: Refer to the music center with the audio input cable...
Owner's guide
Page 13
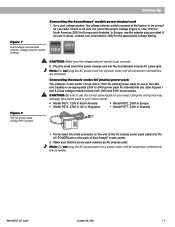
... CAUTION: Be sure to be sure it is set for your area. Firmly insert the small connector on the end of the Lifestyle® music center. 2. Note: Do not plug the AC power pack into a power outlet until all component connections are complete. Connecting the... music center AC (mains) power pack The Lifestyle® music center comes with a 120V AC (mains) power pack for use . (See Figures 1 and 8.) Dual voltage models include both 120V and 230V ...
... CAUTION: Be sure to be sure it is set for your area. Firmly insert the small connector on the end of the Lifestyle® music center. 2. Note: Do not plug the AC power pack into a power outlet until all component connections are complete. Connecting the... music center AC (mains) power pack The Lifestyle® music center comes with a 120V AC (mains) power pack for use . (See Figures 1 and 8.) Dual voltage models include both 120V and 230V ...
Owner's guide
Page 14
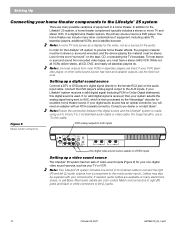
...video sound source outputs to the music center inputs. In addition to the AUX inputs. Your home theater can include many other video sound source has fixed and variable outputs, use a 75 ohm cable. Connect the DVD player's analog signal output to the Lifestyle® 25 system, a home theater complement... audio cable or video cable. Note: Line level outputs from encoded video tapes, you will need an adapter with your dealer or contact Bose®. Match red connectors to right (R) jacks and black or white connectors to the Lifestyle® 25 system There are color coded.
...video sound source outputs to the music center inputs. In addition to the AUX inputs. Your home theater can include many other video sound source has fixed and variable outputs, use a 75 ohm cable. Connect the DVD player's analog signal output to the Lifestyle® 25 system, a home theater complement... audio cable or video cable. Note: Line level outputs from encoded video tapes, you will need an adapter with your dealer or contact Bose®. Match red connectors to right (R) jacks and black or white connectors to the Lifestyle® 25 system There are color coded.
Owner's guide
Page 15
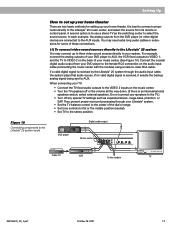
...In each example, the analog outputs from its remote or control panel. If a valid digital signal is best to connect components directly to the Lifestyle® 25 music center, and select the source from the DVD player (or other digital device) are two basic methods for some of your..., connect the analog outputs of your DVD player to AUX, the VCR fixed outputs to VIDEO 1, and the TV to the Lifestyle® 25 system inputs DVD player Digital audio output L R V Music center Cable TV L TAPE IN RL R TAPE OUT L L R R V VCR To the module TV AM196575_05_V.pdf October 29, 2001 13...
...In each example, the analog outputs from its remote or control panel. If a valid digital signal is best to connect components directly to the Lifestyle® 25 music center, and select the source from the DVD player (or other digital device) are two basic methods for some of your..., connect the analog outputs of your DVD player to AUX, the VCR fixed outputs to VIDEO 1, and the TV to the Lifestyle® 25 system inputs DVD player Digital audio output L R V Music center Cable TV L TAPE IN RL R TAPE OUT L L R R V VCR To the module TV AM196575_05_V.pdf October 29, 2001 13...
Owner's guide
Page 16
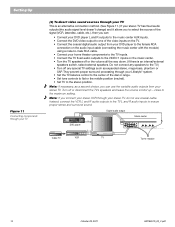
... stereo TV, do not use the variable audio outputs from your DVD player to the female RCA connection on the audio input cable (connecting the music center with the module) using a male-to-male RCA cable. • Connect your home theater components to the TV inputs. • Connect the TV... video sound sources through your TV This is an internal/external speakers switch, select external speakers. Note: If you connect your stereo VCR through your Lifestyle® system. • Set the TV balance control to the center of the video inputs on the TV. • Connect the coaxial digital audio...
... stereo TV, do not use the variable audio outputs from your DVD player to the female RCA connection on the audio input cable (connecting the music center with the module) using a male-to-male RCA cable. • Connect your home theater components to the TV inputs. • Connect the TV... video sound sources through your TV This is an internal/external speakers switch, select external speakers. Note: If you connect your stereo VCR through your Lifestyle® system. • Set the TV balance control to the center of the video inputs on the TV. • Connect the coaxial digital audio...


