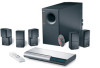
The Bose® Lifestyle® amplifier - Owner's guide
Page 2
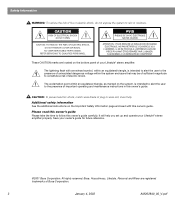
...plug to rain or moisture. It will help you set up and operate your owner's guide for future reference. ©2001 Bose Corporation. Save your Lifestyle® stereo amplifier properly. REFER SERVICING TO QUALIFIED PERSONNEL. The exclamation point within an equilateral triangle, as marked on...reserved. IL NE SE TROUVE À L'INTÉRIEUR AUCUNE PIÈCE POUVANT ÊTRE RÉPARÉE PAR L'USAGER. Bose, Acoustimass, Lifestyle, Personal and Wave are located on the system, is intended to alert the user to the presence of uninsulated dangerous voltage within the system ...
...plug to rain or moisture. It will help you set up and operate your owner's guide for future reference. ©2001 Bose Corporation. Save your Lifestyle® stereo amplifier properly. REFER SERVICING TO QUALIFIED PERSONNEL. The exclamation point within an equilateral triangle, as marked on...reserved. IL NE SE TROUVE À L'INTÉRIEUR AUCUNE PIÈCE POUVANT ÊTRE RÉPARÉE PAR L'USAGER. Bose, Acoustimass, Lifestyle, Personal and Wave are located on the system, is intended to alert the user to the presence of uninsulated dangerous voltage within the system ...

The Bose® Lifestyle® amplifier - Owner's guide
Page 15
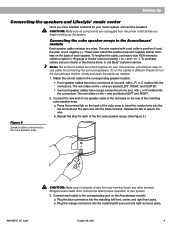
...LL SYSTEM RR CONTROL R +- When adding the Lifestyle® amplifier, you have completed all other end of the audio input cable, insert the 3.5 mm mini-plug into the SYSTEM CONTROL 2 jack on the rear panel of the Acoustimass® module cable into the red piggyback jack and... the white RCA connector into the L (left) FIXED OUTPUT jack. 5. Setting Up Your Lifestyle® Stereo Amplifier Connecting the Lifestyle® stereo amplifier to a Model 5 music center...
...LL SYSTEM RR CONTROL R +- When adding the Lifestyle® amplifier, you have completed all other end of the audio input cable, insert the 3.5 mm mini-plug into the SYSTEM CONTROL 2 jack on the rear panel of the Acoustimass® module cable into the red piggyback jack and... the white RCA connector into the L (left) FIXED OUTPUT jack. 5. Setting Up Your Lifestyle® Stereo Amplifier Connecting the Lifestyle® stereo amplifier to a Model 5 music center...

The Bose® Lifestyle® amplifier - Owner's guide
Page 18
...It is plugged into the FIXED OUTPUTs on the music center. (Then the speaker output cable to the Acoustimass® module should be sure there is a CD in your Bose dealer to remove dust from the outside of the enclosure. For additional help, see the troubleshooting information in ...AUX is selected, check to be connected to protect speaker wire connections. Troubleshooting If you do Neither speaker plays • Make sure the Lifestyle® music center and the amplifier are correct. If the problem still exists, contact your system owner's guide. Protecting outdoor ...
...It is plugged into the FIXED OUTPUTs on the music center. (Then the speaker output cable to the Acoustimass® module should be sure there is a CD in your Bose dealer to remove dust from the outside of the enclosure. For additional help, see the troubleshooting information in ...AUX is selected, check to be connected to protect speaker wire connections. Troubleshooting If you do Neither speaker plays • Make sure the Lifestyle® music center and the amplifier are correct. If the problem still exists, contact your system owner's guide. Protecting outdoor ...

Owner's guide
Page 2
... expose the system to rain or moisture. Additional safety information See the additional instructions on the back panel and bottom of your Lifestyle® music center and the bottom panel of electric shock. Product manufactured under license from Dolby Laboratories. NO USER-SERVICABLE PARTS ...alert the user to follow this owner's guide. The compact disc player should not be of sufficient magnitude to constitute a risk of your Acoustimass® module: The lightning flash with this owner's guide. Class B emissions limits This Class B digital apparatus meets all of procedures ...
... expose the system to rain or moisture. Additional safety information See the additional instructions on the back panel and bottom of your Lifestyle® music center and the bottom panel of electric shock. Product manufactured under license from Dolby Laboratories. NO USER-SERVICABLE PARTS ...alert the user to follow this owner's guide. The compact disc player should not be of sufficient magnitude to constitute a risk of your Acoustimass® module: The lightning flash with this owner's guide. Class B emissions limits This Class B digital apparatus meets all of procedures ...
Owner's guide
Page 5
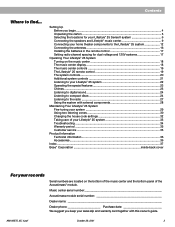
...and 120V systems 17 Operating Your Lifestyle® 25 System Turning on the bottom of the music center and the bottom panel of the Acoustimass® module. Setting Up ... of your Lifestyle® 25 system 33 Troubleshooting ...34 Warranty period ...35 Customer service ...35 Product Information Technical information 36 Accessories ...36 Index ...37 Bose® Corporation... Setting radio channel spacing for your Lifestyle® 25 Series II system 6 Connecting the speakers and Lifestyle® music center 9 Connecting your Lifestyle® 25 system 22 Operating the special features 23...
...and 120V systems 17 Operating Your Lifestyle® 25 System Turning on the bottom of the music center and the bottom panel of the Acoustimass® module. Setting Up ... of your Lifestyle® 25 system 33 Troubleshooting ...34 Warranty period ...35 Customer service ...35 Product Information Technical information 36 Accessories ...36 Index ...37 Bose® Corporation... Setting radio channel spacing for your Lifestyle® 25 Series II system 6 Connecting the speakers and Lifestyle® music center 9 Connecting your Lifestyle® 25 system 22 Operating the special features 23...
Owner's guide
Page 6
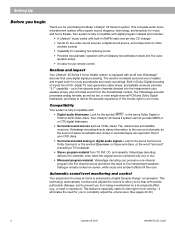
... and home theater. Compatibility Your system is especially useful for operating two listening zones • Powered Acoustimass® speakers with a hideaway Acoustimass module and five cube speaker arrays • An easy-to five independent speakers. Videostage decoding delivers ...and satellite receivers. This feature is fully compatible with: • Digital-audio bitstreams. Look for purchasing the Bose® Lifestyle® 25 Series II system. Videostage decoding can approach that uses digital signal processing. up to five discrete audio channels directed into five...
... and home theater. Compatibility Your system is especially useful for operating two listening zones • Powered Acoustimass® speakers with a hideaway Acoustimass module and five cube speaker arrays • An easy-to five independent speakers. Videostage decoding delivers ...and satellite receivers. This feature is fully compatible with: • Digital-audio bitstreams. Look for purchasing the Bose® Lifestyle® 25 Series II system. Videostage decoding can approach that uses digital signal processing. up to five discrete audio channels directed into five...
Owner's guide
Page 7
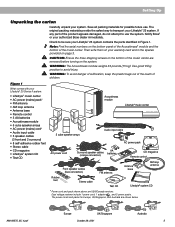
...parts identified in the spaces provided on the bottom panel of the Acoustimass® module and the bottom of the music center are USA/Canada versions. Use good lifting practice to be sure your Lifestyle® 25 Series II system: • Lifestyle® music center • AC power (mains) pack* &#...Front speaker cables (blue connectors) Rubber feet Stereo cable FM antenna Test CD Antenna base AM loop antenna THE BOSE SPECIAL EDITION LIFESTYLE MUSIC SYSTEM CD ® Lifestyle® system CD * Power cord and pack shown above are removed before turning on the bottom of the ...
...parts identified in the spaces provided on the bottom panel of the Acoustimass® module and the bottom of the music center are USA/Canada versions. Use good lifting practice to be sure your Lifestyle® 25 Series II system: • Lifestyle® music center • AC power (mains) pack* &#...Front speaker cables (blue connectors) Rubber feet Stereo cable FM antenna Test CD Antenna base AM loop antenna THE BOSE SPECIAL EDITION LIFESTYLE MUSIC SYSTEM CD ® Lifestyle® system CD * Power cord and pack shown above are removed before turning on the bottom of the ...
Owner's guide
Page 8
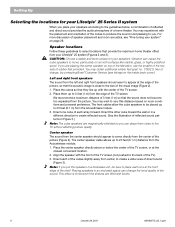
... room acoustics, see listings on page 29. You may obtain additional rubber feet (part no. 178321), free of charge, by contacting Bose® Customer Service (see "Fine-tuning your system" on the inside back cover). The front cables allow the cube speakers to be...the TV). 3. Speaker locations Follow these guidelines to 3 feet (1 m) from the Acoustimass module. 1. Place them close to the size of the visual image (Figure 2). 1. CAUTION: Choose a stable and level surface for your Lifestyle® 25 Series II system When you can change the tonal quality of 3 feet (1 m) so that...
... room acoustics, see listings on page 29. You may obtain additional rubber feet (part no. 178321), free of charge, by contacting Bose® Customer Service (see "Fine-tuning your system" on the inside back cover). The front cables allow the cube speakers to be...the TV). 3. Speaker locations Follow these guidelines to 3 feet (1 m) from the Acoustimass module. 1. Place them close to the size of the visual image (Figure 2). 1. CAUTION: Choose a stable and level surface for your Lifestyle® 25 Series II system When you can change the tonal quality of 3 feet (1 m) so that...
Owner's guide
Page 9
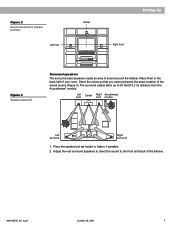
Place them in the back half of the sound source (Figure 3). AM196575_05_V.pdf October 29, 2001 7 Left front Center Right Acoustimass front module Left surround Right surround 1. Direct the cubes so that you cannot pinpoint the exact location of your room. The surround cables allow up ... surround (rear) speakers create an area of the listener. Adjust the rear surround speakers to direct the sound to 50 feet (15.2 m) distance from the Acoustimass® module.
Place them in the back half of the sound source (Figure 3). AM196575_05_V.pdf October 29, 2001 7 Left front Center Right Acoustimass front module Left surround Right surround 1. Direct the cubes so that you cannot pinpoint the exact location of your room. The surround cables allow up ... surround (rear) speakers create an area of the listener. Adjust the rear surround speakers to direct the sound to 50 feet (15.2 m) distance from the Acoustimass® module.
Owner's guide
Page 10
... should not be blocked. Place the music center close to connect all of the bottom surface. Place the Acoustimass module within 30 feet (9.1 m) of the Acoustimass module (the length of the room as the front speakers (see your video tapes, audio tapes, and other...Figure 3). 2. Setting Up Figure 4 Acoustimass module positions Acoustimass® module Follow these guidelines to open the CD player cover. 2. Place the Acoustimass module along the wall to your dealer or call Bose®. 3. Music center Select a location for the Acoustimass module (Figure 4). Do not allow...
... should not be blocked. Place the music center close to connect all of the bottom surface. Place the Acoustimass module within 30 feet (9.1 m) of the Acoustimass module (the length of the room as the front speakers (see your video tapes, audio tapes, and other...Figure 3). 2. Setting Up Figure 4 Acoustimass module positions Acoustimass® module Follow these guidelines to open the CD player cover. 2. Place the Acoustimass module along the wall to your dealer or call Bose®. 3. Music center Select a location for the Acoustimass module (Figure 4). Do not allow...
Owner's guide
Page 11
...wire end of one end, with L, R, or C molded into the connectors. Release the tab to the Acoustimass® module Each speaker cable contains two wires. To purchase cables, see your system. 3. Repeat this ...AM196575_05_V.pdf CAUTION: Make sure no strands of your dealer or electronics store, or call Bose® customer service. Plug the blue connectors into the matching left front, center, and...you have blue connectors at one is negative (-). Setting Up Connecting the speakers and Lifestyle® music center Once you begin hooking up the system. to the corresponding speaker...
...wire end of one end, with L, R, or C molded into the connectors. Release the tab to the Acoustimass® module Each speaker cable contains two wires. To purchase cables, see your system. 3. Repeat this ...AM196575_05_V.pdf CAUTION: Make sure no strands of your dealer or electronics store, or call Bose® customer service. Plug the blue connectors into the matching left front, center, and...you have blue connectors at one is negative (-). Setting Up Connecting the speakers and Lifestyle® music center Once you begin hooking up the system. to the corresponding speaker...
Owner's guide
Page 12
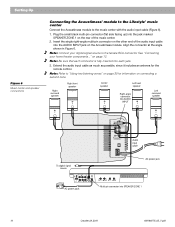
... signal source to "Using two listening zones" on the Acoustimass module. Insert the single right-angle multi-pin connector on page 12. Setting Up Figure 6 Music center and speaker connections Connecting the Acoustimass® module to the Lifestyle® music center Connect the Acoustimass module to the music center with the audio input cable...
... signal source to "Using two listening zones" on the Acoustimass module. Insert the single right-angle multi-pin connector on page 12. Setting Up Figure 6 Music center and speaker connections Connecting the Acoustimass® module to the Lifestyle® music center Connect the Acoustimass module to the music center with the audio input cable...
Owner's guide
Page 13
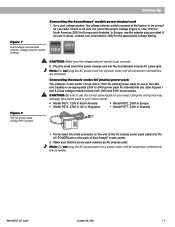
... area. AM196575_05_V.pdf October 29, 2001 11 Check to be sure it is set for Europe and Australia. Plug the small end of the Lifestyle® music center. 2. Firmly insert the small connector on the end of the AC (mains) power pack cable into the AC POWER jack...120V and 230V power packs. Note: Do not plug the AC power cord into a power outlet until all component connections are complete. Figure 7 Dual voltage Acoustimass module: voltage selector switch settings 230 V 115 V Figure 8 The AC power pack (model PS71 shown) CAUTION: Make sure the voltage selector switch is...
... area. AM196575_05_V.pdf October 29, 2001 11 Check to be sure it is set for Europe and Australia. Plug the small end of the Lifestyle® music center. 2. Firmly insert the small connector on the end of the AC (mains) power pack cable into the AC POWER jack...120V and 230V power packs. Note: Do not plug the AC power cord into a power outlet until all component connections are complete. Figure 7 Dual voltage Acoustimass module: voltage selector switch settings 230 V 115 V Figure 8 The AC power pack (model PS71 shown) CAUTION: Make sure the voltage selector switch is...

Owner's guide
Page 18
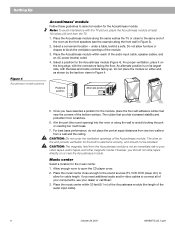
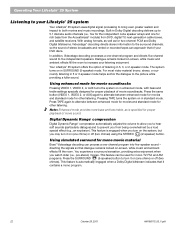
Antennas provide better reception when their wires are not bundled. Plug the AM antenna connector into the FM ANTENNA jack on the back of the Lifestyle® music center. 2. CAUTION: Be certain that the installation includes a signal splitter so that filters the signal to prevent any re-emissions..., following the instructions enclosed with the orientation of the system. The connection is transmitted to the FM signal available from the Acoustimass® module. Spread out the antenna arms. Experiment with the music center antenna connections. Experiment with the antenna. 3.
Antennas provide better reception when their wires are not bundled. Plug the AM antenna connector into the FM ANTENNA jack on the back of the Lifestyle® music center. 2. CAUTION: Be certain that the installation includes a signal splitter so that filters the signal to prevent any re-emissions..., following the instructions enclosed with the orientation of the system. The connection is transmitted to the FM signal available from the Acoustimass® module. Spread out the antenna arms. Experiment with the music center antenna connections. Experiment with the antenna. 3.

Owner's guide
Page 20
Note: If your new Lifestyle® system. The music center display This music center display (Figure 17) provides information on the music center Plug the Acoustimass® module power cord into an AC (mains) outlet. Figure 17 The music center display Zone 1 or 2 indicator ... Source indicators Mute indicator Random play all cable and power connections are ready to prevent a neighbor's Lifestyle® remote control or your system setup. Operating Your Lifestyle® 25 System Turning on the music center functions. Figure 16 Opening the music center door Note: Your speakers...
Note: If your new Lifestyle® system. The music center display This music center display (Figure 17) provides information on the music center Plug the Acoustimass® module power cord into an AC (mains) outlet. Figure 17 The music center display Zone 1 or 2 indicator ... Source indicators Mute indicator Random play all cable and power connections are ready to prevent a neighbor's Lifestyle® remote control or your system setup. Operating Your Lifestyle® 25 System Turning on the music center functions. Figure 16 Opening the music center door Note: Your speakers...
Owner's guide
Page 24
...25 system Your Lifestyle® 25 system uses digital signal processing to bring even greater realism and impact to both movies and music recordings. directing the signals so that dialogue remains locked on in SURROUND (5-speaker) mode. Built-in enhanced mode, with bass and treble settings specially designed for mono movie material Bose...® Videostage decoding can approach that it on (one -channel program and directs five-channel sound to five independent speakers. This feature is specified for rich bass from the Acoustimass® module) from ...
...25 system Your Lifestyle® 25 system uses digital signal processing to bring even greater realism and impact to both movies and music recordings. directing the signals so that dialogue remains locked on in SURROUND (5-speaker) mode. Built-in enhanced mode, with bass and treble settings specially designed for mono movie material Bose...® Videostage decoding can approach that it on (one -channel program and directs five-channel sound to five independent speakers. This feature is specified for rich bass from the Acoustimass® module) from ...

Owner's guide
Page 31
Adjusting speaker controls The Lifestyle® 25 system TREBLE and BASS controls are in volume, since Bose® patented signal processing technology provides a natural tonal balance over...a lot of the TREBLE and BASS controls. Moving speakers farther away from the corner will increase bass. Acoustimass module placement affects the amount of treble or bass. Compensating for changes in the 12 o'clock position. In... setting, the dots on each control are located on the Acoustimass® module (Figure 27). Maintaining Your Lifestyle® 25 System Fine-tuning your system.
Adjusting speaker controls The Lifestyle® 25 system TREBLE and BASS controls are in volume, since Bose® patented signal processing technology provides a natural tonal balance over...a lot of the TREBLE and BASS controls. Moving speakers farther away from the corner will increase bass. Acoustimass module placement affects the amount of treble or bass. Compensating for changes in the 12 o'clock position. In... setting, the dots on each control are located on the Acoustimass® module (Figure 27). Maintaining Your Lifestyle® 25 System Fine-tuning your system.
Owner's guide
Page 32
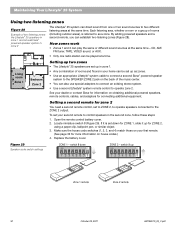
... speakers and a second remote, you can play the same or different sound sources at the same time - See your dealer or contact Bose for information on house codes.) 4. Replace the battery cover. Figure 29 Speaker code switch settings ZONE 1 - Locate miniature switch 8 (... 2, using a paper clip, ballpoint pen, or similar object. 3. Maintaining Your Lifestyle® 25 System Using two listening zones Figure 28 Example of two listening zones: the Lifestyle® 25 speakers in zone 1 and Acoustimass® powered speaker system in your home can be played at a time. Living...
... speakers and a second remote, you can play the same or different sound sources at the same time - See your dealer or contact Bose for information on house codes.) 4. Replace the battery cover. Figure 29 Speaker code switch settings ZONE 1 - Locate miniature switch 8 (... 2, using a paper clip, ballpoint pen, or similar object. 3. Maintaining Your Lifestyle® 25 System Using two listening zones Figure 28 Example of two listening zones: the Lifestyle® 25 speakers in zone 1 and Acoustimass® powered speaker system in your home can be played at a time. Living...
Owner's guide
Page 36
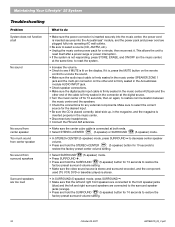
... right front speakers are connected to the front speaker jacks (blue) and the left and right surround speakers are plugged fully into the Acoustimass® module, and the power pack and power cord are connected to the surround speaker jacks (orange). • Press and hold ...laserdisc player) is lit on the display. STEREO+CENTER SURROUND • In STEREO+CENTER (3-speaker) mode, press SURROUND - Maintaining Your Lifestyle® 25 System Troubleshooting Problem System does not function at all No sound No sound from center speaker Too much sound from center speaker No sound from...
... right front speakers are connected to the front speaker jacks (blue) and the left and right surround speakers are plugged fully into the Acoustimass® module, and the power pack and power cord are connected to the surround speaker jacks (orange). • Press and hold ...laserdisc player) is lit on the display. STEREO+CENTER SURROUND • In STEREO+CENTER (3-speaker) mode, press SURROUND - Maintaining Your Lifestyle® 25 System Troubleshooting Problem System does not function at all No sound No sound from center speaker Too much sound from center speaker No sound from...
Owner's guide
Page 38
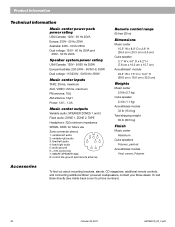
...: ZONE 1, ZONE 2, TAPE Headphone: 32Ω minimum impedance SERIAL DATA: for phone numbers). 36 October 29, 2001 AM196575_05_V.pdf Or call Bose directly (see inside back cover for future use Zone connector pinout: 1: variable left audio 876 2: variable right audio 3: fixed left audio 5 ...20 m) Dimensions Music center 15.5" W x 8.0" D x 2.6" H (39.4 cm x 20.3 cm x 6.6 cm) Cube speaker 3.1" W x 4.0" D x 6.2" H (7.8 cm x 10.2 cm x 15.7 cm) Acoustimass® module 23.3" W x 7.5" D x 14.0" H (59.0 cm x 19.0 cm x 35.5 cm) Weights Music center 5.9 lb (2.7 kg) Cube speaker 2.4 lb (1.1 kg...
...: ZONE 1, ZONE 2, TAPE Headphone: 32Ω minimum impedance SERIAL DATA: for phone numbers). 36 October 29, 2001 AM196575_05_V.pdf Or call Bose directly (see inside back cover for future use Zone connector pinout: 1: variable left audio 876 2: variable right audio 3: fixed left audio 5 ...20 m) Dimensions Music center 15.5" W x 8.0" D x 2.6" H (39.4 cm x 20.3 cm x 6.6 cm) Cube speaker 3.1" W x 4.0" D x 6.2" H (7.8 cm x 10.2 cm x 15.7 cm) Acoustimass® module 23.3" W x 7.5" D x 14.0" H (59.0 cm x 19.0 cm x 35.5 cm) Weights Music center 5.9 lb (2.7 kg) Cube speaker 2.4 lb (1.1 kg...


