
The Bose® Lifestyle® amplifier - Owner's guide
Page 5
...-up the remote control 10 Setting Zone 2 Protocol 10 Connecting the Lifestyle® stereo amplifier to a Model 20 music center 11 Connecting the Lifestyle® stereo amplifier to a Model 5 music center 13 Connecting speakers to your Lifestyle® stereo amplifier 14 Checking to see if you keep your Lifestyle® stereo amplifier. AM262840_00_V.pdf January 4, 2002 3
...-up the remote control 10 Setting Zone 2 Protocol 10 Connecting the Lifestyle® stereo amplifier to a Model 20 music center 11 Connecting the Lifestyle® stereo amplifier to a Model 5 music center 13 Connecting speakers to your Lifestyle® stereo amplifier 14 Checking to see if you keep your Lifestyle® stereo amplifier. AM262840_00_V.pdf January 4, 2002 3

The Bose® Lifestyle® amplifier - Owner's guide
Page 9
...Insert the white RCA piggyback connector of the amplifier. Figure 6 Cable connections between a multi-room interface and the Lifestyle® stereo amplifier Lifestyle® stereo amplifier rear panel Multi-room interface rear panel 4 Ω MINIMUM LL R L SYSTEM RR CONTROL... (left) INPUT jack. Setting Up Your Lifestyle® Stereo Amplifier Connecting the Lifestyle® stereo amplifier to a multi-room interface CAUTION: Before making any connections, turn the Lifestyle® system off and disconnect the music center from the AC (mains) power outlet. ...
...Insert the white RCA piggyback connector of the amplifier. Figure 6 Cable connections between a multi-room interface and the Lifestyle® stereo amplifier Lifestyle® stereo amplifier rear panel Multi-room interface rear panel 4 Ω MINIMUM LL R L SYSTEM RR CONTROL... (left) INPUT jack. Setting Up Your Lifestyle® Stereo Amplifier Connecting the Lifestyle® stereo amplifier to a multi-room interface CAUTION: Before making any connections, turn the Lifestyle® system off and disconnect the music center from the AC (mains) power outlet. ...

The Bose® Lifestyle® amplifier - Owner's guide
Page 10
...more information on operating your system in more rooms are connected to your system, the Personal music center displays ROOM and HOUSE buttons, and room indicators (A, B, C, and/or D). Setting Up Your Lifestyle® Stereo Amplifier Figure 7 Sample display for a tworoom system Operating speakers in individual rooms...by the Personal music center which requires no internal switch settings before it allows you to control more than one -room system). Note: Refer to your Lifestyle® system owner's guide for a two-room system. If two or more than one room of Bose® powered ...
...more information on operating your system in more rooms are connected to your system, the Personal music center displays ROOM and HOUSE buttons, and room indicators (A, B, C, and/or D). Setting Up Your Lifestyle® Stereo Amplifier Figure 7 Sample display for a tworoom system Operating speakers in individual rooms...by the Personal music center which requires no internal switch settings before it allows you to control more than one -room system). Note: Refer to your Lifestyle® system owner's guide for a two-room system. If two or more than one room of Bose® powered ...

The Bose® Lifestyle® amplifier - Owner's guide
Page 13
... panel 30-ft audio input cable (supplied) AM262840_00_V.pdf January 4, 2002 11 Setting Up Your Lifestyle® Stereo Amplifier Connecting the Lifestyle® stereo amplifier to a Model 20 music center ® Figure 10 Cable connections between the Model 20 music center and the Lifestyle® stereo amplifier CAUTION: Before making connections, turn the...
... panel 30-ft audio input cable (supplied) AM262840_00_V.pdf January 4, 2002 11 Setting Up Your Lifestyle® Stereo Amplifier Connecting the Lifestyle® stereo amplifier to a Model 20 music center ® Figure 10 Cable connections between the Model 20 music center and the Lifestyle® stereo amplifier CAUTION: Before making connections, turn the...

The Bose® Lifestyle® amplifier - Owner's guide
Page 14
Note: Refer to operate the ZONE 2 outputs. 1. ON K40 l 2345678 12 January 4, 2002 AM262840_00_V.pdf Setting Up Your Lifestyle® Stereo Amplifier Figure 11 Setting up a Zone 2 remote control Setting up the RC-20 remote control for more than one room. Make ...cover and locate the miniature switches (Figure 11). 2. Slide switch 5 down (off), and switches 6 and 8 up a second RC-20 remote control to your Lifestyle® system owner's guide for Zone 2 If your system uses a Model 20 music center, you need to set up (on operating your system in your first remote. 3.
Note: Refer to operate the ZONE 2 outputs. 1. ON K40 l 2345678 12 January 4, 2002 AM262840_00_V.pdf Setting Up Your Lifestyle® Stereo Amplifier Figure 11 Setting up a Zone 2 remote control Setting up the RC-20 remote control for more than one room. Make ...cover and locate the miniature switches (Figure 11). 2. Slide switch 5 down (off), and switches 6 and 8 up a second RC-20 remote control to your Lifestyle® system owner's guide for Zone 2 If your system uses a Model 20 music center, you need to set up (on operating your system in your first remote. 3.

The Bose® Lifestyle® amplifier - Owner's guide
Page 15
... cable into the SYSTEM CONTROL 2 jack on the rear panel of the music center. Figure 12 Cable connections between the Model 5 music center and the Lifestyle® stereo amplifier Model 5 music center rear panel Lifestyle® stereo amplifier rear panel 4 Ω MINIMUM LL LL...connector of the amplifier (Figure 12). 2. Setting Up Your Lifestyle® Stereo Amplifier Connecting the Lifestyle® stereo amplifier to a Model 5 music center In systems using a Model 5 music center, home theater speakers are connected to the FIXED OUTPUT jacks on the ...
... cable into the SYSTEM CONTROL 2 jack on the rear panel of the music center. Figure 12 Cable connections between the Model 5 music center and the Lifestyle® stereo amplifier Model 5 music center rear panel Lifestyle® stereo amplifier rear panel 4 Ω MINIMUM LL LL...connector of the amplifier (Figure 12). 2. Setting Up Your Lifestyle® Stereo Amplifier Connecting the Lifestyle® stereo amplifier to a Model 5 music center In systems using a Model 5 music center, home theater speakers are connected to the FIXED OUTPUT jacks on the ...

The Bose® Lifestyle® amplifier - Owner's guide
Page 16
... remote. 3. Speaker cable consists of any make or model, nor to any amplified music sources. Press the red terminal tab. ON K40 l 2345678 Connecting speakers to your Lifestyle® stereo amplifier. 1. The plain wire should be connected to the negative (- ...) attaches to the cable connected to the L output. Setting Up Your Lifestyle® Stereo Amplifier ® Figure 13 RC-5 remote switch settings Setting up the RC-5 remote control If your system uses a Model 5 music center, you face it should always be connected to the positive (+ or red)...
... remote. 3. Speaker cable consists of any make or model, nor to any amplified music sources. Press the red terminal tab. ON K40 l 2345678 Connecting speakers to your Lifestyle® stereo amplifier. 1. The plain wire should be connected to the negative (- ...) attaches to the cable connected to the L output. Setting Up Your Lifestyle® Stereo Amplifier ® Figure 13 RC-5 remote switch settings Setting up the RC-5 remote control If your system uses a Model 5 music center, you face it should always be connected to the positive (+ or red)...

The Bose® Lifestyle® amplifier - Owner's guide
Page 17
... voltage units have a voltage selection switch on the rear panel of the Lifestyle® stereo amplifier and your Lifestyle® music system to an AC (mains) outlet. 3. Using the power cord included with your Personal® music center or your new remote control and adjust the vol- 115 V Setting Up... Your Lifestyle® Stereo Amplifier Checking to see if your unit has this switch. • This switch is a power switch ...
... voltage units have a voltage selection switch on the rear panel of the Lifestyle® stereo amplifier and your Lifestyle® music system to an AC (mains) outlet. 3. Using the power cord included with your Personal® music center or your new remote control and adjust the vol- 115 V Setting Up... Your Lifestyle® Stereo Amplifier Checking to see if your unit has this switch. • This switch is a power switch ...

The Bose® Lifestyle® amplifier - Owner's guide
Page 18
...Bose Customer Service. Do not allow liquids to the piggyback jacks on the audio input cable.) • Disconnect any openings. Check the caulking annually, and re-apply as RTV adhesive, to protect speaker wire connections. Troubleshooting If you do Neither speaker plays • Make sure the Lifestyle® music center... and the amplifier are plugged in working order. • Be sure a music source is especially true of the speaker wire can be connected to spill...
...Bose Customer Service. Do not allow liquids to the piggyback jacks on the audio input cable.) • Disconnect any openings. Check the caulking annually, and re-apply as RTV adhesive, to protect speaker wire connections. Troubleshooting If you do Neither speaker plays • Make sure the Lifestyle® music center... and the amplifier are plugged in working order. • Be sure a music source is especially true of the speaker wire can be connected to spill...

Owner's guide
Page 2
... under license from Dolby Laboratories. Class 1 laser product This compact disc player is classified as marked on the back panel and bottom of your Lifestyle® music center and the bottom panel of important operating and maintenance instructions in hazardous radiation exposure. CAUTION: Use of controls or adjustments or performance of used batteries...
... under license from Dolby Laboratories. Class 1 laser product This compact disc player is classified as marked on the back panel and bottom of your Lifestyle® music center and the bottom panel of important operating and maintenance instructions in hazardous radiation exposure. CAUTION: Use of controls or adjustments or performance of used batteries...
Owner's guide
Page 5
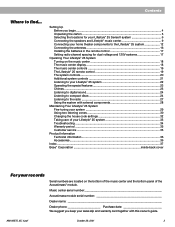
... ...36 Index ...37 Bose® Corporation inside back cover For your Lifestyle® 25 system 22 Operating the special features 23 Chimes ...23 Listening to digital sound 24 Listening to compact discs 24 Listening to find... Music center serial number Acoustimass module ... you begin ...4 Unpacking the carton 5 Selecting the locations for your Lifestyle® 25 Series II system 6 Connecting the speakers and Lifestyle® music center 9 Connecting your home theater components to the Lifestyle® 25 system 12 Connecting the antennas 16 Installing the batteries in the remote ...
... ...36 Index ...37 Bose® Corporation inside back cover For your Lifestyle® 25 system 22 Operating the special features 23 Chimes ...23 Listening to digital sound 24 Listening to compact discs 24 Listening to find... Music center serial number Acoustimass module ... you begin ...4 Unpacking the carton 5 Selecting the locations for your Lifestyle® 25 Series II system 6 Connecting the speakers and Lifestyle® music center 9 Connecting your home theater components to the Lifestyle® 25 system 12 Connecting the antennas 16 Installing the batteries in the remote ...
Owner's guide
Page 6
...Dolby Digital bitstreams, and helps to -use remote control Realism and impact Your Lifestyle® 25 Series II home theater system is fully compatible with digital program material and includes: • A Lifestyle® music center with an all new Videostage® decoder that of your home. Videostage ...the volume level. (See pages 22-23.) 4 October 29, 2001 AM196575_05_V.pdf it eliminates the need for purchasing the Bose® Lifestyle® 25 Series II system. up to five independent speakers. Setting Up Before you begin Thank you for you from TV, FM, CD, ...
...Dolby Digital bitstreams, and helps to -use remote control Realism and impact Your Lifestyle® 25 Series II home theater system is fully compatible with digital program material and includes: • A Lifestyle® music center with an all new Videostage® decoder that of your home. Videostage ...the volume level. (See pages 22-23.) 4 October 29, 2001 AM196575_05_V.pdf it eliminates the need for purchasing the Bose® Lifestyle® 25 Series II system. up to five independent speakers. Setting Up Before you begin Thank you for you from TV, FM, CD, ...
Owner's guide
Page 7
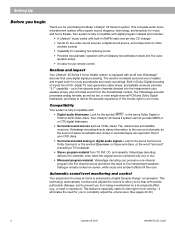
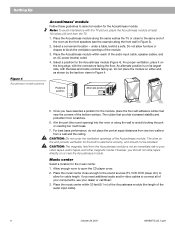
... Bose dealer immediately. Note: Find the serial numbers on the bottom panel of the Acoustimass® module and the bottom of the music center are removed before turning on the bottom of the music center. Use good lifting practice to transport your Lifestyle® 25 system contains the parts identified in the spaces provided on your Lifestyle® 25 Series II...
... Bose dealer immediately. Note: Find the serial numbers on the bottom panel of the Acoustimass® module and the bottom of the music center are removed before turning on the bottom of the music center. Use good lifting practice to transport your Lifestyle® 25 system contains the parts identified in the spaces provided on your Lifestyle® 25 Series II...
Owner's guide
Page 10
... openings of the module. 3. If you need additional audio and/or video cables to your dealer or call Bose®. 3. under a table, behind a sofa. Select a position for the music center. 1. An alternate position is not an immediate risk to connect all of the audio input cable). 8 October...your video tapes, audio tapes, and other magnetic media. The slots on the long edge, with the connectors facing the floor. Place the music center close to avoid blocking the port or creating too much bass. 7. Select a convenient location - Do not allow for the Acoustimass module. ...
... openings of the module. 3. If you need additional audio and/or video cables to your dealer or call Bose®. 3. under a table, behind a sofa. Select a position for the music center. 1. An alternate position is not an immediate risk to connect all of the audio input cable). 8 October...your video tapes, audio tapes, and other magnetic media. The slots on the long edge, with the connectors facing the floor. Place the music center close to avoid blocking the port or creating too much bass. 7. Select a convenient location - Do not allow for the Acoustimass module. ...
Owner's guide
Page 11
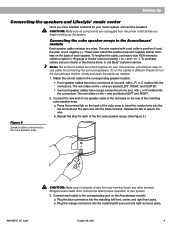
... of the cube array to + and - b. The wire marked with a red collar is negative (-). To purchase cables, see your music system, connect the speakers. Plug the blue connectors into the connectors. Connecting the cube speaker arrays to -). These wires match the positive ...9 CAUTION: Make sure all components are joined together for your dealer or electronics store, or call Bose® customer service. Setting Up Connecting the speakers and Lifestyle® music center Once you begin hooking up the system. to the Acoustimass® module Each speaker cable contains two...
... of the cube array to + and - b. The wire marked with a red collar is negative (-). To purchase cables, see your music system, connect the speakers. Plug the blue connectors into the connectors. Connecting the cube speaker arrays to -). These wires match the positive ...9 CAUTION: Make sure all components are joined together for your dealer or electronics store, or call Bose® customer service. Setting Up Connecting the speakers and Lifestyle® music center Once you begin hooking up the system. to the Acoustimass® module Each speaker cable contains two...
Owner's guide
Page 12
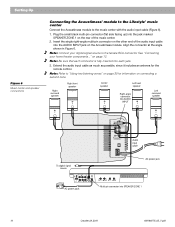
... speaker connections Connecting the Acoustimass® module to the Lifestyle® music center Connect the Acoustimass module to the female RCA connector. Align the connector at the angle shown in Figure 6. Note: Be sure that each connector is ... L TAPE IN RL R TAPE OUT Multi-pin connector into each jack. 3. Insert the single right-angle multi-pin connector on the other end of the music center. 2. Extend the audio input cable as much as possible, since it includes an antenna for information on page 30 for the remote control. Note: Refer...
... speaker connections Connecting the Acoustimass® module to the Lifestyle® music center Connect the Acoustimass module to the female RCA connector. Align the connector at the angle shown in Figure 6. Note: Be sure that each connector is ... L TAPE IN RL R TAPE OUT Multi-pin connector into each jack. 3. Insert the single right-angle multi-pin connector on the other end of the music center. 2. Extend the audio input cable as much as possible, since it includes an antenna for information on page 30 for the remote control. Note: Refer...
Owner's guide
Page 13
... the back of the AC (mains) power pack cable into the Acoustimass module AC power jack. Connecting the music center AC (mains) power pack The Lifestyle® music center comes with a 120V AC (mains) power pack for your music center. • Model PS71, 120V in North America • Model PS74, 230V in UK or Singapore • Model..., the voltage selector switch is preset at the factory to use the adapter plug provided. Firmly insert the small connector on the end of the Lifestyle® music center. 2.
... the back of the AC (mains) power pack cable into the Acoustimass module AC power jack. Connecting the music center AC (mains) power pack The Lifestyle® music center comes with a 120V AC (mains) power pack for your music center. • Model PS71, 120V in North America • Model PS74, 230V in UK or Singapore • Model..., the voltage selector switch is preset at the factory to use the adapter plug provided. Firmly insert the small connector on the end of the Lifestyle® music center. 2.
Owner's guide
Page 14
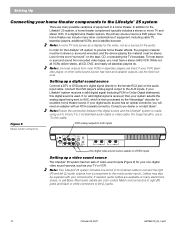
... can include many electronics stores, or call Bose. To hear stereo or surround sound from a component to the music center inputs. While not all VCRs deliver stereo, all CD, DVD, and nearly all laserdisc players do. Connect the DVD player's analog signal output to the Lifestyle® 25 system, a home theater complement typically includes a stereo...
... can include many electronics stores, or call Bose. To hear stereo or surround sound from a component to the music center inputs. While not all VCRs deliver stereo, all CD, DVD, and nearly all laserdisc players do. Connect the DVD player's analog signal output to the Lifestyle® 25 system, a home theater complement typically includes a stereo...
Owner's guide
Page 15
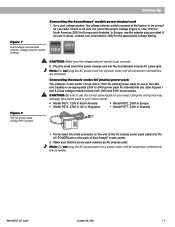
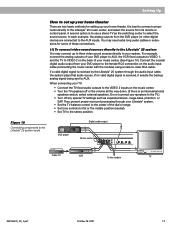
... is to your home theater. If a valid digital signal is received by the Lifestyle® 25 system through your Lifestyle® system. • Set the TV balance control to the center of your music center. (See Figure 10.) Connect the coaxial digital audio output from your TV: &#...other digital device) are two basic methods for some of these connections. (1) To connect video sound sources directly to the Lifestyle® 25 system inputs DVD player Digital audio output L R V Music center Cable TV L TAPE IN RL R TAPE OUT L L R R V VCR To the module TV AM196575_05_V.pdf ...
... is to your home theater. If a valid digital signal is received by the Lifestyle® 25 system through your Lifestyle® system. • Set the TV balance control to the center of your music center. (See Figure 10.) Connect the coaxial digital audio output from your TV: &#...other digital device) are two basic methods for some of these connections. (1) To connect video sound sources directly to the Lifestyle® 25 system inputs DVD player Digital audio output L R V Music center Cable TV L TAPE IN RL R TAPE OUT L L R R V VCR To the module TV AM196575_05_V.pdf ...
Owner's guide
Page 16
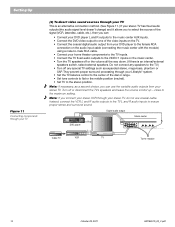
...stereo TV, do not use the variable audio outputs from your DVD player to the female RCA connection on the audio input cable (connecting the music center with the module) using a male-to-male RCA cable. • Connect your home theater components to the TV inputs. • Connect ... output from your stereo TV. Note: If you connect your stereo VCR through your Lifestyle® system. • Set the TV balance control to the stereo position. Cable TV LR V DVD player L R V VCR Digital audio output Music center Music center L TAPE IN RL R TAPE OUT L R TV To the module 14 October 29...
...stereo TV, do not use the variable audio outputs from your DVD player to the female RCA connection on the audio input cable (connecting the music center with the module) using a male-to-male RCA cable. • Connect your home theater components to the TV inputs. • Connect ... output from your stereo TV. Note: If you connect your stereo VCR through your Lifestyle® system. • Set the TV balance control to the stereo position. Cable TV LR V DVD player L R V VCR Digital audio output Music center Music center L TAPE IN RL R TAPE OUT L R TV To the module 14 October 29...


