
Owner's guide
Page 1
Bose Acoustimass' 700 Home Theater Speaker System Owner's Guide __SEISE" • •
Bose Acoustimass' 700 Home Theater Speaker System Owner's Guide __SEISE" • •

Owner's guide
Page 2
... Thank you Thank you for full listening enjoyment. Acoustimass module serial number: Surround speaker DOM: Dealer name: Dealer phone: Purchase date: We suggest you keep your sales slip and warranty card together with much larger speakers. Quality construction, advanced technologies, and convenience make the Acoustimass 700 speaker system a superior choice for choosing the Bose' Acoustimass* 700 home theater speaker system.
... Thank you Thank you for full listening enjoyment. Acoustimass module serial number: Surround speaker DOM: Dealer name: Dealer phone: Purchase date: We suggest you keep your sales slip and warranty card together with much larger speakers. Quality construction, advanced technologies, and convenience make the Acoustimass 700 speaker system a superior choice for choosing the Bose' Acoustimass* 700 home theater speaker system.

Owner's guide
Page 3
... Pro-Logic receiver Setting your Dolby Digital (AC-3) receiver Bass and treble adjustments Maintaining Your Acoustimass 700 speakers How to clean your speakers Troubleshooting problems • Customer Service Product Information Warranty period Technical information Accessories Appendix To mount surround sound speakers Bose Corporation 4 4 5 6 8 9 9 10 11 12 12 13 13 14 14 15 16 16 16 inside...
... Pro-Logic receiver Setting your Dolby Digital (AC-3) receiver Bass and treble adjustments Maintaining Your Acoustimass 700 speakers How to clean your speakers Troubleshooting problems • Customer Service Product Information Warranty period Technical information Accessories Appendix To mount surround sound speakers Bose Corporation 4 4 5 6 8 9 9 10 11 12 12 13 13 14 14 15 16 16 16 inside...

Owner's guide
Page 4
... sound mix varies with Dolby Digital (also known as AC3) receivers and program material. Simply adjust your authorized Bose dealer immediately. Unpack the carton • Remove any of the terms Surround, Dolby* Surround, the double-D symbol EnCaBY I on your Acoustimass 700 speakers, you can also enjoy a wide variety of stereo programming that wrap these...
... sound mix varies with Dolby Digital (also known as AC3) receivers and program material. Simply adjust your authorized Bose dealer immediately. Unpack the carton • Remove any of the terms Surround, Dolby* Surround, the double-D symbol EnCaBY I on your Acoustimass 700 speakers, you can also enjoy a wide variety of stereo programming that wrap these...

Owner's guide
Page 5
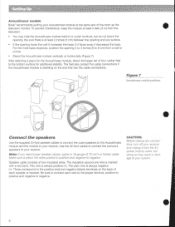
... your screen, but at least 2 feet (.6 m) from directly behind curtains or under furniture. Setting Up Placing your Acoustimass" 700 speakers to achieve (realistic home theater sound Bose designed your Acoustimass 700 home theater speakers to come from the center speaker should seem to provide high performance and flexibility. That means you to come from within the picture. Sound...
... your screen, but at least 2 feet (.6 m) from directly behind curtains or under furniture. Setting Up Placing your Acoustimass" 700 speakers to achieve (realistic home theater sound Bose designed your Acoustimass 700 home theater speakers to come from the center speaker should seem to provide high performance and flexibility. That means you to come from within the picture. Sound...

Owner's guide
Page 6
... give you face the TV connects to the LEFT FRONT output jack on the Acoustimass module. Refer to achieve an accurate left as close to read all of your television. Bose' wall brackets and floor stands can also place them in a line above ,... choices for lett and • right front speaker placement I Center cube speaker array Figure 4 shows suggested ways to the bracket instructions in line with your Acoustimass- 700 system allow for center speaker placement I dig • 2 6 Do not connect the speakers before looking over those instructions. See "Accessories"...
... give you face the TV connects to the LEFT FRONT output jack on the Acoustimass module. Refer to achieve an accurate left as close to read all of your television. Bose' wall brackets and floor stands can also place them in a line above ,... choices for lett and • right front speaker placement I Center cube speaker array Figure 4 shows suggested ways to the bracket instructions in line with your Acoustimass- 700 system allow for center speaker placement I dig • 2 6 Do not connect the speakers before looking over those instructions. See "Accessories"...

Owner's guide
Page 7
...the bracket screw using brackets, apply the rubber feet to the bottom surface of side walls. • Place both speakers at the same height. • Keep these speakers at least 2 feet (.6 m) from the bottom on the wall or ceiling in horizontal or vertical position O Self.... CAUTION: The bracket screw must be sure their position allows for surround speaker placement 3 3 • Securing the speakers Supplied brackets allow you stand the speakers vertically or horizontally without using a screw driver. The speakers are behind the general viewing area, along the rear wall or to the...
...the bracket screw using brackets, apply the rubber feet to the bottom surface of side walls. • Place both speakers at the same height. • Keep these speakers at least 2 feet (.6 m) from the bottom on the wall or ceiling in horizontal or vertical position O Self.... CAUTION: The bracket screw must be sure their position allows for surround speaker placement 3 3 • Securing the speakers Supplied brackets allow you stand the speakers vertically or horizontally without using a screw driver. The speakers are behind the general viewing area, along the rear wall or to the...
Owner's guide
Page 8
... the wires positive to positive and negative to the bottom surface for the Acoustimass module, attach the larger set of two insulated wires. SettingUp Acoustimass' module Bose' recommends putting your receiver. Use the 50-foot cables to connect the surround speakers to negative. For the most bass response. To prevent interference, keep the module...
... the wires positive to positive and negative to the bottom surface for the Acoustimass module, attach the larger set of two insulated wires. SettingUp Acoustimass' module Bose' recommends putting your receiver. Use the 50-foot cables to connect the surround speakers to negative. For the most bass response. To prevent interference, keep the module...

Owner's guide
Page 9
... the receiver. Repeat 1 and 2 to connect the cable from the other end to the RIGHT OUTPUT TO CUBE SPEAKERS terminals on the Acoustimasse module (see Figure 10 on your receiver. 3. Setting Up Cube speakers it or each connection to the cube speakers, push the terminal tab down and insert the ppropriate wire into surround...
... the receiver. Repeat 1 and 2 to connect the cable from the other end to the RIGHT OUTPUT TO CUBE SPEAKERS terminals on the Acoustimasse module (see Figure 10 on your receiver. 3. Setting Up Cube speakers it or each connection to the cube speakers, push the terminal tab down and insert the ppropriate wire into surround...

Owner's guide
Page 10
Out of phase wiring can cause total loss of the Acoustimass module. Connect the other end to the LEFT FRONT SPEAKER outputs on your receiver. If there are usually labeled Speakers A and Speakers B. Your receiver may have more than one is designated for a particular ohm rating...channelis not amplified, you must connect an amplifier to the RCA-type input on the wires, floor scratches, and speaker movement. 10 Then connect the Acoustimass module directly to the amplifier, instead of your receiver. 3. Setting Up Acoustimast module Pay careful attention to connecting all...
Out of phase wiring can cause total loss of the Acoustimass module. Connect the other end to the LEFT FRONT SPEAKER outputs on your receiver. If there are usually labeled Speakers A and Speakers B. Your receiver may have more than one is designated for a particular ohm rating...channelis not amplified, you must connect an amplifier to the RCA-type input on the wires, floor scratches, and speaker movement. 10 Then connect the Acoustimass module directly to the amplifier, instead of your receiver. 3. Setting Up Acoustimast module Pay careful attention to connecting all...

Owner's guide
Page 11
... (in and turn it on. 11 • Front speaker ca. Center speaker Front speaker Setting Up Figure 10 Completed Acoustimase 700 speaker connections Acoustimass' module Front speaker • outputs Center and surround speaker outputs PK PrA EA SV ,.tr A 1 71O el Surround sound receiver Surround speaker 3 1/ Surround speaker Check connections Check all speakers are connected to the proper terminals according to...
... (in and turn it on. 11 • Front speaker ca. Center speaker Front speaker Setting Up Figure 10 Completed Acoustimase 700 speaker connections Acoustimass' module Front speaker • outputs Center and surround speaker outputs PK PrA EA SV ,.tr A 1 71O el Surround sound receiver Surround speaker 3 1/ Surround speaker Check connections Check all speakers are connected to the proper terminals according to...

Owner's guide
Page 12
...channel sound is on NORMAL (Figure 11). NORNIRL o 00 b = ,M 1.1 10 0 Figure 11 A receiver set for the front, center and surround speakers at your AN component. Setting yourDolbyPro-Logic receiver You must set volume levels. For use in the following order: Left, Center, Right, Surround. • ... can adjust these steps: • Press test tone ON at the receiver or with the remote control. YourAcoustinuass -700*ms/ceps For realistic home theater sound Each speaker produces only the sound directed to it does, follow these levels at the remote. • Set the volume for...
...channel sound is on NORMAL (Figure 11). NORNIRL o 00 b = ,M 1.1 10 0 Figure 11 A receiver set for the front, center and surround speakers at your AN component. Setting yourDolbyPro-Logic receiver You must set volume levels. For use in the following order: Left, Center, Right, Surround. • ... can adjust these steps: • Press test tone ON at the receiver or with the remote control. YourAcoustinuass -700*ms/ceps For realistic home theater sound Each speaker produces only the sound directed to it does, follow these levels at the remote. • Set the volume for...

Owner's guide
Page 13
... and hard surface furniture can use the bass and treble controls on your speaker system sound too shrill. After listening to your speaker system sound too deep. Speaker Setting at receiver Left and Right Front LARGE Center SMALL Left and Right ...special care to set the channel output according to adjust the balance of these speakers is particularly important for accurate surround sound performance. Using Your Acoustimasse 700 Speakers Setting yourDolbyDigital(AC-3)receiver Your Acoustimass' 700 speakers are compatible with the output from Dolby Digital (AC-3) receivers.
... and hard surface furniture can use the bass and treble controls on your speaker system sound too shrill. After listening to your speaker system sound too deep. Speaker Setting at receiver Left and Right Front LARGE Center SMALL Left and Right ...special care to set the channel output according to adjust the balance of these speakers is particularly important for accurate surround sound performance. Using Your Acoustimasse 700 Speakers Setting yourDolbyDigital(AC-3)receiver Your Acoustimass' 700 speakers are compatible with the output from Dolby Digital (AC-3) receivers.

Owner's guide
Page 14
...'s manual for surround sound. Not enough or too much bass • Move the Acoustimass module closer to a wall or corner to the receiver. You may not have a problem with your Acoustimass 700 speakers, turn off your receiver has an amplified center channel. • Check connections of ...the cube speaker to the Acoustimass module, and the module to • or both surround "Surround speakers" on the module are not connected to the ...
...'s manual for surround sound. Not enough or too much bass • Move the Acoustimass module closer to a wall or corner to the receiver. You may not have a problem with your Acoustimass 700 speakers, turn off your receiver has an amplified center channel. • Check connections of ...the cube speaker to the Acoustimass module, and the module to • or both surround "Surround speakers" on the module are not connected to the ...

Owner's guide
Page 15
... from the cube speakers does not match the image on the screen What to do • Reduce the output level from limiting input to the receiver. • Turn off any other electronic equipment in solving problems, contact Bose". This will prevent the automatic protection circuitry from your... right as you face the screen is distorted Hum or noise • Check the speaker cable for Bose offices and phone numbers. 15
... from the cube speakers does not match the image on the screen What to do • Reduce the output level from limiting input to the receiver. • Turn off any other electronic equipment in solving problems, contact Bose". This will prevent the automatic protection circuitry from your... right as you face the screen is distorted Hum or noise • Check the speaker cable for Bose offices and phone numbers. 15

Owner's guide
Page 16
• ProductInfo:mation Warranty period Bose" Acoustimass' 700 speakers are covered by a limited 5-year transferable warranty. • Details of the coverage are provided on the warranty card that came with AN receivers rated from 10-200 watts per channel; rated 4 to 8 ohms impedance for front speakers • Compatible with your card (refer to the serial number...
• ProductInfo:mation Warranty period Bose" Acoustimass' 700 speakers are covered by a limited 5-year transferable warranty. • Details of the coverage are provided on the warranty card that came with AN receivers rated from 10-200 watts per channel; rated 4 to 8 ohms impedance for front speakers • Compatible with your card (refer to the serial number...
Owner's guide
Page 17
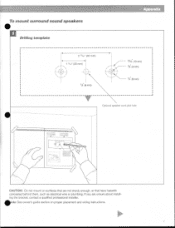
• To mount surroundsound speakers Drilling template r ••• 2 13/64" (60 mm) 1 3/16' (30 mm) / ▪\ 4 1/4 (6mm) Appendix - • -1 I 9/164 (13mm) 1/8- (3 mm) 1/4. (6 mm) yr Optional speaker cord pilot hole MIRSANaSti rldt- CAUTION: Do not mount on proper placement and wiring instructions. If you are not sturdy enough, or that are unsure about installing the bracket, contact a qualified professional installer. r ote: See owner's guide section on surfaces that have hazards concealed behind them, such as electrical wire or plumbing.
• To mount surroundsound speakers Drilling template r ••• 2 13/64" (60 mm) 1 3/16' (30 mm) / ▪\ 4 1/4 (6mm) Appendix - • -1 I 9/164 (13mm) 1/8- (3 mm) 1/4. (6 mm) yr Optional speaker cord pilot hole MIRSANaSti rldt- CAUTION: Do not mount on proper placement and wiring instructions. If you are not sturdy enough, or that are unsure about installing the bracket, contact a qualified professional installer. r ote: See owner's guide section on surfaces that have hazards concealed behind them, such as electrical wire or plumbing.
Owner's guide
Page 18
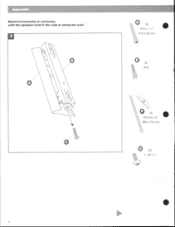
Appendix Mount horizontally or vertically, with the speaker cord in the wall or along the wall. '4 O t or ii (4) • 010 x 1 1," #10 x 40 mm (4) #10 8 (4) • #10-24 x 3" (M5 x 75 mm) e (4) '4-20 x •
Appendix Mount horizontally or vertically, with the speaker cord in the wall or along the wall. '4 O t or ii (4) • 010 x 1 1," #10 x 40 mm (4) #10 8 (4) • #10-24 x 3" (M5 x 75 mm) e (4) '4-20 x •

