Owner's guide
Page 2
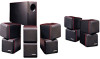
... in accordance with EMC Directive 89/336/EEC and Article 10(1) of the Directive, is located near the connection panel on the Acoustimass module. With these Virtually Invisible® speakers you'll surround yourself with realistic sound, without a lot of the Bose® Acoustimass®-10 home theater speaker system. For your choice of equipment. Introduction...
... in accordance with EMC Directive 89/336/EEC and Article 10(1) of the Directive, is located near the connection panel on the Acoustimass module. With these Virtually Invisible® speakers you'll surround yourself with realistic sound, without a lot of the Bose® Acoustimass®-10 home theater speaker system. For your choice of equipment. Introduction...
Owner's guide
Page 3
... front cube speakers 6 Center cube speaker 6 Surround cube speakers 7 Acoustimass module 7 Connect the speakers 8 Use the cable correctly 8 Connect the Acoustimass module to the center and front cube speakers 9 Connect the Acoustimass module to the surround cube speakers 9 Connect the Acoustimass module to the receiver 9 Check the connections 10 Using Your Acoustimass-10 speakers For realistic home theater sound 11 How to...
... front cube speakers 6 Center cube speaker 6 Surround cube speakers 7 Acoustimass module 7 Connect the speakers 8 Use the cable correctly 8 Connect the Acoustimass module to the center and front cube speakers 9 Connect the Acoustimass module to the surround cube speakers 9 Connect the Acoustimass module to the receiver 9 Check the connections 10 Using Your Acoustimass-10 speakers For realistic home theater sound 11 How to...
Owner's guide
Page 4
... • Owner's Guide * Dolby and the double-D symbol are described on your authorized Bose dealer immediately. The special settings for possible future use them. Simply adjust your Acoustimass-10 speakers. It is not surround-encoded with Dolby AC-3 receivers and program material. To select... opening. • Carefully lift the carton from around the Acoustimass module and packing cushions. • Do not detach the removable cables connected to the Acoustimass module. • If the speakers or the Acoustimass module appear damaged, do not use . Use good lifting practice...
... • Owner's Guide * Dolby and the double-D symbol are described on your authorized Bose dealer immediately. The special settings for possible future use them. Simply adjust your Acoustimass-10 speakers. It is not surround-encoded with Dolby AC-3 receivers and program material. To select... opening. • Carefully lift the carton from around the Acoustimass module and packing cushions. • Do not detach the removable cables connected to the Acoustimass module. • If the speakers or the Acoustimass module appear damaged, do not use . Use good lifting practice...

Owner's guide
Page 6
... This will provide extra stability on surfaces such as you are available, free, by calling the Bose® customer service numbers inside the back cover of this manual. Figure 4 Suggested choices for Part... Number 178321-04. CAUTION: If you face the TV is connected to the vertical center of the screen as 15 feet (5 m) apart. • Place them in ... 1 or 2). Setting Up Select the locations for your speakers The cables provided with your Acoustimass®-10 system vary in length and provide a great deal of flexibility in any way. •...
... This will provide extra stability on surfaces such as you are available, free, by calling the Bose® customer service numbers inside the back cover of this manual. Figure 4 Suggested choices for Part... Number 178321-04. CAUTION: If you face the TV is connected to the vertical center of the screen as 15 feet (5 m) apart. • Place them in ... 1 or 2). Setting Up Select the locations for your speakers The cables provided with your Acoustimass®-10 system vary in length and provide a great deal of flexibility in any way. •...
Owner's guide
Page 7
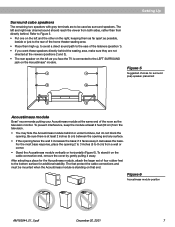
... to the ears of the listeners (position 1). • If you face the TV is connected to the LEFT SURROUND jack on the Acoustimass® module. 1 1 Figure 5 Suggested choices for surround (rear) speaker placement 2 2 3 3 Acoustimass module Bose® recommends putting your Acoustimass module at the same end of four rubber feet to 8 cm) from directly behind...
... to the ears of the listeners (position 1). • If you face the TV is connected to the LEFT SURROUND jack on the Acoustimass® module. 1 1 Figure 5 Suggested choices for surround (rear) speaker placement 2 2 3 3 Acoustimass module Bose® recommends putting your Acoustimass module at the same end of four rubber feet to 8 cm) from directly behind...

Owner's guide
Page 8
... marked LS goes to your receiver or amplifier and unplug it easy for in-wall installation. Always connect the cube speakers to the Acoustimass module, then connect the Acoustimass module to colored RCA connectors. Not doing so may be separated or "unzipped" as much as you... 20, 2001 AM183644_01_V.pdf Call Bose® customer service for cables specifically designed for you to the right surround speaker. The supplied cables are laying out the cable lengths. • The 20 foot (6 m) cable with three pairs of wires connects the Acoustimass module to the center, left...
... marked LS goes to your receiver or amplifier and unplug it easy for in-wall installation. Always connect the cube speakers to the Acoustimass module, then connect the Acoustimass module to colored RCA connectors. Not doing so may be separated or "unzipped" as much as you... 20, 2001 AM183644_01_V.pdf Call Bose® customer service for cables specifically designed for you to the right surround speaker. The supplied cables are laying out the cable lengths. • The 20 foot (6 m) cable with three pairs of wires connects the Acoustimass module to the center, left...

Owner's guide
Page 9
... and R jacks. R wires go to the Right Front SPEAKER OUTPUT connections. LS wires go to the Left Surround (rear) SPEAKER OUTPUT connections. Connect each wire marked with five wire pairs to connect the Acoustimass module to the appropriate red (+) output. Gray connectors go into the...connectors go into the LS and RS OUTPUT TO SPEAKER jacks. AM183644_01_V.pdf December 20, 2001 9 At the Acoustimass module, check to the center and front cube speakers. Connect the Acoustimass module to the receiver Use the 20 foot (6 m) cable with a red collar (+) to your surround sound...
... and R jacks. R wires go to the Right Front SPEAKER OUTPUT connections. LS wires go to the Left Surround (rear) SPEAKER OUTPUT connections. Connect each wire marked with five wire pairs to connect the Acoustimass module to the appropriate red (+) output. Gray connectors go into the...connectors go into the LS and RS OUTPUT TO SPEAKER jacks. AM183644_01_V.pdf December 20, 2001 9 At the Acoustimass module, check to the center and front cube speakers. Connect the Acoustimass module to the receiver Use the 20 foot (6 m) cable with a red collar (+) to your surround sound...

Owner's guide
Page 10
... damage your receiver in and turn it on. to brush against each other; Incorrect wiring can result in a total loss of Acoustimass module output. L C R Figure 9 Completed connections FRONT SPEAKERS R L SURROUND SPEAKERS L REAR R CENTER LS RS OUTPUTS TO CUBE SPEAKERS L C R LS RS LEFT CENTER ...SURROUND INPUTS FROM RECEIVER OR AMPLIFIER L C R LS RS 10 December 20, 2001 AM183644_01_V.pdf Be sure to correct any wiring problems before you plug your receiver. Setting Up Check the connections Check all speakers are connected in phase (+ to + and - Also make sure ...
... damage your receiver in and turn it on. to brush against each other; Incorrect wiring can result in a total loss of Acoustimass module output. L C R Figure 9 Completed connections FRONT SPEAKERS R L SURROUND SPEAKERS L REAR R CENTER LS RS OUTPUTS TO CUBE SPEAKERS L C R LS RS LEFT CENTER ...SURROUND INPUTS FROM RECEIVER OR AMPLIFIER L C R LS RS 10 December 20, 2001 AM183644_01_V.pdf Be sure to correct any wiring problems before you plug your receiver. Setting Up Check the connections Check all speakers are connected in phase (+ to + and - Also make sure ...

Owner's guide
Page 12
...Disconnect any headphones. • Make sure speaker cable is turned ON. Maintaining Your Acoustimass®-10 Speakers Troubleshooting If you have a problem, contact your Bose® dealer to the receiver. • Make sure the speaker connections at the receiver or amplifier are correct at the receiver. Move it farther from... programming) is distorted No bass Not enough or too much bass No stereo sound • Check the speaker connections. If you still have a problem with your Acoustimass-10 speakers, turn off your Acoustimass-10 speakers must be connected to increase bass.
...Disconnect any headphones. • Make sure speaker cable is turned ON. Maintaining Your Acoustimass®-10 Speakers Troubleshooting If you have a problem, contact your Bose® dealer to the receiver. • Make sure the speaker connections at the receiver or amplifier are correct at the receiver. Move it farther from... programming) is distorted No bass Not enough or too much bass No stereo sound • Check the speaker connections. If you still have a problem with your Acoustimass-10 speakers, turn off your Acoustimass-10 speakers must be connected to increase bass.
Owner's guide
Page 14
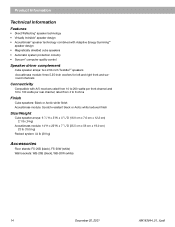
... Cube speaker arrays: 6 1/4"H x 3"W x 4 3/4"D (16.0 cm x 7.6 cm x 12.2 cm) 2.1 lb (.9 kg) Acoustimass module: 14"H x 22"W x 7 1/2"D (35.5 cm x 56 cm x 19.0 cm) 23 lb (10.5 kg) Packed system: 44 lb (20 kg) Accessories Floor stands: FS-20B (black), FS-20W (white) Wall brackets: WB-20B...circuitry • Syncom® computer quality control Speaker driver complement Cube speaker arrays: two 2.50-inch TwiddlerTM speakers Acoustimass module: three 5.25-inch woofers for left and right front and surround channels Connectivity Compatible with A/V receivers rated from 4 to 100 watts per rear channel;
... Cube speaker arrays: 6 1/4"H x 3"W x 4 3/4"D (16.0 cm x 7.6 cm x 12.2 cm) 2.1 lb (.9 kg) Acoustimass module: 14"H x 22"W x 7 1/2"D (35.5 cm x 56 cm x 19.0 cm) 23 lb (10.5 kg) Packed system: 44 lb (20 kg) Accessories Floor stands: FS-20B (black), FS-20W (white) Wall brackets: WB-20B...circuitry • Syncom® computer quality control Speaker driver complement Cube speaker arrays: two 2.50-inch TwiddlerTM speakers Acoustimass module: three 5.25-inch woofers for left and right front and surround channels Connectivity Compatible with A/V receivers rated from 4 to 100 watts per rear channel;


