User Manual
Page 2
... under license from Dolby Laboratories. All rights reserved. 2 Serial number Dealer name Dealer phone Purchase date Please keep your sales receipt and warranty card together with your records The system serial number is intended to alert the user to the presence of the Acoustimass module. No part of this owner's guide. For your speaker system. "Dolby" and the double-D symbol are...
... under license from Dolby Laboratories. All rights reserved. 2 Serial number Dealer name Dealer phone Purchase date Please keep your sales receipt and warranty card together with your records The system serial number is intended to alert the user to the presence of the Acoustimass module. No part of this owner's guide. For your speaker system. "Dolby" and the double-D symbol are...
User Manual
Page 3
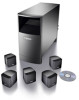
... realistic home theater sound 5 Front left and right speakers 6 Center speaker 6 Rear speakers 6 Powered Acoustimass® module 7 Making the connections 7 Connecting speakers to the Acoustimass module 7 Connecting the Acoustimass module to the receiver 9 Checking the connections 10 USING YOUR SYSTEM 11 Getting the most from your home theater speakers 11 Adjusting the bass/room compensation 11 Adjusting the LFE level 11 Setting your digital surround sound receiver 12 Receiving a digital audio signal 12 Setting your analog surround sound receiver...
... realistic home theater sound 5 Front left and right speakers 6 Center speaker 6 Rear speakers 6 Powered Acoustimass® module 7 Making the connections 7 Connecting speakers to the Acoustimass module 7 Connecting the Acoustimass module to the receiver 9 Checking the connections 10 USING YOUR SYSTEM 11 Getting the most from your home theater speakers 11 Adjusting the bass/room compensation 11 Adjusting the LFE level 11 Setting your digital surround sound receiver 12 Receiving a digital audio signal 12 Setting your analog surround sound receiver...
User Manual
Page 4
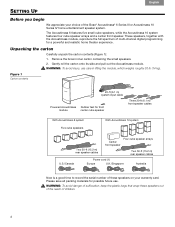
....2 m) rear speaker cables U.S./Canada Power cord (1) Europe U.K./Singapore Australia Now is a good time to record the serial number of these speakers out of the reach of multi-channel digital programming for possible future use care in lifting the module, which weighs roughly 30 lb (14 kg). Please save all packing materials for a powerful and realistic home theater experience. Français Español English SETTING...
....2 m) rear speaker cables U.S./Canada Power cord (1) Europe U.K./Singapore Australia Now is a good time to record the serial number of these speakers out of the reach of multi-channel digital programming for possible future use care in lifting the module, which weighs roughly 30 lb (14 kg). Please save all packing materials for a powerful and realistic home theater experience. Français Español English SETTING...
User Manual
Page 5
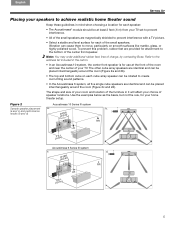
...;ais SETTING UP Placing your speakers to achieve realistic home theater sound Keep these guidelines in mind when choosing a location for each speaker: • The Acoustimass® module should be at the front of the room and near the center of your TV. Figure 2 Acoustimass 10 Series IV system Sample speaker placement a. b. (a and c) and performance results (b and d) Acoustimass 6 Series III...
...;ais SETTING UP Placing your speakers to achieve realistic home theater sound Keep these guidelines in mind when choosing a location for each speaker: • The Acoustimass® module should be at the front of the room and near the center of your TV. Figure 2 Acoustimass 10 Series IV system Sample speaker placement a. b. (a and c) and performance results (b and d) Acoustimass 6 Series III...
User Manual
Page 6
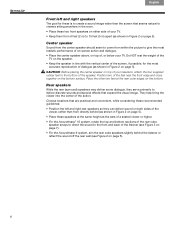
... the rear cube speaker arrays to direct the sound to the front and back of the listener (see Figure 3 on page 7). • For the Acoustimass 6 system, aim the rear cube speakers slightly behind the listener or reflect the sound off the rear wall (see Figure 2 on page 5). 6 SETTING UP Français Español English Front left and right rear speakers so...
... the rear cube speaker arrays to direct the sound to the front and back of the listener (see Figure 3 on page 7). • For the Acoustimass 6 system, aim the rear cube speakers slightly behind the listener or reflect the sound off the rear wall (see Figure 2 on page 5). 6 SETTING UP Français Español English Front left and right rear speakers so...
User Manual
Page 7
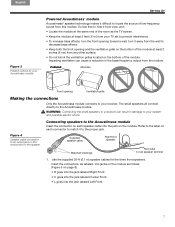
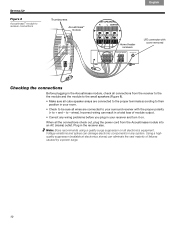
... front speakers. turn the front opening toward a wall; The small speakers all connect directly to red speaker terminal 1. Insert the connectors, as labeled, into the jack labeled Left Front. 7 Impeding ventilation can result in the bass-frequency output from your Acoustimass module SETTING UP Powered Acoustimass® module Acoustimass® speaker technology makes it away from the wall to decrease bass effects. • Keep both the front opening Ventilation grille Making the connections...
... front speakers. turn the front opening toward a wall; The small speakers all connect directly to red speaker terminal 1. Insert the connectors, as labeled, into the jack labeled Left Front. 7 Impeding ventilation can result in the bass-frequency output from your Acoustimass module SETTING UP Powered Acoustimass® module Acoustimass® speaker technology makes it away from the wall to decrease bass effects. • Keep both the front opening Ventilation grille Making the connections...
User Manual
Page 8
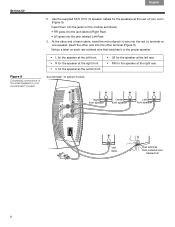
... into the jacks on one speaker. At the other end of each red-collared wire that matches it to the proper speaker: Figure 5 Completing connections of your room (Figure 5). Insert the other terminal (Figure 5). Use the supplied 50-ft (15.2 m) speaker cables for the speaker at the rear of the small speakers to your Acoustimass® module • L for the speaker at the left front...
... into the jacks on one speaker. At the other end of each red-collared wire that matches it to the proper speaker: Figure 5 Completing connections of your room (Figure 5). Insert the other terminal (Figure 5). Use the supplied 50-ft (15.2 m) speaker cables for the speaker at the rear of the small speakers to your Acoustimass® module • L for the speaker at the left front...
User Manual
Page 9
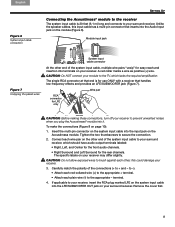
... paired wires System input cable connector At the other end of the system input cable, multiple wire pairs "unzip" for LFE only CAUTION: Before making these connections, turn off your receiver to prevent unwanted noises when you plug the Acoustimass® module into terminals on your receiver may differ slightly. A red collar marks a wire as positive (+) wire. Insert the multi-pin connector on the system input cable into the LFE/SUBWOOFER OUT jack...
... paired wires System input cable connector At the other end of the system input cable, multiple wire pairs "unzip" for LFE only CAUTION: Before making these connections, turn off your receiver to prevent unwanted noises when you plug the Acoustimass® module into terminals on your receiver may differ slightly. A red collar marks a wire as positive (+) wire. Insert the multi-pin connector on the system input cable into the LFE/SUBWOOFER OUT jack...
User Manual
Page 10
... connections check out, plug the power cord from the Acoustimass module into an AC (mains) outlet. Voltage variations and spikes can eliminate the vast majority of module output. • Correct any system. When all electronics equipment. Using a highquality suppressor (available at electronics stores) can damage electronic components in the receiver also. Note: Bose recommends using a quality surge suppressor on . wires). SETTING...
... connections check out, plug the power cord from the Acoustimass module into an AC (mains) outlet. Voltage variations and spikes can eliminate the vast majority of module output. • Correct any system. When all electronics equipment. Using a highquality suppressor (available at electronics stores) can damage electronic components in the receiver also. Note: Bose recommends using a quality surge suppressor on . wires). SETTING...
User Manual
Page 11
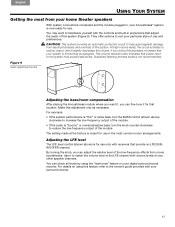
They offer options to suit your digital surround sound receiver. Make this feature, refer to increase the low-frequency output of the module. • If the audio is for use in the most from movie soundtracks. Adjusting the LFE level The LFE level control (shown above ) clockwise to the owner's guide provided with the controls and built-in , your ! You can check...
They offer options to suit your digital surround sound receiver. Make this feature, refer to increase the low-frequency output of the module. • If the audio is for use in the most from movie soundtracks. Adjusting the LFE level The LFE level control (shown above ) clockwise to the owner's guide provided with the controls and built-in , your ! You can check...
User Manual
Page 12
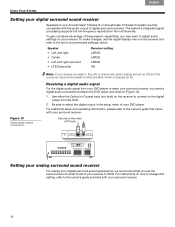
... player. Use either the Optical or Coaxial input (not both Setting your analog surround sound receiver For analog (non-digital) surround sound applications, we recommend that came with your receiver. For additional setup and operating information, please refer to Wide. compatible with your receiver to the owner's guide that you set the ! surround sound center mode of recommended settings, below. To make changes, use the digital display menu on how to change this setting...
... player. Use either the Optical or Coaxial input (not both Setting your analog surround sound receiver For analog (non-digital) surround sound applications, we recommend that came with your receiver. For additional setup and operating information, please refer to Wide. compatible with your receiver to the owner's guide that you set the ! surround sound center mode of recommended settings, below. To make changes, use the digital display menu on how to change this setting...
User Manual
Page 13
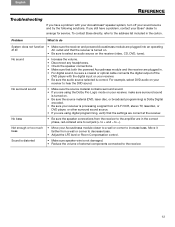
...; Be sure the speaker connections from a Hi-Fi VCR, stereo TV, laserdisc, or DVD player, or other surround sound source. • If you are using digital programming, verify that the settings are correct at all AC outlet and that both the powered Acoustimass module and the receiver are plugged into an operating at the receiver. Sound is distorted • Make sure speaker wire is turned on the receiver...
...; Be sure the speaker connections from a Hi-Fi VCR, stereo TV, laserdisc, or DVD player, or other surround sound source. • If you are using digital programming, verify that the settings are correct at all AC outlet and that both the powered Acoustimass module and the receiver are plugged into an operating at the receiver. Sound is distorted • Make sure speaker wire is turned on the receiver...
User Manual
Page 14
... English REFERENCE Customer service For additional help in black, white, or silver. Do not use with a soft dry cloth. Available in solving problems, contact the Bose® Customer Service office ! Or to contact Bose directly, refer to the receiver. • 20-ft (6.1 m) extension cable for use with your Acoustimass® speaker system may be cleaned only with in-wall wiring from the Acoustimass...
... English REFERENCE Customer service For additional help in black, white, or silver. Do not use with a soft dry cloth. Available in solving problems, contact the Bose® Customer Service office ! Or to contact Bose directly, refer to the receiver. • 20-ft (6.1 m) extension cable for use with your Acoustimass® speaker system may be cleaned only with in-wall wiring from the Acoustimass...
User Manual
Page 15
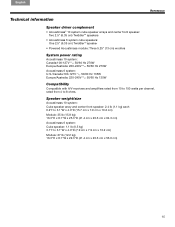
...speaker • Powered Acoustimass module: Three 5.25" (13 cm) woofers System power rating Acoustimass 10 system:! Europe/Australia: 220-240V 50/60 Hz 135W Compatibility Compatible with A/V receivers and amplifiers rated from 4 to 150 watts per channel, ! Two 2.5" (6.35 cm) TwiddlerTM speakers • Acoustimass 6 system cube speakers...Canada:100-127V 50/60 Hz 270W! English Español Français REFERENCE Technical information Speaker driver complement • Acoustimass® 10 system cube speaker arrays and center front speaker: ! U.S./Canada:100-127V 50/60 Hz 135W!
...speaker • Powered Acoustimass module: Three 5.25" (13 cm) woofers System power rating Acoustimass 10 system:! Europe/Australia: 220-240V 50/60 Hz 135W Compatibility Compatible with A/V receivers and amplifiers rated from 4 to 150 watts per channel, ! Two 2.5" (6.35 cm) TwiddlerTM speakers • Acoustimass 6 system cube speakers...Canada:100-127V 50/60 Hz 270W! English Español Français REFERENCE Technical information Speaker driver complement • Acoustimass® 10 system cube speaker arrays and center front speaker: ! U.S./Canada:100-127V 50/60 Hz 135W!


