Owner's guide
Page 2
...keep your records The system serial number is intended to alert the user to the presence of this owner's guide. ©2006 Bose Corporation. No part of important operating and maintenance instructions in this owner's guide carefully. All rights reserved. 2 Please save your safety...the wide slot of Dolby Laboratories. Manufactured under license from Dolby Laboratories. It will help you set up and operate your speaker system. Additional safety information See the additional safety information on the Important Safety Instructions page enclosed with arrowhead symbol within an ...
...keep your records The system serial number is intended to alert the user to the presence of this owner's guide. ©2006 Bose Corporation. No part of important operating and maintenance instructions in this owner's guide carefully. All rights reserved. 2 Please save your safety...the wide slot of Dolby Laboratories. Manufactured under license from Dolby Laboratories. It will help you set up and operate your speaker system. Additional safety information See the additional safety information on the Important Safety Instructions page enclosed with arrowhead symbol within an ...
Owner's guide
Page 3
... 4 Before you begin 4 Unpacking the carton 4 Placing your speakers to achieve realistic home theater sound 5 Front left and right speakers 6 Center speaker 6 Rear speakers 6 Powered Acoustimass® module 7 Making the connections 7 Connecting speakers to the Acoustimass module 7 Connecting the Acoustimass module to the ...receiver 9 Checking the connections 10 USING YOUR SYSTEM 11 Getting the most from your home theater speakers 11 Adjusting the bass/room compensation 11 Adjusting the LFE level 11 Setting your digital surround sound receiver 12 Receiving ...
... 4 Before you begin 4 Unpacking the carton 4 Placing your speakers to achieve realistic home theater sound 5 Front left and right speakers 6 Center speaker 6 Rear speakers 6 Powered Acoustimass® module 7 Making the connections 7 Connecting speakers to the Acoustimass module 7 Connecting the Acoustimass module to the ...receiver 9 Checking the connections 10 USING YOUR SYSTEM 11 Getting the most from your home theater speakers 11 Adjusting the bass/room compensation 11 Adjusting the LFE level 11 Setting your digital surround sound receiver 12 Receiving ...
Owner's guide
Page 4
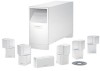
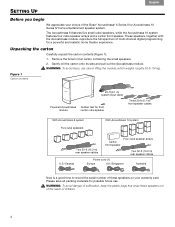
...keep the plastic bags that wrap these speakers on your choice of multi-channel digital programming for a powerful and realistic home theater experience. These speakers, together with the Acoustimass module, reproduce the full spectrum of the Bose® Acoustimass® 6 Series III ...or Acoustimass 10 Series IV home entertainment speaker system. Remove the brown inner carton containing the small speakers. 2. Please save all ...
...keep the plastic bags that wrap these speakers on your choice of multi-channel digital programming for a powerful and realistic home theater experience. These speakers, together with the Acoustimass module, reproduce the full spectrum of the Bose® Acoustimass® 6 Series III ...or Acoustimass 10 Series IV home entertainment speaker system. Remove the brown inner carton containing the small speakers. 2. Please save all ...
Owner's guide
Page 5
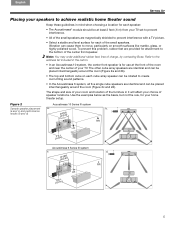
... room and location of the furniture in it will affect your choice of charge, by contacting Bose. d. 5 Refer to the address list included in the carton. • In an Acoustimass 10 system, the center front speaker is for use at least 2 feet (.6 m) from your TV set to prevent interference. • All of... top and bottom cube on smooth surfaces like marble, glass, or highly polished wood. English Español Français SETTING UP Placing your speakers to achieve realistic home theater sound Keep these guidelines in mind when choosing a location for each of the small...
... room and location of the furniture in it will affect your choice of charge, by contacting Bose. d. 5 Refer to the address list included in the carton. • In an Acoustimass 10 system, the center front speaker is for use at least 2 feet (.6 m) from your TV set to prevent interference. • All of... top and bottom cube on smooth surfaces like marble, glass, or highly polished wood. English Español Français SETTING UP Placing your speakers to achieve realistic home theater sound Keep these guidelines in mind when choosing a location for each of the small...
Owner's guide
Page 6
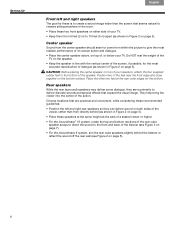
... bottom surface. SETTING UP Français Español English Front left and right rear speakers so they serve primarily to the bottom of the speaker. Center speaker Sound from the center speaker should seem to come from directly behind the listener or reflect the sound off the rear wall... and bottom sections of your television, attach the four supplied rubber feet to ! Choose locations that are practical and convenient, while considering these two front speakers on top of your TV. • Keep them from 6 feet (2 m) to the front and back of the viewer, rather than the screen...
... bottom surface. SETTING UP Français Español English Front left and right rear speakers so they serve primarily to the bottom of the speaker. Center speaker Sound from the center speaker should seem to come from directly behind the listener or reflect the sound off the rear wall... and bottom sections of your television, attach the four supplied rubber feet to ! Choose locations that are practical and convenient, while considering these two front speakers on top of your TV. • Keep them from 6 feet (2 m) to the front and back of the viewer, rather than the screen...
Owner's guide
Page 7
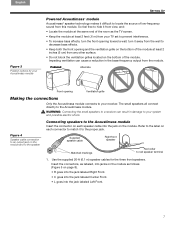
...cause a reduction in damage to the label on the bottom of the room as follows! (Figure 5 on the module. Supplied speaker cable Right front speaker Matched markings Red collar to the Acoustimass module. Impeding ventilation can result in the bass-frequency output from any other surface. •...; Do not block the ventilation grilles located on each speaker cable into the jack on page 8). • R goes into the jack labeled Right Front. • C goes into the jack labeled Center...
...cause a reduction in damage to the label on the bottom of the room as follows! (Figure 5 on the module. Supplied speaker cable Right front speaker Matched markings Red collar to the Acoustimass module. Impeding ventilation can result in the bass-frequency output from any other surface. •...; Do not block the ventilation grilles located on each speaker cable into the jack on page 8). • R goes into the jack labeled Right Front. • C goes into the jack labeled Center...
Owner's guide
Page 8
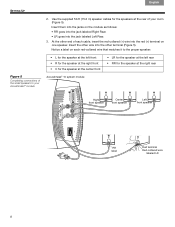
...it to the proper speaker: Figure 5 Completing connections of the small speakers to your room (Figure 5). At the other end of your Acoustimass® module • L for the speaker at the left front • R for the speaker at the right front • C for the speaker at the center front... Acoustimass® 10 system module • LR for the speaker at the left rear • RR for the speakers at the right rear Right front speaker Center front speaker Left front speaker RR label Red terminal Red-collared wire labeled LR 8 Insert the other terminal (Figure 5). ...
...it to the proper speaker: Figure 5 Completing connections of the small speakers to your room (Figure 5). At the other end of your Acoustimass® module • L for the speaker at the left front • R for the speaker at the right front • C for the speaker at the center front... Acoustimass® 10 system module • LR for the speaker at the left rear • RR for the speakers at the right rear Right front speaker Center front speaker Left front speaker RR label Red terminal Red-collared wire labeled LR 8 Insert the other terminal (Figure 5). ...
Owner's guide
Page 9
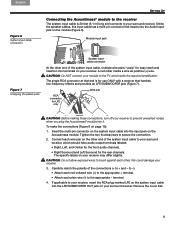
... make the connections (Figure 8 on your receiver may differ slightly. this input cable has a multi-pin connector that handles ! Remove the cover first. 9 Unlike the speaker cables, this could damage your surround receiver, which lacks the required amplification. to -). • Attach each red-collared wire (+) to the appropriate + terminal. • Attach...
... make the connections (Figure 8 on your receiver may differ slightly. this input cable has a multi-pin connector that handles ! Remove the cover first. 9 Unlike the speaker cables, this could damage your surround receiver, which lacks the required amplification. to -). • Attach each red-collared wire (+) to the appropriate + terminal. • Attach...
Owner's guide
Page 10
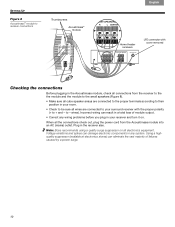
...the connections check out, plug the power cord from the receiver to the the module and the module to the small speakers (Figure 8). • Make sure all cube speaker arrays are connected to the proper terminals according to their position in your room. • Check to be sure all ...wires are connected to your receiver and turn it on all electronics equipment. Note: Bose recommends using a quality surge suppressor on . Incorrect ...
...the connections check out, plug the power cord from the receiver to the the module and the module to the small speakers (Figure 8). • Make sure all cube speaker arrays are connected to the proper terminals according to their position in your room. • Check to be sure all ...wires are connected to your receiver and turn it on all electronics equipment. Note: Bose recommends using a quality surge suppressor on . Incorrect ...

Owner's guide
Page 11
... to the owner's guide provided with your ! At high volume levels, the circuit activates to reduce the low-frequency output of your other speaker channels. Sustained listening at the factory is for use. Use it for use in the most from movie soundtracks. CAUTION: This system provides...can fine-tune it to help guard against damage from electrical stresses and overload of the low-frequency effects from your home theater speakers With system connections completed and the module plugged in protections that power input to the system may exceed safe levels. They offer ...
... to the owner's guide provided with your ! At high volume levels, the circuit activates to reduce the low-frequency output of your other speaker channels. Sustained listening at the factory is for use. Use it for use in the most from movie soundtracks. CAUTION: This system provides...can fine-tune it to help guard against damage from electrical stresses and overload of the low-frequency effects from your home theater speakers With system connections completed and the module plugged in protections that power input to the system may exceed safe levels. They offer ...
Owner's guide
Page 12
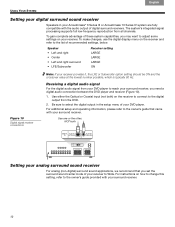
... guide that you need a digital audio connection between the DVD player and receiver (Figure 10). 1. To gain complete advantage of digital surround receivers. Speaker • Left and right • Center • Left and right surround • LFE/Subwoofer Receiver setting LARGE LARGE LARGE ON Figure 10 Digital...reach your surround receiver, you set the ! Français Español English USING YOUR SYSTEM Setting your digital surround sound receiver Speakers in the setup menu of your receiver to the digital output from the DVD. 2. To make changes, use the digital display menu ...
... guide that you need a digital audio connection between the DVD player and receiver (Figure 10). 1. To gain complete advantage of digital surround receivers. Speaker • Left and right • Center • Left and right surround • LFE/Subwoofer Receiver setting LARGE LARGE LARGE ON Figure 10 Digital...reach your surround receiver, you set the ! Français Español English USING YOUR SYSTEM Setting your digital surround sound receiver Speakers in the setup menu of your receiver to the digital output from the DVD. 2. To make changes, use the digital display menu ...
Owner's guide
Page 13
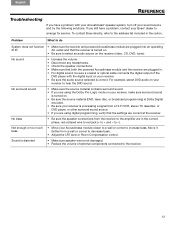
... receiver. 13 Not enough or too much bass • Move your receiver to hear the DVD sound. To contact Bose directly, refer to + and - No bass • Be sure the speaker connections from a wall or corner to -). to decrease bass. • Adjust the LFE level or Room Compensation control...the amplifier are plugged in the carton. Sound is distorted • Make sure speaker wire is not damaged. • Reduce the volume of the DVD player with your Acoustimass® speaker system, turn off your Bose® dealer to arrange for service. English Español Français ...
... receiver. 13 Not enough or too much bass • Move your receiver to hear the DVD sound. To contact Bose directly, refer to + and - No bass • Be sure the speaker connections from a wall or corner to -). to decrease bass. • Adjust the LFE level or Room Compensation control...the amplifier are plugged in the carton. Sound is distorted • Make sure speaker wire is not damaged. • Reduce the volume of the DVD player with your Acoustimass® speaker system, turn off your Bose® dealer to arrange for service. English Español Français ...
Owner's guide
Page 14
...solvents, chemicals, or cleaning solutions containing alcohol, ammonia, or abrasives. Limited warranty Your Acoustimass® speaker system is not taken. Details! however, does not affect your authorized Bose dealer. Please note that came with in -wall wiring from the Acoustimass module to the small... soft dry cloth. The grille assemblies on the card and mail it to Bose. reasonable care is covered by a limited transferable warranty. Please fill out the information section on the small speakers may be carefully vacuumed, if necessary. Contact your rights. of the warranty ...
...solvents, chemicals, or cleaning solutions containing alcohol, ammonia, or abrasives. Limited warranty Your Acoustimass® speaker system is not taken. Details! however, does not affect your authorized Bose dealer. Please note that came with in -wall wiring from the Acoustimass module to the small... soft dry cloth. The grille assemblies on the card and mail it to Bose. reasonable care is covered by a limited transferable warranty. Please fill out the information section on the small speakers may be carefully vacuumed, if necessary. Contact your rights. of the warranty ...
Owner's guide
Page 15
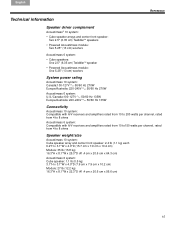
... 4 to 8 ohms Acoustimass 6 system: Compatible with A/V receivers and amplifiers rated from 10 to150 watts per channel, rated from 4 to 8 ohms Speaker weight/size Acoustimass 10 system: Cube speaker array and center front speaker: 2.4 lb (1.1 kg) each 6.2"H x 3.1"W x 4.0"D (15.7 cm x 7.9 cm x 10.2 cm) Module: 35 lb (15.8 kg) 16.3"H x 8.1"W x 25.3"D (41.4 cm x 20.6 cm x 64...
... 4 to 8 ohms Acoustimass 6 system: Compatible with A/V receivers and amplifiers rated from 10 to150 watts per channel, rated from 4 to 8 ohms Speaker weight/size Acoustimass 10 system: Cube speaker array and center front speaker: 2.4 lb (1.1 kg) each 6.2"H x 3.1"W x 4.0"D (15.7 cm x 7.9 cm x 10.2 cm) Module: 35 lb (15.8 kg) 16.3"H x 8.1"W x 25.3"D (41.4 cm x 20.6 cm x 64...


