
Owner's guide
Page 1
The Bose® Acoustimass® 6 Series III and Acoustimass 10 Series III Home Theater Speaker Systems Owner's Guide August 13 , 2002 AM264887_00_V.pdf Bose Corporation
The Bose® Acoustimass® 6 Series III and Acoustimass 10 Series III Home Theater Speaker Systems Owner's Guide August 13 , 2002 AM264887_00_V.pdf Bose Corporation
Owner's guide
Page 2
... this owner's guide. ©2002 Bose Corporation. Manufactured under license from Dolby Laboratories. Safety Information WARNING: To reduce the risk of Dolby Laboratories. NO USER-SERVICABLE PARTS INSIDE. It will help you set up and operate your sales receipt and warranty card together with your records The system serial number is intended to alert the user to rain or moisture. Serial number Dealer name Dealer phone...
... this owner's guide. ©2002 Bose Corporation. Manufactured under license from Dolby Laboratories. Safety Information WARNING: To reduce the risk of Dolby Laboratories. NO USER-SERVICABLE PARTS INSIDE. It will help you set up and operate your sales receipt and warranty card together with your records The system serial number is intended to alert the user to rain or moisture. Serial number Dealer name Dealer phone...
Owner's guide
Page 3
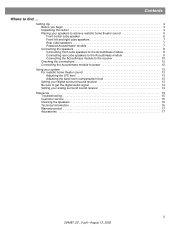
... to get the digital audio signal 14 Setting your digital surround sound receiver 13 Be sure to find ... Setting Up 4 Before you begin 4 Unpacking the carton 4 Placing your speakers to achieve realistic home theater sound 5 Front center cube speaker 6 Front left and right cube speakers 7 Rear cube speakers 7 Powered Acoustimass® module 7 Connecting the speakers 8 Connecting front cube speakers to the Acoustimass module 8 Connecting rear cube speakers to the Acoustimass module 9 Connecting the Acoustimass...
... to get the digital audio signal 14 Setting your digital surround sound receiver 13 Be sure to find ... Setting Up 4 Before you begin 4 Unpacking the carton 4 Placing your speakers to achieve realistic home theater sound 5 Front center cube speaker 6 Front left and right cube speakers 7 Rear cube speakers 7 Powered Acoustimass® module 7 Connecting the speakers 8 Connecting front cube speakers to the Acoustimass module 8 Connecting rear cube speakers to the Acoustimass module 9 Connecting the Acoustimass...
Owner's guide
Page 4
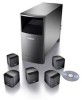
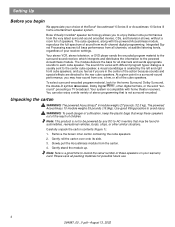
Bose Virtually Invisible® speaker technology allows you to record the serial number of the cube speakers. The module delivers the bass for possible future use. 4 264887_00 _V.pdf • August 13, 2002 Your system is a good time to enjoy lifelike home performances from multi-channel digital programming. The powered Acoustimass 10 module weighs 35 pounds (15.9kg). Use good lifting practice to the powered Acoustimass...
Bose Virtually Invisible® speaker technology allows you to record the serial number of the cube speakers. The module delivers the bass for possible future use. 4 264887_00 _V.pdf • August 13, 2002 Your system is a good time to enjoy lifelike home performances from multi-channel digital programming. The powered Acoustimass 10 module weighs 35 pounds (15.9kg). Use good lifting practice to the powered Acoustimass...
Owner's guide
Page 5
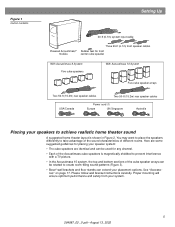
... the cube speaker arrays can be used for front center cube speaker With Acoustimass 6 System Five cube speakers With Acoustimass 10 System Five cube speaker arrays Two 50-ft (15.2m) rear speaker cables Two 50-ft (15.2m) rear speaker cables USA/Canada Power cord (1) Europe UK/Singapore Australia Placing your placement options. Figure 1 Carton contents Setting Up 20-ft (6.1m) system input cable Powered Acoustimass...
... the cube speaker arrays can be used for front center cube speaker With Acoustimass 6 System Five cube speakers With Acoustimass 10 System Five cube speaker arrays Two 50-ft (15.2m) rear speaker cables Two 50-ft (15.2m) rear speaker cables USA/Canada Power cord (1) Europe UK/Singapore Australia Placing your placement options. Figure 1 Carton contents Setting Up 20-ft (6.1m) system input cable Powered Acoustimass...
Owner's guide
Page 6
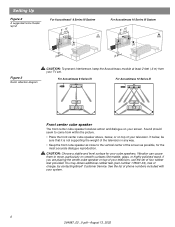
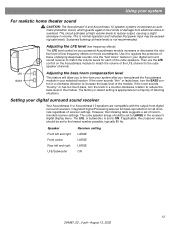
... See the list of phone numbers included with your television, use the set . If you are placing the center cube speaker on smooth surfaces like marble, glass, or highly polished wood. You may obtain additional rubber feet (part number 178321-04), free of charge, by contacting Bose® Customer Service. Setting Up Figure 2 A suggested home theater layout For Acoustimass® 6 Series III System (26'--51m5...
... See the list of phone numbers included with your television, use the set . If you are placing the center cube speaker on smooth surfaces like marble, glass, or highly polished wood. You may obtain additional rubber feet (part number 178321-04), free of charge, by contacting Bose® Customer Service. Setting Up Figure 2 A suggested home theater layout For Acoustimass® 6 Series III System (26'--51m5...
Owner's guide
Page 7
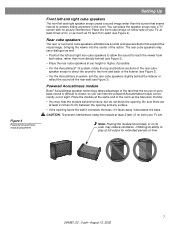
... directly behind furniture, but do not block the opening faces the wall it decreases the bass. CAUTION: To prevent interference, keep the module at least 2 inches (5 cm) between the opening and any surface. • If the opening . You can hide the powered Acoustimass module conveniently out of your TV set. The rear cube speakers may carry dialogue as the television monitor...
... directly behind furniture, but do not block the opening faces the wall it decreases the bass. CAUTION: To prevent interference, keep the module at least 2 inches (5 cm) between the opening and any surface. • If the opening . You can hide the powered Acoustimass module conveniently out of your TV set. The rear cube speakers may carry dialogue as the television monitor...
Owner's guide
Page 8
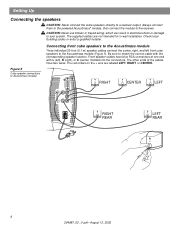
...: Never use broken or frayed wiring, which can result in -wall installation. Be sure to Acoustimass module RIGHT CENTER LEFT Audio Input Left Center Right Front Front Front Right Rear Audio Output Left Rear RIGHT REAR LEFT REAR 8 264887_00 _V.pdf • August 13, 2002 Setting Up Connecting the speakers CAUTION: Never connect the cube speakers directly to the Acoustimass module (Figure 5). Connecting front cube speakers to the Acoustimass module Three individual 20-foot (6.1 m) speaker cables connect the...
...: Never use broken or frayed wiring, which can result in -wall installation. Be sure to Acoustimass module RIGHT CENTER LEFT Audio Input Left Center Right Front Front Front Right Rear Audio Output Left Rear RIGHT REAR LEFT REAR 8 264887_00 _V.pdf • August 13, 2002 Setting Up Connecting the speakers CAUTION: Never connect the cube speakers directly to the Acoustimass module (Figure 5). Connecting front cube speakers to the Acoustimass module Three individual 20-foot (6.1 m) speaker cables connect the...
Owner's guide
Page 9
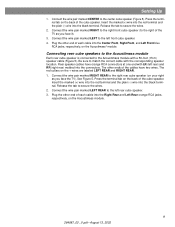
... connectors. See Figure 5. Connect the wire pair marked LEFT REAR to the right of the cube speaker. Setting Up 1. Connect the wire pair marked RIGHT REAR to the Acoustimass module with a 50-foot (15 m) speaker cable (Figure 5). Connecting rear cube speakers to the Acoustimass module Each rear cube speaker is connected to the right rear cube speaker (on the back of each cable into the Center Front, Right Front, and Left Front blue RCA jacks...
... connectors. See Figure 5. Connect the wire pair marked LEFT REAR to the right of the cube speaker. Setting Up 1. Connect the wire pair marked RIGHT REAR to the Acoustimass module with a 50-foot (15 m) speaker cable (Figure 5). Connecting rear cube speakers to the Acoustimass module Each rear cube speaker is connected to the right rear cube speaker (on the back of each cable into the Center Front, Right Front, and Left Front blue RCA jacks...
Owner's guide
Page 10
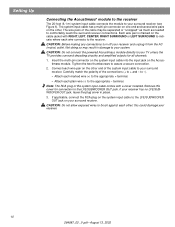
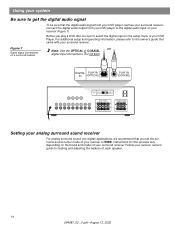
... wire pair is marked on the cable jacket with a cover installed. Insert the multi-pin connector on the system input cable into the input jack on the other ; terminal. If applicable, connect the RCA plug on your TV unless the TV provides surround decoding circuitry and amplified outputs for connection to your surround receiver (see Figure 6). The wire pairs of the system input cable to the LFE/SUBWOOFER OUT jack...
... wire pair is marked on the cable jacket with a cover installed. Insert the multi-pin connector on the system input cable into the input jack on the other ; terminal. If applicable, connect the RCA plug on your TV unless the TV provides surround decoding circuitry and amplified outputs for connection to your surround receiver (see Figure 6). The wire pairs of the system input cable to the LFE/SUBWOOFER OUT jack...
Owner's guide
Page 11
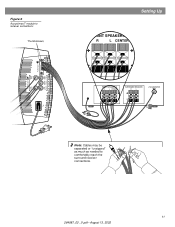
Figure 6 Acoustimass® module to receiver connections Thumbscrews Audio Output Left Rear Right Rear Audio Input Left Center Right Front Front Front Setting Up FRONT SPEAKERS A R L CENTER FRONT SPEAKERS A R L CENTER SURROUND SPEAKERS R L LFE/SUBWOOFER OUT Note: Cables may be separated or "unzipped" as much as needed to comfortably reach the surround receiver connections. 11 264887_00 _V.pdf • August 13, 2002
Figure 6 Acoustimass® module to receiver connections Thumbscrews Audio Output Left Rear Right Rear Audio Input Left Center Right Front Front Front Setting Up FRONT SPEAKERS A R L CENTER FRONT SPEAKERS A R L CENTER SURROUND SPEAKERS R L LFE/SUBWOOFER OUT Note: Cables may be separated or "unzipped" as much as needed to comfortably reach the surround receiver connections. 11 264887_00 _V.pdf • August 13, 2002
Owner's guide
Page 12
... connections, plug the power cord of failures attributed to + and - After you plug your room. Your Acoustimass speaker system will turn it receives a signal from your surround receiver in and turn on all connections from the receiver to the powered Acoustimass® module and from the module to power Note: Bose® recommends using a quality surge suppressor on and off automatically as it on. Setting...
... connections, plug the power cord of failures attributed to + and - After you plug your room. Your Acoustimass speaker system will turn it receives a signal from your surround receiver in and turn on all connections from the receiver to the powered Acoustimass® module and from the module to power Note: Bose® recommends using a quality surge suppressor on and off automatically as it on. Setting...
Owner's guide
Page 13
... that power input may be set to ON. If the room sounds "boomy" or has too much bass, turn the BASS control in a counter-clockwise rotation to reduce the bass level of the LFE channel to the lowest number possible, typically 80 Hz. If applicable, the crossover value should be set to the cube speaker channels. Then use the LFE BASS control on your digital surround sound receiver...
... that power input may be set to ON. If the room sounds "boomy" or has too much bass, turn the BASS control in a counter-clockwise rotation to reduce the bass level of the LFE channel to the lowest number possible, typically 80 Hz. If applicable, the crossover value should be set to the cube speaker channels. Then use the LFE BASS control on your digital surround sound receiver...
Owner's guide
Page 14
... you set the surround-sound center mode of your receiver owner's guide for this process vary, depending on a surround receiver Note: Use the OPTICAL or COAXIAL OR digital input connections, but not both. Instructions for testing and adjusting the balance of your surround receiver. For additional setup and operating information, please refer to the owner's guide that the digital audio signal from your DVD player reaches your surround receiver, connect the digital audio output from...
... you set the surround-sound center mode of your receiver owner's guide for this process vary, depending on a surround receiver Note: Use the OPTICAL or COAXIAL OR digital input connections, but not both. Instructions for testing and adjusting the balance of your surround receiver. For additional setup and operating information, please refer to the owner's guide that the digital audio signal from your DVD player reaches your surround receiver, connect the digital audio output from...
Owner's guide
Page 15
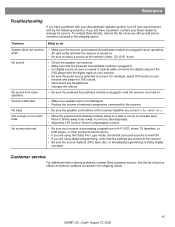
... Troubleshooting If you are using the Dolby Pro-Logic mode, check that the receiver is plugged in. • For digital sound, be sure a coaxial or optical cable connects the digital output of external components connected to the receiver. Problem What to do System does not function • Make sure the receiver and powered Acoustimass module are plugged into an operating at all AC wall outlet and that surround-sound is turned...
... Troubleshooting If you are using the Dolby Pro-Logic mode, check that the receiver is plugged in. • For digital sound, be sure a coaxial or optical cable connects the digital output of external components connected to the receiver. Problem What to do System does not function • Make sure the receiver and powered Acoustimass module are plugged into an operating at all AC wall outlet and that surround-sound is turned...
Owner's guide
Page 16
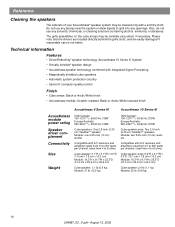
... 10 Series III Acoustimass module power rating Speaker driver complement Connectivity Size Weight USA/Canada: 100-127V 50/60 Hz 135W Europe/Australia: 220-240V 50/60 Hz 135W Cube speakers: One 2.5-inch (6.35 cm) TwiddlerTM speaker Module: one 5.25-inch (13 cm) woofer Compatible with A/V receivers and amplifiers rated from 10 to150 watts per channel, rated from...
... 10 Series III Acoustimass module power rating Speaker driver complement Connectivity Size Weight USA/Canada: 100-127V 50/60 Hz 135W Europe/Australia: 220-240V 50/60 Hz 135W Cube speakers: One 2.5-inch (6.35 cm) TwiddlerTM speaker Module: one 5.25-inch (13 cm) woofer Compatible with A/V receivers and amplifiers rated from 10 to150 watts per channel, rated from...
Owner's guide
Page 17
...; speaker system is covered by a limited transferable warranty. Accessories • Table stands: UTS-20B (black), UTS-20W (white) • Floor stands: UFS-20B (black), UFS-20W (white) • Wall brackets: UB-20B (black), UB-20W (white) • Module input cable adapter for use with existing wiring: PN 267138-001 (black) PN 267138-002 (white) • Module-to Bose®...
...; speaker system is covered by a limited transferable warranty. Accessories • Table stands: UTS-20B (black), UTS-20W (white) • Floor stands: UFS-20B (black), UFS-20W (white) • Wall brackets: UB-20B (black), UB-20W (white) • Module input cable adapter for use with existing wiring: PN 267138-001 (black) PN 267138-002 (white) • Module-to Bose®...

Owner's guide
Page 18
©2002 Bose Corporation, The Mountain, Framingham, MA 01701-9168 USA 264887 AM Rev.00 JN20952 264887_00 _V.pdf • August 13, 2002
©2002 Bose Corporation, The Mountain, Framingham, MA 01701-9168 USA 264887 AM Rev.00 JN20952 264887_00 _V.pdf • August 13, 2002
Quick setup guide
Page 1
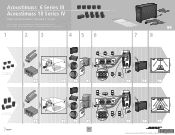
Acoustimass® 6 Series III Acoustimass 10 Series IV HOME ENTERTAINMENT SPEAKER SYSTEMS Quick setup guide • Hurtig opstillingsvejledning • Kurzanleitung • Guía rápida de instalación • Noticede montage • Guida di installazione rapida • Snelle opstellingsgids • Vägledning för snabb montering 1 2 3 4 5 6 �� � � � �� Acoustimass 6 Series III system � �� � �...
Acoustimass® 6 Series III Acoustimass 10 Series IV HOME ENTERTAINMENT SPEAKER SYSTEMS Quick setup guide • Hurtig opstillingsvejledning • Kurzanleitung • Guía rápida de instalación • Noticede montage • Guida di installazione rapida • Snelle opstellingsgids • Vägledning för snabb montering 1 2 3 4 5 6 �� � � � �� Acoustimass 6 Series III system � �� � �...


