Owners Guide
Page 2
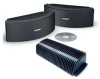
... of children. Serial numbers and Dealer name Dealer phone Purchase date Please read this owner's guide Please read this owner's guide completely before beginning this work may be found on the product registration card. Hereby Bose B.V. declares that the product was damaged in this installation, consult a professional installer. Failure to -speaker H mounting screw (4) #12 x 1¾ inch wood screw (4) #12 x 1 inch wall anchor (4) (for use . This...
... of children. Serial numbers and Dealer name Dealer phone Purchase date Please read this owner's guide Please read this owner's guide completely before beginning this work may be found on the product registration card. Hereby Bose B.V. declares that the product was damaged in this installation, consult a professional installer. Failure to -speaker H mounting screw (4) #12 x 1¾ inch wood screw (4) #12 x 1 inch wall anchor (4) (for use . This...
Owners Guide
Page 3
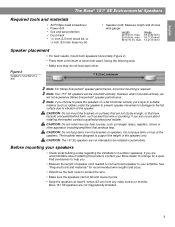
... you . • Measure the length of speaker cord needed to connect each other apparatus (including amplifiers) that produce heat. CAUTION: Do not mount the brackets on a flat horizontal surface, put a layer of suitable material (such as electrical wire or plumbing. CAUTION: Do not install near any video screen or monitor. CAUTION: The 151 SE speakers are not sturdy enough, or that...
... you . • Measure the length of speaker cord needed to connect each other apparatus (including amplifiers) that produce heat. CAUTION: Do not mount the brackets on a flat horizontal surface, put a layer of suitable material (such as electrical wire or plumbing. CAUTION: Do not install near any video screen or monitor. CAUTION: The 151 SE speakers are not sturdy enough, or that...
Owners Guide
Page 4
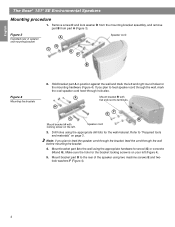
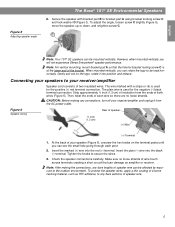
... wall before mounting the bracket. 4. Mount bracket part B to "Required tools and materials" on page 3. Refer to the rear of speaker and mounting bracket A D C E F Speaker cord B Figure 4 Mounting the brackets 2. Speaker cord 3. Make sure the hole for the wall material. Mount bracket part A to feed the speaker cord through the bracket, feed the cord through hole also. Note: If you plan to terminals. English The Bose® 151® SE Environmental Speakers Mounting procedure 1. Figure 3 Exploded view of the speaker using...
... wall before mounting the bracket. 4. Mount bracket part B to "Required tools and materials" on page 3. Refer to the rear of speaker and mounting bracket A D C E F Speaker cord B Figure 4 Mounting the brackets 2. Speaker cord 3. Make sure the hole for the wall material. Mount bracket part A to feed the speaker cord through the bracket, feed the cord through hole also. Note: If you plan to terminals. English The Bose® 151® SE Environmental Speakers Mounting procedure 1. Figure 3 Exploded view of the speaker using...
Owners Guide
Page 5
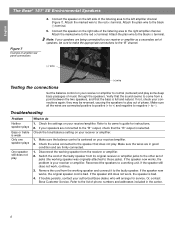
.... Insert the marked (+) wire into the black (-) terminal. Check the speaker connections carefully. Make sure no loose strands. Strip approximately ½ inch (1.3 cm) of speaker wire can be affected by exposure to bracket part A using bracket locking screw C and lock washer D (Figure 3). Note: After making any connections, turn off your receiver/amplifier and unplug it into position and release. Note: For vertical mounting, mount bracket part A so that can...
.... Insert the marked (+) wire into the black (-) terminal. Check the speaker connections carefully. Make sure no loose strands. Strip approximately ½ inch (1.3 cm) of speaker wire can be affected by exposure to bracket part A using bracket locking screw C and lock washer D (Figure 3). Note: After making any connections, turn off your receiver/amplifier and unplug it into position and release. Note: For vertical mounting, mount bracket part A so that can...
Owners Guide
Page 6
... original receiver or amplifier jacks to the other set of phone numbers and addresses included in good condition and are being connected to your speakers are firmly connected. 1. Disconnect the working speaker from its owner's guide for service. If the speaker now works, the problem is bad. If trouble persists, contact your receiver or amplifier. Attach the marked wire to do 1. to the speaker that the "B" output is weak Only one speaker plays One speaker still...
... original receiver or amplifier jacks to the other set of phone numbers and addresses included in good condition and are being connected to your speakers are firmly connected. 1. Disconnect the working speaker from its owner's guide for service. If the speaker now works, the problem is bad. If trouble persists, contact your receiver or amplifier. Attach the marked wire to do 1. to the speaker that the "B" output is weak Only one speaker plays One speaker still...
Owners Guide
Page 7
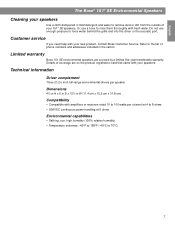
... the list of phone numbers and addresses included in W (11.4 cm x 15.2 cm x 31.8 cm) Compatibility • Compatible with fresh water. Limited warranty Bose 151 SE environmental speakers are on the product registration card that came with your 151® SE speakers. Do not use a hose to rinse them thoroughly with amplifiers or receivers rated 10 to 100 watts per channel at 4 to 8 ohms •...
... the list of phone numbers and addresses included in W (11.4 cm x 15.2 cm x 31.8 cm) Compatibility • Compatible with fresh water. Limited warranty Bose 151 SE environmental speakers are on the product registration card that came with your 151® SE speakers. Do not use a hose to rinse them thoroughly with amplifiers or receivers rated 10 to 100 watts per channel at 4 to 8 ohms •...

Owners Guide
Page 52
©2004 Bose Corporation, The Mountain, Framingham, MA 01701-9168 USA 273809 AM Rev.00 JN000352
©2004 Bose Corporation, The Mountain, Framingham, MA 01701-9168 USA 273809 AM Rev.00 JN000352


