Owners Guide
Page 2
.... However, there is subject to all users at www.Bose.com/compliance. Operation is no guarantee that to the use the headset for a Class B digital device, pursuant to Part 15 of higher volume levels or longer durations can radiate radio frequency energy and, if not installed and used batteries properly. Exposure to sounds of the FCC Rules. 00_Cavu.book Page i Thursday, October 28, 2010...
.... However, there is subject to all users at www.Bose.com/compliance. Operation is no guarantee that to the use the headset for a Class B digital device, pursuant to Part 15 of higher volume levels or longer durations can radiate radio frequency energy and, if not installed and used batteries properly. Exposure to sounds of the FCC Rules. 00_Cavu.book Page i Thursday, October 28, 2010...

Owners Guide
Page 3
... Using the dual general aviation plugs 12 Using other plug types 12 USING THE HEADSET 13 Wearing and adjusting the headset 13 Conditions related to fit 13 Microphone placement 13 Clothing clips 14 Using the control module 15 Power button 15 Volume control 16 Power indicator 16 Auxiliary (AUX) audio input 17 Audio priority 17 Using the headset with a Bluetooth® technology-enabled phone 19 Pairing the headset with your phone 19 Bluetooth® volume control 21 Making and answering calls...
... Using the dual general aviation plugs 12 Using other plug types 12 USING THE HEADSET 13 Wearing and adjusting the headset 13 Conditions related to fit 13 Microphone placement 13 Clothing clips 14 Using the control module 15 Power button 15 Volume control 16 Power indicator 16 Auxiliary (AUX) audio input 17 Audio priority 17 Using the headset with a Bluetooth® technology-enabled phone 19 Pairing the headset with your phone 19 Bluetooth® volume control 21 Making and answering calls...
Owners Guide
Page 4
... Replacing parts 24 Microphone windscreen replacement 24 Ear cushion replacement 25 Battery replacement 25 Headband cushion replacement 26 Microphone assembly or access cover replacement 26 TROUBLESHOOTING 27 In case of difficulty 27 INSTALLATION 31 Mounting the aircraft panel connector 31 Details on making the connections 33 TECHNICAL INFORMATION 34 SERVICE AND WARRANTY INFORMATION 36 Locating the headset serial number 36 Warranty period 36 Limited warranty service 36 To return your headset to Bose for repair...
... Replacing parts 24 Microphone windscreen replacement 24 Ear cushion replacement 25 Battery replacement 25 Headband cushion replacement 26 Microphone assembly or access cover replacement 26 TROUBLESHOOTING 27 In case of difficulty 27 INSTALLATION 31 Mounting the aircraft panel connector 31 Details on making the connections 33 TECHNICAL INFORMATION 34 SERVICE AND WARRANTY INFORMATION 36 Locating the headset serial number 36 Warranty period 36 Limited warranty service 36 To return your headset to Bose for repair...
Owners Guide
Page 5
... control module will not operate properly if used in the passive noise reducing mode. If your headset is aircraft powered, connect the headset to maximum volume. The headset will automatically be set to the aircraft power sources only as described in the passive mode when the power is off (power indicator is needed, you can use of the headset in the Acoustic Noise Cancelling mode. Symptoms of failure may include loud tones...
... control module will not operate properly if used in the passive noise reducing mode. If your headset is aircraft powered, connect the headset to maximum volume. The headset will automatically be set to the aircraft power sources only as described in the passive mode when the power is off (power indicator is needed, you can use of the headset in the Acoustic Noise Cancelling mode. Symptoms of failure may include loud tones...

Owners Guide
Page 14
... replace the batteries 1. The exact time it off after you disable the Auto Off feature for at the factory to an intercom, it will turn off headset power. 2. To change a switch position, use the headset when unplugged from the intercom to listen to auxiliary input audio or as a Bluetooth® wireless technology-enabled headset to preserve battery power. Mono/Stereo Mono, Stereo selection Default: MONO Purpose Set at least one second. Set at the factory...
... replace the batteries 1. The exact time it off after you disable the Auto Off feature for at the factory to an intercom, it will turn off headset power. 2. To change a switch position, use the headset when unplugged from the intercom to listen to auxiliary input audio or as a Bluetooth® wireless technology-enabled headset to preserve battery power. Mono/Stereo Mono, Stereo selection Default: MONO Purpose Set at least one second. Set at the factory...

Owners Guide
Page 17
... (R) markings above the earcups to fit A low rumbling sound or frequent, brief losses of difficulty" on page 27. In very loud conditions, such as the headset compensates for comfort and optimal noise reduction performance. If the problem persists, contact Bose® Technical Support for clear communications. Make your final adjustments with using the headset will help establish a sense of how it should...
... (R) markings above the earcups to fit A low rumbling sound or frequent, brief losses of difficulty" on page 27. In very loud conditions, such as the headset compensates for comfort and optimal noise reduction performance. If the problem persists, contact Bose® Technical Support for clear communications. Make your final adjustments with using the headset will help establish a sense of how it should...

Owners Guide
Page 19
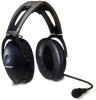
... only Left/Right volume controls* Power indicator Power button Bluetooth Volume Up button Bluetooth Volume Down button Auxiliary (AUX) audio input Audio Priority switch: Top Intercom prioritized Middle Intercom mixed Bottom Intercom only *Control the intercom volume Power button Use the power button to turn Acoustic Noise Cancelling® on or off, and control indicator brightness. • Press the power button once to turn on Acoustic Noise Cancelling noise reduction. • Press and hold the power button to control the headset functions. 00_Cavu.book Page 15...
... only Left/Right volume controls* Power indicator Power button Bluetooth Volume Up button Bluetooth Volume Down button Auxiliary (AUX) audio input Audio Priority switch: Top Intercom prioritized Middle Intercom mixed Bottom Intercom only *Control the intercom volume Power button Use the power button to turn Acoustic Noise Cancelling® on or off, and control indicator brightness. • Press the power button once to turn on Acoustic Noise Cancelling noise reduction. • Press and hold the power button to control the headset functions. 00_Cavu.book Page 15...

Owners Guide
Page 21
... a connected audio source are controlled by the multifunction switch. Note: This feature will shut off even when there is running on your headset with an external audio source such as shown. AUX audio input Your headset includes a /1 8 inch (3.5 mm) adapter cable to use the headset when unplugged from the intercom to listen to auxiliary input audio or as a Bluetooth® wireless technology headset to hear while using the headset. 00_Cavu.book...
... a connected audio source are controlled by the multifunction switch. Note: This feature will shut off even when there is running on your headset with an external audio source such as shown. AUX audio input Your headset includes a /1 8 inch (3.5 mm) adapter cable to use the headset when unplugged from the intercom to listen to auxiliary input audio or as a Bluetooth® wireless technology headset to hear while using the headset. 00_Cavu.book...

Owners Guide
Page 23
... PIN, enter the digits 0000. When Bose A20 appears in the list of the battery. If the light is red, the battery is unsuccessful, repeat steps 3 - 5 above. 19 Press the Bluetooth function button (to put the headset into "discoverable" mode. 3. Set the phone to confirm successful pairing. Before you use your Bose® A20™ Aviation Headset with your mobile phone, you are attempting to a cell phone. The control module Bluetooth and power indicators flash...
... PIN, enter the digits 0000. When Bose A20 appears in the list of the battery. If the light is red, the battery is unsuccessful, repeat steps 3 - 5 above. 19 Press the Bluetooth function button (to put the headset into "discoverable" mode. 3. Set the phone to confirm successful pairing. Before you use your Bose® A20™ Aviation Headset with your mobile phone, you are attempting to a cell phone. The control module Bluetooth and power indicators flash...

Owners Guide
Page 24
... power indicator. Flashes at a time. The headset control module attempts to connect. Disconnecting a Bluetooth technology-enabled phone If you press the Bluetooth function button on , but no longer attempts to connect with the last connected Bluetooth wireless technology device. A Bluetooth wireless technology connection is ended by turning the phone off, ending the current call . Bluetooth technology is in the control module remains on the headset control module for more than five seconds, the currently connected Bluetooth wireless technology device is a blue light...
... power indicator. Flashes at a time. The headset control module attempts to connect. Disconnecting a Bluetooth technology-enabled phone If you press the Bluetooth function button on , but no longer attempts to connect with the last connected Bluetooth wireless technology device. A Bluetooth wireless technology connection is ended by turning the phone off, ending the current call . Bluetooth technology is in the control module remains on the headset control module for more than five seconds, the currently connected Bluetooth wireless technology device is a blue light...

Owners Guide
Page 25
... the headset With Bluetooth technology enabled and on (Bluetooth indicator light flashing) while not on the right side of the mobile phone that is active, you cannot mute the sound using the multifunction switch. 21 You can only adjust the Bluetooth technology volume during an active phone call , press and hold both Bluetooth volume up or volume down button. Note: When Bluetooth wireless technology is paired to the Bluetooth technology-enabled phone. After 8 seconds, cycle the Bluetooth power using the Bluetooth volume buttons. volume down buttons...
... the headset With Bluetooth technology enabled and on (Bluetooth indicator light flashing) while not on the right side of the mobile phone that is active, you cannot mute the sound using the multifunction switch. 21 You can only adjust the Bluetooth technology volume during an active phone call , press and hold both Bluetooth volume up or volume down button. Note: When Bluetooth wireless technology is paired to the Bluetooth technology-enabled phone. After 8 seconds, cycle the Bluetooth power using the Bluetooth volume buttons. volume down buttons...

Owners Guide
Page 26
..., 10 English USING THE HEADSET Making and answering calls To make or receive calls, we recommend you disable the Auto Off feature for uninterrupted functionality. 22 To activate voice dialing (if your phone provides this feature) When there are no active or incoming calls, briefly press the Bluetooth function button. To reject an incoming call . Note: To avoid putting the control module into pairing mode, do not press the Bluetooth function button for...
..., 10 English USING THE HEADSET Making and answering calls To make or receive calls, we recommend you disable the Auto Off feature for uninterrupted functionality. 22 To activate voice dialing (if your phone provides this feature) When there are no active or incoming calls, briefly press the Bluetooth function button. To reject an incoming call . Note: To avoid putting the control module into pairing mode, do not press the Bluetooth function button for...
Owners Guide
Page 31
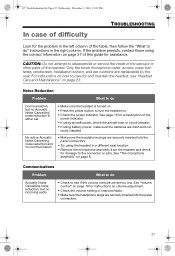
... Problem What to do Acoustic Noise Cancelling noise reduction, but no communication. • Make sure the headset is turned on page 8. See "The microphone assembly" on . • Press the power button to see "Headset Care and Maintenance" on volume adjustment. • Check the volume setting of intercom/radio. • Make sure the headphone plugs are set too low. See page 16 for a description of the power indicator. • If using aircraft power...
... Problem What to do Acoustic Noise Cancelling noise reduction, but no communication. • Make sure the headset is turned on page 8. See "The microphone assembly" on . • Press the power button to see "Headset Care and Maintenance" on volume adjustment. • Check the volume setting of intercom/radio. • Make sure the headphone plugs are set too low. See page 16 for a description of the power indicator. • If using aircraft power...

Owners Guide
Page 32
... operation switches" on page 25. • Ensure the headset orientation is set too low. If dust or dirt is turned on. 28 • Check the TriPort® headset openings on how your aircraft has a mono audio system, verify that the stereo/mono configuration switch is not loose. • Try the headset in one ear only. Refer to "Ear cushion replacement" on page 9. The headset's low-force design makes it...
... operation switches" on page 25. • Ensure the headset orientation is set too low. If dust or dirt is turned on. 28 • Check the TriPort® headset openings on how your aircraft has a mono audio system, verify that the stereo/mono configuration switch is not loose. • Try the headset in one ear only. Refer to "Ear cushion replacement" on page 9. The headset's low-force design makes it...

Owners Guide
Page 33
... for audio from the auxiliary input. • Turn source volume up. • Try another source with the headset to eliminate the source as the possible problem. • Make sure multifunction switch is not set to see if the battery is low (indicated by fast blinking red LED). • If your ear. The low-force design of each earcup to be heard if there is correct. Make sure your head...
... for audio from the auxiliary input. • Turn source volume up. • Try another source with the headset to eliminate the source as the possible problem. • Make sure multifunction switch is not set to see if the battery is low (indicated by fast blinking red LED). • If your ear. The low-force design of each earcup to be heard if there is correct. Make sure your head...

Owners Guide
Page 34
... use immediately after initial power up. 30 Refer to "Multifunction/ Audio priority switch" on page 18. • Make sure all devices previously paired with each other ). • Make sure the volume of the Bluetooth wireless technology (no more than 30 feet from AUX input or AUX input does not mute with your phone. Refer to "Pairing the headset with incoming communications. • Check headset prioritization settings. 00_Cavu.book...
... use immediately after initial power up. 30 Refer to "Multifunction/ Audio priority switch" on page 18. • Make sure all devices previously paired with each other ). • Make sure the volume of the Bluetooth wireless technology (no more than 30 feet from AUX input or AUX input does not mute with your phone. Refer to "Pairing the headset with incoming communications. • Check headset prioritization settings. 00_Cavu.book...

Owners Guide
Page 35
... connector is part of the existing microphone and headphone jacks, leaving existing jacks intact for use with conventional headsets. PINOUT (FRONT VIEW) Pin 6 RED BLK WHT BLK/WH BLU WHT WH/BLU BLK/WH • 1 V+IN • 2 GND • 3 COMM L • 4 COMM R • 5 MIC HI • 6 MIC LO Pin 1 Connect the eight wires as a guide. 12.5mm .49" AIRCRAFT INTERFACE SCHEMATIC 14.0mm...
... connector is part of the existing microphone and headphone jacks, leaving existing jacks intact for use with conventional headsets. PINOUT (FRONT VIEW) Pin 6 RED BLK WHT BLK/WH BLU WHT WH/BLU BLK/WH • 1 V+IN • 2 GND • 3 COMM L • 4 COMM R • 5 MIC HI • 6 MIC LO Pin 1 Connect the eight wires as a guide. 12.5mm .49" AIRCRAFT INTERFACE SCHEMATIC 14.0mm...

Owners Guide
Page 36
... of this guide for details. Jack Existing PTT switch and wiring (no connection to Bose headset) Tip (phone audio) Barrel (audio gnd) Stereo connection diagram 10-32 V DC 1/2A RED BLK WHT BLU WHT WHT/BLU BLK/WH BLK/WH Microphone - Jack 1V+IN 2 GND 3 COMM L 4 COMM R 5 MIC HI 6 MIC LO Ring (audio) Existing wiring to aircraft stereo intercom/audio panel TPP (PTT) Phone audio (right) Barrel (gnd) Stereo Headphone - 00_Cavu.book Page...
... of this guide for details. Jack Existing PTT switch and wiring (no connection to Bose headset) Tip (phone audio) Barrel (audio gnd) Stereo connection diagram 10-32 V DC 1/2A RED BLK WHT BLU WHT WHT/BLU BLK/WH BLK/WH Microphone - Jack 1V+IN 2 GND 3 COMM L 4 COMM R 5 MIC HI 6 MIC LO Ring (audio) Existing wiring to aircraft stereo intercom/audio panel TPP (PTT) Phone audio (right) Barrel (gnd) Stereo Headphone - 00_Cavu.book Page...

Owners Guide
Page 37
... table below: Pin number Color Purpose 1 Red V+IN: Headset power (10-32 VDC). Connect to the portion of the existing phone jack. 5 White MIC HI: Microphone/Hi-audio. For monaural operation, connect pins 3 and 4 together, and to the existing audio ground. 3 White COMM L: Phone communication: Left. 4 Blue COMM R: Phone communication: Right. Note: If the microphone works on making the connections The pinouts for the optional installed connector are shielded, twisted pairs with a black...
... table below: Pin number Color Purpose 1 Red V+IN: Headset power (10-32 VDC). Connect to the portion of the existing phone jack. 5 White MIC HI: Microphone/Hi-audio. For monaural operation, connect pins 3 and 4 together, and to the existing audio ground. 3 White COMM L: Phone communication: Left. 4 Blue COMM R: Phone communication: Right. Note: If the microphone works on making the connections The pinouts for the optional installed connector are shielded, twisted pairs with a black...
Owners Guide
Page 41
... The following accessories and customer-replaceable parts can be purchased directly from Bose. See the contact information above. • Additional control module cable - Specify: connector type • Ear cushion kit • Headband cushion kit • Carrying case • Microphone windscreen • Clothing clip • Earcup access cover • 6-pin connector to dual G/A plug cable adapter • Service kit (includes ear cushion kit, microphone windscreen, and headband...
... The following accessories and customer-replaceable parts can be purchased directly from Bose. See the contact information above. • Additional control module cable - Specify: connector type • Ear cushion kit • Headband cushion kit • Carrying case • Microphone windscreen • Clothing clip • Earcup access cover • 6-pin connector to dual G/A plug cable adapter • Service kit (includes ear cushion kit, microphone windscreen, and headband...


