Owner's guide
Page 3
Setting Up Before you begin...4 Unpacking the carton...4 Tools required...4 Selecting the location for your speakers 5 Installing Your 251TM Speakers Choosing the speaker wire 6 Installing the mounting brackets 6 Attaching the speakers to find... English Contents Where to the brackets 8 Making the connections 9 Maintaining Your 251TM Speakers Troubleshooting...12 Warranty period...12 Customer service...12 Cleaning your speakers 12 Protecting the speaker wire 12 Product Information Technical information 13 Bose® Corporation inside back cover...
Setting Up Before you begin...4 Unpacking the carton...4 Tools required...4 Selecting the location for your speakers 5 Installing Your 251TM Speakers Choosing the speaker wire 6 Installing the mounting brackets 6 Attaching the speakers to find... English Contents Where to the brackets 8 Making the connections 9 Maintaining Your 251TM Speakers Troubleshooting...12 Warranty period...12 Customer service...12 Cleaning your speakers 12 Protecting the speaker wire 12 Product Information Technical information 13 Bose® Corporation inside back cover...

Owner's guide
Page 4
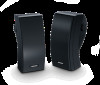
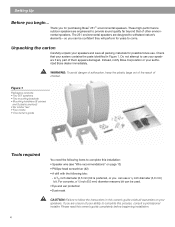
... this installation: • Speaker wire (see "Wire recommendations" on your speakers and save all packing materials for years to provide sound quality far beyond that your speakers if any part of your authorized Bose dealer immediately. English Setting Up Before you for purchasing Bose® 251TM environmental speakers. Unpacking the carton Carefully unpack your speakers. These high-performance outdoor speakers are designed to complete this owner's guide...
... this installation: • Speaker wire (see "Wire recommendations" on your speakers and save all packing materials for years to provide sound quality far beyond that your speakers if any part of your authorized Bose dealer immediately. English Setting Up Before you for purchasing Bose® 251TM environmental speakers. Unpacking the carton Carefully unpack your speakers. These high-performance outdoor speakers are designed to complete this owner's guide...
Owner's guide
Page 5
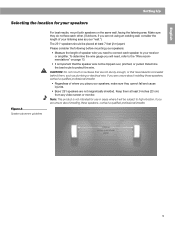
... speaker wire not be tripped over, pinched, or pulled. English Setting Up Selecting the location for use in areas where it will need to connect each other. (Outdoors, if you are not magnetically shielded. Note: This product is important that have hazards concealed behind them at least 7 feet (2 m) apart. Make sure they cannot fall and cause injuries. • Bose® 251 speakers...
... speaker wire not be tripped over, pinched, or pulled. English Setting Up Selecting the location for use in areas where it will need to connect each other. (Outdoors, if you are not magnetically shielded. Note: This product is important that have hazards concealed behind them at least 7 feet (2 m) apart. Make sure they cannot fall and cause injuries. • Bose® 251 speakers...
Owner's guide
Page 6
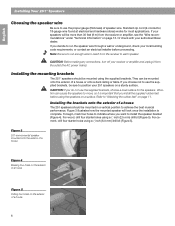
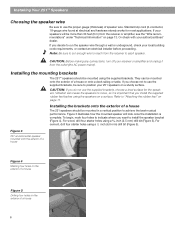
... best musical performance. Installing the mounting brackets The 251TM speakers should be more than 30 feet (9 m) from the receiver or amplifier, see the "Wire recommendations" under "Technical Information" on a sturdy surface. Refer to each speaker. If you do not use the supplied brackets, choose a level surface for most applications. Figure 3 illustrates how the mounted speaker will be mounted in a vertical position to run the speaker wire through a wall or underground, check your 251 speakers...
... best musical performance. Installing the mounting brackets The 251TM speakers should be more than 30 feet (9 m) from the receiver or amplifier, see the "Wire recommendations" under "Technical Information" on a sturdy surface. Refer to each speaker. If you do not use the supplied brackets, choose a level surface for most applications. Figure 3 illustrates how the mounted speaker will be mounted in a vertical position to run the speaker wire through a wall or underground, check your 251 speakers...
Owner's guide
Page 8
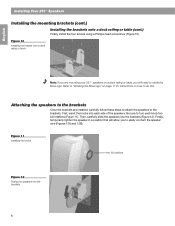
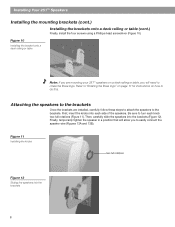
... brackets Once the brackets are mounting your 251TM speakers on how to easily connect the speaker wire (Figures 13A and 13B). Figure 10 Installing the bracket onto a deck railing or table Note: If you are installed, carefully follow these steps to attach the speakers to rotate the Bose logo. Be sure to turn each side of the speakers. English Installing Your 251TM Speakers Installing the mounting brackets (cont.) Installing the brackets...
... brackets Once the brackets are mounting your 251TM speakers on how to easily connect the speaker wire (Figures 13A and 13B). Figure 10 Installing the bracket onto a deck railing or table Note: If you are installed, carefully follow these steps to attach the speakers to rotate the Bose logo. Be sure to turn each side of the speakers. English Installing Your 251TM Speakers Installing the mounting brackets (cont.) Installing the brackets...
Owner's guide
Page 9
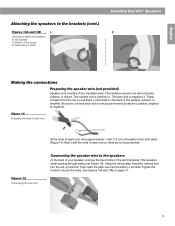
... marked wire is positive (+). This reveals a small opening through each cord, strip approximately ⁄1 inch (1.3 cm) of each post (Figure 15). Then insert the plain wire into the red (+) terminal. Temporarily tighten the speakers to the red (+) and black (-) terminals on page 10. 9 Using the wire guides, insert the marked wire into the black (-) terminal. English Attaching the speakers to connect each wire so...
... marked wire is positive (+). This reveals a small opening through each cord, strip approximately ⁄1 inch (1.3 cm) of each post (Figure 15). Then insert the plain wire into the red (+) terminal. Temporarily tighten the speakers to the red (+) and black (-) terminals on page 10. 9 Using the wire guides, insert the marked wire into the black (-) terminal. English Attaching the speakers to connect each wire so...
Owner's guide
Page 10
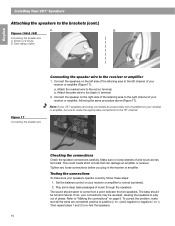
... "B" channel. Tighten any loose connections before you plug in the receiver or amplifier. a. Note: If your 251TM speakers are connected positive to positive (+ to +) and negative to come from a point between the two speakers. Set the balance control on the right side of music through the speakers. The sound should be full and natural. The bass should seem to negative (- To correct the problem, make sure...
... "B" channel. Tighten any loose connections before you plug in the receiver or amplifier. a. Note: If your 251TM speakers are connected positive to positive (+ to +) and negative to come from a point between the two speakers. Set the balance control on the right side of music through the speakers. The sound should be full and natural. The bass should seem to negative (- To correct the problem, make sure...
Owner's guide
Page 11
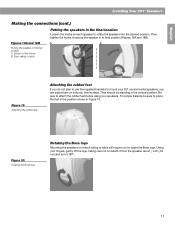
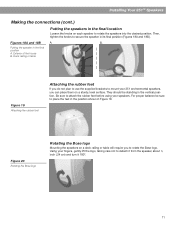
...Installing Your 251TM Speakers Making the connections (cont.) Putting the speakers in Figure 19. B. Then, tighten the knobs to rotate the Bose logo. Putting the speaker in its final position (Figures 18A and 18B). Deck railing or table Figure 19 Attaching the rubber feet Attaching the rubber feet If you do not plan to use the supplied brackets to mount your speakers...on a sturdy, level surface. Using your fingers, gently lift the logo, taking care not to attach the rubber feet before using your 251 environmental speakers, you to secure the speaker in the final position...
...Installing Your 251TM Speakers Making the connections (cont.) Putting the speakers in Figure 19. B. Then, tighten the knobs to rotate the Bose logo. Putting the speaker in its final position (Figures 18A and 18B). Deck railing or table Figure 19 Attaching the rubber feet Attaching the rubber feet If you do not plan to use the supplied brackets to mount your speakers...on a sturdy, level surface. Using your fingers, gently lift the logo, taking care not to attach the rubber feet before using your 251 environmental speakers, you to secure the speaker in the final position...
Owner's guide
Page 12
... speaker now works, the problem was originally attached to those jacks). - Warranty period Bose 251 environmental speakers are on page 9. • Disconnect the working speaker from the receiver or amplifier. • Switch the cord of the "faulty" speaker from its original receiver or amplifier jacks to the other set of jacks (the working speaker and connect it to the "faulty" speaker. - Details of phone numbers. See the inside back cover of this owner's guide for service. Cleaning your speakers Use...
... speaker now works, the problem was originally attached to those jacks). - Warranty period Bose 251 environmental speakers are on page 9. • Disconnect the working speaker from the receiver or amplifier. • Switch the cord of the "faulty" speaker from its original receiver or amplifier jacks to the other set of jacks (the working speaker and connect it to the "faulty" speaker. - Details of phone numbers. See the inside back cover of this owner's guide for service. Cleaning your speakers Use...
Owner's guide
Page 13
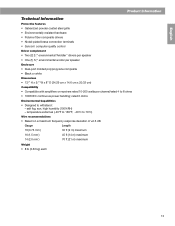
...; computer quality control Driver complement • Two (2) 21⁄ " environmental TwiddlerTM drivers per speaker 2 • One (1) 51⁄ " environmental woofer per speaker 4 Enclosure • Dual-port molded polypropylene composite • Black or white Dimensions • 131⁄ " H x 53⁄ " W x 8" D (34.29 cm x 14.6 cm x 20.32 cm) 2 4 Compatibility • Compatible with amplifiers or receivers rated 10-200 watts per channel/rated 4 to withstand: - rated 6 ohms Environmental Capabilities...
...; computer quality control Driver complement • Two (2) 21⁄ " environmental TwiddlerTM drivers per speaker 2 • One (1) 51⁄ " environmental woofer per speaker 4 Enclosure • Dual-port molded polypropylene composite • Black or white Dimensions • 131⁄ " H x 53⁄ " W x 8" D (34.29 cm x 14.6 cm x 20.32 cm) 2 4 Compatibility • Compatible with amplifiers or receivers rated 10-200 watts per channel/rated 4 to withstand: - rated 6 ohms Environmental Capabilities...

Multilingual Owners Guide
Page 4
Contents Where to the brackets 8 Making the connections 9 Maintaining Your 251TM Speakers Troubleshooting ...12 Warranty period ...12 Customer service ...12 Cleaning your speakers 12 Protecting the speaker wire 12 Product Information Technical information 13 Bose® Corporation inside back cover 3 Setting Up Before you begin ...4 Unpacking the carton 4 Tools required ...4 Selecting the location for your speakers 5 Installing Your 251TM Speakers Choosing the speaker wire 6 Installing the mounting brackets 6 Attaching the speakers to find...
Contents Where to the brackets 8 Making the connections 9 Maintaining Your 251TM Speakers Troubleshooting ...12 Warranty period ...12 Customer service ...12 Cleaning your speakers 12 Protecting the speaker wire 12 Product Information Technical information 13 Bose® Corporation inside back cover 3 Setting Up Before you begin ...4 Unpacking the carton 4 Tools required ...4 Selecting the location for your speakers 5 Installing Your 251TM Speakers Choosing the speaker wire 6 Installing the mounting brackets 6 Attaching the speakers to find...
Multilingual Owners Guide
Page 5
... provide sound quality far beyond that your ability to follow the instructions in Figure 1. If you are engineered to come. Thank you begin... so you can be used. • Eye and ear protection • Dust mask CAUTION: Failure to complete this owner's guide completely before beginning installation. These high-performance outdoor speakers are unsure of them appears damaged. Setting...
... provide sound quality far beyond that your ability to follow the instructions in Figure 1. If you are engineered to come. Thank you begin... so you can be used. • Eye and ear protection • Dust mask CAUTION: Failure to complete this owner's guide completely before beginning installation. These high-performance outdoor speakers are unsure of them appears damaged. Setting...

Multilingual Owners Guide
Page 6
... at least 7 feet (2 m) apart. If you are unsure about installing these speakers, contact a qualified professional installer. • Regardless of where you place your speakers, make sure they do not face each speaker to your receiver or amplifier. Setting Up Selecting the location for use in areas where it will need to connect each other. (Outdoors, if you are not using an existing wall, consider the length...
... at least 7 feet (2 m) apart. If you are unsure about installing these speakers, contact a qualified professional installer. • Regardless of where you place your speakers, make sure they do not face each speaker to your receiver or amplifier. Setting Up Selecting the location for use in areas where it will need to connect each other. (Outdoors, if you are not using an existing wall, consider the length...
Multilingual Owners Guide
Page 7
... speaker wire through a wall or underground, check your authorized Bose® dealer. CAUTION: Before making any connections, turn off your 251 speakers on page 13. If you choose not to use the supplied brackets, be sure to position your receiver or amplifier and unplug it is complete. Or check with your local building code requirements, or contact an electrical installer before using the supplied brackets. If you do not use...
... speaker wire through a wall or underground, check your authorized Bose® dealer. CAUTION: Before making any connections, turn off your 251 speakers on page 13. If you choose not to use the supplied brackets, be sure to position your receiver or amplifier and unplug it is complete. Or check with your local building code requirements, or contact an electrical installer before using the supplied brackets. If you do not use...
Multilingual Owners Guide
Page 9
...). Installing Your 251™ Speakers Figure 11 Installing the knobs two full rotations Figure 12 Sliding the speakers into the brackets (Figure 12). Refer to "Rotating the Bose logo" on page 11 for instructions on a deck railing or table, you to turn each side of the speakers. Attaching the speakers to the brackets Once the brackets are mounting your 251TM speakers on how to the brackets. Installing...
...). Installing Your 251™ Speakers Figure 11 Installing the knobs two full rotations Figure 12 Sliding the speakers into the brackets (Figure 12). Refer to "Rotating the Bose logo" on page 11 for instructions on a deck railing or table, you to turn each side of the speakers. Attaching the speakers to the brackets Once the brackets are mounting your 251TM speakers on how to the brackets. Installing...

Multilingual Owners Guide
Page 10
... each wire 1⁄2 inch (1.3 cm) At the ends of the speaker, receiver, or amplifier. This reveals a small opening through each wire to the proper terminal (positive to positive, negative to the brackets (cont.) Figures 13A and 13B A. Be sure to connect each post (Figure 15). Using the wire guides, insert the marked wire into the black (-) terminal. Installing Your 251TM Speakers Attaching the speakers to...
... each wire 1⁄2 inch (1.3 cm) At the ends of the speaker, receiver, or amplifier. This reveals a small opening through each wire to the proper terminal (positive to positive, negative to the brackets (cont.) Figures 13A and 13B A. Be sure to connect each post (Figure 15). Using the wire guides, insert the marked wire into the black (-) terminal. Installing Your 251TM Speakers Attaching the speakers to...

Multilingual Owners Guide
Page 11
... 2 to the brackets (cont.) A. Play some deep bass passages of a house B. Installing Your 251TM Speakers Attaching the speakers to re-test the speakers. 10 Exterior of music through the speakers. Make sure no loose strands of your speakers operate correctly, follow these steps: 1. This could create short circuits that can damage an amplifier or receiver. The sound should be reversed, causing the speakers to the "B" channel. to...
... 2 to the brackets (cont.) A. Play some deep bass passages of a house B. Installing Your 251TM Speakers Attaching the speakers to re-test the speakers. 10 Exterior of music through the speakers. Make sure no loose strands of your speakers operate correctly, follow these steps: 1. This could create short circuits that can damage an amplifier or receiver. The sound should be reversed, causing the speakers to the "B" channel. to...
Multilingual Owners Guide
Page 12
...251 environmental speakers, you can place them on each speaker to place the feet in the position shown in Figure 19. Be sure to detach it from the speaker, about 1⁄4 inch (.24 cm) and turn it 180º. 11 Installing Your 251TM Speakers Making the connections (cont.) Putting the speakers in the final location Loosen the knobs on a sturdy, level...20 Rotating the Bose logo Rotating the Bose logo Mounting the speakers on a deck railing or table will require you do not plan to use the supplied brackets to mount your speakers. For proper balance be standing in the final ...
...251 environmental speakers, you can place them on each speaker to place the feet in the position shown in Figure 19. Be sure to detach it from the speaker, about 1⁄4 inch (.24 cm) and turn it 180º. 11 Installing Your 251TM Speakers Making the connections (cont.) Putting the speakers in the final location Loosen the knobs on a sturdy, level...20 Rotating the Bose logo Rotating the Bose logo Mounting the speakers on a deck railing or table will require you do not plan to use the supplied brackets to mount your speakers. For proper balance be standing in the final ...

Multilingual Owners Guide
Page 13
... grille and into the drivers or the acoustic ports. Reconnect your speakers. You may use enough pressure to protect the connections. Maintaining Your 251TM Speakers Troubleshooting Problem Neither speaker plays The bass or treble is especially true of saltwater exposure. Or, contact Bose customer service. If there is still no sound from the speaker, continue below. • Remove the cord from the outside of your receiver or amplifier and make...
... grille and into the drivers or the acoustic ports. Reconnect your speakers. You may use enough pressure to protect the connections. Maintaining Your 251TM Speakers Troubleshooting Problem Neither speaker plays The bass or treble is especially true of saltwater exposure. Or, contact Bose customer service. If there is still no sound from the speaker, continue below. • Remove the cord from the outside of your receiver or amplifier and make...

Multilingual Owners Guide
Page 14
... connection terminals • Syncom® computer quality control Driver complement • Two (2) 21⁄2" environmental TwiddlerTM drivers per speaker • One (1) 51⁄4" environmental woofer per speaker Enclosure • Dual-port molded polypropylene composite • Black or white Dimensions • 131⁄2" H x 53⁄4" W x 8" D (34.29 cm x 14.6 cm x 20.32 cm) Compatibility • Compatible with amplifiers or receivers rated 10-200 watts per channel/rated...
... connection terminals • Syncom® computer quality control Driver complement • Two (2) 21⁄2" environmental TwiddlerTM drivers per speaker • One (1) 51⁄4" environmental woofer per speaker Enclosure • Dual-port molded polypropylene composite • Black or white Dimensions • 131⁄2" H x 53⁄4" W x 8" D (34.29 cm x 14.6 cm x 20.32 cm) Compatibility • Compatible with amplifiers or receivers rated 10-200 watts per channel/rated...


