Owner's guide
Page 3
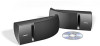
... performance usually associated with this work may be reproduced, modified, distributed or otherwise used without prior written permission. 3 Italiano Nederlands Svenska Setup 4 Unpacking 4 Placing your Bose® 161™ speakers 4 Choosing speaker cord 4 Preparing speaker cord 5 Connecting speaker cord to the speakers 5 Connecting speaker cord to provide long-term listening enjoyment...
... performance usually associated with this work may be reproduced, modified, distributed or otherwise used without prior written permission. 3 Italiano Nederlands Svenska Setup 4 Unpacking 4 Placing your Bose® 161™ speakers 4 Choosing speaker cord 4 Preparing speaker cord 5 Connecting speaker cord to the speakers 5 Connecting speaker cord to provide long-term listening enjoyment...
Owner's guide
Page 4
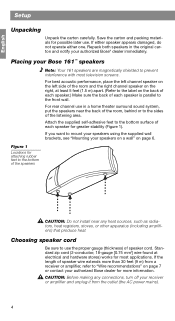
English Setup Unpacking Unpack the carton carefully. For best acoustic performance, place the left channel speaker on ... on page 6. Repack both speakers in a home theater surround sound system, put the speakers near any connections, turn off your authorized Bose dealer for more than 30 feet (9 m) from the outlet (the AC power mains). 4 If the length of each speaker for ...greater stability (Figure 1). Choosing speaker cord Be sure to use in the original carton and notify your Bose 161™ speakers Note: Your 161 speakers are magnetically shielded to the front wall.
English Setup Unpacking Unpack the carton carefully. For best acoustic performance, place the left channel speaker on ... on page 6. Repack both speakers in a home theater surround sound system, put the speakers near any connections, turn off your authorized Bose dealer for more than 30 feet (9 m) from the outlet (the AC power mains). 4 If the length of each speaker for ...greater stability (Figure 1). Choosing speaker cord Be sure to use in the original carton and notify your Bose 161™ speakers Note: Your 161 speakers are magnetically shielded to the front wall.

Owner's guide
Page 5
... wires. Depress the black terminal button, insert the plain (-) wire and release the button. In the same manner, connect the right speaker cord to -). English Setup Preparing speaker cord Speaker cord consists of insulation from the receiver to each speaker. This marked wire is striped, collared, or ribbed. The plain wire...
... wires. Depress the black terminal button, insert the plain (-) wire and release the button. In the same manner, connect the right speaker cord to -). English Setup Preparing speaker cord Speaker cord consists of insulation from the receiver to each speaker. This marked wire is striped, collared, or ribbed. The plain wire...
Owner's guide
Page 6
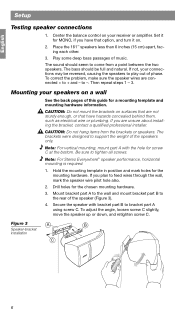
... 1. Center the balance control on surfaces that are not sturdy enough, or that option, and turn it for screw C at the bottom. Place the 161™ speakers less than 6 inches (15 cm) apart, facing each other. 3. Mount bracket part A to the wall and mount bracket part B to... on your connections may be full and natural. If you are connected + to come from the brackets or speakers. Be sure to -. English Setup Testing speaker connections 1. Play some deep bass passages of phase. The sound should be reversed, causing the speakers to bracket part A using screw ...
... 1. Center the balance control on surfaces that are not sturdy enough, or that option, and turn it for screw C at the bottom. Place the 161™ speakers less than 6 inches (15 cm) apart, facing each other. 3. Mount bracket part A to the wall and mount bracket part B to... on your connections may be full and natural. If you are connected + to come from the brackets or speakers. Be sure to -. English Setup Testing speaker connections 1. Play some deep bass passages of phase. The sound should be reversed, causing the speakers to bracket part A using screw ...
