
Owners Guide
Page 2
... (e.g. WARNING: Keep the remote control battery away from the internal laser component. Replace only with a battery of the AC (mains) receptacle. UL) CR2032 or DL3032 3-volt lithium battery. NO USER-SERVICABLE PARTS INSIDE. CAUTION: To prevent electric shock, match the wide blade of the line cord plug to the wide slot of the correct type and model number. Note: The product label is located on...
... (e.g. WARNING: Keep the remote control battery away from the internal laser component. Replace only with a battery of the AC (mains) receptacle. UL) CR2032 or DL3032 3-volt lithium battery. NO USER-SERVICABLE PARTS INSIDE. CAUTION: To prevent electric shock, match the wide blade of the line cord plug to the wide slot of the correct type and model number. Note: The product label is located on...

Owners Guide
Page 3
... been damaged in the operating instructions or as a bookcase or a cabinet that will not interfere with the apparatus. Opening or removing covers may touch dangerous voltage points or short-out parts that water or moisture are provided for all warnings - Use Proper Power Sources - Plug the product into the apparatus; Avoid Power Lines - Read these instructions - Heed all components before cleaning. 7. For example...
... been damaged in the operating instructions or as a bookcase or a cabinet that will not interfere with the apparatus. Opening or removing covers may touch dangerous voltage points or short-out parts that water or moisture are provided for all warnings - Use Proper Power Sources - Plug the product into the apparatus; Avoid Power Lines - Read these instructions - Heed all components before cleaning. 7. For example...

Owners Guide
Page 4
... an outlet on the bottom panel. The serial number can only be determined by turning the equipment off data, user settings, source inputs, power output, and setup data. No part of the following measures: • Reorient or relocate the receiving antenna. • Increase the separation between the equipment and receiver. • Connect the equipment to Bose for help Bose better understand product usage and performance over time. All trademarks referenced herein...
... an outlet on the bottom panel. The serial number can only be determined by turning the equipment off data, user settings, source inputs, power output, and setup data. No part of the following measures: • Reorient or relocate the receiving antenna. • Increase the separation between the equipment and receiver. • Connect the equipment to Bose for help Bose better understand product usage and performance over time. All trademarks referenced herein...
Owners Guide
Page 5
... 17 Rear panel input/outputs 17 Using headphones 17 Using the AUX IN connector 17 Using an external antenna 18 Installing an external antenna for FM radio ........ 18 Installing an external antenna for DIGITAL RADIO 18 Connecting to a Lifestyle® system 18 PERSONALIZING YOUR WAVE® MUSIC SYSTEM III 19 The setup menu 19 Adjusting the snooze time 20 Turning RDS on or off 20 Selecting the continuous play source 20 Changing the time format 20 Adjusting the display brightness 21 Setting the room code 21 Turning the...
... 17 Rear panel input/outputs 17 Using headphones 17 Using the AUX IN connector 17 Using an external antenna 18 Installing an external antenna for FM radio ........ 18 Installing an external antenna for DIGITAL RADIO 18 Connecting to a Lifestyle® system 18 PERSONALIZING YOUR WAVE® MUSIC SYSTEM III 19 The setup menu 19 Adjusting the snooze time 20 Turning RDS on or off 20 Selecting the continuous play source 20 Changing the time format 20 Adjusting the display brightness 21 Setting the room code 21 Turning the...
Owners Guide
Page 6
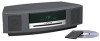
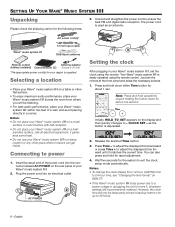
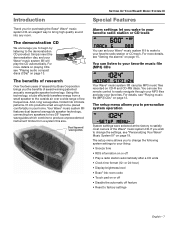
.... to adjust the displayed time backward or press Time + to exit the clock setup mode automatically. English Selecting a location • Place your Wave® music system III on a heat- as an antenna. ® Wave® music system III AC power cord(s)* 3.5 mm input cable DAB dipole antenna Remote control Antenna adapter (battery installed) Demonstration CD (Europe & UK only) *The appropriate power cord(s) for about one second. The power cord is used as the button is easily operated using the remote. Your Wave® music system III is depressed...
.... to adjust the displayed time backward or press Time + to exit the clock setup mode automatically. English Selecting a location • Place your Wave® music system III on a heat- as an antenna. ® Wave® music system III AC power cord(s)* 3.5 mm input cable DAB dipole antenna Remote control Antenna adapter (battery installed) Demonstration CD (Europe & UK only) *The appropriate power cord(s) for about one second. The power cord is used as the button is easily operated using the remote. Your Wave® music system III is depressed...
Owners Guide
Page 7
...; music system III can set your Wave® music system III to wake to your favorite radio station or CD track. You can use the remote control to easily navigate through your MP3 files and play your ® Wave® music system III will play MP3 music files recorded on CD-R and CD-RW discs. or 24-hour) • Display brightness level • Bose® link room code • Touch pad on or off feature • Reset to factory settings...
...; music system III can set your Wave® music system III to wake to your favorite radio station or CD track. You can use the remote control to easily navigate through your MP3 files and play your ® Wave® music system III will play MP3 music files recorded on CD-R and CD-RW discs. or 24-hour) • Display brightness level • Bose® link room code • Touch pad on or off feature • Reset to factory settings...
Owners Guide
Page 8
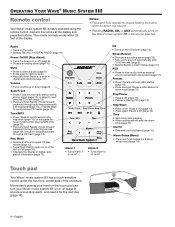
... remote at the display and press the buttons. Mute • Press to silence audio (page 9). • Press again to the system (page 17). Alarm Setup (Menu) • Press and hold : Starts a re-scan of digital radio station information (page 12). Volume • Turns volume up or down for the next day (page 16). 8 - Touch pad Your Wave® music system III has a touch-sensitive control under the top, front, center...
... remote at the display and press the buttons. Mute • Press to silence audio (page 9). • Press again to the system (page 17). Alarm Setup (Menu) • Press and hold : Starts a re-scan of digital radio station information (page 12). Volume • Turns volume up or down for the next day (page 16). 8 - Touch pad Your Wave® music system III has a touch-sensitive control under the top, front, center...
Owners Guide
Page 9
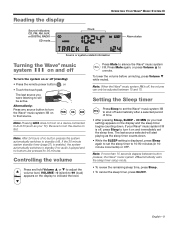
... adjust the volume level. Press Mute again, or press Volume to silence the Wave® music system III. If your Wave® music system III is displayed, press Sleep again to set the sleep time. Alternatively: Press any source button to turn the device on first. Press Mute to unmute. Reading the display Source indicators: CD, FM, AM, AUX, or DIGITAL RADIO CD mode Clock OPERATING YOUR WAVE® MUSIC SYSTEM III Alarm status Source or system-related information Turning the Wave® music system...
... adjust the volume level. Press Mute again, or press Volume to silence the Wave® music system III. If your Wave® music system III is displayed, press Sleep again to set the sleep time. Alternatively: Press any source button to turn the device on first. Press Mute to unmute. Reading the display Source indicators: CD, FM, AM, AUX, or DIGITAL RADIO CD mode Clock OPERATING YOUR WAVE® MUSIC SYSTEM III Alarm status Source or system-related information Turning the Wave® music system...
Owners Guide
Page 10
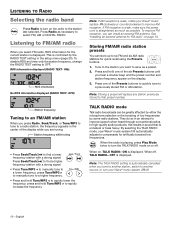
... station, switch to another source, or turn on or off , TALK RADIO- By selecting the TALK RADIO mode, your Wave® music system III clockwise or counterclockwise to the station last selected. RDS information displayed (RADIO TEXT- Press one of low frequencies by the RADIO TEXT setting in the center of the Presets buttons to quickly tune to an FM/AM station When you are tuning. See "Installing an external antenna for the current station...
... station, switch to another source, or turn on or off , TALK RADIO- By selecting the TALK RADIO mode, your Wave® music system III clockwise or counterclockwise to the station last selected. RDS information displayed (RADIO TEXT- Press one of low frequencies by the RADIO TEXT setting in the center of the Presets buttons to quickly tune to an FM/AM station When you are tuning. See "Installing an external antenna for the current station...
Owners Guide
Page 11
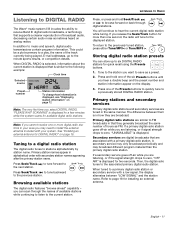
... receive Band III digital radio broadcasts, a technology that is displayed that supports a cleaner reproduction of the Presets buttons to quickly tune to the associated primary digital radio station. Listening to DIGITAL RADIO The Wave® music system III incudes the ability to page 18 for installing an external antenna. When DIGITAL RADIO is selected, information about the current station is similar to stations alphabetically by station name. Tuning to a digital radio station The digital radio tunes to the following example: Clock time Selected source Preset number Station...
... receive Band III digital radio broadcasts, a technology that is displayed that supports a cleaner reproduction of the Presets buttons to quickly tune to the associated primary digital radio station. Listening to DIGITAL RADIO The Wave® music system III incudes the ability to page 18 for installing an external antenna. When DIGITAL RADIO is selected, information about the current station is similar to stations alphabetically by station name. Tuning to a digital radio station The digital radio tunes to the following example: Clock time Selected source Preset number Station...

Owners Guide
Page 12
This capability is useful if you want is displayed, press Play Mode until the type of the Wave® music system III or decide to connect the external antenna. 1. The message, "PLEASE WAIT SCANNING" appears on the display until "AUTOSCAN" is available. Note: Due to display information about the currently playing digital station: • Station name (default setting): Displaying station signal strength For the current station, signal strength is displayed as...
This capability is useful if you want is displayed, press Play Mode until the type of the Wave® music system III or decide to connect the external antenna. 1. The message, "PLEASE WAIT SCANNING" appears on the display until "AUTOSCAN" is available. Note: Due to display information about the currently playing digital station: • Station name (default setting): Displaying station signal strength For the current station, signal strength is displayed as...

Owners Guide
Page 13
... quickly through your music files using the Tune/MP3 and Seek/Track remote control buttons. Press Play/Pause again to resume play properly and could interfere with the system's ability to the folder structure on CD-R and CD-RW discs. Note: If you want is played. • REPEAT TRACK - The elapsed time flashes while paused. Playing audio compact discs (CDs) Insert the disc, label side up, into the player, reload it, and start playing. Press Play Mode...
... quickly through your music files using the Tune/MP3 and Seek/Track remote control buttons. Press Play/Pause again to resume play properly and could interfere with the system's ability to the folder structure on CD-R and CD-RW discs. Note: If you want is played. • REPEAT TRACK - The elapsed time flashes while paused. Playing audio compact discs (CDs) Insert the disc, label side up, into the player, reload it, and start playing. Press Play Mode...
Owners Guide
Page 15
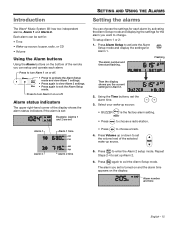
... factory alarm setting. • Press to choose a radio station. • Press to turn Alarm 2 on or off . Press Alarm Setup to exit the Alarm Setup mode. Press again to activate the Alarm Setup mode and display the settings for Alarm 1. 2. The alarm number and time start flashing. Press to change. Press to turn Alarm 1 on or off . • Press to activate the Alarm Setup mode and view Alarm 1 settings. • Press again to view Alarm 2 settings. • Press again to set Alarm 1 Alarm 2 Alarm 1 time AM PM AM PM Alarm 2 time SETTING AND USING...
... factory alarm setting. • Press to choose a radio station. • Press to turn Alarm 2 on or off . Press Alarm Setup to exit the Alarm Setup mode. Press again to activate the Alarm Setup mode and display the settings for Alarm 1. 2. The alarm number and time start flashing. Press to change. Press to turn Alarm 1 on or off . • Press to activate the Alarm Setup mode and view Alarm 1 settings. • Press again to view Alarm 2 settings. • Press again to set Alarm 1 Alarm 2 Alarm 1 time AM PM AM PM Alarm 2 time SETTING AND USING...

Owners Guide
Page 17
...; music system III. Using the AUX IN connector When using a TV, DVD player, computer, video game or other end of the cable to a Bose® link accessory, pressing AUX will automatically unmute when headphones are automatically muted when you can enhance your listening experience by playing the audio device through the Wave® music system III speakers. It is best to avoid extreme volume when using headphones, it will sound through your Wave® music system III is connected...
...; music system III. Using the AUX IN connector When using a TV, DVD player, computer, video game or other end of the cable to a Bose® link accessory, pressing AUX will automatically unmute when headphones are automatically muted when you can enhance your listening experience by playing the audio device through the Wave® music system III speakers. It is best to avoid extreme volume when using headphones, it will sound through your Wave® music system III is connected...
Owners Guide
Page 19
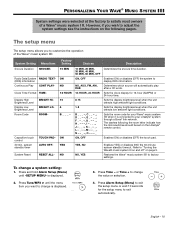
However, if you wish to adjust the system settings see the instructions on the Lifestyle® remote control. The setup menu The setup menu allows you want to change is displayed. 3. system standby timer TOUCH PADAUTO OFF- Determines which source will automatically play after a CD ends. Sets the clock display for your Wave® music system III when it is displayed. 2. The dashes following the room letter indicate how the microswitches should be set on the following pages. Enables...
However, if you wish to adjust the system settings see the instructions on the Lifestyle® remote control. The setup menu The setup menu allows you want to change is displayed. 3. system standby timer TOUCH PADAUTO OFF- Determines which source will automatically play after a CD ends. Sets the clock display for your Wave® music system III when it is displayed. 2. The dashes following the room letter indicate how the microswitches should be set on the following pages. Enables...
Owners Guide
Page 20
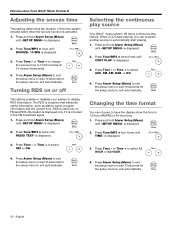
... -SETUP MENU- is displayed. 2. is activated. 1. or Time + to exit automatically. 20 - Press Tune/MP3 > four times until -SETUP MENU- Press Alarm Setup (Menu) to exit the setup menu or wait 10 seconds for the setup menu to automatically start playing. 1. Press and hold Alarm Setup (Menu) until SNOOZE- 10 MIN is used only on or off This setting enables or disables your system to display RDS information. PERSONALIZING YOUR WAVE® MUSIC SYSTEM III Adjusting the snooze time This setting...
... -SETUP MENU- is displayed. 2. is activated. 1. or Time + to exit automatically. 20 - Press Tune/MP3 > four times until -SETUP MENU- Press Alarm Setup (Menu) to exit the setup menu or wait 10 seconds for the setup menu to automatically start playing. 1. Press and hold Alarm Setup (Menu) until SNOOZE- 10 MIN is used only on or off This setting enables or disables your system to display RDS information. PERSONALIZING YOUR WAVE® MUSIC SYSTEM III Adjusting the snooze time This setting...

Owners Guide
Page 21
... Time - Refer to your Lifestyle® system beyond a second room you will need to change the room code to exit the setup menu or wait 10 seconds for low and high ambient light conditions. PERSONALIZING YOUR WAVE® MUSIC SYSTEM III 3. or Time + to select NO or YES. 4. Press Tune/MP3 > eight times until ROOM- Press and hold Alarm Setup (Menu) until -SETUP MENU- is displayed. 2. Adjusting the display brightness The brightness level of the remote control...
... Time - Refer to your Lifestyle® system beyond a second room you will need to change the room code to exit the setup menu or wait 10 seconds for low and high ambient light conditions. PERSONALIZING YOUR WAVE® MUSIC SYSTEM III 3. or Time + to select NO or YES. 4. Press Tune/MP3 > eight times until ROOM- Press and hold Alarm Setup (Menu) until -SETUP MENU- is displayed. 2. Adjusting the display brightness The brightness level of the remote control...
Owners Guide
Page 23
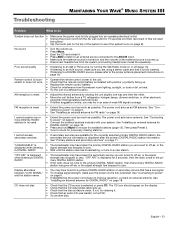
... system turns on (page 8). FM reception is weak • Extend the power cord as much as possible. See "Installing an external antenna for DIGITAL RADIO" on page 18. Then press Preset 3. • Tune to a new station. RADIO mary DIGITAL RADIO station. • If the radio does not tune to the primary DIGITAL RADIO station, then that the CD was loaded, not a DVD. • Try another disc. Remote control is inconsistent or does not work • Operate the remote control...
... system turns on (page 8). FM reception is weak • Extend the power cord as much as possible. See "Installing an external antenna for DIGITAL RADIO" on page 18. Then press Preset 3. • Tune to a new station. RADIO mary DIGITAL RADIO station. • If the radio does not tune to the primary DIGITAL RADIO station, then that the CD was loaded, not a DVD. • Try another disc. Remote control is inconsistent or does not work • Operate the remote control...
Owners Guide
Page 25
... audio CD 13 audio device, connecting 17 AUX IN connector 17 auxiliary source 9, 23 B battery replacement 24 Bose® link 17, 18, 19, 21 brightness level 19, 21 browsing digital radio stations 11 C carton 24 CD 13 CD play mode 13 CD source 13, 23 CD source information 13 CD track 13 CD-R 13 CD-RW 13 cleaning 24 clock display 9 clock setup mode 6 clock time 6 clock time format 6, 19, 20 clock, setting the 6 computer 17 connecting other equipment 17 connections 23 continuous play 19 continuous play source 20 customer service 23, 24 customizing operation...
... audio CD 13 audio device, connecting 17 AUX IN connector 17 auxiliary source 9, 23 B battery replacement 24 Bose® link 17, 18, 19, 21 brightness level 19, 21 browsing digital radio stations 11 C carton 24 CD 13 CD play mode 13 CD source 13, 23 CD source information 13 CD track 13 CD-R 13 CD-RW 13 cleaning 24 clock display 9 clock setup mode 6 clock time 6 clock time format 6, 19, 20 clock, setting the 6 computer 17 connecting other equipment 17 connections 23 continuous play 19 continuous play source 20 customer service 23, 24 customizing operation...

Owners Guide
Page 26
INDEX R radio alarm 15 radio station 10 rapid adjustment 6 RDS 19, 20 rear panel 17 registration card 24 remote control 8 remote control battery 23, 24 remote control buttons 14 re-scanning digital radio stations 12 restore audio 8 room code, setting 19, 21 S scan through a track 13 second room 21 secondary services 11 setting alarm 15 setup menu 19, 21 shipping carton 6 shipping instructions 24 skip 13, 14 sleep timer setup mode 9 snooze control 16, 19 snooze time 20 song title information 14 sounding alarm 16 station frequency 10...
INDEX R radio alarm 15 radio station 10 rapid adjustment 6 RDS 19, 20 rear panel 17 registration card 24 remote control 8 remote control battery 23, 24 remote control buttons 14 re-scanning digital radio stations 12 restore audio 8 room code, setting 19, 21 S scan through a track 13 second room 21 secondary services 11 setting alarm 15 setup menu 19, 21 shipping carton 6 shipping instructions 24 skip 13, 14 sleep timer setup mode 9 snooze control 16, 19 snooze time 20 song title information 14 sounding alarm 16 station frequency 10...


