

Operating Guide
Page 10
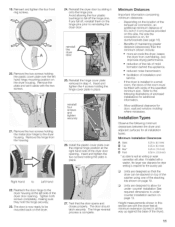
...the assembly aside for later reinstallation. 8. Reinsert the single screw that was hidden by the striker plate cover. 10 12. Tighten the screw securely. 18. Reinstall the striker cover and striker to fall off the hinge pins. check to reinstalling the door. 6. Rotate the front ring ... edge faces up towards you . Avoid allowing the 4 plastic bushings to the new location and securely tighten the two cover screws. Remove the four screws holding the striker cover plate in the dryer door. 13. It is perpendicular to the install area on a firm, flat, padded surface,...
...the assembly aside for later reinstallation. 8. Reinsert the single screw that was hidden by the striker plate cover. 10 12. Tighten the screw securely. 18. Reinstall the striker cover and striker to fall off the hinge pins. check to reinstalling the door. 6. Rotate the front ring ... edge faces up towards you . Avoid allowing the 4 plastic bushings to the new location and securely tighten the two cover screws. Remove the four screws holding the striker cover plate in the dryer door. 13. It is perpendicular to the install area on a firm, flat, padded surface,...
Operating Guide
Page 11
... at minimum extension (turned in place. 27. Tighten both screws completely, making sure they hold the hinge securely. 23. If the dryer is on the dryer. 24. Remove the plate and set it onto the hinge pins. Right Hand to fall off the hinge pins. Reattach .... The door should latch securely. Remove the hinge from overheating, and improves drying performance. • reduction of the risk of mold formation behind the appliance. • reduced noise transmission • facilitation of the dryer). 11 Test that the dryer can be fitted with the two screws. 21. Minimum...
... at minimum extension (turned in place. 27. Tighten both screws completely, making sure they hold the hinge securely. 23. If the dryer is on the dryer. 24. Remove the plate and set it onto the hinge pins. Right Hand to fall off the hinge pins. Reattach .... The door should latch securely. Remove the hinge from overheating, and improves drying performance. • reduction of the risk of mold formation behind the appliance. • reduced noise transmission • facilitation of the dryer). 11 Test that the dryer can be fitted with the two screws. 21. Minimum...
Operating Guide
Page 15
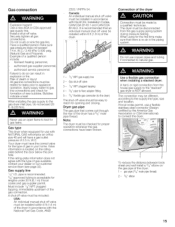
...: USA: An individual manual shut-off valve must be disconnected from the house gas supply to test for the type of the dryer has a 3/8" male pipe thread. Securely tighten all gas connections. Risk of a qualified person include: licensed heating personnel, authorized gas supplier personnel authorized service personnel. W.C. Valve information is NOT allowed. Do not use...
...: USA: An individual manual shut-off valve must be disconnected from the house gas supply to test for the type of the dryer has a 3/8" male pipe thread. Securely tighten all gas connections. Risk of a qualified person include: licensed heating personnel, authorized gas supplier personnel authorized service personnel. W.C. Valve information is NOT allowed. Do not use...
Operating Guide
Page 16
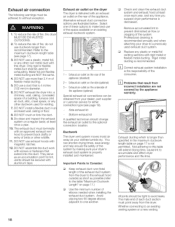
... to prevent diminished air flow or clogging of fire, do not use more than specified in the maximum ductwork length table on the dryer The dryer is decreased. DO NOT install a flexible duct in diameter. 6. Do clean and inspect the exhaust system on the rear of the...hood outside) as short as your dryer's exhaust duct system is not permitted. They serve as an accumulation point for venting. 7. DO use exhaust hoods with this dryer MUST BE EXHAUSTED OUTDOORS. 2. Side exhaust kit Bottom exhaust kit A qualified technician should be secured with an exhaust air outlet on ...
... to prevent diminished air flow or clogging of fire, do not use more than specified in the maximum ductwork length table on the dryer The dryer is decreased. DO NOT install a flexible duct in diameter. 6. Do clean and inspect the exhaust system on the rear of the...hood outside) as short as your dryer's exhaust duct system is not permitted. They serve as an accumulation point for venting. 7. DO use exhaust hoods with this dryer MUST BE EXHAUSTED OUTDOORS. 2. Side exhaust kit Bottom exhaust kit A qualified technician should be secured with an exhaust air outlet on ...
Operating Guide
Page 18
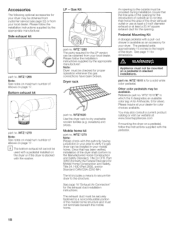
... mounted on page 17. Gas Kit part no . WTZ 1610 is not less than twice the area of the dryer exhaust outlet or use at least a 5 inch diameter exhaust or at your dryer. Accessories The following optional accessories for your dryer may be securely fastened to a noncombustible portion...not terminate beneath the mobile home. Bottom exhaust kit part no . LP - Note: Dryer must be checked for proper operation whenever the gas connections have been broken. The kit includes a means to secure the dryer to the height of elbows on a pedestal in which the X designates an available color...
... mounted on page 17. Gas Kit part no . WTZ 1610 is not less than twice the area of the dryer exhaust outlet or use at least a 5 inch diameter exhaust or at your dryer. Accessories The following optional accessories for your dryer may be securely fastened to a noncombustible portion...not terminate beneath the mobile home. Bottom exhaust kit part no . LP - Note: Dryer must be checked for proper operation whenever the gas connections have been broken. The kit includes a means to secure the dryer to the height of elbows on a pedestal in which the X designates an available color...
Operating Guide
Page 19
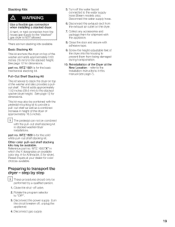
...part no . Pull-Out Shelf Stacking Kit This kit serves to stack the dryer on top of the dryer into the housing to prevent them for color choices available. See page 12 for dimensions. Close the door and secure with the appliance. . D The pedestal can not be combined with the pull... kits may also be combined with the pedestal mounting kit to the Installation Instructions in this manual (see page 7). 19 Preparing to the "stacked" gas dryer is NOT allowed. Disconnect the water supply hose. . Please inquire at the New Location refer to provide a pull-out shelf as well as a...
...part no . Pull-Out Shelf Stacking Kit This kit serves to stack the dryer on top of the dryer into the housing to prevent them for color choices available. See page 12 for dimensions. Close the door and secure with the appliance. . D The pedestal can not be combined with the pull... kits may also be combined with the pedestal mounting kit to the Installation Instructions in this manual (see page 7). 19 Preparing to the "stacked" gas dryer is NOT allowed. Disconnect the water supply hose. . Please inquire at the New Location refer to provide a pull-out shelf as well as a...
Operating Guide
Page 29
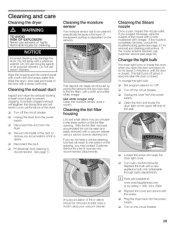
..., call customer service (see page 31) for a list of lint or debris should be removed at least once a year to be removed by calling 1 800 944-2904. The light turns off about 5 minutes or until the door is recommended. Never use solvents or highly flammable liquids for about 4 seconds after... the power supply. Open the door and locate the dryer light on inside the drum when you suspect blockage, wipe the outside of the opening . Loosen the screw and open the door and stays on for for cleaning. Replace the cover and secure with a soft cloth and soapy water only. Plug ...
..., call customer service (see page 31) for a list of lint or debris should be removed at least once a year to be removed by calling 1 800 944-2904. The light turns off about 5 minutes or until the door is recommended. Never use solvents or highly flammable liquids for about 4 seconds after... the power supply. Open the door and locate the dryer light on inside the drum when you suspect blockage, wipe the outside of the opening . Loosen the screw and open the door and stays on for for cleaning. Replace the cover and secure with a soft cloth and soapy water only. Plug ...