Operating Guide
Page 3
...concerning waste disposal 7 Before installing the dryer 7 Checklist for Installation 8 Installation Location 8 Dryer Dimensions 8 Door Hinge Reversal 9 Installation Types 12 Electrical connection 15 Gas connection 15 Exhaust air connection 16 Accessories 19 Preparing to transport the dryer ć step by step 20 OPERATING... cycles 25 Additional Options on LCD Menu 25 Operation 27 Using the dryer 27 Cleaning the lint filter 28 Using the dryer rack (Option 29 Cleaning and care 30 Cleaning the dryer 30 Cleaning the exhaust duct 30 Cleaning the moisture...
...concerning waste disposal 7 Before installing the dryer 7 Checklist for Installation 8 Installation Location 8 Dryer Dimensions 8 Door Hinge Reversal 9 Installation Types 12 Electrical connection 15 Gas connection 15 Exhaust air connection 16 Accessories 19 Preparing to transport the dryer ć step by step 20 OPERATING... cycles 25 Additional Options on LCD Menu 25 Operation 27 Using the dryer 27 Cleaning the lint filter 28 Using the dryer rack (Option 29 Cleaning and care 30 Cleaning the dryer 30 Cleaning the exhaust duct 30 Cleaning the moisture...
Operating Guide
Page 6
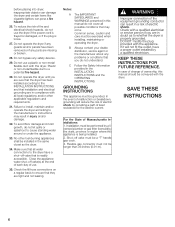
.... 31. B Always contact your dealer, distributor, service agent or the manufacturer about any safety devices. 29. Flexible gas connector must be conveyed with the dryer. Plastic or nonĆmetal flexible duct is loose. 27. Check with all water connections to ensure that all local regulations and/or other fuelĆburning appliances...
.... 31. B Always contact your dealer, distributor, service agent or the manufacturer about any safety devices. 29. Flexible gas connector must be conveyed with the dryer. Plastic or nonĆmetal flexible duct is loose. 27. Check with all water connections to ensure that all local regulations and/or other fuelĆburning appliances...

Operating Guide
Page 8
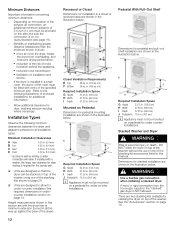
... operate below 41°F (5°C). Low temperatures affect the automatic program sequence and may contain gas or other fuelĆburning appliances in . (25mm) 5. Compensate for the dryer must be clean, level and firm. The size of the installation area depends on a substantial platform ...at temperatures above the floor to the left (see page 18). 8 Dryer Dimensions a b c (min)* c (max)* d e Dimension 27.0" (68.6 cm) 31.8" (81.0 cm) 36.9" (93.6 cm) 37.8" (95.9 cm) 22.0" (59.7 cm) angle 160° ...
... operate below 41°F (5°C). Low temperatures affect the automatic program sequence and may contain gas or other fuelĆburning appliances in . (25mm) 5. Compensate for the dryer must be clean, level and firm. The size of the installation area depends on a substantial platform ...at temperatures above the floor to the left (see page 18). 8 Dryer Dimensions a b c (min)* c (max)* d e Dimension 27.0" (68.6 cm) 31.8" (81.0 cm) 36.9" (93.6 cm) 37.8" (95.9 cm) 22.0" (59.7 cm) angle 160° ...

Operating Guide
Page 11
...fall off the hinge pins. The door should latch securely. reinstall the dryer door 27. Remove the two screws holding the plastic cover plate over the original hinge position at the left hand hinge mounting position on the dryer. 26. Rotate the striker cover and striker 180 degrees so the ...assembly fits to be mounted back on the dryer housing. Reinsert and tighten the...
...fall off the hinge pins. The door should latch securely. reinstall the dryer door 27. Remove the two screws holding the plastic cover plate over the original hinge position at the left hand hinge mounting position on the dryer. 26. Rotate the striker cover and striker 180 degrees so the ...assembly fits to be mounted back on the dryer housing. Reinsert and tighten the...
Operating Guide
Page 12
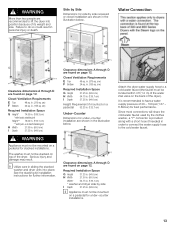
...installation See required dimensions in the illustration below . cm) F Bottom 24 sq. J Required Installation Space G Height 53.75 in. (136.5 cm) H Width 27.50 in. (69.9 cm) I Depth 37.25 in. (94.6 cm) J Pedestal ht. 15.0 in a small room, the doors of the stacking kit... greater distance (clearances) than the minimum shown include: S more air cools the dryer, keeps the dryer from the house gas supply to wall as close to the stacked" gas dryer is required for stacking the dryer on page 20. A hard, or rigid connection from overheating, and improves drying ...
...installation See required dimensions in the illustration below . cm) F Bottom 24 sq. J Required Installation Space G Height 53.75 in. (136.5 cm) H Width 27.50 in. (69.9 cm) I Depth 37.25 in. (94.6 cm) J Pedestal ht. 15.0 in a small room, the doors of the stacking kit... greater distance (clearances) than the minimum shown include: S more air cools the dryer, keeps the dryer from the house gas supply to wall as close to the stacked" gas dryer is required for stacking the dryer on page 20. A hard, or rigid connection from overheating, and improves drying ...
Operating Guide
Page 13
... best performance. It is provided along with pull-out shelf stacking kit H Width 27.50 in. (69.9 cm) I Depth 37.25 in the illustration below . , WARNING More than two people are recommended to lift the dryer into place. Side by side recessed or closet installation are shown in . (94...side I Depth 37.25 in . (139.1 cm) * washer and dryer side by the clothes washer, a Y connector is recommended to have a water supply pressure of the dryer). cm) F Bottom 24 sq. Required Installation Space G Height 37.25 in. (94.6 cm) H Width 27.50 in. (69.9 cm) Width* 54.75 in . (94.6...
... best performance. It is provided along with pull-out shelf stacking kit H Width 27.50 in. (69.9 cm) I Depth 37.25 in the illustration below . , WARNING More than two people are recommended to lift the dryer into place. Side by side recessed or closet installation are shown in . (94...side I Depth 37.25 in . (139.1 cm) * washer and dryer side by the clothes washer, a Y connector is recommended to have a water supply pressure of the dryer). cm) F Bottom 24 sq. Required Installation Space G Height 37.25 in. (94.6 cm) H Width 27.50 in. (69.9 cm) Width* 54.75 in . (94.6...
Operating Guide
Page 27
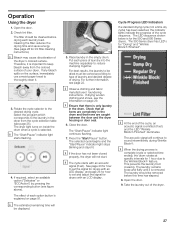
i Bleach may cause discoloration of the dryer. 27 Rotate the cycle selector to the Wrinkle BlockR feature. i The Start/Pause" indicator light starts flashing. 4. i Observe clothing and fabric manufacturers' laundering instructions. i Ensure that ... the door. 2. Check lint filter. Cleaning the filter reduces the drying time and saves energy. (See page 28 for the 500 and 800 Series dryers. Therefore, it is for lint filter cleaning instructions). Select the program which corresponds to type of laundry and desired degree of the cycle, an acoustic ...
i Bleach may cause discoloration of the dryer. 27 Rotate the cycle selector to the Wrinkle BlockR feature. i The Start/Pause" indicator light starts flashing. 4. i Observe clothing and fabric manufacturers' laundering instructions. i Ensure that ... the door. 2. Check lint filter. Cleaning the filter reduces the drying time and saves energy. (See page 28 for the 500 and 800 Series dryers. Therefore, it is for lint filter cleaning instructions). Select the program which corresponds to type of laundry and desired degree of the cycle, an acoustic ...