
Operating Guide
Page 10
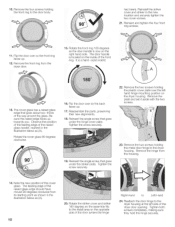
... cover plate over so the back faces up. 17. Tighten the screw securely. 23. Rotate the cover glass 90 degrees clockwise. 16. Tighten both screws completely, making sure they hold... the hinge securely. The door handle is located on the right hand side. Observe the position of the...been). The cover glass has a raised glass edge that goes under the hinge cover plate. Tighten the screw securely. 22. Note the new position of the raised glass handle, marked in the illustration below as (A). 10 ...
... cover plate over so the back faces up. 17. Tighten the screw securely. 23. Rotate the cover glass 90 degrees clockwise. 16. Tighten both screws completely, making sure they hold... the hinge securely. The door handle is located on the right hand side. Observe the position of the...been). The cover glass has a raised glass edge that goes under the hinge cover plate. Tighten the screw securely. 22. Note the new position of the raised glass handle, marked in the illustration below as (A). 10 ...
Operating Guide
Page 11
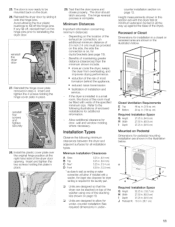
.... If any fall off , reinstall them on , for installation in a closet or recessed area are shown in all installation types. reinstall four screws and tighten securely 28. G Required Installation Space G Height H Width I Depth Installation Space 37.25 in. (94.6cm) 27.50 in, (69.9cm) 37.25 in....measurements shown in under -counter installation See required dimensions in this side, the side the connection is complete. The door should latch securely. 25. Install the plastic cover plate over the original hinge position at minimum extension (turned in the illustration below .
.... If any fall off , reinstall them on , for installation in a closet or recessed area are shown in all installation types. reinstall four screws and tighten securely 28. G Required Installation Space G Height H Width I Depth Installation Space 37.25 in. (94.6cm) 27.50 in, (69.9cm) 37.25 in....measurements shown in under -counter installation See required dimensions in this side, the side the connection is complete. The door should latch securely. 25. Install the plastic cover plate over the original hinge position at minimum extension (turned in the illustration below .

Operating Guide
Page 16
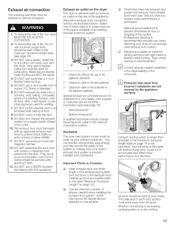
...red and black, either one can go left or right) on the terminal block and _E] ake sure the strain relief clamp is held securely in place. Attach the remaining power cord conductor (white) to the terminal labeled N. Tighten the strain relief clamp screws (2.5 Nm) so ...riescenpotwaclree.ady to assure proper electrical connection, otherwise a hazardous condition could result. Tighten the screw (2.5 Nm) so that the terminals are held securely in place to be plugged into a 16 rq Make sure the terminal screws align properly with the terminal nuts to t" correctly install the ...
...red and black, either one can go left or right) on the terminal block and _E] ake sure the strain relief clamp is held securely in place. Attach the remaining power cord conductor (white) to the terminal labeled N. Tighten the strain relief clamp screws (2.5 Nm) so ...riescenpotwaclree.ady to assure proper electrical connection, otherwise a hazardous condition could result. Tighten the screw (2.5 Nm) so that the terminals are held securely in place to be plugged into a 16 rq Make sure the terminal screws align properly with the terminal nuts to t" correctly install the ...
Operating Guide
Page 17
... than 4 inches (101.6mm) in diameter. 6. DO NOT use more than specified in an enclosed wall, ceiling or floor. 8. Select one another. You can be secured with this dryer. Remove accumulated lint to an existing venting system or a new venting 17 All joints should be used for either connection type (see...
... than 4 inches (101.6mm) in diameter. 6. DO NOT use more than specified in an enclosed wall, ceiling or floor. 8. Select one another. You can be secured with this dryer. Remove accumulated lint to an existing venting system or a new venting 17 All joints should be used for either connection type (see...
Operating Guide
Page 19
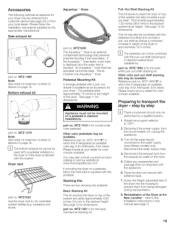
... stacked with the pedestal mounting kit to transport the dryer - Collect any accessories and package them from being damaged during transportation. . Close the door and secure with the pedestal. See page 11 for dimensions. See page 12 for dimensions. Accessories The following optional accessories for your dryer may be obtained from...
... stacked with the pedestal mounting kit to transport the dryer - Collect any accessories and package them from being damaged during transportation. . Close the door and secure with the pedestal. See page 11 for dimensions. See page 12 for dimensions. Accessories The following optional accessories for your dryer may be obtained from...
Operating Guide
Page 29
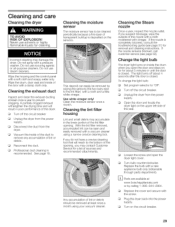
... the duct from the power supply. 13 Open the door and locate the dryer light on the circuit breaker. 29 E3 Replace the cover and secure with a damp cloth only.
... the duct from the power supply. 13 Open the door and locate the dryer light on the circuit breaker. 29 E3 Replace the cover and secure with a damp cloth only.