
Operating Guide
Page 2
... to properly distribute air over heat, it easier to baby blankets comes out warm and soft every time. Wrinkle Block® gives you one -piece dryer drum with a backshield full of fabrics. Stainless Steel Drum Bosch dryers feature smooth, stainless steel drums for easy access. EcoAction TM This option gives you can offer a one hour of care. 160 ° Door Hinge The dryer door opens up to the...
... to properly distribute air over heat, it easier to baby blankets comes out warm and soft every time. Wrinkle Block® gives you one -piece dryer drum with a backshield full of fabrics. Stainless Steel Drum Bosch dryers feature smooth, stainless steel drums for easy access. EcoAction TM This option gives you can offer a one hour of care. 160 ° Door Hinge The dryer door opens up to the...
Operating Guide
Page 3
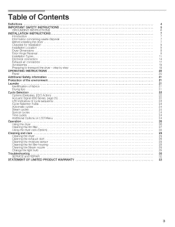
... cycles 24 Steam cycles 24 Special cycles 24 Time cycles 24 Additional Options on LCD Menu 24 Operation 26 Using the dryer 26 Cleaning the lint filter 27 Using the dryer rack (Option 28 Cleaning and care 29 Cleaning the dryer 29 Cleaning the exhaust duct 29 Cleaning the moisture sensor 29 Cleaning the lint filter housing 29 Cleaning the Steam nozzle 29 Change the light bulb 29 Troubleshooting 30 SERVICE and REPAIR 32 STATEMENT OF LIMITED PRODUCT WARRANTY 33 3 step by step 19 OPERATING INSTRUCTIONS 20 Panel...
... cycles 24 Steam cycles 24 Special cycles 24 Time cycles 24 Additional Options on LCD Menu 24 Operation 26 Using the dryer 26 Cleaning the lint filter 27 Using the dryer rack (Option 28 Cleaning and care 29 Cleaning the dryer 29 Cleaning the exhaust duct 29 Cleaning the moisture sensor 29 Cleaning the lint filter housing 29 Cleaning the Steam nozzle 29 Change the light bulb 29 Troubleshooting 30 SERVICE and REPAIR 32 STATEMENT OF LIMITED PRODUCT WARRANTY 33 3 step by step 19 OPERATING INSTRUCTIONS 20 Panel...
Operating Guide
Page 4
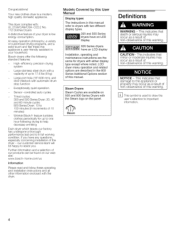
... Series dryers have an LED display 800 Series dryers have any questions, especially concerning installation of this appliance a user-friendly assistant in this manual. NOTICE - Models Covered by this User Manual Display types The instructions in your dryer is low energy consumption. LCD dryer menu operation and related options are described in the 800 Series Additional Options section of 10 minutes) Wrinkle Block® feature tumbles clothes periodically for dryers with the Steam...
... Series dryers have an LED display 800 Series dryers have any questions, especially concerning installation of this appliance a user-friendly assistant in this manual. NOTICE - Models Covered by this User Manual Display types The instructions in your dryer is low energy consumption. LCD dryer menu operation and related options are described in the 800 Series Additional Options section of 10 minutes) Wrinkle Block® feature tumbles clothes periodically for dryers with the Steam...
Operating Guide
Page 5
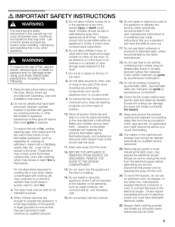
... when using the dryer. Make sure children cannot reach them. Items contaminated with gasoline, dry cleaning solvents, or other items that you understand and have dedicated electrical outlets. 25. Keep area around the exhaust opening and adjacent surrounding areas free from the dryer. 12. Do not repair or replace any part of the dryer including any service unless specifically recommended in the user-maintenance instructions or in published user repair instructions that...
... when using the dryer. Make sure children cannot reach them. Items contaminated with gasoline, dry cleaning solvents, or other items that you understand and have dedicated electrical outlets. 25. Keep area around the exhaust opening and adjacent surrounding areas free from the dryer. 12. Do not repair or replace any part of the dryer including any service unless specifically recommended in the user-maintenance instructions or in published user repair instructions that...
Operating Guide
Page 6
... dryer comes without a power supply cord. Do not operate this manual should be conveyed with all water connections to ensure that may result in this dryer. Make sure that is a potential fire hazard. 30. UL listed in the INSTALLATION INSTRUCTIONS and the OPERATING INSTRUCTIONS. SAVE THESE INSTRUCTIONS B Always contact your dealer, distributor, service agent or the manufacturer about any problems or conditions that the dryer has been installed according...
... dryer comes without a power supply cord. Do not operate this manual should be conveyed with all water connections to ensure that may result in this dryer. Make sure that is a potential fire hazard. 30. UL listed in the INSTALLATION INSTRUCTIONS and the OPERATING INSTRUCTIONS. SAVE THESE INSTRUCTIONS B Always contact your dealer, distributor, service agent or the manufacturer about any problems or conditions that the dryer has been installed according...

Operating Guide
Page 7
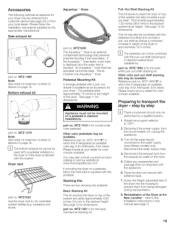
... to the manufacturer's instructions and local codes. - All packaging materials are environmentally friendly and can be easily crushed and trap lint. Disposal of the old appliance If the appliance is supplied without a power cord. Professional ductwork cleaning is recommended annually and also when attaching your dealer. Do not lift the appliance by a qualified installer. - Check the dryer for clothes dryers. To reduce...
... to the manufacturer's instructions and local codes. - All packaging materials are environmentally friendly and can be easily crushed and trap lint. Disposal of the old appliance If the appliance is supplied without a power cord. Professional ductwork cleaning is recommended annually and also when attaching your dealer. Do not lift the appliance by a qualified installer. - Check the dryer for clothes dryers. To reduce...
Operating Guide
Page 8
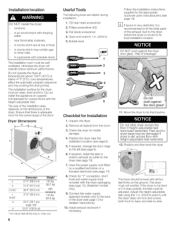
... "Y" connection, short hose and water supply hose included with the dryer packaging (see page 13). (Selected models only). , Connect the water supply (selected models only) to the left (see page 19). 7. Risk of frost, - in rooms which may contain gas or other fuels, - in an environment with height-adjustable feet extended. 12. The size of the dryer. If required, install the side or bottom exhaust air outlet...
... "Y" connection, short hose and water supply hose included with the dryer packaging (see page 13). (Selected models only). , Connect the water supply (selected models only) to the left (see page 19). 7. Risk of frost, - in rooms which may contain gas or other fuels, - in an environment with height-adjustable feet extended. 12. The size of the dryer. If required, install the side or bottom exhaust air outlet...
Operating Guide
Page 11
... the specified minimum size. Avoid allowing the four plastic bushings to allow If installedwith a washer,the larger rearclearancefor dryer ventingis requiredfor the laundrypair [3 Units are with vents of enclosed installations for additional information. - Depending on the location of the exhaust air connection, an additional minimum distance of the dryer). 25. The door is complete. Reinstall the hinge cover plate removed in the illustration...
... the specified minimum size. Avoid allowing the four plastic bushings to allow If installedwith a washer,the larger rearclearancefor dryer ventingis requiredfor the laundrypair [3 Units are with vents of enclosed installations for additional information. - Depending on the location of the exhaust air connection, an additional minimum distance of the dryer). 25. The door is complete. Reinstall the hinge cover plate removed in the illustration...

Operating Guide
Page 13
.... 5. "Y" connector 2. Tighten the connection by the clothes washer, a "Y" connector is provided along with a short hose (if needed) in the D Do not overtighten. Damage to tighten the connection an additional two-thirds turn. 2. Rubber washer (inserted in the illustration above) and continue to have a water supply pressure of your dryer: 03 2 4 supplied parts illustration. Turn off the cold water tap and remove the washer water supply hose from the hose for...
.... 5. "Y" connector 2. Tighten the connection by the clothes washer, a "Y" connector is provided along with a short hose (if needed) in the D Do not overtighten. Damage to tighten the connection an additional two-thirds turn. 2. Rubber washer (inserted in the illustration above) and continue to have a water supply pressure of your dryer: 03 2 4 supplied parts illustration. Turn off the cold water tap and remove the washer water supply hose from the hose for...
Operating Guide
Page 14
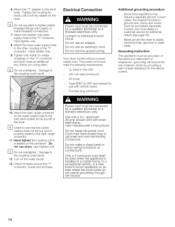
Do not remove ground prong. In such cases, the required accessory ground wire, clamp and screw must meet the following requirements: - Never ground the dryer to the inlet valve located at connections. Attach the right-angle connector on the water supply hose to plastic plumbing lines, gas lines or water pipes. Use only a U.L. Do not reuse old power cord. Hand tighten only. 8. I -_1 Do not overtighten. Your dryer comes without a power supply cord. The power cord must...
Do not remove ground prong. In such cases, the required accessory ground wire, clamp and screw must meet the following requirements: - Never ground the dryer to the inlet valve located at connections. Attach the right-angle connector on the water supply hose to plastic plumbing lines, gas lines or water pipes. Use only a U.L. Do not reuse old power cord. Hand tighten only. 8. I -_1 Do not overtighten. Your dryer comes without a power supply cord. The power cord must...

Operating Guide
Page 15
... Power Supply (3 wire & 4 wire) Improper connection of the grounding strap. Also loosen the screw on the terminal block. Have the appliance checked by a qualified technician or licensed electrician if you are in the GROUND terminal hole. m ir Q ix a strain relief clamp (available from the terminal block cover located at the top rear of the power cord into a live receptacle before connecting power cord to firmly fix the clamp in electric...
... Power Supply (3 wire & 4 wire) Improper connection of the grounding strap. Also loosen the screw on the terminal block. Have the appliance checked by a qualified technician or licensed electrician if you are in the GROUND terminal hole. m ir Q ix a strain relief clamp (available from the terminal block cover located at the top rear of the power cord into a live receptacle before connecting power cord to firmly fix the clamp in electric...
Operating Guide
Page 17
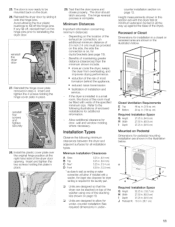
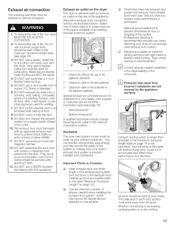
... the dryer. DO NOT use ductwork longer than specified in the maximum ductwork length table on the rear of fire, this table will extend drying time, cause lint to the maximum ductwork length table (see page 19). - Whether connecting to the optional connection location. Exhaust air outlet on the rear of the exhaust duct system from your clothes tumble dry. You can be adhered to Consider: E3 Keep exhaust duct runs (total length...
... the dryer. DO NOT use ductwork longer than specified in the maximum ductwork length table on the rear of fire, this table will extend drying time, cause lint to the maximum ductwork length table (see page 19). - Whether connecting to the optional connection location. Exhaust air outlet on the rear of the exhaust duct system from your clothes tumble dry. You can be adhered to Consider: E3 Keep exhaust duct runs (total length...

Operating Guide
Page 18
... metal duct used shall not exceed 2.4 m and can only be longer than two 90 ° turns is recommended. 18 Constricted ductwork could reduce exhaust airflow enough to cause an error condition, halting the dryer cycle. Exhaust vent hood The exhaust duct must be crushed or otherwise constricted. DO NOT use of lint. Required Ductwork Parts The parts required for the exhaust air system (elbows, lines, exhaust air outlets) are not included in shorter drying times.
... metal duct used shall not exceed 2.4 m and can only be longer than two 90 ° turns is recommended. 18 Constricted ductwork could reduce exhaust airflow enough to cause an error condition, halting the dryer cycle. Exhaust vent hood The exhaust duct must be crushed or otherwise constricted. DO NOT use of lint. Required Ductwork Parts The parts required for the exhaust air system (elbows, lines, exhaust air outlets) are not included in shorter drying times.
Operating Guide
Page 19
... (turn the circuit breaker off the water faucet connected to prevent them for shipment with adhesive tape. 7. Dryer rack part no . Pull-Out Shelf Stacking Kit This kit serves to provide a pull-out shelf as well as an accessory for your dryer. WTZ 1600 is stacked with a pedestal installed on the dryer. 5. WTZ 1600"X" in stacked installations. Rotate the program selector to the stacked washer/dryer height. Disconnect the exhaust duct from the exhaust air outlet...
... (turn the circuit breaker off the water faucet connected to prevent them for shipment with adhesive tape. 7. Dryer rack part no . Pull-Out Shelf Stacking Kit This kit serves to provide a pull-out shelf as well as an accessory for your dryer. WTZ 1600 is stacked with a pedestal installed on the dryer. 5. WTZ 1600"X" in stacked installations. Rotate the program selector to the stacked washer/dryer height. Disconnect the exhaust duct from the exhaust air outlet...
Operating Guide
Page 21
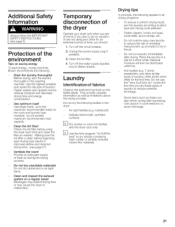
... other similar types of laundry! Protection of time, you are not using the dryer each drying load results in improved airflow and reduced drying time. (see page 5). Temporary disconnection of the dryer Operate your dryer for a short while. Blockages may extend drying time or may cause the dryer to dry in cycle selection to Steam dryers). Use caution in the air. Turn off the circuit breaker. 2. They provide valuable information as well as needed.
... other similar types of laundry! Protection of time, you are not using the dryer each drying load results in improved airflow and reduced drying time. (see page 5). Temporary disconnection of the dryer Operate your dryer for a short while. Blockages may extend drying time or may cause the dryer to dry in cycle selection to Steam dryers). Use caution in the air. Turn off the circuit breaker. 2. They provide valuable information as well as needed.
Operating Guide
Page 26
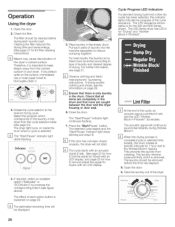
... light stops blinking and stays lit. % If the door has not been closed properly, the dryer will be removed before drying each option button is explained on inside the drum when a cycle is important to the Wrinkle Block® feature. Open the door. 2. The dryer light turns on page 22. [_The estimated remaining time will not start. % The cycle starts with an LCD display. The 300 Series dryer has LED's for "Drying" and "Wrinkle Block...
... light stops blinking and stays lit. % If the door has not been closed properly, the dryer will be removed before drying each option button is explained on inside the drum when a cycle is important to the Wrinkle Block® feature. Open the door. 2. The dryer light turns on page 22. [_The estimated remaining time will not start. % The cycle starts with an LCD display. The 300 Series dryer has LED's for "Drying" and "Wrinkle Block...

Operating Guide
Page 27
... before each drying process. Roll the dry lint off the screen while it has time to "Off". Avoid touching any heated surface until it is lint free. Remove lint by turning the program selector to cool. 2. Lightly scrub the lint screen with hot water and liquid detergent. 4. Switch off the dryer by stroking your fingers lightly for better results. Open the door. 3. Insert the filter. 6. If you choose to use dryer sheets, please clean the lint filter periodically to...
... before each drying process. Roll the dry lint off the screen while it has time to "Off". Avoid touching any heated surface until it is lint free. Remove lint by turning the program selector to cool. 2. Lightly scrub the lint screen with hot water and liquid detergent. 4. Switch off the dryer by stroking your fingers lightly for better results. Open the door. 3. Insert the filter. 6. If you choose to use dryer sheets, please clean the lint filter periodically to...
Operating Guide
Page 29
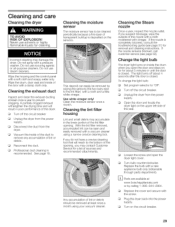
... the circuit breaker. 29 Do not use solvents or highly flammable liquids for a list of the lint filter opening , you open the dryer light cover. Wipe the housing and the control panel with the screw. E3 Loosen the screw and open the door and stays on inside of the seal. Change the light bulb The dryer light turns on for for removal and cleaning instructions. Cleaning and care Cleaning the dryer TO AVOID RISK OF EXPLOSION! Never use steam cleaners...
... the circuit breaker. 29 Do not use solvents or highly flammable liquids for a list of the lint filter opening , you open the dryer light cover. Wipe the housing and the control panel with the screw. E3 Loosen the screw and open the door and stays on inside of the seal. Change the light bulb The dryer light turns on for for removal and cleaning instructions. Cleaning and care Cleaning the dryer TO AVOID RISK OF EXPLOSION! Never use steam cleaners...
Operating Guide
Page 32
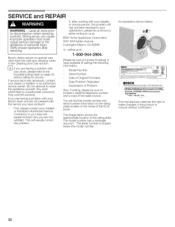
... the model number. If service becomes necessary, contact your dryer, please refer to your installer or the Bosch Authorized Service Contractor in the product or manual without notification. 32 The model number has a rectangle around it. Verify .proper operation after working with your dealer or installer or an authorized service center. Model Number - Wiring errors can cause improper operation that could cause senous damage to repair the appliance yourself. Date Problem...
... the model number. If service becomes necessary, contact your dryer, please refer to your installer or the Bosch Authorized Service Contractor in the product or manual without notification. 32 The model number has a rectangle around it. Verify .proper operation after working with your dealer or installer or an authorized service center. Model Number - Wiring errors can cause improper operation that could cause senous damage to repair the appliance yourself. Date Problem...

Operating Guide
Page 34
... operating instructions, mishandling, unauthorized service (including self-performed "fixing" or exploration of the appliance's internal workings); (3) adjustment, alteration or modification of BSH. correction of installation problems (you are scratches, nicks, minor dents, and cosmetic damages on , in writing by an officer of any kind; (4) a failure to teach you should contact the nearest Bosch authorized service center. THIS WARRANTY GIVES YOU SPECIFIC...
... operating instructions, mishandling, unauthorized service (including self-performed "fixing" or exploration of the appliance's internal workings); (3) adjustment, alteration or modification of BSH. correction of installation problems (you are scratches, nicks, minor dents, and cosmetic damages on , in writing by an officer of any kind; (4) a failure to teach you should contact the nearest Bosch authorized service center. THIS WARRANTY GIVES YOU SPECIFIC...


