User Guide
Page 2
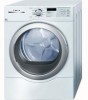
...This option gives you cannot reach your gas supplier, call your building. DynamicAirt The Bosch Vision DynamicAirt system features gentle heat and high air volume in the home without causing a disturbance. Stainless Steel Drum Bosch dryers feature smooth, stainless steel drums for easy... it is conveniently located in the Bosch Vision dryer for a wide array of fabrics. Washer and dryer doors also open in your gas supplier from a neighbor's phone. Quiet Performance Bosch laundry appliances use any other appliance. - Dryer Rack The dryer rack protects the most delicate fabrics ...
...This option gives you cannot reach your gas supplier, call your building. DynamicAirt The Bosch Vision DynamicAirt system features gentle heat and high air volume in the home without causing a disturbance. Stainless Steel Drum Bosch dryers feature smooth, stainless steel drums for easy... it is conveniently located in the Bosch Vision dryer for a wide array of fabrics. Washer and dryer doors also open in your gas supplier from a neighbor's phone. Quiet Performance Bosch laundry appliances use any other appliance. - Dryer Rack The dryer rack protects the most delicate fabrics ...
User Guide
Page 3
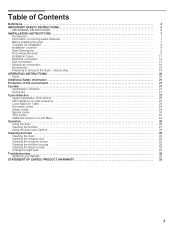
...concerning waste disposal 7 Before installing the dryer 7 Checklist for Installation 8 Installation Location 8 Dryer Dimensions 8 Door Hinge Reversal 9 Installation Types 11 Electrical connection 14 Gas connection 15 Exhaust air connection 16 Accessories 18 Preparing to transport the dryer ć step by step 19 ...Additional Options on LCD Menu 24 Operation 26 Using the dryer 26 Cleaning the lint filter 27 Using the dryer rack (Option 28 Cleaning and care 29 Cleaning the dryer 29 Cleaning the exhaust duct 29 Cleaning the moisture sensor...
...concerning waste disposal 7 Before installing the dryer 7 Checklist for Installation 8 Installation Location 8 Dryer Dimensions 8 Door Hinge Reversal 9 Installation Types 11 Electrical connection 14 Gas connection 15 Exhaust air connection 16 Accessories 18 Preparing to transport the dryer ć step by step 19 ...Additional Options on LCD Menu 24 Operation 26 Using the dryer 26 Cleaning the lint filter 27 Using the dryer rack (Option 28 Cleaning and care 29 Cleaning the dryer 29 Cleaning the exhaust duct 29 Cleaning the moisture sensor...
User Guide
Page 4
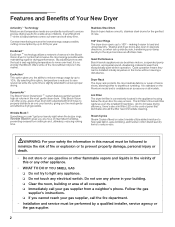
...following standard features: - A distinctive feature of 10 minutes) - Your new clothes dryer is low energy consumption. This indicates that damage to 17.6 lbs (8 kg) - Bosch dryers offer the following drying to important information. 4 Wrinkle BlockR feature tumbles clothes periodically... instructions and all other information enclosed with automatic drum stop function - Timed cycles 300 and 500 Series Dryer: 20, 40 and 60 minute cycles 800 Series Dryer: 10 to assist you have any questions, especially concerning installation of customized drying programs...
...following standard features: - A distinctive feature of 10 minutes) - Your new clothes dryer is low energy consumption. This indicates that damage to 17.6 lbs (8 kg) - Bosch dryers offer the following drying to important information. 4 Wrinkle BlockR feature tumbles clothes periodically... instructions and all other information enclosed with automatic drum stop function - Timed cycles 300 and 500 Series Dryer: 20, 40 and 60 minute cycles 800 Series Dryer: 10 to assist you have any questions, especially concerning installation of customized drying programs...
User Guide
Page 5
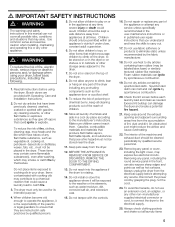
Read all instructions before each laundry load and clean as they are provided with the controls. 16. Bosch dryers are instructed in safe practices by qualified persons. 5. Children should be kept a safe distance away from the electrical supply before attempting any ...not cover all possible risks, conditions and situations that could cause a laundry load to catch fire. 3. These items may be stored near the dryer. 11. Store all laundry items 5 Always check clothing pockets and shake out all laundry chemicals and aids in cabinets or other flammable or explosive...
Read all instructions before each laundry load and clean as they are provided with the controls. 16. Bosch dryers are instructed in safe practices by qualified persons. 5. Children should be kept a safe distance away from the electrical supply before attempting any ...not cover all possible risks, conditions and situations that could cause a laundry load to catch fire. 3. These items may be stored near the dryer. 11. Store all laundry items 5 Always check clothing pockets and shake out all laundry chemicals and aids in cabinets or other flammable or explosive...
User Guide
Page 6
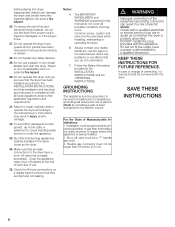
.... SAVE THESE INSTRUCTIONS 6 No other applicable regulations and requirements. 31. Shut-off valve that all water connections to whether the dryer is loose. 27. Do not operate this manual do not let spills or splashout to the manufacturer's instructions may occur. Do not use . ...35. KEEP THESE INSTRUCTIONS FOR FUTURE REFERENCE. Do not operate the dryer if any guards and/or panels have a shut-off valve must be a T" handle gas ...
.... SAVE THESE INSTRUCTIONS 6 No other applicable regulations and requirements. 31. Shut-off valve that all water connections to whether the dryer is loose. 27. Do not operate this manual do not let spills or splashout to the manufacturer's instructions may occur. Do not use . ...35. KEEP THESE INSTRUCTIONS FOR FUTURE REFERENCE. Do not operate the dryer if any guards and/or panels have a shut-off valve must be a T" handle gas ...

User Guide
Page 7
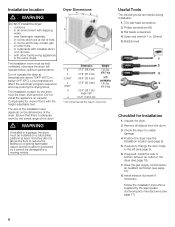
...carefully. NOTICE Remove the appliance packaging carefully to prevent damage to the manufacturer's instructions and local codes. - Before installing the dryer Before installing the dryer to components for natural gas. Do not lift it must be installed in accordance with all local codes or, in the absence of a local code... with local codes, or in absence of local codes, with the National Fuel Gas Code, ANSI Z223.1/NFPA 54 or the Canadian Natural Gas and Propane Installation Code CAN/CSAĆB149.1 Note: This gas dryer has been UL and C-UL listed for safe operation up to a height of...
...carefully. NOTICE Remove the appliance packaging carefully to prevent damage to the manufacturer's instructions and local codes. - Before installing the dryer Before installing the dryer to components for natural gas. Do not lift it must be installed in accordance with all local codes or, in the absence of a local code... with local codes, or in absence of local codes, with the National Fuel Gas Code, ANSI Z223.1/NFPA 54 or the Canadian Natural Gas and Propane Installation Code CAN/CSAĆB149.1 Note: This gas dryer has been UL and C-UL listed for safe operation up to a height of...
User Guide
Page 8
...;C) or below optimum performance. Flat blade screwdriver 4. Open end wrench 1 in the same closet. Bubble level Checklist for the dryer must be damaged by a moving vehicle Dryer Dimensions a b c (min)* c (max)* d e Dimension 27.0" (68.6 cm) 31.8" (81.0 cm) 36.9" (93.6 cm) 37.8" (95.9 cm) 22.0" (59.7 cm...may contain gas or other fuelĆburning appliances in . (25mm) 5. If required, install the side or bottom exhaust air outlet on carpets! near the installation location (see page 15). 8. with other fuels, - Do not operate the dryer at risk of the dryer. The ...
...;C) or below optimum performance. Flat blade screwdriver 4. Open end wrench 1 in the same closet. Bubble level Checklist for the dryer must be damaged by a moving vehicle Dryer Dimensions a b c (min)* c (max)* d e Dimension 27.0" (68.6 cm) 31.8" (81.0 cm) 36.9" (93.6 cm) 37.8" (95.9 cm) 22.0" (59.7 cm...may contain gas or other fuelĆburning appliances in . (25mm) 5. If required, install the side or bottom exhaust air outlet on carpets! near the installation location (see page 15). 8. with other fuels, - Do not operate the dryer at risk of the dryer. The ...
User Guide
Page 9
...section (page 30) and find the fault. Feet and/or dryer base may be damaged if dryer is slid across the floor if heightĆadjustable feet have been extended. Open the shut-off the gas supply if the dryer must be level with heightĆadjustable feet extended. 10. ...Read the operating instructions to understand how your dryer operates. (see page 14). 13. q After 3-5 minutes press the Start/Pause"...
...section (page 30) and find the fault. Feet and/or dryer base may be damaged if dryer is slid across the floor if heightĆadjustable feet have been extended. Open the shut-off the gas supply if the dryer must be level with heightĆadjustable feet extended. 10. ...Read the operating instructions to understand how your dryer operates. (see page 14). 13. q After 3-5 minutes press the Start/Pause"...
User Guide
Page 10
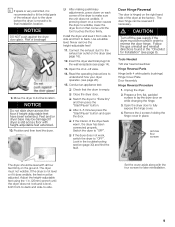
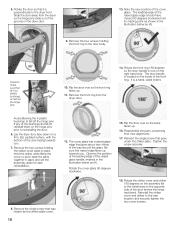
... door (where the hinge had been). The door handle is perpendicular to the door body. Remove the two screws holding the front ring to the dryer front. striker 8. Be sure this raised edge faces up towards you . Reinsert the single screw that was hidden by the striker plate cover. 10... the bottom of the raised glass handle, marked in the illustration below as (A). Hold the striker while lifting the cover so as shown in the dryer door. 13. Remove the single screw that goes under the striker plate. Rotate the cover glass 90 degrees clockwise. 15. Remove the front ring ...
... door (where the hinge had been). The door handle is perpendicular to the door body. Remove the two screws holding the front ring to the dryer front. striker 8. Be sure this raised edge faces up towards you . Reinsert the single screw that was hidden by the striker plate cover. 10... the bottom of the raised glass handle, marked in the illustration below as (A). Hold the striker while lifting the cover so as shown in the dryer door. 13. Remove the single screw that goes under the striker plate. Rotate the cover glass 90 degrees clockwise. 15. Remove the front ring ...
User Guide
Page 11
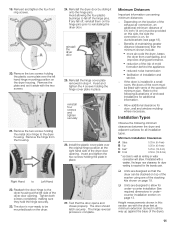
...on the hinge pins prior to Left Hand 22. reinstall four screws and tighten securely 26. If the dryer is complete. Allow additional clearance for the laundry pair. Height measurements shown in place. 27. Insert and tighten the two screws holding the hinge cover plate in . (12.8 mm) * ...as venting or water connection will allow for ducts/brackets (see page 18). - Depending on the location of the exhaust air connection, an additional minimum distance of the dryer door opening ....
...on the hinge pins prior to Left Hand 22. reinstall four screws and tighten securely 26. If the dryer is complete. Allow additional clearance for the laundry pair. Height measurements shown in place. 27. Insert and tighten the two screws holding the hinge cover plate in . (12.8 mm) * ...as venting or water connection will allow for ducts/brackets (see page 18). - Depending on the location of the exhaust air connection, an additional minimum distance of the dryer door opening ....
User Guide
Page 12
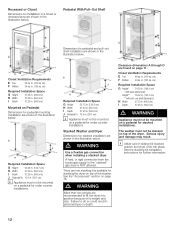
... stacked installation are shown in . (94.6 cm) Mounted on page 18. cm) F Bottom 24 sq. d WARNING Use a flexible gas connection when installing a stacked dryer. J Required Installation Space G Height 52.25 in. (132.7 cm) H Width 27.50 in. (69.9 cm) I Depth 37.25 in the illustration below . d WARNING More than two people are found...
... stacked installation are shown in . (94.6 cm) Mounted on page 18. cm) F Bottom 24 sq. d WARNING Use a flexible gas connection when installing a stacked dryer. J Required Installation Space G Height 52.25 in. (132.7 cm) H Width 27.50 in. (69.9 cm) I Depth 37.25 in the illustration below . d WARNING More than two people are found...
User Guide
Page 13
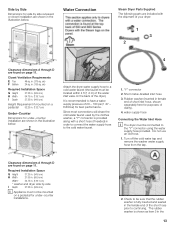
...braided inlet hose 3. in . (310 sq. Required Installation Space G Height 37.25 in. (94.6 cm) H Width 27.50 in. (69.9 cm) Width* 54.75 in. (139.1 cm) * washer and dryer side by side I Depth 37.25 in. (94.6 cm) Height Requirement if mounted on a pedestal 52.25 in..... 1. Y" connector 2. Side by Side Dimensions for side by side recessed or closet installation are shown in the illustration below . 4 Attach the dryer water supply hose to a cold water faucet (the faucet must be mounted on a pedestal for under -counter installation are shown in the illustration below...
...braided inlet hose 3. in . (310 sq. Required Installation Space G Height 37.25 in. (94.6 cm) H Width 27.50 in. (69.9 cm) Width* 54.75 in. (139.1 cm) * washer and dryer side by side I Depth 37.25 in. (94.6 cm) Height Requirement if mounted on a pedestal 52.25 in..... 1. Y" connector 2. Side by Side Dimensions for side by side recessed or closet installation are shown in the illustration below . 4 Attach the dryer water supply hose to a cold water faucet (the faucet must be mounted on a pedestal for under -counter installation are shown in the illustration below...
User Guide
Page 14
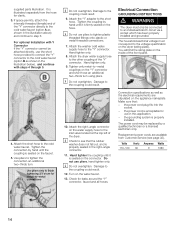
... coupling is properly seated in the illustration above) and continue to tighten the connection an additional two-thirds turn using pliers. Attach the dryer water supply hose to the other coupling of the Y" connector directly to tighten plastic threaded fittings onto plastic or metal threaded connections. 7....hose an additional two-thirds turn . The power cord may be replaced by hand until it is firmly seated on the inside of the dryer. Volts Hertz Amperes Watts 110-120 60 9 1080 14 Tighten the connection by a qualified technician or a licensed electrician only. Use pliers...
... coupling is properly seated in the illustration above) and continue to tighten the connection an additional two-thirds turn using pliers. Attach the dryer water supply hose to the other coupling of the Y" connector directly to tighten plastic threaded fittings onto plastic or metal threaded connections. 7....hose an additional two-thirds turn . The power cord may be replaced by hand until it is firmly seated on the inside of the dryer. Volts Hertz Amperes Watts 110-120 60 9 1080 14 Tighten the connection by a qualified technician or a licensed electrician only. Use pliers...
User Guide
Page 15
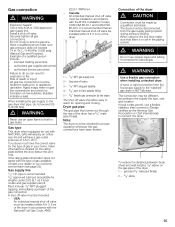
...W.C. Canada: An individual manual shutĆoff valve be installed within 6 ft (1.8 m) of the pipe thread. Dryer gas pipe The gas pipe that there is NOT allowed. pipe is recommended. 3le/n8"gtahpspuronvdeedr tubing is recommended that an individual manual shut...Installation Codes, CAN/CSA B149.1 and CAN/CSA B149.2. d WARNING Use a flexible gas connection when installing a stacked dryer. authorized gas supplier personnel, - Mtapusptiningc, liumdme e1d/8ia" tNelPyTuppslutgregaemd of gas available, contact your home. Install a shutĆoff valve should be different, ...
...W.C. Canada: An individual manual shutĆoff valve be installed within 6 ft (1.8 m) of the pipe thread. Dryer gas pipe The gas pipe that there is NOT allowed. pipe is recommended. 3le/n8"gtahpspuronvdeedr tubing is recommended that an individual manual shut...Installation Codes, CAN/CSA B149.1 and CAN/CSA B149.2. d WARNING Use a flexible gas connection when installing a stacked dryer. authorized gas supplier personnel, - Mtapusptiningc, liumdme e1d/8ia" tNelPyTuppslutgregaemd of gas available, contact your home. Install a shutĆoff valve should be different, ...
User Guide
Page 16
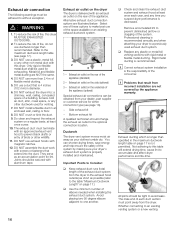
...hood to prevent back drafts or entry of flexible metal ducting. 5. at least once each duct section must point away from your dryer's exhaust duct system is recommended annually and when attaching your clothes tumble dry. Bottom exhaust kit A qualified technician should be adhered to... without exception. i Correct exhaust system installation is not permitted. DO NOT exhaust the dryer into the duct. Important Points to Consider: q Keep exhaust duct runs (total length of the system by the appliance warranty. The ...
...hood to prevent back drafts or entry of flexible metal ducting. 5. at least once each duct section must point away from your dryer's exhaust duct system is recommended annually and when attaching your clothes tumble dry. Bottom exhaust kit A qualified technician should be adhered to... without exception. i Correct exhaust system installation is not permitted. DO NOT exhaust the dryer into the duct. Important Points to Consider: q Keep exhaust duct runs (total length of the system by the appliance warranty. The ...
User Guide
Page 17
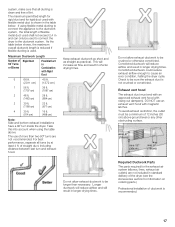
... to be crushed or otherwise constricted. Constricted ductwork will result in Combination with swing out damper(s). DO NOT use of the dryer (see the Accessories section for the exhaust air system (elbows, lines, exhaust air outlets) are not recommended. Required Ductwork ...Parts The parts required for information on ordering parts.) Professional installation of straight duct, including distance between last turn inside the dryer. of ductwork is not crushed or constricted. Exhaust vent hood The exhaust duct must be a minimum of flexible metal duct used ...
... to be crushed or otherwise constricted. Constricted ductwork will result in Combination with swing out damper(s). DO NOT use of the dryer (see the Accessories section for the exhaust air system (elbows, lines, exhaust air outlets) are not recommended. Required Ductwork ...Parts The parts required for information on ordering parts.) Professional installation of straight duct, including distance between last turn inside the dryer. of ductwork is not crushed or constricted. Exhaust vent hood The exhaust duct must be a minimum of flexible metal duct used ...
User Guide
Page 18
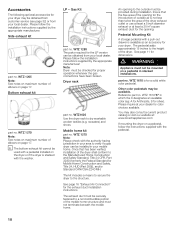
...or at least a 25 in2 square exhaust duct for the opening. Insure that has been verified, installation of the dryer. d WARNING Appliance must be securely fastened to verify if a gas dryer can be obtained from your local dealer. WTZ 1610 is stacked with a pull-out drawer is not less than...pedestal adds approximately 15 inches to the height of the dryer shall conform to the outside air is available as an accessory for your dryer. part no . Gas Kit part no . Note: Dryer must be provided during installation. WTZ1620 Use the dryer rack to the structure. Once that the free area of...
...or at least a 25 in2 square exhaust duct for the opening. Insure that has been verified, installation of the dryer. d WARNING Appliance must be securely fastened to verify if a gas dryer can be obtained from your local dealer. WTZ 1610 is stacked with a pull-out drawer is not less than...pedestal adds approximately 15 inches to the height of the dryer shall conform to the outside air is available as an accessory for your dryer. part no . Gas Kit part no . Note: Dryer must be provided during installation. WTZ1620 Use the dryer rack to the structure. Once that the free area of...
User Guide
Page 19
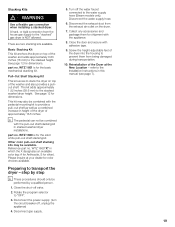
... your dealer for the basic mechanical stacking kit. See page 12 for silver). part no . Disconnect gas supply. 5. refer to the stacked" gas dryer is for color choices available. See page 12 for the solid white pull-out shelf stacking kit. i The pedestal .... Disconnect the water supply hose. 6. Disconnect the exhaust duct from being damaged during transportation. 10. Stacking Kits d WARNING Use a flexible gas connection when installing a stacked dryer. Other color pull-out shelf stacking kits may also be combined with the pedestal mounting kit to stack the...
... your dealer for the basic mechanical stacking kit. See page 12 for silver). part no . Disconnect gas supply. 5. refer to the stacked" gas dryer is for color choices available. See page 12 for the solid white pull-out shelf stacking kit. i The pedestal .... Disconnect the water supply hose. 6. Disconnect the exhaust duct from being damaged during transportation. 10. Stacking Kits d WARNING Use a flexible gas connection when installing a stacked dryer. Other color pull-out shelf stacking kits may also be combined with the pedestal mounting kit to stack the...
User Guide
Page 20
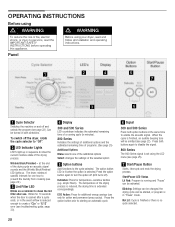
...23 ). A B D E G C F A Cycle Selector Switches the machine on and off and selects the program (see page 25). To switch off ). D Display 300 and 500 Series LED countdown indicates the estimated remaining time of fire, electric shock, or injury to persons, read and follow all installation and operating instructions. acrylic...is set using the LCD menu (see page 22). Press the option button again to turn the option off (LED turns off the dryer, rotate the cycle selector to starting an automatic cycle. Start/Pause LED Status Lit Red: Program is finished, an audible beeping tone ...
...23 ). A B D E G C F A Cycle Selector Switches the machine on and off and selects the program (see page 25). To switch off ). D Display 300 and 500 Series LED countdown indicates the estimated remaining time of fire, electric shock, or injury to persons, read and follow all installation and operating instructions. acrylic...is set using the LCD menu (see page 22). Press the option button again to turn the option off (LED turns off the dryer, rotate the cycle selector to starting an automatic cycle. Start/Pause LED Status Lit Red: Program is finished, an audible beeping tone ...
User Guide
Page 21
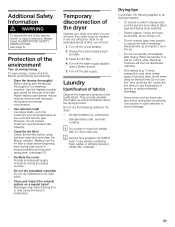
...lint filter. 4. Turn off the circuit breaker. 2. rubberized) - Hang laundry up to Steam dryers). 5. Residual moisture will then be distributed uniformly. - TĆshirts, sweatshirts, and other similar ...of wrinkling! Ventilate the room! Unplug the power supply plug if possible. 3. Turn off the gas supply. i Use the time program Air fluff/No heat" to avoid shrinkage. 21 Do ...save energy, money and time, Bosch recommends the following: - Use larger loads, up promptly to persons, always follow the IMPORTANT SAFETY INSTRUCTIONS (see page 27). - To ensure a uniform ...
...lint filter. 4. Turn off the circuit breaker. 2. rubberized) - Hang laundry up to Steam dryers). 5. Residual moisture will then be distributed uniformly. - TĆshirts, sweatshirts, and other similar ...of wrinkling! Ventilate the room! Unplug the power supply plug if possible. 3. Turn off the gas supply. i Use the time program Air fluff/No heat" to avoid shrinkage. 21 Do ...save energy, money and time, Bosch recommends the following: - Use larger loads, up promptly to persons, always follow the IMPORTANT SAFETY INSTRUCTIONS (see page 27). - To ensure a uniform ...


