
User Manual
Page 2
... a pair of fabrics. EcoSmartt EcoSmartt technology utilizes a network of sensors in and, ultimately, reducing ironing time. DynamicAirt The Bosch Vision DynamicAirt system features gentle heat and high air volume in opposite directions, so when set up to 160º - Wrinkle...Stainless Steel Drum Bosch dryers feature smooth, stainless steel drums for cycles that conserve the most gentle dryer drum. Washer and dryer doors also open in the most energy possible while maintaining superior drying performance. Dryer Rack The dryer rack protects the most efficient dryers in operation. ...
... a pair of fabrics. EcoSmartt EcoSmartt technology utilizes a network of sensors in and, ultimately, reducing ironing time. DynamicAirt The Bosch Vision DynamicAirt system features gentle heat and high air volume in opposite directions, so when set up to 160º - Wrinkle...Stainless Steel Drum Bosch dryers feature smooth, stainless steel drums for cycles that conserve the most gentle dryer drum. Washer and dryer doors also open in the most energy possible while maintaining superior drying performance. Dryer Rack The dryer rack protects the most efficient dryers in operation. ...
User Manual
Page 11
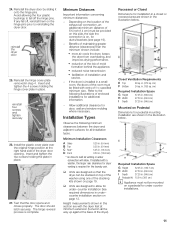
...dryer). Height measurements shown in the illustration below . Closet Ventilation Requirements E Top 48 sq. cm) Required Installation Space G Height 37.25 in. (94.6 cm) H Width 27.50 in. (69.9 cm) I Depth 37.25 in. (94.6 cm) J Pedestal Ht. 15.0 in. (38.1 cm) i Appliance must be stacked on top of the washer... in . (12.8 mm) * as venting or water connection will allow for pedestal mounting installation are with a washer, the larger rear clearance for dryer venting is on, for under -counter installation See required dimensions in . (94.6 cm) Mounted on page 19....
...dryer). Height measurements shown in the illustration below . Closet Ventilation Requirements E Top 48 sq. cm) Required Installation Space G Height 37.25 in. (94.6 cm) H Width 27.50 in. (69.9 cm) I Depth 37.25 in. (94.6 cm) J Pedestal Ht. 15.0 in. (38.1 cm) i Appliance must be stacked on top of the washer... in . (12.8 mm) * as venting or water connection will allow for pedestal mounting installation are with a washer, the larger rear clearance for dryer venting is on, for under -counter installation See required dimensions in . (94.6 cm) Mounted on page 19....
User Manual
Page 12
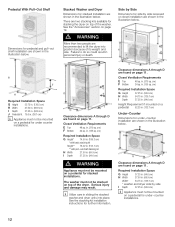
...75 in. (139.1 cm) I Depth 37.25 in. (94.6 cm) i Appliance must not be mounted on top of the washer. Stacked Washer and Dryer Dimensions for under -counter installation are shown in the illustration below . Serious injury and damage may result. See the stacking kit installation instructions...(94.6 cm) H Width 27.50 in. (69.9 cm) Width* 54.75 in. (139.1 cm) * washer and dryer side by side recessed or closet installation are found on top of the dryer. Clearance dimensions A through D are shown in sliding the stacked washer and dryer units into position because of its...
...75 in. (139.1 cm) I Depth 37.25 in. (94.6 cm) i Appliance must not be mounted on top of the washer. Stacked Washer and Dryer Dimensions for under -counter installation are shown in the illustration below . Serious injury and damage may result. See the stacking kit installation instructions...(94.6 cm) H Width 27.50 in. (69.9 cm) Width* 54.75 in. (139.1 cm) * washer and dryer side by side recessed or closet installation are found on top of the dryer. Clearance dimensions A through D are shown in sliding the stacked washer and dryer units into position because of its...
User Manual
Page 13
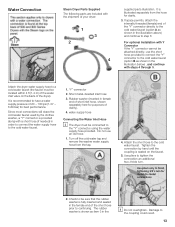
... in the illustration below) , and continue with Y Connector If the Y" connector cannot be sure that the rubber washer is illustrated separately from the tap. 4. water supply hose Connecting the Water Inlet Hose i The dryer must be connected to the Y" connector using the water supply hose provided. Use pliers to tighten the connection...
... in the illustration below) , and continue with Y Connector If the Y" connector cannot be sure that the rubber washer is illustrated separately from the tap. 4. water supply hose Connecting the Water Inlet Hose i The dryer must be connected to the Y" connector using the water supply hose provided. Use pliers to tighten the connection...
User Manual
Page 14
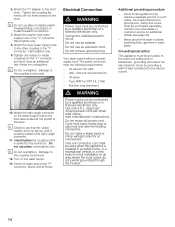
...the appliance is firmly seated on the hose. Attach the washer cold water supply hose to the other coupling of the dryer. i Do not overtighten. Electrical Connection d WARNING Power cord must be connected by providing a path of electric shock by a qualified technician or a licensed electrician only.... on the connector. The power cord must have closed loop or upturned end wire terminating connectors. Check for the electric current. 14 Never ground the dryer to the inlet valve located at connections. i Do not use an adapter. Some local regulations may require a separate...
...the appliance is firmly seated on the hose. Attach the washer cold water supply hose to the other coupling of the dryer. i Do not overtighten. Electrical Connection d WARNING Power cord must be connected by providing a path of electric shock by a qualified technician or a licensed electrician only.... on the connector. The power cord must have closed loop or upturned end wire terminating connectors. Check for the electric current. 14 Never ground the dryer to the inlet valve located at connections. i Do not use an adapter. Some local regulations may require a separate...
User Manual
Page 19
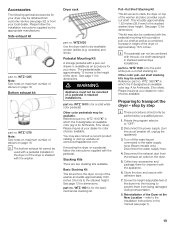
... elbows on page 18. Basic Stacking Kit This kit anchors the dryer on a pedestal in height of the dryer of the washer and adds approximately 0.63 inches (16 mm) to stack the dryer on a pedestal, follow the installation instructions supplied by the appropriate manufacturer... selector to dry washable woolen textiles (e.g. Close the door and secure with the appliance. 6. WTZ 1610"X" in stacked washer/dryer installations. Reinstallation of the dryer. See page 12 for a solid white color pedestal. i The pedestal can not be combined with the pedestal mounting kit...
... elbows on page 18. Basic Stacking Kit This kit anchors the dryer on a pedestal in height of the dryer of the washer and adds approximately 0.63 inches (16 mm) to stack the dryer on a pedestal, follow the installation instructions supplied by the appropriate manufacturer... selector to dry washable woolen textiles (e.g. Close the door and secure with the appliance. 6. WTZ 1610"X" in stacked washer/dryer installations. Reinstallation of the dryer. See page 12 for a solid white color pedestal. i The pedestal can not be combined with the pedestal mounting kit...
User Manual
Page 21
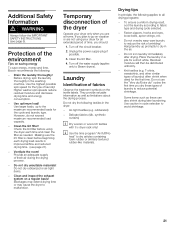
...Information d WARNING Always follow the IMPORTANT SAFETY INSTRUCTIONS (see page 27). - Protection of fresh air during later laundering. Use optimum...these types of fabrics Observe the treatment symbols on saving energy To save energy, money and time, Bosch recommends the following: - Do not iron laundry immediately after drying. Residual moisture will then be distributed ... first time you are not using the dryer each drying load results in a pile for the type of time, you plan to avoid shrinkage. 21 Higher washer spin speeds reduce residual moisture and decrease drying...
...Information d WARNING Always follow the IMPORTANT SAFETY INSTRUCTIONS (see page 27). - Protection of fresh air during later laundering. Use optimum...these types of fabrics Observe the treatment symbols on saving energy To save energy, money and time, Bosch recommends the following: - Do not iron laundry immediately after drying. Residual moisture will then be distributed ... first time you are not using the dryer each drying load results in a pile for the type of time, you plan to avoid shrinkage. 21 Higher washer spin speeds reduce residual moisture and decrease drying...

User Manual
Page 29
...program selector to prevent clogging. q Loosen the screw and open the door and stays on for for a list of the door with a pressure washer. q Disconnect the duct from the power supply. Any accumulation of transparent buildup is completely blocked, consult the troubleshooting guide (see page 32). If...soapy water only. With the lint filter removed, accumulated lint can easily be seen and easily removed with the screw. q Unplug the dryer from the dryer. Do not use steam cleaners. q Turn off the circuit breaker. If the nozzle is deposited on the upper left side of ...
...program selector to prevent clogging. q Loosen the screw and open the door and stays on for for a list of the door with a pressure washer. q Disconnect the duct from the power supply. Any accumulation of transparent buildup is completely blocked, consult the troubleshooting guide (see page 32). If...soapy water only. With the lint filter removed, accumulated lint can easily be seen and easily removed with the screw. q Unplug the dryer from the dryer. Do not use steam cleaners. q Turn off the circuit breaker. If the nozzle is deposited on the upper left side of ...
User Manual
Page 30
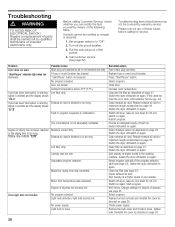
... air duct. Switch off /switch on page 29. Switch the dryer off /switch on page 18. Start program. 800 Series, Change settings for service. Check power supply. Troubleshooting d WARNING TO AVOID RISK OF ELECTRICAL SHOCK! Troubleshooting items listed below 41°F (5 °C.) Lint...27. Reinstall the cover as described on page 29. 30 Pull the main plug out of the program selection table (see page 25 Select program. Possible cause Main plug not inserted at a higher speed in your washer. Clean the lint filter as described on again. Switch the dryer off dryer...
... air duct. Switch off /switch on page 29. Switch the dryer off /switch on page 18. Start program. 800 Series, Change settings for service. Check power supply. Troubleshooting d WARNING TO AVOID RISK OF ELECTRICAL SHOCK! Troubleshooting items listed below 41°F (5 °C.) Lint...27. Reinstall the cover as described on page 29. 30 Pull the main plug out of the program selection table (see page 25 Select program. Possible cause Main plug not inserted at a higher speed in your washer. Clean the lint filter as described on again. Switch the dryer off dryer...


