User Manual
Page 3
... Information concerning waste disposal 7 Before installing the dryer 7 Checklist for Installation 8 Installation Location 8 Dryer Dimensions 8 Door Hinge Reversal 9 Installation Types 11 Electrical connection 14 Exhaust air connection 17 Accessories 19 Preparing to transport the dryer ć step by step 19 OPERATING INSTRUCTIONS 20... Options on LCD Menu 24 Operation 26 Using the dryer 26 Cleaning the lint filter 27 Using the dryer rack (Option 28 Cleaning and care 29 Cleaning the dryer 29 Cleaning the exhaust duct 29 Cleaning the moisture ...
... Information concerning waste disposal 7 Before installing the dryer 7 Checklist for Installation 8 Installation Location 8 Dryer Dimensions 8 Door Hinge Reversal 9 Installation Types 11 Electrical connection 14 Exhaust air connection 17 Accessories 19 Preparing to transport the dryer ć step by step 19 OPERATING INSTRUCTIONS 20... Options on LCD Menu 24 Operation 26 Using the dryer 26 Cleaning the lint filter 27 Using the dryer rack (Option 28 Cleaning and care 29 Cleaning the dryer 29 Cleaning the exhaust duct 29 Cleaning the moisture ...
User Manual
Page 6
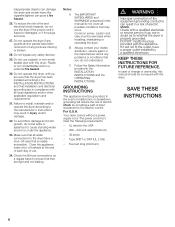
...Safety Information provided in the USA - 208 ć 240 volt rated (minimum) - 30 amps - Your dryer comes without a power supply cord. If it will reduce the risk of electric shock by a qualified electrician. SAVE THESE INSTRUCTIONS 6 GROUNDING INSTRUCTIONS This appliance must meet the following requirements: ...to the INSTALLATION INSTRUCTIONS and that installation and electrical grounding are tight and not leaking. Check the fill hose connections on a regular basis to the dryer have been removed or if any parts are loose. 27. Plastic or nonĆmetal flexible duct ...
...Safety Information provided in the USA - 208 ć 240 volt rated (minimum) - 30 amps - Your dryer comes without a power supply cord. If it will reduce the risk of electric shock by a qualified electrician. SAVE THESE INSTRUCTIONS 6 GROUNDING INSTRUCTIONS This appliance must meet the following requirements: ...to the INSTALLATION INSTRUCTIONS and that installation and electrical grounding are tight and not leaking. Check the fill hose connections on a regular basis to the dryer have been removed or if any parts are loose. 27. Plastic or nonĆmetal flexible duct ...
User Manual
Page 30
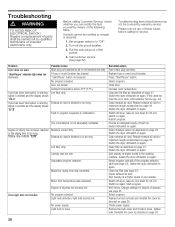
...socket. 4. Clean filter as described on again. Switch the dryer off dryer, leave to maximum length as directed on again. Remove the bulb cover and if bulb is not adequately ventilated. Troubleshooting d WARNING TO AVOID RISK OF ELECTRICAL SHOCK! Before calling Customer Service, check whether you can ... /switch on page 27. Clean the lint filter as described on again. Switch the dryer off /switch on page 18. Repairs or replacement of the following table. Exhaust air duct is blocked or is too long. Check exhaust air duct. Start program. 800 Series, Change settings for 30 ...
...socket. 4. Clean filter as described on again. Switch the dryer off dryer, leave to maximum length as directed on again. Remove the bulb cover and if bulb is not adequately ventilated. Troubleshooting d WARNING TO AVOID RISK OF ELECTRICAL SHOCK! Before calling Customer Service, check whether you can ... /switch on page 27. Clean the lint filter as described on again. Switch the dryer off /switch on page 18. Repairs or replacement of the following table. Exhaust air duct is blocked or is too long. Check exhaust air duct. Start program. 800 Series, Change settings for 30 ...


