
Pedestal Installation Instructions
Page 7
... the pedestal side to the front (see Figure 19). Close the drawer. d CAUTION Do not use . 5. Use the supplied 17mm openĆend wrench to securely tighten both locknuts for 10 seconds. Ensure slides of the appliance during appliance use the drawer as a step. All locknuts must be necessary to hold...
... the pedestal side to the front (see Figure 19). Close the drawer. d CAUTION Do not use . 5. Use the supplied 17mm openĆend wrench to securely tighten both locknuts for 10 seconds. Ensure slides of the appliance during appliance use the drawer as a step. All locknuts must be necessary to hold...
Installation and Use & Care (all languages)
Page 6
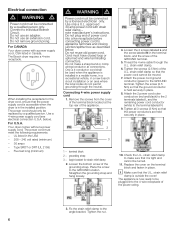
Do not use an extension cord. The Bosch dryer requires a 4Ćwire receptacle. When installing the receptacle for ...wiring/conductor at the top rear of the GROUND terminal. 5. Fix the strain relief clamp to the GROUND location. Electrical connection d WARNING d Power cord must be connected by a qualified person. Use only a U.L. approved 30 amp power... the screw (2.5 Nm) so that the power conductors are held securely in the installed position. Angle bracket for the dryer cord, ensure that it is held securely in a new branch circuit installation or an area where the local...
Do not use an extension cord. The Bosch dryer requires a 4Ćwire receptacle. When installing the receptacle for ...wiring/conductor at the top rear of the GROUND terminal. 5. Fix the strain relief clamp to the GROUND location. Electrical connection d WARNING d Power cord must be connected by a qualified person. Use only a U.L. approved 30 amp power... the screw (2.5 Nm) so that the power conductors are held securely in the installed position. Angle bracket for the dryer cord, ensure that it is held securely in a new branch circuit installation or an area where the local...
Installation and Use & Care (all languages)
Page 7
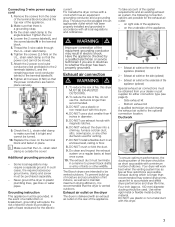
...DO NOT use the ductwork longer than 4 inches in place securely. 9. DO NOT exhaust the dryer into an appropriate outlet which has an equipment grounding conductor and a grounding plug. at the top rear of the dryer should be as short as to prevent back drafts or ... conductor may require a separate ground. Additional grounding procedure - DO NOT install a flexible duct in the terminal block. 5. The Bosch dryers are possible for the electric current. Loosen the 2 screws labeled L and the screw labeled N in an enclosed wall, ceiling or floor. 8. Grounding instruction...
...DO NOT use the ductwork longer than 4 inches in place securely. 9. DO NOT exhaust the dryer into an appropriate outlet which has an equipment grounding conductor and a grounding plug. at the top rear of the dryer should be as short as to prevent back drafts or ... conductor may require a separate ground. Additional grounding procedure - DO NOT install a flexible duct in the terminal block. 5. The Bosch dryers are possible for the electric current. Loosen the 2 screws labeled L and the screw labeled N in an enclosed wall, ceiling or floor. 8. Grounding instruction...
Installation and Use & Care (all languages)
Page 8
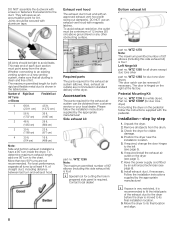
... of each duct section must be a minimum of lint. For best performance, separate all objects from the dryer. of the dryer. WTZ 126S for the exhaust air system can be secured with aluminum tape. Unpack the dryer. 2. If required, change the door hinges to its final installation location. 9. Side exhaust kit part no . Left...
... of each duct section must be a minimum of lint. For best performance, separate all objects from the dryer. of the dryer. WTZ 126S for the exhaust air system can be secured with aluminum tape. Unpack the dryer. 2. If required, change the door hinges to its final installation location. 9. Side exhaust kit part no . Left...
Installation and Use & Care (all languages)
Page 9
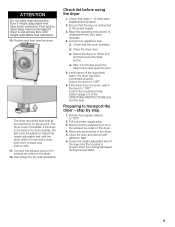
... Extra Dry" and then press the Start button. Connect the exhaust duct to prevent them from the exhaust air outlet on the dryer. 4. q After 3Ć5 minutes press the Stop button and open the door. 5. Place any accessories in the troubleshooting section (page 21) of the ... floor with adhesive tape. 6. Adjust the heightĆadjustable feet until the dryer does not rock and is empty. If the dryer does not work, switch the dryer to understand how your dryer operates. 4. Close the door and secure with heightĆadjustable feet extended. 10. Ensure that the drum is level, ...
... Extra Dry" and then press the Start button. Connect the exhaust duct to prevent them from the exhaust air outlet on the dryer. 4. q After 3Ć5 minutes press the Stop button and open the door. 5. Place any accessories in the troubleshooting section (page 21) of the ... floor with adhesive tape. 6. Adjust the heightĆadjustable feet until the dryer does not rock and is empty. If the dryer does not work, switch the dryer to understand how your dryer operates. 4. Close the door and secure with heightĆadjustable feet extended. 10. Ensure that the drum is level, ...
Installation and Use & Care (all languages)
Page 20
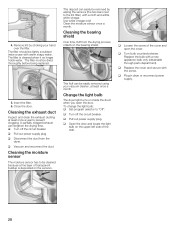
...breaker q Pull out power supply plug q Disconnect the duct from the drying process collects in dryer or reconnect power supply. 20 q Pull out power supply plug. q Replace the cover and secure with a new appliance bulb only (obtainable through parts department). Insert the filter. 6. This ...deposit can easily be easily removed using your hand over the filter. The filter must be lightly scrubbed twice a year with a cloth and a little white vinegar....
...breaker q Pull out power supply plug q Disconnect the duct from the drying process collects in dryer or reconnect power supply. 20 q Pull out power supply plug. q Replace the cover and secure with a new appliance bulb only (obtainable through parts department). Insert the filter. 6. This ...deposit can easily be easily removed using your hand over the filter. The filter must be lightly scrubbed twice a year with a cloth and a little white vinegar....