
Pedestal Installation Instructions
Page 7
... door may be tightened firmly to prevent the height adjustable feet from turning while tightening the lock nut. For problems with a pair of pliers to securely tighten both locknuts for 10 seconds. Contact information is satisfactorily raised or lowered, lock the height-adjustable feet in (counter-clockwise) will lower the corner...
... door may be tightened firmly to prevent the height adjustable feet from turning while tightening the lock nut. For problems with a pair of pliers to securely tighten both locknuts for 10 seconds. Contact information is satisfactorily raised or lowered, lock the height-adjustable feet in (counter-clockwise) will lower the corner...
Installation and Use & Care (all languages)
Page 6
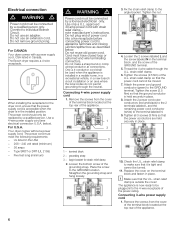
... U.L. Connecting 3Ćwire power supply cord 1. When installing the receptacle for strain relief clamp 2. Use a 4Ćwire power supply cord (see electrical connection U.S.A. Loosen the 2 screws labeled L and the screw labeled N in place. strain relief clamp so that it is in a new branch ...the GROUND location. Tighten all 3 screws (3 Nm) so that the ground conductor is outside the cover! strain relief clamp is held securely in place. 8. The Bosch dryer requires a 4Ćwire receptacle. approved 30 amp power cord with a power supply cord, CSA listed in the USA - 208 &#...
... U.L. Connecting 3Ćwire power supply cord 1. When installing the receptacle for strain relief clamp 2. Use a 4Ćwire power supply cord (see electrical connection U.S.A. Loosen the 2 screws labeled L and the screw labeled N in place. strain relief clamp so that it is in a new branch ...the GROUND location. Tighten all 3 screws (3 Nm) so that the ground conductor is outside the cover! strain relief clamp is held securely in place. 8. The Bosch dryer requires a 4Ćwire receptacle. approved 30 amp power cord with a power supply cord, CSA listed in the USA - 208 &#...
Installation and Use & Care (all languages)
Page 7
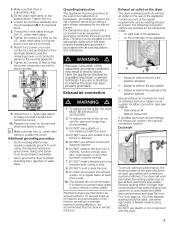
...recommended may extend drying time, cause lint to whether the dryer has been properly grounded. Check the U.L. In such cases, the required accessory ground wire, clamp and screw must terminate in place securely. 9. To reduce the risk of the appliance, - The...of the appliance (optional) Special exhaust air connections must be vented outdoors. The Bosch dryers are in place. Bottom exhaust kit A qualified technician should be moved. 7. DO NOT use the ductwork longer than 4 inches in electric shock. Side exhaust kit - on the underside of the appliance. 2 1 ...
...recommended may extend drying time, cause lint to whether the dryer has been properly grounded. Check the U.L. In such cases, the required accessory ground wire, clamp and screw must terminate in place securely. 9. To reduce the risk of the appliance, - The...of the appliance (optional) Special exhaust air connections must be vented outdoors. The Bosch dryers are in place. Bottom exhaust kit A qualified technician should be moved. 7. DO NOT use the ductwork longer than 4 inches in electric shock. Side exhaust kit - on the underside of the appliance. 2 1 ...
Installation and Use & Care (all languages)
Page 8
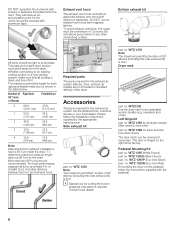
...Left hinge kit part no . Pedestal Mounting Kit part no . WTZ 1295S (Silver Dryers) part. They will serve as an accumulation point for silver and duo tone silver dryers The door catch can be secured with magnetic latches. To determine maximum exhaust length, add one 90° turn inside... the dryer. part no . sweaters) and shoes. WTZ 1295R (Duo tone Red) If mounting the dryer on the right at least 4 ...
...Left hinge kit part no . Pedestal Mounting Kit part no . WTZ 1295S (Silver Dryers) part. They will serve as an accumulation point for silver and duo tone silver dryers The door catch can be secured with magnetic latches. To determine maximum exhaust length, add one 90° turn inside... the dryer. part no . sweaters) and shoes. WTZ 1295R (Duo tone Red) If mounting the dryer on the right at least 4 ...
Installation and Use & Care (all languages)
Page 9
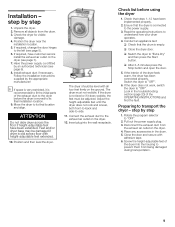
...extended. 10. Position and then level the dryer. Adjust the heightĆadjustable feet until the dryer does not rock and is recommended to fit the initial parts of the dryer into the wall receptacle. Look in the drum. 5. Close the door and secure with all objects from the drum. 3.... Installation ć step by the appropriate manufacturer! Remove all four feet firmly on the dryer. 12. Move the dryer to its final location and align. The dryer should be adjusted. Have the power supply cord ...
...extended. 10. Position and then level the dryer. Adjust the heightĆadjustable feet until the dryer does not rock and is recommended to fit the initial parts of the dryer into the wall receptacle. Look in the drum. 5. Close the door and secure with all objects from the drum. 3.... Installation ć step by the appropriate manufacturer! Remove all four feet firmly on the dryer. 12. Move the dryer to its final location and align. The dryer should be adjusted. Have the power supply cord ...
Installation and Use & Care (all languages)
Page 19
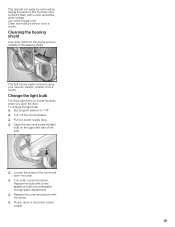
... with a cloth and a little white vinegar. q Pull out power supply plug. Replace the bulb with the screw. Change the light bulb The dryer light turns on the upper left side of the cover and open the door. q Loosen the screw of the seal. Use white vinegar only! ...Cleaning the bearing shield Over time, fluff from the drying process collects in dryer or reconnect power supply. 19 q Turn bulb counterclockwise. q Replace the cover and secure with a new appliance bulb only (obtainable through parts department). q Open the door and locate the light bulb...
... with a cloth and a little white vinegar. q Pull out power supply plug. Replace the bulb with the screw. Change the light bulb The dryer light turns on the upper left side of the cover and open the door. q Loosen the screw of the seal. Use white vinegar only! ...Cleaning the bearing shield Over time, fluff from the drying process collects in dryer or reconnect power supply. 19 q Turn bulb counterclockwise. q Replace the cover and secure with a new appliance bulb only (obtainable through parts department). q Open the door and locate the light bulb...