
Pedestal Installation Instructions
Page 2
... and (4) Flat Washers 4. (4) Height Adjustable Feet 5. (4) Spacers 6. This indicates that minor or moderate injury may occur as a result of nonĆobservance of the following parts and tools in injury. Tools and Parts Confirm receipt of this warning. Failure to move and uninstall the appliance.
... and (4) Flat Washers 4. (4) Height Adjustable Feet 5. (4) Spacers 6. This indicates that minor or moderate injury may occur as a result of nonĆobservance of the following parts and tools in injury. Tools and Parts Confirm receipt of this warning. Failure to move and uninstall the appliance.

Pedestal Installation Instructions
Page 8
... this pedestal is installed with the listed washer or dryer and operated according to the instructions provided in the washer or dryer Operating, Care and Installation Instructions", supplier will repair or replace any of its mechanical parts if defective in material or workmanship. This warranty applies... the Installation Instructions, the warranty is subject to the Operating, Care and Installation Instructions" that came with the washer or dryer that is installed with any other rights which the pedestal is available by contacting the retailer where the Pedestal was purchased. Warranty...
... this pedestal is installed with the listed washer or dryer and operated according to the instructions provided in the washer or dryer Operating, Care and Installation Instructions", supplier will repair or replace any of its mechanical parts if defective in material or workmanship. This warranty applies... the Installation Instructions, the warranty is subject to the Operating, Care and Installation Instructions" that came with the washer or dryer that is installed with any other rights which the pedestal is available by contacting the retailer where the Pedestal was purchased. Warranty...
Installation and Use & Care (all languages)
Page 3
... care from the electrical supply before attempting any flammable substance, such as vegetable oil, cooking oil, petroleum based oils or distillates, waxes, fats, etc., must not be happy to play on having selected a Bosch clothes dryer, the choice of any service. Bosch dryers are instructed in ... that damage may occur as a result of nonĆobservance of the dryer - Large 6.4 cu.ft. (181 l) stainless steel drum with the controls. 9. Do not repair or replace any part of the appliance or attempt any questions especially concerning installation of this appliance ...
... care from the electrical supply before attempting any flammable substance, such as vegetable oil, cooking oil, petroleum based oils or distillates, waxes, fats, etc., must not be happy to play on having selected a Bosch clothes dryer, the choice of any service. Bosch dryers are instructed in ... that damage may occur as a result of nonĆobservance of the dryer - Large 6.4 cu.ft. (181 l) stainless steel drum with the controls. 9. Do not repair or replace any part of the appliance or attempt any questions especially concerning installation of this appliance ...
Installation and Use & Care (all languages)
Page 4
...27. Do not operate the dryer if any parts are a potential fire hazard. 28. Common sense, caution and care must be grounded. GROUNDING INSTRUCTIONS This appliance must be used for the electric current. The power cord must only be exercised when installing, maintaining or operating the dryer... - Cigarette lighters are intended for use an extension cord or an adapter to connect the dryer to whether the dryer is properly installed and grounded in doubt as to the electrical power supply. 21. For U.S.A. These installation instructions are particularly hazardous. 23. In Canada,...
...27. Do not operate the dryer if any parts are a potential fire hazard. 28. Common sense, caution and care must be grounded. GROUNDING INSTRUCTIONS This appliance must be used for the electric current. The power cord must only be exercised when installing, maintaining or operating the dryer... - Cigarette lighters are intended for use an extension cord or an adapter to connect the dryer to whether the dryer is properly installed and grounded in doubt as to the electrical power supply. 21. For U.S.A. These installation instructions are particularly hazardous. 23. In Canada,...
Installation and Use & Care (all languages)
Page 7
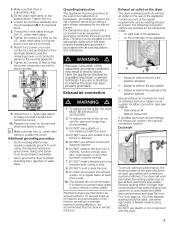
...the terminal block and fasten in electric shock. To prevent buildĆup of moisture and accumulation of the dryer should be used for the electric current. Ductwork To ensure optimum performance...and a grounding plug. DO NOT install a flexible duct in the terminal block. 5. The Bosch dryers are possible for either rigid metal or flexible metal ducting material. on the underside of the ... on the rear of fire, this dryer. 4. strain relief clamp so that the U.L. i Make sure that the power cord cannot be obtained from your dealer or part supplier for the exhaust air outlet:...
...the terminal block and fasten in electric shock. To prevent buildĆup of moisture and accumulation of the dryer should be used for the electric current. Ductwork To ensure optimum performance...and a grounding plug. DO NOT install a flexible duct in the terminal block. 5. The Bosch dryers are possible for either rigid metal or flexible metal ducting material. on the underside of the ... on the rear of fire, this dryer. 4. strain relief clamp so that the U.L. i Make sure that the power cord cannot be obtained from your dealer or part supplier for the exhaust air outlet:...
Installation and Use & Care (all languages)
Page 8
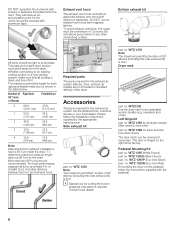
...assemble the ductwork with screws or fasteners that all turns by the appropriate manufacturer! WTZ 1260 for all dryers except silver and duo tone silver part no . WTZ 1295S (Silver Dryers) part. Exhaust vent hood The exhaust duct must end with an approved exhaust vent hood with magnetic latches. i... Special tool for both rigid and flexible metal duct is four! WTZ1290 Use the dryer rack to avoid leaks. WTZ 1295P (Duo tone Silver) part. Side exhaust kit part no . Left hinge kit part no . The maximum permitted length for cutting the hole in standard delivery of lint....
...assemble the ductwork with screws or fasteners that all turns by the appropriate manufacturer! WTZ 1260 for all dryers except silver and duo tone silver part no . WTZ 1295S (Silver Dryers) part. Exhaust vent hood The exhaust duct must end with an approved exhaust vent hood with magnetic latches. i... Special tool for both rigid and flexible metal duct is four! WTZ1290 Use the dryer rack to avoid leaks. WTZ 1295P (Duo tone Silver) part. Side exhaust kit part no . Left hinge kit part no . The maximum permitted length for cutting the hole in standard delivery of lint....
Installation and Use & Care (all languages)
Page 9
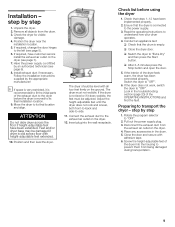
...it does wobble, the feet must not wobble. Move the dryer to "OFF". Feet and/or dryer base may be damaged if dryer is recommended to fit the initial parts of the dryer into the wall receptacle. Position and then level the dryer. If the dryer is not level or if it is slid across the floor... if heightĆadjustable feet have been extended. Connect the exhaust duct to transport the dryer ć step by an ...
...it does wobble, the feet must not wobble. Move the dryer to "OFF". Feet and/or dryer base may be damaged if dryer is recommended to fit the initial parts of the dryer into the wall receptacle. Position and then level the dryer. If the dryer is not level or if it is slid across the floor... if heightĆadjustable feet have been extended. Connect the exhaust duct to transport the dryer ć step by an ...
Installation and Use & Care (all languages)
Page 17
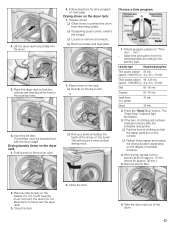
...indicated drying time: q Fold the item of the shoes on the basket. Do not allow items to the laundry type. Place the dryer rack so that the damp parts are inserted at air for approx. 15 min. (shoes for time program on the outside. Drying shoes on the degree of the ...drum. 17 q Loosen or remove shoeĆlaces. Remove the lint filter. 2. Select the drying time from becoming soiled. Fold laundry to fit the dryer rack. 4. q...
...indicated drying time: q Fold the item of the shoes on the basket. Do not allow items to the laundry type. Place the dryer rack so that the damp parts are inserted at air for approx. 15 min. (shoes for time program on the outside. Drying shoes on the degree of the ...drum. 17 q Loosen or remove shoeĆlaces. Remove the lint filter. 2. Select the drying time from becoming soiled. Fold laundry to fit the dryer rack. 4. q...
Installation and Use & Care (all languages)
Page 19
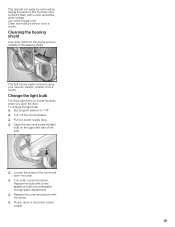
...on inside the drum when you open the cover. q Turn bulb counterclockwise. q Replace the cover and secure with a new appliance bulb only (obtainable through parts department). To change the light bulb: q Set program selector to the lint filter) with a cloth and a little white vinegar. q Loosen the screw ...once a month. Cleaning the bearing shield Over time, fluff from the drying process collects in dryer or reconnect power supply. 19 q Turn off the circuit breaker. Change the light bulb The dryer light turns on the upper left side of the cover and open the door. Replace the ...
...on inside the drum when you open the cover. q Turn bulb counterclockwise. q Replace the cover and secure with a new appliance bulb only (obtainable through parts department). To change the light bulb: q Set program selector to the lint filter) with a cloth and a little white vinegar. q Loosen the screw ...once a month. Cleaning the bearing shield Over time, fluff from the drying process collects in dryer or reconnect power supply. 19 q Turn off the circuit breaker. Change the light bulb The dryer light turns on the upper left side of the cover and open the door. Replace the ...
Installation and Use & Care (all languages)
Page 20
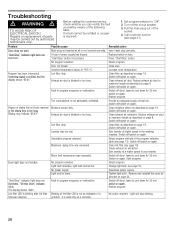
... It is not an indication of lint filter LED is used only as a reminder. Troubleshooting d WARNING d TO AVOID RISK OF ELECTRICAL SHOCK! Turn off /switch on again. Call...was too wet. Select program with aid of parts may indicate E:03". Check exhaust air extraction. No power supply. Switch off dryer, leave to cool down for 30 min, ...Dryer does not start. Start/Stop" indicator light does not illuminate. Switch off dryer, leave to cool down for 30 min. No action required. Switch off the circuit breaker. 3. The display shows 000". Lint filter LED...
... It is not an indication of lint filter LED is used only as a reminder. Troubleshooting d WARNING d TO AVOID RISK OF ELECTRICAL SHOCK! Turn off /switch on again. Call...was too wet. Select program with aid of parts may indicate E:03". Check exhaust air extraction. No power supply. Switch off dryer, leave to cool down for 30 min, ...Dryer does not start. Start/Stop" indicator light does not illuminate. Switch off dryer, leave to cool down for 30 min. No action required. Switch off the circuit breaker. 3. The display shows 000". Lint filter LED...
Installation and Use & Care (all languages)
Page 22
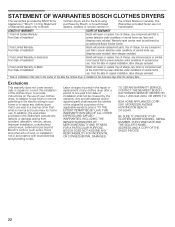
... replace, free of charge, any component part that is proven defective under conditions of normal home use was in accordance with local electrical and plumbing codes. Labor charges incurred in the United States or Canada. STATEMENT OF WARRANTIES BOSCH CLOTHES DRYERS The warranties provided by BSH Home Appliances (``Bosch'') in this Statement of Warranties apply...
... replace, free of charge, any component part that is proven defective under conditions of normal home use was in accordance with local electrical and plumbing codes. Labor charges incurred in the United States or Canada. STATEMENT OF WARRANTIES BOSCH CLOTHES DRYERS The warranties provided by BSH Home Appliances (``Bosch'') in this Statement of Warranties apply...


