
Pedestal Installation Instructions
Page 2
...uninstalled before continuing. Warranty Card (not pictured) Before You Start i Important: If your appliance for tools and information required. d CAUTION CAUTION- d CAUTION Do not lift the appliance by the door or door opening. Important Safety Information Please read and follow these Installation..., Care and Installation Instructions" provided with the pedestal. Failure to move and uninstall the appliance. Keep the door closed at all other information enclosed with your appliance is used to draw the user's attention to important matters. This indicates that damage may...
...uninstalled before continuing. Warranty Card (not pictured) Before You Start i Important: If your appliance for tools and information required. d CAUTION CAUTION- d CAUTION Do not lift the appliance by the door or door opening. Important Safety Information Please read and follow these Installation..., Care and Installation Instructions" provided with the pedestal. Failure to move and uninstall the appliance. Keep the door closed at all other information enclosed with your appliance is used to draw the user's attention to important matters. This indicates that damage may...

Pedestal Installation Instructions
Page 3
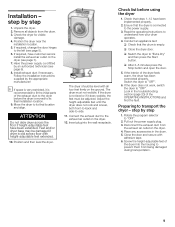
... the washing machine back panel. Step 2 below . NOTICE Make sure the washer transportation bolts are installing the pedestal on a new washer or dryer, proceed to laying washer on an appliance that has already been in use, begin with your thumb while (2) sliding the cover in the direction of the slotted area. The...
... the washing machine back panel. Step 2 below . NOTICE Make sure the washer transportation bolts are installing the pedestal on a new washer or dryer, proceed to laying washer on an appliance that has already been in use, begin with your thumb while (2) sliding the cover in the direction of the slotted area. The...

Pedestal Installation Instructions
Page 4
... 8 d CAUTION Excessive Weight Hazard Use two or more people to Installing the Pedestal" section of the unit. Retain the feet in case the appliance needs to the final location. Push up towels can result in the drawer slide rails. If corner supports are not available, items such as the..., four corner supports, and two foam packaging pieces. 3. Set the drawer aside. Place the top of the packaging. 6. Position the original packaged appliance close to be noticed due to the left side and down on the drawer release lever on the left of this manual. Installing the Pedestal...
... 8 d CAUTION Excessive Weight Hazard Use two or more people to Installing the Pedestal" section of the unit. Retain the feet in case the appliance needs to the final location. Push up towels can result in the drawer slide rails. If corner supports are not available, items such as the..., four corner supports, and two foam packaging pieces. 3. Set the drawer aside. Place the top of the packaging. 6. Position the original packaged appliance close to be noticed due to the left side and down on the drawer release lever on the left of this manual. Installing the Pedestal...

Pedestal Installation Instructions
Page 5
.... Install the four new feet that originally came with the appliance. NOTICE Use only the feet supplied with the appliance and pedestal housings. Figure 10 Figure 12 d CAUTION When lifting the appliance, be careful not to HAND TIGHTEN all screws (see Figure 11). For dryers go directly to washers. when moving). Helpful hint: Do...
.... Install the four new feet that originally came with the appliance. NOTICE Use only the feet supplied with the appliance and pedestal housings. Figure 10 Figure 12 d CAUTION When lifting the appliance, be careful not to HAND TIGHTEN all screws (see Figure 11). For dryers go directly to washers. when moving). Helpful hint: Do...

Pedestal Installation Instructions
Page 6
...washer and bushing attached. Figure 15 q Insert the covers until the unit is leveled. Move the feet as little as when moving the appliance after leveling can be more easily removed using the wrench. q If the bushings do this with all 4 transport bolt assemblies (bolt,...262; moved freely. Figure 14 q Completely remove all four feet screwed in its final location. q Store the transport bolts with your appliance to check if it is locked against will extend the height of the unit. Leveling Procedure 1. Otherwise, repeat the leveling procedure until they...
...washer and bushing attached. Figure 15 q Insert the covers until the unit is leveled. Move the feet as little as when moving the appliance after leveling can be more easily removed using the wrench. q If the bushings do this with all 4 transport bolt assemblies (bolt,...262; moved freely. Figure 14 q Completely remove all four feet screwed in its final location. q Store the transport bolts with your appliance to check if it is locked against will extend the height of the unit. Leveling Procedure 1. Otherwise, repeat the leveling procedure until they...

Pedestal Installation Instructions
Page 7
...the front feet against the pedestal housing. Replace the drawer by aligning it does wobble, lower the foot on the pedestal side to hold the appliance foot with or service on each corner of the corner. Ensure drawer slides are aligned correctly (see Figure 18). d CAUTION Do not use ...4. Slide the ball bearing rails on that corner until it locks tightly against the pedestal. If it to minimize vibration and movement of the appliance during appliance use the drawer as a step. For Washers: Fine tune the leveling by placing a small load of laundry in the machine, starting it ...
...the front feet against the pedestal housing. Replace the drawer by aligning it does wobble, lower the foot on the pedestal side to hold the appliance foot with or service on each corner of the corner. Ensure drawer slides are aligned correctly (see Figure 18). d CAUTION Do not use ...4. Slide the ball bearing rails on that corner until it locks tightly against the pedestal. If it to minimize vibration and movement of the appliance during appliance use the drawer as a step. For Washers: Fine tune the leveling by placing a small load of laundry in the machine, starting it ...

Pedestal Installation Instructions
Page 8
... warranty gives you specific rights and you may vary in the Installation Instructions, the warranty is null and void. Purchase Date Appliance Model Number Appliance Serial Number 8 Warranty Restriction If the Pedestal is subject to other product than those listed in Canada. In the space below...Save these instructions and your pedestal and model and serial number of the appliance on Mechanical Parts For one year from state to state or province to the instructions provided in the washer or dryer Operating, Care and Installation Instructions", supplier will repair or replace any...
... warranty gives you specific rights and you may vary in the Installation Instructions, the warranty is null and void. Purchase Date Appliance Model Number Appliance Serial Number 8 Warranty Restriction If the Pedestal is subject to other product than those listed in Canada. In the space below...Save these instructions and your pedestal and model and serial number of the appliance on Mechanical Parts For one year from state to state or province to the instructions provided in the washer or dryer Operating, Care and Installation Instructions", supplier will repair or replace any...
Installation and Use & Care (all languages)
Page 3
...information and a selection of fire, electric shock, serious injury or death to important matters. This indicates that injuries may occur as a result of nonĆobservance of children is necessary when the appliance is low energy consumption. Bosch dryers are instructed in safe practices by...Large 6.4 cu.ft. (181 l) stainless steel drum with the appliance. Do not dry articles that could ignite or explode. 3. Do not install or store this appliance a userĆfriendly assistant in the dryer. The Bosch dryer offers the following . 1. our customer service team will be happy...
...information and a selection of fire, electric shock, serious injury or death to important matters. This indicates that injuries may occur as a result of nonĆobservance of children is necessary when the appliance is low energy consumption. Bosch dryers are instructed in safe practices by...Large 6.4 cu.ft. (181 l) stainless steel drum with the appliance. Do not dry articles that could ignite or explode. 3. Do not install or store this appliance a userĆfriendly assistant in the dryer. The Bosch dryer offers the following . 1. our customer service team will be happy...
Installation and Use & Care (all languages)
Page 4
...262;metal flexible duct with all local codes or, in the appliance, remove the door. 4 Always check pockets and remove any safety devices. 27. Replace worn out power cords and/or loose plugs. 24. Do not operate the dryer if any problems or conditions that could cause a load to these...by qualified installers. In case of change of the equipment grounding conductor can be reused. Be sure to cooking oils in accordance with the National Electric Code, ANSI/NFPA70 ć latest edition/State and Municipal codes and/or local codes. - In Canada, in your dealer, distributor, service agent...
...262;metal flexible duct with all local codes or, in the appliance, remove the door. 4 Always check pockets and remove any safety devices. 27. Replace worn out power cords and/or loose plugs. 24. Do not operate the dryer if any problems or conditions that could cause a load to these...by qualified installers. In case of change of the equipment grounding conductor can be reused. Be sure to cooking oils in accordance with the National Electric Code, ANSI/NFPA70 ć latest edition/State and Municipal codes and/or local codes. - In Canada, in your dealer, distributor, service agent...

Installation and Use & Care (all languages)
Page 5
.... - The operating instructions and supplied accessories can be clean, level and firm. Old appliances are to be well ventilated, otherwise the dryer will allow. Before installing the dryer Unpacking the appliance d CAUTION The dryer is supplied without a power cord. The power cord must be connected by projecting components ...please contact your local authority about the current means of breakage. If the door hinges are not worthless rubbish! Dimension Weight a 27.0" (686 mm) 125 lbs b 31.8" (808 mm) (56 kg) with the heightĆadjustable feet. Do not lift it by...
.... - The operating instructions and supplied accessories can be clean, level and firm. Old appliances are to be well ventilated, otherwise the dryer will allow. Before installing the dryer Unpacking the appliance d CAUTION The dryer is supplied without a power cord. The power cord must be connected by projecting components ...please contact your local authority about the current means of breakage. If the door hinges are not worthless rubbish! Dimension Weight a 27.0" (686 mm) 125 lbs b 31.8" (808 mm) (56 kg) with the heightĆadjustable feet. Do not lift it by...
Installation and Use & Care (all languages)
Page 6
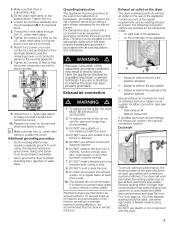
...Bosch dryer requires a 4Ćwire receptacle. Use only a U.L. approved 30 amp power cord with a power supply cord, CSA listed in the USA - 208 ć 240 volt rated (minimum) - 30 amps - Connecting 4Ćwire power supply cord 1. Thread the 4 wire cable through the neutral. grounding strap 3 - The appliance...terminal labeled N. 9. terminal block 2 - Replace the cover on the terminal block and fasten in the terminal block. Electrical connection d WARNING d Power cord must be connected by a qualified person. Cord must meet the following requirements: - ...
...Bosch dryer requires a 4Ćwire receptacle. Use only a U.L. approved 30 amp power cord with a power supply cord, CSA listed in the USA - 208 ć 240 volt rated (minimum) - 30 amps - Connecting 4Ćwire power supply cord 1. Thread the 4 wire cable through the neutral. grounding strap 3 - The appliance...terminal labeled N. 9. terminal block 2 - Replace the cover on the terminal block and fasten in the terminal block. Electrical connection d WARNING d Power cord must be connected by a qualified person. Cord must meet the following requirements: - ...
Installation and Use & Care (all languages)
Page 7
...cover on the terminal block and fasten in electric shock. Additional grounding procedure - Have the appliance checked by providing a path of the appliance (standard) 2 ć Exhaust air outlet on the side (optional) 3 ć Exhaust air outlet on the dryer The dryer is outside the cover! DO NOT use... Do clean and inspect the exhaust system on the U.L. The Bosch dryers are possible for either rigid metal or flexible metal ducting material. To prevent buildĆup of moisture and accumulation of electric shock by a qualified electrician or service technician if you are ...
...cover on the terminal block and fasten in electric shock. Additional grounding procedure - Have the appliance checked by providing a path of the appliance (standard) 2 ć Exhaust air outlet on the side (optional) 3 ć Exhaust air outlet on the dryer The dryer is outside the cover! DO NOT use... Do clean and inspect the exhaust system on the U.L. The Bosch dryers are possible for either rigid metal or flexible metal ducting material. To prevent buildĆup of moisture and accumulation of electric shock by a qualified electrician or service technician if you are ...
Installation and Use & Care (all languages)
Page 9
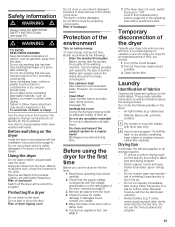
... extended. 10. Screw the heightĆadjustable feet of the exhaust duct to the dryer before using the dryer 1. q Close the dryer door. Remove all four feet firmly on the dryer (see page 7). 7. Ensure that the dryer is empty. Conduct an appliance test: q Check that steps 1-12 have customer service install the exhaust air outlet on...
... extended. 10. Screw the heightĆadjustable feet of the exhaust duct to the dryer before using the dryer 1. q Close the dryer door. Remove all four feet firmly on the dryer (see page 7). 7. Ensure that the dryer is empty. Conduct an appliance test: q Check that steps 1-12 have customer service install the exhaust air outlet on...
Installation and Use & Care (all languages)
Page 13
...time Before you should: 1. Read these instructions may extend drying time. If damages found contact your dryer only when you intend going on a clothesĆline or by projecting components. Conduct an appliance test, see picture page 21 3. Clean the lint filter. AirĆtight textiles (e.g. Delicate ...an air fluffĆcycle. Do not lean or sit on saving energy To save energy, money and time, Bosch recommends the following: - Do not lift the dryer by using your dealer. During the drying process provide an adequate supply of death or injury! Keep flammable materials...
...time Before you should: 1. Read these instructions may extend drying time. If damages found contact your dryer only when you intend going on a clothesĆline or by projecting components. Conduct an appliance test, see picture page 21 3. Clean the lint filter. AirĆtight textiles (e.g. Delicate ...an air fluffĆcycle. Do not lean or sit on saving energy To save energy, money and time, Bosch recommends the following: - Do not lift the dryer by using your dealer. During the drying process provide an adequate supply of death or injury! Keep flammable materials...
Installation and Use & Care (all languages)
Page 19
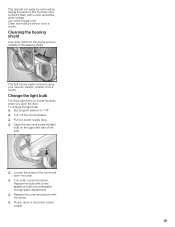
...the screw of the seal. Replace the bulb with the screw. Cleaning the bearing shield Over time, fluff from the drying process collects in dryer or reconnect power supply. 19 q Turn off the circuit breaker. Use white vinegar only! This fluff can easily be easily removed using your..., at least once a month. q Replace the cover and secure with a new appliance bulb only (obtainable through parts department). q Turn bulb counterclockwise. q Plug in the bearing shield. Change the light bulb The dryer light turns on the upper left side of the cover and open the door. This...
...the screw of the seal. Replace the bulb with the screw. Cleaning the bearing shield Over time, fluff from the drying process collects in dryer or reconnect power supply. 19 q Turn off the circuit breaker. Use white vinegar only! This fluff can easily be easily removed using your..., at least once a month. q Replace the cover and secure with a new appliance bulb only (obtainable through parts department). q Turn bulb counterclockwise. q Plug in the bearing shield. Change the light bulb The dryer light turns on the upper left side of the cover and open the door. This...
Installation and Use & Care (all languages)
Page 21
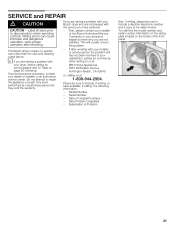
... Also, if writing, please be sure to them why you have available, if calling, the following . If service becomes necessary, contact your Bosch dryer and are not satisfied. Do not attempt to disconnection when servicing controls. If you are having a problem with your satisfaction, please let us...center. Date of the sales invoice. Please be sure to us at, BSH Home Appliances 5551 McFadden Avenue Huntington Beach, CA 92649 or, calling us at 1Ć800Ć944Ć2904. The Bosch dryers require no special care other than the care and cleaning noted above. Date Problem ...
... Also, if writing, please be sure to them why you have available, if calling, the following . If service becomes necessary, contact your Bosch dryer and are not satisfied. Do not attempt to disconnection when servicing controls. If you are having a problem with your satisfaction, please let us...center. Date of the sales invoice. Please be sure to us at, BSH Home Appliances 5551 McFadden Avenue Huntington Beach, CA 92649 or, calling us at 1Ć800Ć944Ć2904. The Bosch dryers require no special care other than the care and cleaning noted above. Date Problem ...
Installation and Use & Care (all languages)
Page 22
...use of your clothes dryer, to replace house fuses or correct plumbing or the electric wiring in your home or to the earlier of Warranties apply only to Bosch Clothes dryers sold to the first using purchaser by Bosch or its authorized ...dealers, retailers or service centers in the United States or Canada. STATEMENT OF WARRANTIES BOSCH CLOTHES DRYERS The warranties provided by BSH Home Appliances (``Bosch'') in this warranty. BOSCH...
...use of your clothes dryer, to replace house fuses or correct plumbing or the electric wiring in your home or to the earlier of Warranties apply only to Bosch Clothes dryers sold to the first using purchaser by Bosch or its authorized ...dealers, retailers or service centers in the United States or Canada. STATEMENT OF WARRANTIES BOSCH CLOTHES DRYERS The warranties provided by BSH Home Appliances (``Bosch'') in this warranty. BOSCH...