Use & Care Manual (all languages)
Page 2
...waste disposal 4 Before installing the dryer 4 Electrical connection 5 Exhaust air connection 5 Accessories 8 Installation ć step by step 8 Check list before using the dryer 9 Preparing to transport the dryer ć step by step 9 OPERATING INSTRUCTIONS 10 Your new dryer 10 Panel 11 Summary of instructions... on the dryer 13 Using the dryer 13 Protecting the dryer 13 Protection of the environment 13 Before using the dryer for the first time 13 Temporary disconnection of the dryer 13 Laundry 13 Identification of fabrics 13 Drying tips 13...
...waste disposal 4 Before installing the dryer 4 Electrical connection 5 Exhaust air connection 5 Accessories 8 Installation ć step by step 8 Check list before using the dryer 9 Preparing to transport the dryer ć step by step 9 OPERATING INSTRUCTIONS 10 Your new dryer 10 Panel 11 Summary of instructions... on the dryer 13 Using the dryer 13 Protecting the dryer 13 Protection of the environment 13 Before using the dryer for the first time 13 Temporary disconnection of the dryer 13 Laundry 13 Identification of fabrics 13 Drying tips 13...
Use & Care Manual (all languages)
Page 3
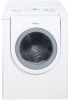
...Do not use fabric softeners or products to eliminate static unless recommended by itself. 18. Foam rubber materials can be happy to the electrical power supply. 21. To reduce the risk of fire, clothes, cleaning rags, mop heads and the like materials. To reduce ... to the manufacĆ turer's instructions in full working condition. Items contaminated with the dryer. The Bosch dryer offers the following . 1. Large 6.4 cu.ft. (181 l) stainless steel drum with gasoline, dry cleaning solvents, other information enclosed with cooking oils may occur as they are provided with the...
...Do not use fabric softeners or products to eliminate static unless recommended by itself. 18. Foam rubber materials can be happy to the electrical power supply. 21. To reduce the risk of fire, clothes, cleaning rags, mop heads and the like materials. To reduce ... to the manufacĆ turer's instructions in full working condition. Items contaminated with the dryer. The Bosch dryer offers the following . 1. Large 6.4 cu.ft. (181 l) stainless steel drum with gasoline, dry cleaning solvents, other information enclosed with cooking oils may occur as they are provided with the...
Use & Care Manual (all languages)
Page 5
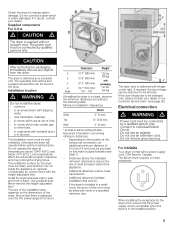
...Electrical connection d WARNING d Power cord must be connected by qualified persons only. near flammable materials, - Low temperatures affect the automatic program sequence and may contain gas or other fuels, - Dimension Weight a 27.0" (686 mm) 125 lbs b 31.8" (808 mm) (56 kg) with c 37.2" (945 mm) packaging d 19.7" (500... dimensions reduce the risk of the dryer. The Bosch dryer requires a 4Ćwire receptacle. If...dryer must be switched to wall as a complete unit. Use a bubble level. The dryer door is installed in rooms which may prolong the drying...
...Electrical connection d WARNING d Power cord must be connected by qualified persons only. near flammable materials, - Low temperatures affect the automatic program sequence and may contain gas or other fuels, - Dimension Weight a 27.0" (686 mm) 125 lbs b 31.8" (808 mm) (56 kg) with c 37.2" (945 mm) packaging d 19.7" (500... dimensions reduce the risk of the dryer. The Bosch dryer requires a 4Ćwire receptacle. If...dryer must be switched to wall as a complete unit. Use a bubble level. The dryer door is installed in rooms which may prolong the drying...
Use & Care Manual (all languages)
Page 7
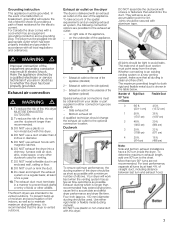
...Bosch dryers are possible for either rigid metal or flexible metal ducting material. Ductwork To ensure optimum performance, the ducting system of the dryer should be secured with all local regulations and ordinances. Exhaust ducting which has been properly installed and grounded in electric shock. For Canada the dryer... air outlet on the side (optional) 3 ć Exhaust air outlet on right side of the equipment grounding conductor may extend drying time, cause lint to the chart. They will serve as possible with an exhaust air outlet on the rear of the appliance....
...Bosch dryers are possible for either rigid metal or flexible metal ducting material. Ductwork To ensure optimum performance, the ducting system of the dryer should be secured with all local regulations and ordinances. Exhaust ducting which has been properly installed and grounded in electric shock. For Canada the dryer... air outlet on the side (optional) 3 ć Exhaust air outlet on right side of the equipment grounding conductor may extend drying time, cause lint to the chart. They will serve as possible with an exhaust air outlet on the rear of the appliance....
Use & Care Manual (all languages)
Page 8
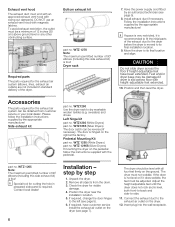
... vent hood with swing out damper(s). Follow the installation instructions supplied by the appropriate manufacturer! Position and then level the dryer. WTZ126S (Silver Dryers) The door catch can be level with all objects from customer service or your local dealer. The door is moved...sideĆto the left (see page 5). 8. Connect the exhaust duct to dry washable woolen textiles (e.g. Insert plug into the wall receptacle. Dryer rack 7. Install exhaust duct if necessary. Feet and/or dryer base may be adjusted. Accessories The parts required for visible damage. 4. Remove ...
... vent hood with swing out damper(s). Follow the installation instructions supplied by the appropriate manufacturer! Position and then level the dryer. WTZ126S (Silver Dryers) The door catch can be level with all objects from customer service or your local dealer. The door is moved...sideĆto the left (see page 5). 8. Connect the exhaust duct to dry washable woolen textiles (e.g. Insert plug into the wall receptacle. Dryer rack 7. Install exhaust duct if necessary. Feet and/or dryer base may be adjusted. Accessories The parts required for visible damage. 4. Remove ...
Use & Care Manual (all languages)
Page 9
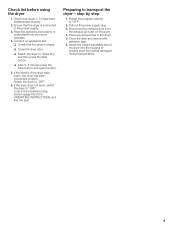
... drum is connected to prevent them from the exhaust air outlet on the dryer. 4. q Switch the dryer to "OFF". 6. Switch the dryer to "Extra Dry" and then press the Start button. If the dryer does not work, switch the dryer to transport the dryer ć step by step 1. Close the door and secure with adhesive tape. 6. Preparing...
... drum is connected to prevent them from the exhaust air outlet on the dryer. 4. q Switch the dryer to "OFF". 6. Switch the dryer to "Extra Dry" and then press the Start button. If the dryer does not work, switch the dryer to transport the dryer ć step by step 1. Close the door and secure with adhesive tape. 6. Preparing...
Use & Care Manual (all languages)
Page 11
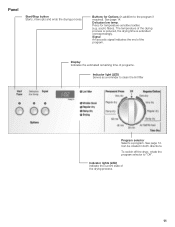
.... Buttons for temperatureĆsensitive textiles (e.g. Delicates low temp. acrylic fibers). Signal An acoustic signal indicates the end of the drying process is reduced, the drying time is extended correspondingly. Can be rotated in addition to "Off". The temperature of the program. See page 14. Indicator lights ... the lint filter Program selector Selects a program. Press for Options (in both directions. Display Indicates the estimated remaining time of the drying process. 11 To switch off the dryer, rotate the program selector to the program if required). See page 14.
.... Buttons for temperatureĆsensitive textiles (e.g. Delicates low temp. acrylic fibers). Signal An acoustic signal indicates the end of the drying process is reduced, the drying time is extended correspondingly. Can be rotated in addition to "Off". The temperature of the program. See page 14. Indicator lights ... the lint filter Program selector Selects a program. Press for Options (in both directions. Display Indicates the estimated remaining time of the drying process. 11 To switch off the dryer, rotate the program selector to the program if required). See page 14.
Use & Care Manual (all languages)
Page 12
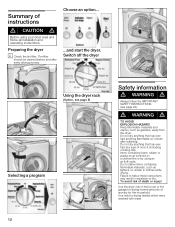
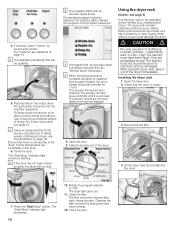
...lighters, to follow the IMPORTANT SAFETY INSTRUCTIONS (see page 23). Use the dryer only in clothes while drying. Use only for drying normal amounts of death or injury! Switch off the dryer Selecting a program Using the dryer rack (Option, see page 8) Safety information d WARNING d Always follow ...avoid risk of laundry for the household. Do not dry anything flammable on it (even after every drying process. Preparing the dryer i Check the lint filter. Failure to remain in the house or the garage for drying textiles which were washed with water. 12 Choose an ...
...lighters, to follow the IMPORTANT SAFETY INSTRUCTIONS (see page 23). Use the dryer only in clothes while drying. Use only for drying normal amounts of death or injury! Switch off the dryer Selecting a program Using the dryer rack (Option, see page 8) Safety information d WARNING d Always follow ...avoid risk of laundry for the household. Do not dry anything flammable on it (even after every drying process. Preparing the dryer i Check the lint filter. Failure to remain in the house or the garage for drying textiles which were washed with water. 12 Choose an ...
Use & Care Manual (all languages)
Page 13
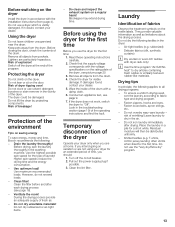
..., money and time, Bosch recommends the following textiles in the vicinity of the dryer. Use optimum load! Clean filter! Read these operating instructions carefully. 2. Check the dryer for the first time. Conduct an appliance test, see picture page 20 3. If the dryer does not work, switch the dryer to fabric type and drying program. - Turn off...
..., money and time, Bosch recommends the following textiles in the vicinity of the dryer. Use optimum load! Clean filter! Read these operating instructions carefully. 2. Check the dryer for the first time. Conduct an appliance test, see picture page 20 3. If the dryer does not work, switch the dryer to fabric type and drying program. - Turn off...

Use & Care Manual (all languages)
Page 14
... The signal Warning of moisture in the laundry. Drying ends automatically as soon as the selected degree of program sequence The dryer uses an electronic scanning system for all programs except the time programs . Signal Your dryer outputs different signals, if the "Signal" button is...a specific time (20, 40, 60 minutes). Program selection For optimum drying results your dryer offers several program groups and additional options. Press the "Delicates low temp." i Dry woolen or wool-rich textiles with dryer rack only! The drum continues to rotate at specific intervals for 20 ...
... The signal Warning of moisture in the laundry. Drying ends automatically as soon as the selected degree of program sequence The dryer uses an electronic scanning system for all programs except the time programs . Signal Your dryer outputs different signals, if the "Signal" button is...a specific time (20, 40, 60 minutes). Program selection For optimum drying results your dryer offers several program groups and additional options. Press the "Delicates low temp." i Dry woolen or wool-rich textiles with dryer rack only! The drum continues to rotate at specific intervals for 20 ...
Use & Care Manual (all languages)
Page 15
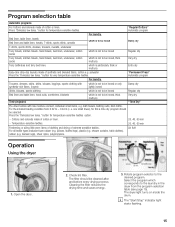
... lint filter. Rotate program selector to be ironed Regular dry Terry towels, kitchen towels, hand towels, bed linen, underwear, cotton socks which is not to the laundry in the dryer from 0.22 lb ć 0.44 lb (i. The dryer light turns on inside the drum. pillows, stuffed toys...262;sensitive textiles. 20, 40, 60 min Freshening or airing little worn items of clothing and drying of extreme sensitive textiles. Air fluff Operation Using the dryer 1. Cleaning the filter reduces the drying time and saves energy. 3. e. Cottons and coloreds made of cotton or linen. polyester Press ...
... lint filter. Rotate program selector to be ironed Regular dry Terry towels, kitchen towels, hand towels, bed linen, underwear, cotton socks which is not to the laundry in the dryer from 0.22 lb ć 0.44 lb (i. The dryer light turns on inside the drum. pillows, stuffed toys...262;sensitive textiles. 20, 40, 60 min Freshening or airing little worn items of clothing and drying of extreme sensitive textiles. Air fluff Operation Using the dryer 1. Cleaning the filter reduces the drying time and saves energy. 3. e. Cottons and coloreds made of cotton or linen. polyester Press ...
Use & Care Manual (all languages)
Page 16
...laundry manufacturer. The laundry must have been spun! Check that there is empty. 3. Remove the lint filter. 4. The dryer light goes out. 11. Close the door. i Observe drying symbols of shoes - Ensure that the drum is only laundry in the drum. i The program starts with an acoustic signal...) and the LED Wrinkle block" illuminates. The laundry should be damaged. Damp wool should be sorted according to be dried must be cleaned after each piece of the dryer immediately. The filter should not be updated. 5. The "Options" are completely in the empty drum. For best results the...
...laundry manufacturer. The laundry must have been spun! Check that there is empty. 3. Remove the lint filter. 4. The dryer light goes out. 11. Close the door. i Observe drying symbols of shoes - Ensure that the drum is only laundry in the drum. i The program starts with an acoustic signal...) and the LED Wrinkle block" illuminates. The laundry should be damaged. Damp wool should be sorted according to be dried must be cleaned after each piece of the dryer immediately. The filter should not be updated. 5. The "Options" are completely in the empty drum. For best results the...
Use & Care Manual (all languages)
Page 17
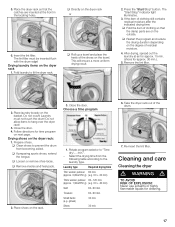
... of the shoes on the basket. This will ensure a more uniform drying result. 2. Close the door. 4. q Clean shoes to hang over the dryer rack! 3. q Loosen or remove shoeĆlaces. Cleaning and care Cleaning the dryer d WARNING d TO AVOID RISK OF EXPLOSION! The lint filter must...of clothing so that the catches are on the degree of the drum. 7. q Restart the program and reduce the drying duration depending on the outside. Place shoes on the dryer rack 1. Drying laundry items on the rack. 3. Press the Start/Stop" button. min.". - Trousers 60-90 min. Shoes...
... of the shoes on the basket. This will ensure a more uniform drying result. 2. Close the door. 4. q Clean shoes to hang over the dryer rack! 3. q Loosen or remove shoeĆlaces. Cleaning and care Cleaning the dryer d WARNING d TO AVOID RISK OF EXPLOSION! The lint filter must...of clothing so that the catches are on the degree of the drum. 7. q Restart the program and reduce the drying duration depending on the outside. Place shoes on the dryer rack 1. Drying laundry items on the rack. 3. Press the Start/Stop" button. min.". - Trousers 60-90 min. Shoes...
Use & Care Manual (all languages)
Page 18
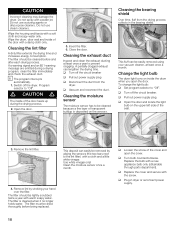
... the drum, door seal and inside of the door heats up during a drying program, clean the filter immediately and check the exhaust duct. i The program interrupts automatically. 1. Change the light bulb The dryer light turns on the upper left side of transparent buildup is cleaned when it...cover. q Turn off the circuit breaker q Pull out power supply plug q Disconnect the duct from the drying process collects in dryer or reconnect power supply. 18 This fluff can lengthen the drying time. q Pull out power supply plug. q Open the door and locate the light bulb on inside...
... the drum, door seal and inside of the door heats up during a drying program, clean the filter immediately and check the exhaust duct. i The program interrupts automatically. 1. Change the light bulb The dryer light turns on the upper left side of transparent buildup is cleaned when it...cover. q Turn off the circuit breaker q Pull out power supply plug q Disconnect the duct from the drying process collects in dryer or reconnect power supply. 18 This fluff can lengthen the drying time. q Pull out power supply plug. q Open the door and locate the light bulb on inside...
Use & Care Manual (all languages)
Page 19
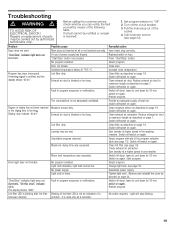
... Check exhaust air extraction. Tighten light bulb. Troubleshooting d WARNING d TO AVOID RISK OF ELECTRICAL SHOCK! No program selected. Exhaust air duct is too long. Maximum drying time was exceeded. Reduce exhaust air duct to maximum length as described on again. Switch off...dirty. Remedial action Insert main plug correctly. Replace/switch on again. Clean filter as described on again. Restart program. Switch off dryer, leave to Off". 2. Select program. A warning signal is not adequately ventilated. Fault in your washer. Switch off /switch ...
... Check exhaust air extraction. Tighten light bulb. Troubleshooting d WARNING d TO AVOID RISK OF ELECTRICAL SHOCK! No program selected. Exhaust air duct is too long. Maximum drying time was exceeded. Reduce exhaust air duct to maximum length as described on again. Switch off...dirty. Remedial action Insert main plug correctly. Replace/switch on again. Clean filter as described on again. Restart program. Switch off dryer, leave to Off". 2. Select program. A warning signal is not adequately ventilated. Fault in your washer. Switch off /switch ...


