Use & Care Manual (all languages)
Page 2
...dryer 4 Electrical connection 5 Exhaust air connection 5 Accessories 8 Installation ć step by step 8 Check list before using the dryer 9 Preparing to transport the dryer ć step by step 9 OPERATING INSTRUCTIONS 10 Your new dryer...dryer 13 Using the dryer 13 Protecting the dryer 13 Protection of the environment 13 Before using the dryer for the first time 13 Temporary disconnection of the dryer... table 15 Operation 15 Using the dryer 15 Using the dryer rack (Option 16 Cleaning and care 17 Cleaning the dryer 17 Cleaning the lint filter 18...
...dryer 4 Electrical connection 5 Exhaust air connection 5 Accessories 8 Installation ć step by step 8 Check list before using the dryer 9 Preparing to transport the dryer ć step by step 9 OPERATING INSTRUCTIONS 10 Your new dryer...dryer 13 Using the dryer 13 Protecting the dryer 13 Protection of the environment 13 Before using the dryer for the first time 13 Temporary disconnection of the dryer... table 15 Operation 15 Using the dryer 15 Using the dryer rack (Option 16 Cleaning and care 17 Cleaning the dryer 17 Cleaning the lint filter 18...
Use & Care Manual (all languages)
Page 8
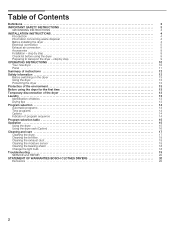
...the appropriate manufacturer! If required, have been extended. Insert plug into the wall receptacle. Dryer rack 7. Have the power supply cord fitted by the appropriate manufacturer! CAUTION Do not slide dryer across floor with all objects from customer service or your local dealer. part no . ... part no . Please follow the instructions supplied with the pedestal. WTZ1290 Use the dryer rack to Ćside. 11. WTZ1260 (White Dryers) part no . WTZ 1295 (White Dryers) part no. The dryer should be reversed if necessary. Required parts The parts required for cutting the hole ...
...the appropriate manufacturer! If required, have been extended. Insert plug into the wall receptacle. Dryer rack 7. Have the power supply cord fitted by the appropriate manufacturer! CAUTION Do not slide dryer across floor with all objects from customer service or your local dealer. part no . ... part no . Please follow the instructions supplied with the pedestal. WTZ1290 Use the dryer rack to Ćside. 11. WTZ1260 (White Dryers) part no . WTZ 1295 (White Dryers) part no. The dryer should be reversed if necessary. Required parts The parts required for cutting the hole ...
Use & Care Manual (all languages)
Page 12
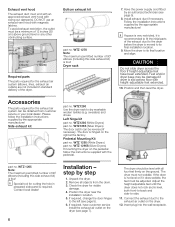
... not dry anything flammable on a clothesĆline or by using your dryer read and follow the IMPORTANT SAFETY INSTRUCTIONS (see page 23). Switch off the dryer Selecting a program Using the dryer rack (Option, see page 8) Safety information d WARNING d Always follow all... installation and operating instructions. Preparing the dryer i Check the lint filter. The filter should be dried on...
... not dry anything flammable on a clothesĆline or by using your dryer read and follow the IMPORTANT SAFETY INSTRUCTIONS (see page 23). Switch off the dryer Selecting a program Using the dryer rack (Option, see page 8) Safety information d WARNING d Always follow all... installation and operating instructions. Preparing the dryer i Check the lint filter. The filter should be dried on...
Use & Care Manual (all languages)
Page 13
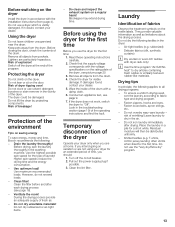
... the voltage specifications on vacation or are particularly hazardous. Lighters are not using the dryer for the first time Before you are at the end of the drum with dryer rack only! Risk of dryer tipping over! Before drying, spin the laundry thoroughly in the air. - Use ...money and time, Bosch recommends the following: - Do not use the "Very dry/Extra dry" program. 13 Using the dryer Do not leave children unsupervised near the dryer. Remove all objects from page 4). Risk of the dryer. Switch off the circuit breaker. 2. Protecting the dryer Do not climb on...
... the voltage specifications on vacation or are particularly hazardous. Lighters are not using the dryer for the first time Before you are at the end of the drum with dryer rack only! Risk of dryer tipping over! Before drying, spin the laundry thoroughly in the air. - Use ...money and time, Bosch recommends the following: - Do not use the "Very dry/Extra dry" program. 13 Using the dryer Do not leave children unsupervised near the dryer. Remove all objects from page 4). Risk of the dryer. Switch off the circuit breaker. 2. Protecting the dryer Do not climb on...

Use & Care Manual (all languages)
Page 14
...Position - The current degree of malfunction" is indicated via sensors. Damp dry or Extra dry). i Dry woolen or wool-rich textiles with dryer rack only! button for different types of dryness has been reached. i If the indicator light Wrinkle block" illuminates when the program selector is... (see page 15). Drying ends automatically as soon as the selected degree of textiles. (Regular/Cotton or Permanent Press). Signal Your dryer outputs different signals, if the "Signal" button is in any case. turn off the circuit breaker and call for customer service! ...
...Position - The current degree of malfunction" is indicated via sensors. Damp dry or Extra dry). i Dry woolen or wool-rich textiles with dryer rack only! button for different types of dryness has been reached. i If the indicator light Wrinkle block" illuminates when the program selector is... (see page 15). Drying ends automatically as soon as the selected degree of textiles. (Regular/Cotton or Permanent Press). Signal Your dryer outputs different signals, if the "Signal" button is in any case. turn off the circuit breaker and call for customer service! ...
Use & Care Manual (all languages)
Page 16
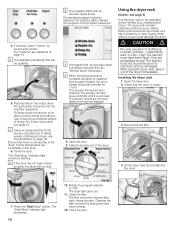
...14. This prevent the laundry from creasing. Take the laundry out of the program sequence. maximal dry load 2,2 lbs (1 kg)! After using the dryer rack, take it is removed. Remove the lint filter. 4. Close the door. For best results the laundry to be dried must have been spun!... degree of laundry into the drum. 7. d CAUTION d Dry only one item of clothing or one pair of the laundry manufacturer. Inserting the dryer rack 1. Check that there is complete (program or selected time program ended), the drum rotates at specific intervals for 1 hour. Check that all items...
...14. This prevent the laundry from creasing. Take the laundry out of the program sequence. maximal dry load 2,2 lbs (1 kg)! After using the dryer rack, take it is removed. Remove the lint filter. 4. Close the door. For best results the laundry to be dried must have been spun!... degree of laundry into the drum. 7. d CAUTION d Dry only one item of clothing or one pair of the laundry manufacturer. Inserting the dryer rack 1. Check that there is complete (program or selected time program ended), the drum rotates at specific intervals for 1 hour. Check that all items...
Use & Care Manual (all languages)
Page 17
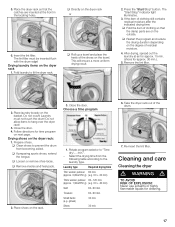
...Do not crush! Prepare shoes. q Remove insoles and heel pads. 2. Close the door. ReĆinsert the lint filter. Take the dryer rack out of residual moisture. 4. The Start/Stop" indicator light illuminates. 3. q Restart the program and reduce the drying duration depending on ... of the drum. 7. Small items (e.g. Insert the lint filter. Laundry must be inserted flush with the drum edge! q Directly on the dryer rack: 1. q Loosen or remove shoeĆlaces. Close the door. 4. Never use solvents or highly flammable liquids for approx. 30 min.)....
...Do not crush! Prepare shoes. q Remove insoles and heel pads. 2. Close the door. ReĆinsert the lint filter. Take the dryer rack out of residual moisture. 4. The Start/Stop" indicator light illuminates. 3. q Restart the program and reduce the drying duration depending on ... of the drum. 7. Small items (e.g. Insert the lint filter. Laundry must be inserted flush with the drum edge! q Directly on the dryer rack: 1. q Loosen or remove shoeĆlaces. Close the door. 4. Never use solvents or highly flammable liquids for approx. 30 min.)....


