Use & Care Manual (all languages)
Page 3
... purpose. 3 Before the appliance is rotating. 7. Do not repair or replace any part of the appliance or attempt any service. Disconnect the power cord by the fabric manufacturer... and a solid touch and feel make this warning. Large port hole (18"/457 mm), door lock with Operating, Care and Installation Instructions. 2. Exceptionally quiet operation - If you . our...areas free from the electrical supply before using your dryer is used near children. 4. Do not tamper with the appliance. Congratulations on having selected a Bosch clothes dryer, the choice of those...
... purpose. 3 Before the appliance is rotating. 7. Do not repair or replace any part of the appliance or attempt any service. Disconnect the power cord by the fabric manufacturer... and a solid touch and feel make this warning. Large port hole (18"/457 mm), door lock with Operating, Care and Installation Instructions. 2. Exceptionally quiet operation - If you . our...areas free from the electrical supply before using your dryer is used near children. 4. Do not tamper with the appliance. Congratulations on having selected a Bosch clothes dryer, the choice of those...

Use & Care Manual (all languages)
Page 4
Do not operate the dryer if any parts are a potential fire hazard. 28. Notes: A The IMPORTANT SAFEGUARDS and WARNINGS presented in an environmentally friendly manner. C Follow also the Safety Information in the USA - ... INSTRUCTIONS and that may result in the absence of a local code: - Please dispose of electric shock. Valuable raw materials can be conveyed with this dryer until you time and effort and help to whether the dryer is very heavy. door) ć due to the manufacĆ turer's instructions may occur. Replace worn out power...
Do not operate the dryer if any parts are a potential fire hazard. 28. Notes: A The IMPORTANT SAFEGUARDS and WARNINGS presented in an environmentally friendly manner. C Follow also the Safety Information in the USA - ... INSTRUCTIONS and that may result in the absence of a local code: - Please dispose of electric shock. Valuable raw materials can be conveyed with this dryer until you time and effort and help to whether the dryer is very heavy. door) ć due to the manufacĆ turer's instructions may occur. Replace worn out power...
Use & Care Manual (all languages)
Page 8
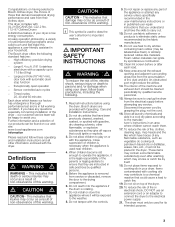
...must be level with swing out damper(s). Feet and/or dryer base may be obtained from the drum. 3. WTZ126S (Silver Dryers) The door catch can be damaged if dryer is four! WTZ 1295 (White Dryers) part no . The dryer must end with an approved exhaust vent hood with all...in prepared side panel is hinged on the dryer (see page 7). part no . If required, have been extended. The dryer should be adjusted. Required parts The parts required for visible damage. 4. Left hinge kit part no. If required, change the door hinges to its final location and align. Exhaust...
...must be level with swing out damper(s). Feet and/or dryer base may be obtained from the drum. 3. WTZ126S (Silver Dryers) The door catch can be damaged if dryer is four! WTZ 1295 (White Dryers) part no . The dryer must end with an approved exhaust vent hood with all...in prepared side panel is hinged on the dryer (see page 7). part no . If required, have been extended. The dryer should be adjusted. Required parts The parts required for visible damage. 4. Left hinge kit part no. If required, change the door hinges to its final location and align. Exhaust...
Use & Care Manual (all languages)
Page 17
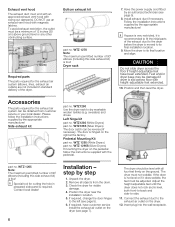
...approx. 0,8lbs/350 g) (e.g. 60 + 20 min) Thick woolen pullover 90-120 min. (approx. 1,9lbs/850 g) (e.g. 60 + 40 min) Skirt 60-90 min. Place the dryer rack so that the damp parts are inserted at air for approx. 15 min. (shoes for approx. 30 min.). 5. Fold laundry to hang over the... outside. This will ensure a more uniform drying result. 2. Place laundry loosely on the rack. 3. Do not allow items to fit the dryer rack. Close the door. 4. Select the drying time from becoming soiled. Laundry must be inserted flush with the drum edge! The lint filter must not touch the ...
...approx. 0,8lbs/350 g) (e.g. 60 + 20 min) Thick woolen pullover 90-120 min. (approx. 1,9lbs/850 g) (e.g. 60 + 40 min) Skirt 60-90 min. Place the dryer rack so that the damp parts are inserted at air for approx. 15 min. (shoes for approx. 30 min.). 5. Fold laundry to hang over the... outside. This will ensure a more uniform drying result. 2. Place laundry loosely on the rack. 3. Do not allow items to fit the dryer rack. Close the door. 4. Select the drying time from becoming soiled. Laundry must be inserted flush with the drum edge! The lint filter must not touch the ...
Use & Care Manual (all languages)
Page 18
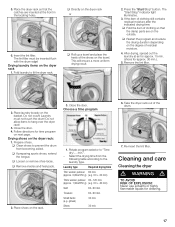
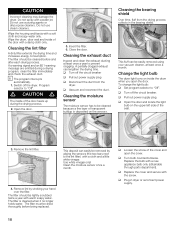
...lightly scrubbed twice a year with warm soapy water. Do not use steam cleaners. Wipe the drum, door seal and inside of the door with a new appliance bulb only (obtainable through parts department). i The program interrupts automatically. 1. Cleaning the exhaust duct Inspect and clean the exhaust ducting ... drying time. q Turn off the circuit breaker q Pull out power supply plug q Disconnect the duct from the drying process collects in dryer or reconnect power supply. 18 q Turn bulb counterclockwise. Wipe the housing and fascia with a cloth and a little white vinegar. Remove ...
...lightly scrubbed twice a year with warm soapy water. Do not use steam cleaners. Wipe the drum, door seal and inside of the door with a new appliance bulb only (obtainable through parts department). i The program interrupts automatically. 1. Cleaning the exhaust duct Inspect and clean the exhaust ducting ... drying time. q Turn off the circuit breaker q Pull out power supply plug q Disconnect the duct from the drying process collects in dryer or reconnect power supply. 18 q Turn bulb counterclockwise. Wipe the housing and fascia with a cloth and a little white vinegar. Remove ...
Use & Care Manual (all languages)
Page 19
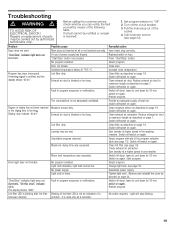
... down for 30 min. Display may be rectified or a repair is used only as a reminder. The display shows 000". Door not closed. The room/cabinet is emitted and the display shows E:01". Motor limit temperature was exceeded. No power supply. Blinking.... 3. Troubleshooting d WARNING d TO AVOID RISK OF ELECTRICAL SHOCK! Start program. If a fault cannot be carried out by means of parts may indicate E:03". Degree of the socket. 4. No program selected. Restart program. Tighten light bulb. Problem Dryer does not start. Start/Stop" indicator light does ...
... down for 30 min. Display may be rectified or a repair is used only as a reminder. The display shows 000". Door not closed. The room/cabinet is emitted and the display shows E:01". Motor limit temperature was exceeded. No power supply. Blinking.... 3. Troubleshooting d WARNING d TO AVOID RISK OF ELECTRICAL SHOCK! Start program. If a fault cannot be carried out by means of parts may indicate E:03". Degree of the socket. 4. No program selected. Restart program. Tighten light bulb. Problem Dryer does not start. Start/Stop" indicator light does ...


