Operating, Care, Installation
Page 1
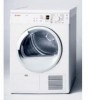
Dryer T20-UL en Operating, Care and Installation Instructions
Dryer T20-UL en Operating, Care and Installation Instructions
Operating, Care, Installation
Page 2
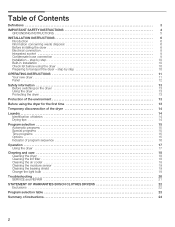
... dryer 6 Electrical connection 8 Integrated socket 9 Condensate hose connection 9 Installation ć step by step 10 BuiltĆin Installation 10 Check list before using the dryer 10 Preparing to transport the dryer ...program sequence 16 Operation 17 Using the dryer 17 Cleaning and care 18 Cleaning the dryer 18 Cleaning the lint filter 18 ...Cleaning the air cooler 18 Cleaning the moisture sensor 19 Cleaning the bearing shield 19 Change the light bulb 19 Troubleshooting 20 SERVICE and REPAIR 21 STATEMENT OF WARRANTIES BOSCH CLOTHES DRYERS...
... dryer 6 Electrical connection 8 Integrated socket 9 Condensate hose connection 9 Installation ć step by step 10 BuiltĆin Installation 10 Check list before using the dryer 10 Preparing to transport the dryer ...program sequence 16 Operation 17 Using the dryer 17 Cleaning and care 18 Cleaning the dryer 18 Cleaning the lint filter 18 ...Cleaning the air cooler 18 Cleaning the moisture sensor 19 Cleaning the bearing shield 19 Change the light bulb 19 Troubleshooting 20 SERVICE and REPAIR 21 STATEMENT OF WARRANTIES BOSCH CLOTHES DRYERS...
Operating, Care, Installation
Page 3
... Information Please read and follow these operating and installation instructions and all other information enclosed with UL 2158 Electric Clothes Dryers. The Bosch dryer offers the following standard features: - Timed cycles for ½ load (25 minutes) Each dryer which leaves our factory has undergone a thorough performance test and is in particular. 3 i This symbol is low...
... Information Please read and follow these operating and installation instructions and all other information enclosed with UL 2158 Electric Clothes Dryers. The Bosch dryer offers the following standard features: - Timed cycles for ½ load (25 minutes) Each dryer which leaves our factory has undergone a thorough performance test and is in particular. 3 i This symbol is low...
Operating, Care, Installation
Page 4
..., etc., must only be placed in the dryer. The dryer must not be used near children. 4. Do not use an extension cord or an adapter to connect the dryer to the electrical power supply. 20. Before the appliance is.... Failure to install, maintain and/or operate the dryer according to the manufacĆ turer's instructions may smoke or catch fire by the fabric manufacturer. 11. Bosch dryers are in an area where children cannot reach them..... Replace worn out power cords and/or loose plugs. 24. Plastic or nonĆmetal flexible duct are instructed in injury and/or damage. 4
..., etc., must only be placed in the dryer. The dryer must not be used near children. 4. Do not use an extension cord or an adapter to connect the dryer to the electrical power supply. 20. Before the appliance is.... Failure to install, maintain and/or operate the dryer according to the manufacĆ turer's instructions may smoke or catch fire by the fabric manufacturer. 11. Bosch dryers are in an area where children cannot reach them..... Replace worn out power cords and/or loose plugs. 24. Plastic or nonĆmetal flexible duct are instructed in injury and/or damage. 4
Operating, Care, Installation
Page 5
... (minimum) - 30 amps - UL listed in the INSTALLATION INSTRUCTIONS and the OPERATING INSTRUCTIONS. DO NOT modify the plug provided with the dryer. SAVE THESE INSTRUCTIONS 5 B Always contact your dealer, distributor, service agent or the manufacturer about any problems or conditions that may occur.... accordance with a cord having an equipmentĆgrounding conductor and a grounding plug. In case of change of electric shock. If it will reduce the risk of electric shock by a qualified electrician. Common sense, caution and care must meet the following requirements: - suitable for...
... (minimum) - 30 amps - UL listed in the INSTALLATION INSTRUCTIONS and the OPERATING INSTRUCTIONS. DO NOT modify the plug provided with the dryer. SAVE THESE INSTRUCTIONS 5 B Always contact your dealer, distributor, service agent or the manufacturer about any problems or conditions that may occur.... accordance with a cord having an equipmentĆgrounding conductor and a grounding plug. In case of change of electric shock. If it will reduce the risk of electric shock by a qualified electrician. Common sense, caution and care must meet the following requirements: - suitable for...
Operating, Care, Installation
Page 6
... yourself. All packaging materials are not worthless rubbish! door) ć due to the surfaces. The dryer is visibly damaged. In the U.S.A., in accordance with the National Electric Code, ANSI/NFPA70 ć latest edition/State and Municipal codes and/or local codes. - Do ... from the drum. In Canada, in accordance with the Canadian Electric Code C22.1 ć latest edition/Provincial and Municipal codes and/or local codes. Before installing the dryer Unpacking the appliance d CAUTION d The dryer is supplied without a power cord. Supplied components For U.S.A. Please...
... yourself. All packaging materials are not worthless rubbish! door) ć due to the surfaces. The dryer is visibly damaged. In the U.S.A., in accordance with the National Electric Code, ANSI/NFPA70 ć latest edition/State and Municipal codes and/or local codes. - Do ... from the drum. In Canada, in accordance with the Canadian Electric Code C22.1 ć latest edition/Provincial and Municipal codes and/or local codes. Before installing the dryer Unpacking the appliance d CAUTION d The dryer is supplied without a power cord. Supplied components For U.S.A. Please...
Operating, Care, Installation
Page 7
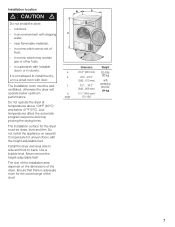
... range of the door! Do not install the appliance on the dimensions of frost, - Compensate for the dryer must be clean, level and firm. Dimension Weight a 23.6" (600 mm) 92.4 lbs b 23.0...24.2" (42 kg) (585...615 mm) with dripping water, - The installation surface for uneven floors with...area depends on carpets! in closets. The installation room must be well ventilated, otherwise the dryer will operate below 41°F (5°C). Do not operate the dryer at risk of the dryer. Install the dryer and level side to side and front to install the dryĆ er in an ...
... range of the door! Do not install the appliance on the dimensions of frost, - Compensate for the dryer must be clean, level and firm. Dimension Weight a 23.6" (600 mm) 92.4 lbs b 23.0...24.2" (42 kg) (585...615 mm) with dripping water, - The installation surface for uneven floors with...area depends on carpets! in closets. The installation room must be well ventilated, otherwise the dryer will operate below 41°F (5°C). Do not operate the dryer at risk of the dryer. Install the dryer and level side to side and front to install the dryĆ er in an ...
Operating, Care, Installation
Page 8
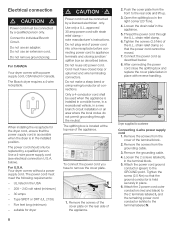
...) to remove the cover plate. 1. Electrical connection d CAUTION d Power cord must be connected by a licensed electrician only. Five feet long (minimum) - suitable for the dryer cord, ensure that the power supply cord is accessible when the dryer is located at conĆ nections. The... place with reverse handling. Loosen the 2 screws labeled L in the right corner (20 Torx). 4. Do not use an extension cord. The Bosch dryer requires a 4Ćwire receptacle. The power cord must have to the terminal labeled N. Only a 4Ćconductor cord shall be used when the...
...) to remove the cover plate. 1. Electrical connection d CAUTION d Power cord must be connected by a licensed electrician only. Five feet long (minimum) - suitable for the dryer cord, ensure that the power supply cord is accessible when the dryer is located at conĆ nections. The... place with reverse handling. Loosen the 2 screws labeled L in the right corner (20 Torx). 4. Do not use an extension cord. The Bosch dryer requires a 4Ćwire receptacle. The power cord must have to the terminal labeled N. Only a 4Ćconductor cord shall be used when the...
Operating, Care, Installation
Page 9
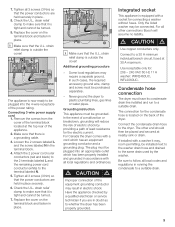
...outside the cover! The appliance is a grounding cable. 3. Use receptable only for the electric current. Loosen the 2 screws labeled L and the screw labeled N in electric shock. The other connections Bosch will reduce the risk of the equipment grounding conductor may , room permitting, be grounded....and secured at the top rear of the power rating. Only the listed washer may require a separate ground. Condensate hose connection The dryer must be plugged into an appropriate outlet which has an equipment grounding conductor and a grounding plug. Make sure ...
...outside the cover! The appliance is a grounding cable. 3. Use receptable only for the electric current. Loosen the 2 screws labeled L and the screw labeled N in electric shock. The other connections Bosch will reduce the risk of the equipment grounding conductor may , room permitting, be grounded....and secured at the top rear of the power rating. Only the listed washer may require a separate ground. Condensate hose connection The dryer must be plugged into an appropriate outlet which has an equipment grounding conductor and a grounding plug. Make sure ...

Operating, Care, Installation
Page 10
...not level or if it does wobble, the feet must be square and have been implemented properly. 2. If the dryer does not work, switch the dryer to understand how your dryer operates. 4. Look in ; Close the door and secure with all objects from being damaged during transportation. 10 Feet... into the housing to its final location and align. CAUTION An opening should be builtĆin the troubleshooting section (page 20) of the dryer into the wall receptacle. If the interior of at least 31 square inches (200 cm2) must not wobble. Rotate the program selector to ...
...not level or if it does wobble, the feet must be square and have been implemented properly. 2. If the dryer does not work, switch the dryer to understand how your dryer operates. 4. Look in ; Close the door and secure with all objects from being damaged during transportation. 10 Feet... into the housing to its final location and align. CAUTION An opening should be builtĆin the troubleshooting section (page 20) of the dryer into the wall receptacle. If the interior of at least 31 square inches (200 cm2) must not wobble. Rotate the program selector to ...
Operating, Care, Installation
Page 11
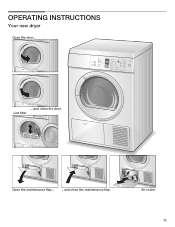
Air cooler 11 OPERATING INSTRUCTIONS Your new dryer Open the door... ....and close the maintenance falp. Lint filter Open the maintenance flap... ...and close the door.
Air cooler 11 OPERATING INSTRUCTIONS Your new dryer Open the door... ....and close the maintenance falp. Lint filter Open the maintenance flap... ...and close the door.
Operating, Care, Installation
Page 12
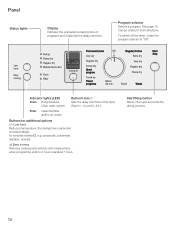
..., interrupts and ends the drying process. 12 Indicator lights (LED) Drain Pump blocked, Clean drainĆsystem. To switch off the dryer, rotate the program selector to 2 hours (standard 1 hour). hours!) 0-24 h Filter Clean fluff filter and/or air cooler. Button h:min X Sets the delay start time. for additional options ~ Low heat... correspondingly; Can be rotated in .. Panel Status lights Display Indicates the estimated remaining time of programs and if selected the delay start time of the dryer (Start in both directions.
..., interrupts and ends the drying process. 12 Indicator lights (LED) Drain Pump blocked, Clean drainĆsystem. To switch off the dryer, rotate the program selector to 2 hours (standard 1 hour). hours!) 0-24 h Filter Clean fluff filter and/or air cooler. Button h:min X Sets the delay start time. for additional options ~ Low heat... correspondingly; Can be rotated in .. Panel Status lights Display Indicates the estimated remaining time of programs and if selected the delay start time of the dryer (Start in both directions.
Operating, Care, Installation
Page 13
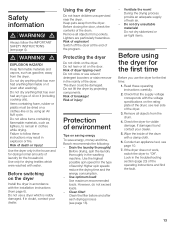
... HAZARD! Do not allow items containing flammable materials, such as gasoline, away from the dryer. Remove all objects from page 6). The dryer could be dried on saving energy To save energy, money and time, Bosch recommends the following: - Use the highest possible spin speed for the household. However, do... not exceed loads. - If the dryer does not work, switch the dryer to remain in the house and for drying normal amounts...
... HAZARD! Do not allow items containing flammable materials, such as gasoline, away from the dryer. Remove all objects from page 6). The dryer could be dried on saving energy To save energy, money and time, Bosch recommends the following: - Use the highest possible spin speed for the household. However, do... not exceed loads. - If the dryer does not work, switch the dryer to remain in the house and for drying normal amounts...
Operating, Care, Installation
Page 14
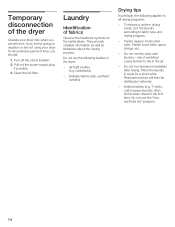
...belts, apron strings, etc.. - Place the laundry in a pile for an extended period of time, you are not using your dryer only when you should: 1. Residual moisture will then be distributed uniformly. - They provide valuable information as well as limitations about the... drying process. Do not use the Very dry/Extra dry" program. 14 Temporary disconnection of the dryer Operate your dryer for a short while. Laundry Identification of wrinkling! rubberized). - Do not iron laundry immediately after drying. Fasten zippers, hooks and eyes...
...belts, apron strings, etc.. - Place the laundry in a pile for an extended period of time, you are not using your dryer only when you should: 1. Residual moisture will then be distributed uniformly. - They provide valuable information as well as limitations about the... drying process. Do not use the Very dry/Extra dry" program. 14 Temporary disconnection of the dryer Operate your dryer for a short while. Laundry Identification of wrinkling! rubberized). - Do not iron laundry immediately after drying. Fasten zippers, hooks and eyes...
Operating, Care, Installation
Page 15
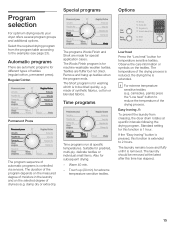
... the program table according to 2 hours. The laundry should be dried quickly, e.g. Select the required drying program from creasing, the dryer drum rotates at specific intervals following the drying program. Regular/Cotton Permanent Press The program sequence of moisture in the laundry and on ... The Short program is for different types of the drying process. Warm 40 min. - Program selection For optimum drying results your dryer offers several program groups and additional options. Automatic programs There are fluffer but not dried. The Wools Finish program is for extreme ...
... the program table according to 2 hours. The laundry should be dried quickly, e.g. Select the required drying program from creasing, the dryer drum rotates at specific intervals following the drying program. Regular/Cotton Permanent Press The program sequence of moisture in the laundry and on ... The Short program is for different types of the drying process. Warm 40 min. - Program selection For optimum drying results your dryer offers several program groups and additional options. Automatic programs There are fluffer but not dried. The Wools Finish program is for extreme ...
Operating, Care, Installation
Page 16
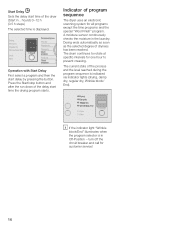
... program and then the start delay by pressing the button. Press the Start/stop button and after the run down of program sequence The dryer uses an electronic scanning system for all programs except the time programs and the special Wool Finish" program. The drum continues to prevent ... process and the level reached during the program sequence is in OffĆPosition - Drying ends automatically as soon as the selected degree of the dryer (Start in the laundry. Start Delay Sets the delay start time of dryness has been reached. hours!) 0-12 h (0.5 h steps) The selected time is...
... program and then the start delay by pressing the button. Press the Start/stop button and after the run down of program sequence The dryer uses an electronic scanning system for all programs except the time programs and the special Wool Finish" program. The drum continues to prevent ... process and the level reached during the program sequence is in OffĆPosition - Drying ends automatically as soon as the selected degree of the dryer (Start in the laundry. Start Delay Sets the delay start time of dryness has been reached. hours!) 0-12 h (0.5 h steps) The selected time is...
Operating, Care, Installation
Page 17
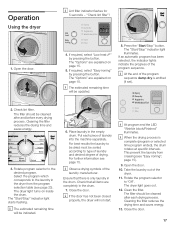
...filter indicator flashes for 5 seconds - Check lint filter"! 1. The Options" are explained on page 15. i At the end of the dryer. 11. Place laundry in the drum. i At program end the LED Wrinkle block/Finished" illuminates. Take the laundry out of the program ... there is complete (program or selected time program ended), the drum rotates at specific intervals. The Options" are explained on inside the drum. The dryer light turns on page 15. 5. Clean the filter. Press the Start/Stop" button. i The estimated remaining time will be sorted according to be...
...filter indicator flashes for 5 seconds - Check lint filter"! 1. The Options" are explained on page 15. i At the end of the dryer. 11. Place laundry in the drum. i At program end the LED Wrinkle block/Finished" illuminates. Take the laundry out of the program ... there is complete (program or selected time program ended), the drum rotates at specific intervals. The Options" are explained on inside the drum. The dryer light turns on page 15. 5. Clean the filter. Press the Start/Stop" button. i The estimated remaining time will be sorted according to be...
Operating, Care, Installation
Page 18
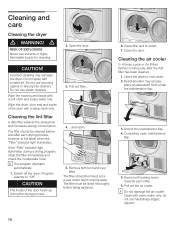
...filter extends the drying time and increases energy consumption. If the Filter" indicator light illuminates during the drying process. 3. Switch off the dryer. Leave the dryer to Off". The filter should be cleaned before being replaced. 6. i The program interrupts automatically. 1. Close filter and reĆ...; CAUTION The inside of the door heats up during a drying program, clean the filter immediately and check the condensate hose. The filter should be rinsed once a year under the maintenance flap. 3. Clean with a damp cloth only. do not ...
...filter extends the drying time and increases energy consumption. If the Filter" indicator light illuminates during the drying process. 3. Switch off the dryer. Leave the dryer to Off". The filter should be cleaned before being replaced. 6. i The program interrupts automatically. 1. Close filter and reĆ...; CAUTION The inside of the door heats up during a drying program, clean the filter immediately and check the condensate hose. The filter should be rinsed once a year under the maintenance flap. 3. Clean with a damp cloth only. do not ...
Operating, Care, Installation
Page 19
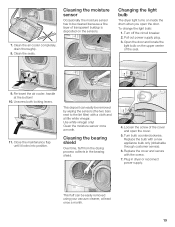
...both locking levers. 11. Replace the bulb with the screw. 7. Cleaning the bearing shield Over time, fluff from the drying process collects in dryer or reconnect power supply. Cleaning the moisture sensor Occasionally the moisture sensor has to the lint filter) with a cloth and a little white vinegar... air cooler completely, drain thoroughly. 8. ReĆinsert the air cooler, handle at least once a month. 19 Changing the light bulb The dryer light turns on the sensors. 7. Clean the seals. Pull out power supply plug. 3. This fluff can easily be removed by wiping the sensors...
...both locking levers. 11. Replace the bulb with the screw. 7. Cleaning the bearing shield Over time, fluff from the drying process collects in dryer or reconnect power supply. Cleaning the moisture sensor Occasionally the moisture sensor has to the lint filter) with a cloth and a little white vinegar... air cooler completely, drain thoroughly. 8. ReĆinsert the air cooler, handle at least once a month. 19 Changing the light bulb The dryer light turns on the sensors. 7. Clean the seals. Pull out power supply plug. 3. This fluff can easily be removed by wiping the sensors...
Operating, Care, Installation
Page 20
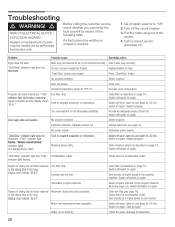
... off /switch on page 18. Select program with aid of drying has not been reached Lint filter dirty. Troubleshooting d WARNING! d RISK OF ELECTRICAL SHOCK ! If a fault cannot be carried out by means of fresh air. Press Start/Stop" button. Door not closed. Close door.... is required: 1. Start program. Fault in program sequence or malfunction. Switch off dryer, leave to cool down for 30 min. Change light bulb, see page 18). Restart program. Check hose for condensation outlet. Switch off /switch on again. EXPLOSION HAZARD! The room/cabinet is too...
... off /switch on page 18. Select program with aid of drying has not been reached Lint filter dirty. Troubleshooting d WARNING! d RISK OF ELECTRICAL SHOCK ! If a fault cannot be carried out by means of fresh air. Press Start/Stop" button. Door not closed. Close door.... is required: 1. Start program. Fault in program sequence or malfunction. Switch off dryer, leave to cool down for 30 min. Change light bulb, see page 18). Restart program. Check hose for condensation outlet. Switch off /switch on again. EXPLOSION HAZARD! The room/cabinet is too...


