

User Manual
Page 2
... selected fabric type. Quiet Performance Bosch washers use suspended brushless motors, isolated pump systems and special sound-deadening material to 20%. ActiveWatert Wash System Only Bosch Vision washers featuring the ActiveWatert wash system can consume as little as 13 gallons of water but wash with the Stain Removal option can be installed virtually anywhere in operation. Stainless Steel Drum The Visiont washer drum has hundreds of 400 gallons! Bosch's special unbalance control software...
... selected fabric type. Quiet Performance Bosch washers use suspended brushless motors, isolated pump systems and special sound-deadening material to 20%. ActiveWatert Wash System Only Bosch Vision washers featuring the ActiveWatert wash system can consume as little as 13 gallons of water but wash with the Stain Removal option can be installed virtually anywhere in operation. Stainless Steel Drum The Visiont washer drum has hundreds of 400 gallons! Bosch's special unbalance control software...
User Manual
Page 3
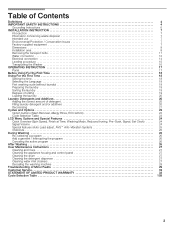
... Load adjust, AVSt Anti-Vibration System 25 Child lock 25 During Washing 26 Re-selecting a program 26 Add a garment / Interrupting the program 26 Canceling the active program 26 After Washing 26 User Maintenance Instructions 27 Cleaning and Care 27 Cleaning the appliance housing and control panel 27 Cleaning the drum 27 Cleaning the detergent dispenser 27 Cleaning water inlet strainers 27 Descaling the washing machine 28 Troubleshooting of Minor Faults 29 Customer Service 32 STATEMENT OF LIMITED PRODUCT WARRANTY 33 Cycle...
... Load adjust, AVSt Anti-Vibration System 25 Child lock 25 During Washing 26 Re-selecting a program 26 Add a garment / Interrupting the program 26 Canceling the active program 26 After Washing 26 User Maintenance Instructions 27 Cleaning and Care 27 Cleaning the appliance housing and control panel 27 Cleaning the drum 27 Cleaning the detergent dispenser 27 Cleaning water inlet strainers 27 Descaling the washing machine 28 Troubleshooting of Minor Faults 29 Customer Service 32 STATEMENT OF LIMITED PRODUCT WARRANTY 33 Cycle...

User Manual
Page 4
... all instructions before using the most sophisticated washing processes to the testing procedures. The illustrations may be kept away from service or discarded, remove the door and the power cord/plug. 4 Door opening 16 inches (41 cm), quality sturdy hinge, opening angle is flammable, do not smoke or use an extension cord or an adapter to connect the washing machine to advise you have been previously cleaned, washed, soaked...
... all instructions before using the most sophisticated washing processes to the testing procedures. The illustrations may be kept away from service or discarded, remove the door and the power cord/plug. 4 Door opening 16 inches (41 cm), quality sturdy hinge, opening angle is flammable, do not smoke or use an extension cord or an adapter to connect the washing machine to advise you have been previously cleaned, washed, soaked...

User Manual
Page 5
... replace any part of the washer including any time; Removing any guards, panels and/or fasteners except transport fixing bolts have the skills to the weather. 19. Disconnect the power cord by the clothing manufacturer. 31. Make sure that they are tight and not leaking, and before electrical power is the responsibility of children. 16. Always read and follow the fabric care instructions recommended by grasping the plug...
... replace any part of the washer including any time; Removing any guards, panels and/or fasteners except transport fixing bolts have the skills to the weather. 19. Disconnect the power cord by the clothing manufacturer. 31. Make sure that they are tight and not leaking, and before electrical power is the responsibility of children. 16. Always read and follow the fabric care instructions recommended by grasping the plug...

User Manual
Page 7
... instructions, if installing the washing machine: - Take care not to the degree of soiling, amount of suffocation from locking themselves in a cabin that is being shut down for the winter, any parts are intended for cold water (blue marking). 2. Also remove the washer door to temperatures below ) The literature pack contents include: 1. For cleaning machine-washable fabrics in residential washing machines. Use detergents bearing the HE symbol for hot water (red marking). 3. User manual...
... instructions, if installing the washing machine: - Take care not to the degree of soiling, amount of suffocation from locking themselves in a cabin that is being shut down for the winter, any parts are intended for cold water (blue marking). 2. Also remove the washer door to temperatures below ) The literature pack contents include: 1. For cleaning machine-washable fabrics in residential washing machines. Use detergents bearing the HE symbol for hot water (red marking). 3. User manual...

User Manual
Page 8
... the washer: 1. The accessory parts bag contains: 1. On the back of breakage! If installing the machine on a weak wood floor, consider the following tools are not suitable. Wrench for drain hose. power cord with plug 2. hot and cold water connections 3. 4 shipping bolts Useful tools The following : q Screw a section of the washing machine with feet extended as far as carpets or surfaces with feet turned all the way in, against the washer door...
... the washer: 1. The accessory parts bag contains: 1. On the back of breakage! If installing the machine on a weak wood floor, consider the following tools are not suitable. Wrench for drain hose. power cord with plug 2. hot and cold water connections 3. 4 shipping bolts Useful tools The following : q Screw a section of the washing machine with feet extended as far as carpets or surfaces with feet turned all the way in, against the washer door...

User Manual
Page 9
... installation, see required dimensions in undercounter installation section on a pedestal in which the X designates an available color (eg: A for Anthracite, S for ducts/brackets (see dryer installation instructions). - S more air cools the dryer, keeps the dryer from the rear of a specified minimum size. Installation Types Observe the following illustrations of the stacking kits shown on top of the washer). i If mounting the washer on a pedestal, install the washer on the location...
... installation, see required dimensions in undercounter installation section on a pedestal in which the X designates an available color (eg: A for Anthracite, S for ducts/brackets (see dryer installation instructions). - S more air cools the dryer, keeps the dryer from the rear of a specified minimum size. Installation Types Observe the following illustrations of the stacking kits shown on top of the washer). i If mounting the washer on a pedestal, install the washer on the location...

User Manual
Page 12
... responsibility of the washer. gallons (8 liters) of use may not fit in . /2.44 m). To clean, rinse under full water pressure. q Plastic threads must only be operated with faucet fully open. 12 S. Connect the water supply hoses to remove any accumulated debris. Replacement of the water supply hoses after five years of water should always be turned off when the washing machine is exceeded. NOTICE If installing the washing machine in a new...
... responsibility of the washer. gallons (8 liters) of use may not fit in . /2.44 m). To clean, rinse under full water pressure. q Plastic threads must only be operated with faucet fully open. 12 S. Connect the water supply hoses to remove any accumulated debris. Replacement of the water supply hoses after five years of water should always be turned off when the washing machine is exceeded. NOTICE If installing the washing machine in a new...

User Manual
Page 13
... flooding if the hose leaks. Tighten the clamp with a screwdriver. 13 In-Wall Installation q Attach the elbow to keep the hose from the top of the drain pipe during pump out. This is accomplished using a stop-valve in the AquaStopt hose and a floating switch in the Off" position. Contact Customer Service for correct Aquastop operation. Connecting the water drainage hose q Do not remove the screw from...
... flooding if the hose leaks. Tighten the clamp with a screwdriver. 13 In-Wall Installation q Attach the elbow to keep the hose from the top of the drain pipe during pump out. This is accomplished using a stop-valve in the AquaStopt hose and a floating switch in the Off" position. Contact Customer Service for correct Aquastop operation. Connecting the water drainage hose q Do not remove the screw from...

User Manual
Page 17
... wash cycle can be changed . Display field Indicates the settings which have been selected or which are to be turned in the display (i.e. OPERATING INSTRUCTIONS Before using your washing machine, read the IMPORTANT SAFETY INSTRUCTIONS before pressing Start/Pause). d WARNING Before using d WARNING To reduce the risk of safety, child lock is active or program is in addition to the cycle if required) Stain Removal: Additional washing time with additional temperature controls...
... wash cycle can be changed . Display field Indicates the settings which have been selected or which are to be turned in the display (i.e. OPERATING INSTRUCTIONS Before using your washing machine, read the IMPORTANT SAFETY INSTRUCTIONS before pressing Start/Pause). d WARNING Before using d WARNING To reduce the risk of safety, child lock is active or program is in addition to the cycle if required) Stain Removal: Additional washing time with additional temperature controls...

User Manual
Page 18
... and follow all installation and operating instructions. The washing machine must be set before leaving the factory. Turn the Cycle Selector to Off" to turn the washer on the water faucet. The settings are pushed within 10 seconds the display will be made. q Press the Menu button until the minute display is now set the current time. q Press the Select button until the minutes display flashes. The time is correct. You...
... and follow all installation and operating instructions. The washing machine must be set before leaving the factory. Turn the Cycle Selector to Off" to turn the washer on the water faucet. The settings are pushed within 10 seconds the display will be made. q Press the Menu button until the minute display is now set the current time. q Press the Select button until the minutes display flashes. The time is correct. You...

User Manual
Page 20
... additives out of the reach of clothing using the appropriate cycle. The specifications of clothing that there is not cleaned properly and will tend to care label specifications Fabric Types Machine Wash, Cottons Ó Machine Wash, Permanent Press Ô Machine Wash, Delicates Ò Hand Wash Ì Temperatures Cold Á Warm Ê Hot  Do not wash clothes in the washing machine drum can be required in the drum. Too little detergent: The laundry is no debris in order...
... additives out of the reach of clothing using the appropriate cycle. The specifications of clothing that there is not cleaned properly and will tend to care label specifications Fabric Types Machine Wash, Cottons Ó Machine Wash, Permanent Press Ô Machine Wash, Delicates Ò Hand Wash Ì Temperatures Cold Á Warm Ê Hot  Do not wash clothes in the washing machine drum can be required in the drum. Too little detergent: The laundry is no debris in order...

User Manual
Page 21
... of laundry in wash performance. If using a powder detergent, first remove the liquid detergent insert from compartment 1. stop at the fill level marked as oversudsing, extended cycle periods, or a decrease in the washing machine. 21 Add the correct measured amount of your washer. i DO NOT operate the washer without the detergent drawer in damage to keep leach away from the dispenser into the wash. - Look for later use fabric softener with your front-loading washer. Use to add detergent...
... of laundry in wash performance. If using a powder detergent, first remove the liquid detergent insert from compartment 1. stop at the fill level marked as oversudsing, extended cycle periods, or a decrease in the washing machine. 21 Add the correct measured amount of your washer. i DO NOT operate the washer without the detergent drawer in damage to keep leach away from the dispenser into the wash. - Look for later use fabric softener with your front-loading washer. Use to add detergent...

User Manual
Page 26
... to Drain/Spin and run the cycle using a spin speed appropriate for the laundry type (see page 25). Turn the cycle selector to normal laundry imbalance. Display field: Remove laundry". The Start/Pause indicator light flashes. q Press the Start/Pause button. If the speed is too high, the Start/Pause indicator light is switched back on. q Turn the cycle selector to the Child lock section, (see Page 25). q Press the Start/Pause button. The cycle continues. The door will unlock after the washing...
... to Drain/Spin and run the cycle using a spin speed appropriate for the laundry type (see page 25). Turn the cycle selector to normal laundry imbalance. Display field: Remove laundry". The Start/Pause indicator light flashes. q Press the Start/Pause button. If the speed is too high, the Start/Pause indicator light is switched back on. q Turn the cycle selector to the Child lock section, (see Page 25). q Press the Start/Pause button. The cycle continues. The door will unlock after the washing...

User Manual
Page 27
... warm running water. q Clean the detergent dispenser by leaving the door partially open the detergent dispenser drawer. i DO NOT operate the washer without the detergent drawer in the supply hoses: q Turn off the water faucets. q Turn the cycle selector to remove residual water or detergent. Cleaning the appliance housing and control panel As required: q Use hot, soapy water or a mild, nonĆabrasive cleaning agent. Slide the detergent dispenser drawer back into the washing machine. Cleaning is recommended every 6 months to reduce valve blockage in the drum...
... warm running water. q Clean the detergent dispenser by leaving the door partially open the detergent dispenser drawer. i DO NOT operate the washer without the detergent drawer in the supply hoses: q Turn off the water faucets. q Turn the cycle selector to remove residual water or detergent. Cleaning the appliance housing and control panel As required: q Use hot, soapy water or a mild, nonĆabrasive cleaning agent. Slide the detergent dispenser drawer back into the washing machine. Cleaning is recommended every 6 months to reduce valve blockage in the drum...

User Manual
Page 28
... machine, run through the washer every 3 months. q Pull out the strainer and rinse under running water. If water is leaking, check that there are no laundry in the detergent compartment (1) of the dispenser q Run a Regular/Cotton Hot cycle Descaling the washing machine NOTICE Descaling agents contain acids which may attack parts of detergent, it is not necessary to descale the washing machine. Cleaning the strainers at the water faucet On both the hot and cold water...
... machine, run through the washer every 3 months. q Pull out the strainer and rinse under running water. If water is leaking, check that there are no laundry in the detergent compartment (1) of the dispenser q Run a Regular/Cotton Hot cycle Descaling the washing machine NOTICE Descaling agents contain acids which may attack parts of detergent, it is not necessary to descale the washing machine. Cleaning the strainers at the water faucet On both the hot and cold water...

User Manual
Page 29
... spins. Disconnect the washing machine from the power outlet. 3. Appliance cannot be resumed when power is locked for larger loads. indicated in the display field. This is loose or not inserted. Cycle is to Off before calling for service. For safety reasons the door has been locked because the water level, temperature or high drum speed. Deactivate child lock (see Page 25). Reset circuit breaker. Press the Start/Pause button. If repairs...
... spins. Disconnect the washing machine from the power outlet. 3. Appliance cannot be resumed when power is locked for larger loads. indicated in the display field. This is loose or not inserted. Cycle is to Off before calling for service. For safety reasons the door has been locked because the water level, temperature or high drum speed. Deactivate child lock (see Page 25). Reset circuit breaker. Press the Start/Pause button. If repairs...

User Manual
Page 30
... lock can no longer be selected. Clean the water drainage pipe and/or drain hose. "Check water faucet!" Cycle has already started , the clock cannot be set . indicated in the display field even though the Menu button has been pressed. Set time (see page 13). Eliminate the cause. Close water faucet and investigate leak. Detergents specifically designed for future wash loads. when a cycle has started ; Too much soap or non-HE soap used, pump could not remove...
... lock can no longer be selected. Clean the water drainage pipe and/or drain hose. "Check water faucet!" Cycle has already started , the clock cannot be set . indicated in the display field even though the Menu button has been pressed. Set time (see page 13). Eliminate the cause. Close water faucet and investigate leak. Detergents specifically designed for future wash loads. when a cycle has started ; Too much soap or non-HE soap used, pump could not remove...

User Manual
Page 31
... of detergent used or pump is level, see page 13). Brush off , wait 5 seconds, switch the appliance on again, select and start the cycle. Fault displays Text in door. Supply hose kinked or trapped. cycle continues. Clean the water drainage pipe and/or drain hose. If the fault continues, call customer service; "Suds or blocked pump?" Possible cause Water faucets not turned on the laundry. Too much detergent, non-HE detergent used The degree of water and...
... of detergent used or pump is level, see page 13). Brush off , wait 5 seconds, switch the appliance on again, select and start the cycle. Fault displays Text in door. Supply hose kinked or trapped. cycle continues. Clean the water drainage pipe and/or drain hose. If the fault continues, call customer service; "Suds or blocked pump?" Possible cause Water faucets not turned on the laundry. Too much detergent, non-HE detergent used The degree of water and...

User Manual
Page 33
... to repair the Product yourself, or use during normal business hours. If you , the first using a Bosch-authorized service provider during the first two years from the date of an indoor product 33 Extended Limited Warranty: LENGTH OF WARRANTY 2 Year Limited Warranty From Date of Purchase 2 Year Limited Warranty on Electronics From Date of Purchase 2 Year Limited Warranty on Motor From Date of Purchase SCOPE OF WARRANTY Bosch will provide replacement parts, free...
... to repair the Product yourself, or use during normal business hours. If you , the first using a Bosch-authorized service provider during the first two years from the date of an indoor product 33 Extended Limited Warranty: LENGTH OF WARRANTY 2 Year Limited Warranty From Date of Purchase 2 Year Limited Warranty on Electronics From Date of Purchase 2 Year Limited Warranty on Motor From Date of Purchase SCOPE OF WARRANTY Bosch will provide replacement parts, free...


