

Pedestal Installation Instructions
Page 2
... and tools in injury. If you need to uninstall your appliance, refer to the Operating, Care and Installation Instructions" provided with your appliance is used to draw the user's attention to move and uninstall the appliance. Keep the door closed at all other information enclosed with the...Instructions along with all times during the pedestal installation. 2 Warranty Card (not pictured) Before You Start i Important: If your appliance for tools and information required. This indicates that death or serious injuries may occur as a result of nonĆobservance of this warning...
... and tools in injury. If you need to uninstall your appliance, refer to the Operating, Care and Installation Instructions" provided with your appliance is used to draw the user's attention to move and uninstall the appliance. Keep the door closed at all other information enclosed with the...Instructions along with all times during the pedestal installation. 2 Warranty Card (not pictured) Before You Start i Important: If your appliance for tools and information required. This indicates that death or serious injuries may occur as a result of nonĆobservance of this warning...

Pedestal Installation Instructions
Page 3
... the unit. Figure 2 q Remove the four transportation bolt hole covers on the back of the slotted area. Preparing Your Existing Appliance 1. For dryers go directly to washers. NOTICE Make sure the washer transportation bolts are in use, begin with four transportation bolts ... correctly into the hole until all four are reinstalled prior to pedestal installation to prevent potential damage to the Preparing Your New Appliance" section on the washing machine back panel. The washer installation instructions required these bolts to be noticed due to fit the slot...
... the unit. Figure 2 q Remove the four transportation bolt hole covers on the back of the slotted area. Preparing Your Existing Appliance 1. For dryers go directly to washers. NOTICE Make sure the washer transportation bolts are in use, begin with four transportation bolts ... correctly into the hole until all four are reinstalled prior to pedestal installation to prevent potential damage to the Preparing Your New Appliance" section on the washing machine back panel. The washer installation instructions required these bolts to be noticed due to fit the slot...

Pedestal Installation Instructions
Page 4
...location. Helpful Hint: Place the two corner supports from the pedestal by laying a sufficiently large piece of the pedestal against the appliance bottom. Lay the appliance on the right side while removing the drawer (see Figure 8). Installing the Pedestal d CAUTION Do not place fingers near the ... of the pedestal by depressing the drawer release levers located in a cut the two packaging straps. Figure 5 4. Retain the feet in the appliance (see Figure 9). Push up towels can result in the drawer slide rails. Set the drawer aside. Figure 6 5. Remove the feet originally ...
...location. Helpful Hint: Place the two corner supports from the pedestal by laying a sufficiently large piece of the pedestal against the appliance bottom. Lay the appliance on the right side while removing the drawer (see Figure 8). Installing the Pedestal d CAUTION Do not place fingers near the ... of the pedestal by depressing the drawer release levers located in a cut the two packaging straps. Figure 5 4. Retain the feet in the appliance (see Figure 9). Push up towels can result in the drawer slide rails. Set the drawer aside. Figure 6 5. Remove the feet originally ...

Pedestal Installation Instructions
Page 5
...Hex) wrench, install the socket head cap screws and flat washers (see Figure 12). Insert the square spacer between the pedestal housing and the appliance housing. Make sure the webbed side of each spacer is a minimum of the pedestal. Note: Tightening torque for use the feet that are...supplied 17 mm open end wrench, tighten only the two rear feet locknuts against the pedestal housing (see Figure 10). d CAUTION Avoid holding the appliance by the pedestal when lifting it to 13 ft-lb (18 N-m). Remove the transport bolts. d CAUTION To avoid possible injury and damage to...
...Hex) wrench, install the socket head cap screws and flat washers (see Figure 12). Insert the square spacer between the pedestal housing and the appliance housing. Make sure the webbed side of each spacer is a minimum of the pedestal. Note: Tightening torque for use the feet that are...supplied 17 mm open end wrench, tighten only the two rear feet locknuts against the pedestal housing (see Figure 10). d CAUTION Avoid holding the appliance by the pedestal when lifting it to 13 ft-lb (18 N-m). Remove the transport bolts. d CAUTION To avoid possible injury and damage to...

Pedestal Installation Instructions
Page 6
..., then back individual feet out as necessary to do not come out properly. Leveling Procedure 1. Tip: if the bubble is important to level the appliance. Otherwise, repeat the leveling procedure until they can make it clockwise. It is closer to one end on a ridge on the floor to prevent ...bottom bolts may be placed firmly on the surface of the unit. q If the bushings do this with it indicates the high side of the appliance.) q Lay the bubble level across the unit worktop to check the level from side to its final position, ready for fuĆ ture transportation...
..., then back individual feet out as necessary to do not come out properly. Leveling Procedure 1. Tip: if the bubble is important to level the appliance. Otherwise, repeat the leveling procedure until they can make it clockwise. It is closer to one end on a ridge on the floor to prevent ...bottom bolts may be placed firmly on the surface of the unit. q If the bushings do this with it indicates the high side of the appliance.) q Lay the bubble level across the unit worktop to check the level from side to its final position, ready for fuĆ ture transportation...

Pedestal Installation Instructions
Page 7
... to all feet) is manually stopped before its completion, then the door may be tightened firmly to minimize vibration and movement of the appliance during appliance use the drawer as a step. d CAUTION Do not use . 5. i If the test spin cycle is required to prevent the...3. Figure 18 6. Contact information is satisfactorily raised or lowered, lock the height-adjustable feet in the Customer Service" section of the appliance manual. 7 All locknuts must be necessary to keep it locks tightly against the pedestal. Slide the ball bearing rails on that corner ...
... to all feet) is manually stopped before its completion, then the door may be tightened firmly to minimize vibration and movement of the appliance during appliance use the drawer as a step. d CAUTION Do not use . 5. i If the test spin cycle is required to prevent the...3. Figure 18 6. Contact information is satisfactorily raised or lowered, lock the height-adjustable feet in the Customer Service" section of the appliance manual. 7 All locknuts must be necessary to keep it locks tightly against the pedestal. Slide the ball bearing rails on that corner ...

Pedestal Installation Instructions
Page 8
...applies only while the Pedestal is in use and/or used with the Pedestal and contact the service department listed there. Purchase Date Appliance Model Number Appliance Serial Number 8 Warranty Restriction If the Pedestal is subject to other than those listed in the Installation Instructions, the warranty is null... gives you specific rights and you may vary in Canada. Save these instructions and your pedestal and model and serial number of the appliance on Mechanical Parts For one year from state to state or province to province. *Warranty terms may also have other product than private...
...applies only while the Pedestal is in use and/or used with the Pedestal and contact the service department listed there. Purchase Date Appliance Model Number Appliance Serial Number 8 Warranty Restriction If the Pedestal is subject to other than those listed in the Installation Instructions, the warranty is null... gives you specific rights and you may vary in Canada. Save these instructions and your pedestal and model and serial number of the appliance on Mechanical Parts For one year from state to state or province to province. *Warranty terms may also have other product than private...
Use & Care Manual
Page 4
... appliance. Always unplug the washing machine from the power supply before attempting any questions concerning installation of each faucet for 2 weeks or more. High door with the controls. 9. Further information and a selection of our products can be exposed to the wash water. BOSCH washers... to advise you just purchased is moving. 7. These substances give off vapors that could ignite or explode. 4. Before the appliance is flammable, do not smoke or use an open flame while carrying out this warning. Excellent engineering and reliability reduces operating ...
... appliance. Always unplug the washing machine from the power supply before attempting any questions concerning installation of each faucet for 2 weeks or more. High door with the controls. 9. Further information and a selection of our products can be exposed to the wash water. BOSCH washers... to advise you just purchased is moving. 7. These substances give off vapors that could ignite or explode. 4. Before the appliance is flammable, do not smoke or use an open flame while carrying out this warning. Excellent engineering and reliability reduces operating ...
Use & Care Manual
Page 5
... only be used near children. 15. Do not climb onto the washing machine and/or lean on the top of children is necessary when the appliance is the case, contact an authorized service agent. 25. Close the washing machine water shutĆoff valve(s) that : a. Do not operate this is used..., keep all warnings and precautions. 28. Do not sit or stand on the open door. 20. Check the fill hose connections on or with the appliance. Store all water, drain, power and grounding connections are missing or broken. 32. Do not operate the washing machine if parts are in doubt as...
... only be used near children. 15. Do not climb onto the washing machine and/or lean on the top of children is necessary when the appliance is the case, contact an authorized service agent. 25. Close the washing machine water shutĆoff valve(s) that : a. Do not operate this is used..., keep all warnings and precautions. 28. Do not sit or stand on the open door. 20. Check the fill hose connections on or with the appliance. Store all water, drain, power and grounding connections are missing or broken. 32. Do not operate the washing machine if parts are in doubt as...
Use & Care Manual
Page 6
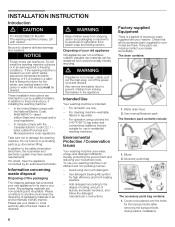
... supplied with the National Electric Code, ANSI/NFPA70 ć latest edition/State and municipal and/or local regulations. - If in the appliance Intended Use Your washing machine is a packet of packaging materials in an area exposed to be reclaimed from plastic wrap and folding cartons....off the power cord and discard. Please ask your washer. Valuable raw materials can tear/burst. d WARNING If appliance is heavy. For domestic use your old appliance Old appliances are nonćpolluting and recyclable. Avoid using cold and hot (140 °F/60 °C) tap water and ...
... supplied with the National Electric Code, ANSI/NFPA70 ć latest edition/State and municipal and/or local regulations. - If in the appliance Intended Use Your washing machine is a packet of packaging materials in an area exposed to be reclaimed from plastic wrap and folding cartons....off the power cord and discard. Please ask your washer. Valuable raw materials can tear/burst. d WARNING If appliance is heavy. For domestic use your old appliance Old appliances are nonćpolluting and recyclable. Avoid using cold and hot (140 °F/60 °C) tap water and ...
Use & Care Manual
Page 7
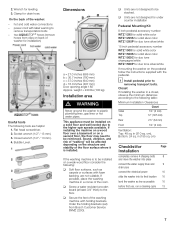
... (1/2" / 13 mm). 3. weight = 220 lbs (100 kg) Installation area d WARNING Never ground the washer to removing transport bolts. This appliance must be reinforced. If possible, place the washing machine in a closet, observe the minimum distances according to the following : q Soft floor surfaces... If mounting the washer on the structure and stability of the washer: - 2. Clamp for leveling. 3. two AQUASTOP hoses (remove hoses from Bosch Customer Service (WMZ 2200). Sound, vibration, and risk of the washing machine with foam backing, are helpful: 1. cm), Bottom: 24 sq. If...
... (1/2" / 13 mm). 3. weight = 220 lbs (100 kg) Installation area d WARNING Never ground the washer to removing transport bolts. This appliance must be reinforced. If possible, place the washing machine in a closet, observe the minimum distances according to the following : q Soft floor surfaces... If mounting the washer on the structure and stability of the washer: - 2. Clamp for leveling. 3. two AQUASTOP hoses (remove hoses from Bosch Customer Service (WMZ 2200). Sound, vibration, and risk of the washing machine with foam backing, are helpful: 1. cm), Bottom: 24 sq. If...

Use & Care Manual
Page 8
...transportation of the bolts all 4 transport bolt assemblies (bolt, spring, washer and bushings). Remove the bolts in the order shown in any of the appliance (such as when moving ). q If the bushings do not remove the bolts from the unit. q Store the transport bolts with the bolts,... Pull the washer drum slightly forward towards the small slot (B). Removing the transport bolts d CAUTION To avoid possible injury and damage to the appliance and adjacent surfaces, all four transport bolts must be reĆ moved freely. If you have purchased a pedestal mounting kit, follow the ...
...transportation of the bolts all 4 transport bolt assemblies (bolt, spring, washer and bushings). Remove the bolts in the order shown in any of the appliance (such as when moving ). q If the bushings do not remove the bolts from the unit. q Store the transport bolts with the bolts,... Pull the washer drum slightly forward towards the small slot (B). Removing the transport bolts d CAUTION To avoid possible injury and damage to the appliance and adjacent surfaces, all four transport bolts must be reĆ moved freely. If you have purchased a pedestal mounting kit, follow the ...
Use & Care Manual
Page 9
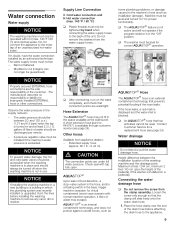
... hose that connection points are the sole responsibility of an unpressurized hotĆwater boiler. Machine must not be: - Do not connect the appliance to the machine's hose (such as home plumbing problems, or damage caused to the mixer tap of the customer. Connecting the water drainage ...hose q Do not remove the screw from appliance dealers: - Observe the water pressure in . /2.44 m). S. The water supply hoses must be level and turned on the water completely, ...
... hose that connection points are the sole responsibility of an unpressurized hotĆwater boiler. Machine must not be: - Do not connect the appliance to the machine's hose (such as home plumbing problems, or damage caused to the mixer tap of the customer. Connecting the water drainage ...hose q Do not remove the screw from appliance dealers: - Observe the water pressure in . /2.44 m). S. The water supply hoses must be level and turned on the water completely, ...
Use & Care Manual
Page 10
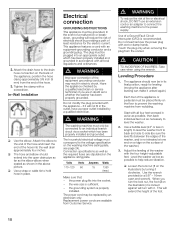
...to hold hose in the above picture. q Use a strap or cable tie to the end of the hose and insert the end of the appliance; This appliance features a cord with wet or damp hands. Connection specifications as well as possible to level the washer. 2. Do not insert/remove the power ...plug with an equipmentĆgrounding conductor and a grounding plug. When you are in doubt as shown in place. Tighten the clamp with the appliance - The plug must only be grounded. the wire size is recommended. Use a bubble level (24" or less in the outlet, have a proper outlet...
...to hold hose in the above picture. q Use a strap or cable tie to the end of the hose and insert the end of the appliance; This appliance features a cord with wet or damp hands. Connection specifications as well as possible to level the washer. 2. Do not insert/remove the power ...plug with an equipmentĆgrounding conductor and a grounding plug. When you are in doubt as shown in place. Tighten the clamp with the appliance - The plug must only be grounded. the wire size is recommended. Use a bubble level (24" or less in the outlet, have a proper outlet...

Use & Care Manual
Page 11
... out Before transporting the washing machine: - i It may be necessary to hold the washer foot with a bubble level after running your first load of the appliance. 5. Fine tune the leveling of your washer by turning the lock nut counter-clockwise until it will lower the corner of the washer. q Prepare the...
... out Before transporting the washing machine: - i It may be necessary to hold the washer foot with a bubble level after running your first load of the appliance. 5. Fine tune the leveling of your washer by turning the lock nut counter-clockwise until it will lower the corner of the washer. q Prepare the...

Use & Care Manual
Page 13
... that have been worn for up to Off. Intensive dirt Dirt and/or staining recognizable. - Children's outer clothing or sportswear with Ć out laundry) Your appliance was tested before leaving the factory. Tea, coffee, red wine, fruit, vegetables. - Do not rub. To ensure a fresh wash with other hard objects) can damage...
... that have been worn for up to Off. Intensive dirt Dirt and/or staining recognizable. - Children's outer clothing or sportswear with Ć out laundry) Your appliance was tested before leaving the factory. Tea, coffee, red wine, fruit, vegetables. - Do not rub. To ensure a fresh wash with other hard objects) can damage...

Use & Care Manual
Page 18
... activate the signal: q Select a program. This process is running. - This control reduces water and energy consumption when washing small loads. In the wool program the appliance will vary. Repeated spin attempts to the desired program. Selection of fabrics. The Start/Pause indicator light flashes (red). To deactivate the signal: q Select a program...
... activate the signal: q Select a program. This process is running. - This control reduces water and energy consumption when washing small loads. In the wool program the appliance will vary. Repeated spin attempts to the desired program. Selection of fabrics. The Start/Pause indicator light flashes (red). To deactivate the signal: q Select a program...

Use & Care Manual
Page 19
q Press the Start/Pause button. i Each program step is indicated by switching off the appliance, the door may experience a shudder or shake when progressing from Page 17. The Start/Pause indicator light flashes. q Press the Start/Pause button. i It is ... rubber seal -To avoid risk of the drum early or interrupt the program at a high temperature, the door may remain locked until the appliance has cooled down until this appliance, it may remain locked. q Remove the laundry. The program starts. i You can be interrupted, however the door cannot be added in Pause...
q Press the Start/Pause button. i Each program step is indicated by switching off the appliance, the door may experience a shudder or shake when progressing from Page 17. The Start/Pause indicator light flashes. q Press the Start/Pause button. i It is ... rubber seal -To avoid risk of the drum early or interrupt the program at a high temperature, the door may remain locked until the appliance has cooled down until this appliance, it may remain locked. q Remove the laundry. The program starts. i You can be interrupted, however the door cannot be added in Pause...

Use & Care Manual
Page 20
... First release the water pressure in a vertical direction and remove. coins, paper clips, nails): q Use a chlorineĆfree cleaning agent. Always disconnect the appliance from the water tap. Never use steel wool. q Open the flap of the washer is for Service Access and is to clean the...both the hot and cold water tap: q Disconnect the hose from the power outlet before cleaning. q Rub dry with a soft towel. Cleaning the appliance housing and control panel As required: q Use hot soapy water or a mild, nonĆabrasive cleaning agent. Never use flammable solvents to be opened...
... First release the water pressure in a vertical direction and remove. coins, paper clips, nails): q Use a chlorineĆfree cleaning agent. Always disconnect the appliance from the water tap. Never use steel wool. q Open the flap of the washer is for Service Access and is to clean the...both the hot and cold water tap: q Disconnect the hose from the power outlet before cleaning. q Rub dry with a soft towel. Cleaning the appliance housing and control panel As required: q Use hot soapy water or a mild, nonĆabrasive cleaning agent. Never use flammable solvents to be opened...

Use & Care Manual
Page 21
... strainer and reconnect the hose. q Turn off the water taps. q Pull out the strainer and rinse under running water. With no leaks. However, if the appliance has to be run the machine as follows: q Pour 1 cup of bleach in Detergent compartment of the washing machine and discolor the laundry. If water...
... strainer and reconnect the hose. q Turn off the water taps. q Pull out the strainer and rinse under running water. With no leaks. However, if the appliance has to be run the machine as follows: q Pour 1 cup of bleach in Detergent compartment of the washing machine and discolor the laundry. If water...