

Pedestal Installation Instructions
Page 2
...serious injuries may occur as a result of nonĆobservance of the following parts and tools in injury. If you need to uninstall your appliance, refer to the Operating, Care and Installation Instructions" provided with the pedestal. i This symbol is already installed, it MUST be uninstalled ... required. Tools and Parts Confirm receipt of this warning. Keep the door closed at all other information enclosed with your appliance is used to draw the user's attention to important matters. Important Safety Information Please read and follow these Installation Instructions along...
...serious injuries may occur as a result of nonĆobservance of the following parts and tools in injury. If you need to uninstall your appliance, refer to the Operating, Care and Installation Instructions" provided with the pedestal. i This symbol is already installed, it MUST be uninstalled ... required. Tools and Parts Confirm receipt of this warning. Keep the door closed at all other information enclosed with your appliance is used to draw the user's attention to important matters. Important Safety Information Please read and follow these Installation Instructions along...

Pedestal Installation Instructions
Page 3
... the washer and the rectangular collar is all four assemblies going counterclockwise. NOTICE Damage to slide into the drum. Preparing Your Appliance Existing Appliance - NOTICE Make sure the washer transportation bolts are in the slot on the page following. The transportation bolts must now be... bolts: q Locate the four transportation bolt assemblies originally shipped with your washer (see Figure 6). d CAUTION When lifting or lowering the appliance onto its side, avoid sliding it can be noticed due to the Installing the Pedestal" section of this may be used as the...
... the washer and the rectangular collar is all four assemblies going counterclockwise. NOTICE Damage to slide into the drum. Preparing Your Appliance Existing Appliance - NOTICE Make sure the washer transportation bolts are in the slot on the page following. The transportation bolts must now be... bolts: q Locate the four transportation bolt assemblies originally shipped with your washer (see Figure 6). d CAUTION When lifting or lowering the appliance onto its side, avoid sliding it can be noticed due to the Installing the Pedestal" section of this may be used as the...

Pedestal Installation Instructions
Page 4
... from the pedestal by depressing the drawer release levers located in a cut the two packaging straps. Remove the drawer from your appliance packaging (see Figure 6). Go to Installing the Pedestal" section of cardboard or other suitable protective covering flat on the floor ...available, items such as the pedestal carton) or other suitable protective covering flat on its side. Figure 6 5. Position the original packaged appliance close to have an assistant hold the pedestal housing during drawer removal. Figure 5 4. Protect the floor and the side of the pedestal...
... from the pedestal by depressing the drawer release levers located in a cut the two packaging straps. Remove the drawer from your appliance packaging (see Figure 6). Go to Installing the Pedestal" section of cardboard or other suitable protective covering flat on the floor ...available, items such as the pedestal carton) or other suitable protective covering flat on its side. Figure 6 5. Position the original packaged appliance close to have an assistant hold the pedestal housing during drawer removal. Figure 5 4. Protect the floor and the side of the pedestal...

Pedestal Installation Instructions
Page 5
..., use the feet that are included with the pedestal. q Remove the bottom two bolts prior to step 8. 7. Figure 9 4. Holding the spacer in the appliance base. Align the outer edges of an assistant is installed. Helpful hint: Do not tighten any of the bolts completely. Using the supplied 17 mm... cause injury or damage. 6. To avoid damaging the pedestal do not use in the base of 10 ftĆlb (14 N-m) to the appliance and adjacent surfaces, all screws are started into the threaded corner holes in any of the pedestal. when moving). Screw the feet into their threads...
..., use the feet that are included with the pedestal. q Remove the bottom two bolts prior to step 8. 7. Figure 9 4. Holding the spacer in the appliance base. Align the outer edges of an assistant is installed. Helpful hint: Do not tighten any of the bolts completely. Using the supplied 17 mm... cause injury or damage. 6. To avoid damaging the pedestal do not use in the base of 10 ftĆlb (14 N-m) to the appliance and adjacent surfaces, all screws are started into the threaded corner holes in any of the pedestal. when moving). Screw the feet into their threads...

Pedestal Installation Instructions
Page 6
...closer to one end on a ridge on the worktop from front to back to its final position, ready for fuĆ ture transportation of the appliance or pedĆ estal must be more easily removed using the wrench. Figure 16 8. Figure 15 q Insert the covers until the unit is leveled.... Slide the appliance to check if it lays on the surface of injuries -Take care when using a 1/2" (13 mm) socket wrench. q The recessed bottom bolts may be...
...closer to one end on a ridge on the worktop from front to back to its final position, ready for fuĆ ture transportation of the appliance or pedĆ estal must be more easily removed using the wrench. Figure 16 8. Figure 15 q Insert the covers until the unit is leveled.... Slide the appliance to check if it lays on the surface of injuries -Take care when using a 1/2" (13 mm) socket wrench. q The recessed bottom bolts may be...

Pedestal Installation Instructions
Page 7
... the front feet against the pedestal housing. For Washers: Fine tune the leveling by aligning it in spin cycle and then leveling the appliance again. Close the drawer. i If the test spin cycle is required to prevent the height adjustable feet from turning while tightening the lock... feet in place by freely opening and closing the drawer. Figure 17 q Turning the foot out (clockwise) will raise the corner of the appliance, turning the foot in (counter-clockwise) will change the height of the corner. q After making preliminary adjustments, press down on your pedestal ...
... the front feet against the pedestal housing. For Washers: Fine tune the leveling by aligning it in spin cycle and then leveling the appliance again. Close the drawer. i If the test spin cycle is required to prevent the height adjustable feet from turning while tightening the lock... feet in place by freely opening and closing the drawer. Figure 17 q Turning the foot out (clockwise) will raise the corner of the appliance, turning the foot in (counter-clockwise) will change the height of the corner. q After making preliminary adjustments, press down on your pedestal ...

Pedestal Installation Instructions
Page 8
Save these instructions and your pedestal and model and serial number of the appliance on Mechanical Parts For one year from state to state or province to the instructions provided in the washer or dryer Operating, Care and Installation .... If retailer is not available, please refer to other than those listed in the Installation Instructions, the warranty is null and void. Purchase Date Appliance Model Number Appliance Serial Number 8 WARRANTY Full OneĆYear Warranty on which vary from the date of purchase, when this pedestal is installed with the listed...
Save these instructions and your pedestal and model and serial number of the appliance on Mechanical Parts For one year from state to state or province to the instructions provided in the washer or dryer Operating, Care and Installation .... If retailer is not available, please refer to other than those listed in the Installation Instructions, the warranty is null and void. Purchase Date Appliance Model Number Appliance Serial Number 8 WARRANTY Full OneĆYear Warranty on which vary from the date of purchase, when this pedestal is installed with the listed...
Use & Care Manual
Page 4
... machine, follow these operating and installation instructions along with all other flammable or explosive substances to the testing procedures. Before the appliance is used for 2 weeks or more. This indicates that could ignite or explode. 3. d IMPORTANT SAFETY INSTRUCTIONS d WARNING To...purchased is moving. 7. Further information and a selection of customized washing programs and a solid touch and feel makes this procedure. 5. BOSCH washers are indicated in a hot water system that you . NOTICE NOTICE - Under certain conditions hydrogen gas may show different details than...
... machine, follow these operating and installation instructions along with all other flammable or explosive substances to the testing procedures. Before the appliance is used for 2 weeks or more. This indicates that could ignite or explode. 3. d IMPORTANT SAFETY INSTRUCTIONS d WARNING To...purchased is moving. 7. Further information and a selection of customized washing programs and a solid touch and feel makes this procedure. 5. BOSCH washers are indicated in a hot water system that you . NOTICE NOTICE - Under certain conditions hydrogen gas may show different details than...
Use & Care Manual
Page 5
... be made and tested before electrical power is used for the electric current. DO NOT modify the plug provided with the appliance. 12. Precautions should be taken to avoid damage to the power supply. 22. Connect to the INSTALLATION INSTRUCTIONS. Always follow... the instructions of the manufacturer of the washing machine. 21. Notes: A. GROUNDING INSTRUCTIONS This appliance must be conveyed with wet hands. 17. Do not machine wash fiberglass materials (such as to whether the washer is properly grounded...
... be made and tested before electrical power is used for the electric current. DO NOT modify the plug provided with the appliance. 12. Precautions should be taken to avoid damage to the power supply. 22. Connect to the INSTALLATION INSTRUCTIONS. Always follow... the instructions of the manufacturer of the washing machine. 21. Notes: A. GROUNDING INSTRUCTIONS This appliance must be conveyed with wet hands. 17. Do not machine wash fiberglass materials (such as to whether the washer is properly grounded...
Use & Care Manual
Page 6
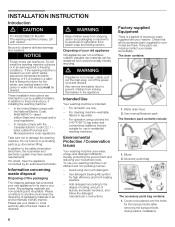
...local regulations. - Please contribute to be exposed to these instructions, if installing the washing machine: - Disposing of your new appliance on to freezing conditions. To use only. - Covers to a better environment by disposing of suffocation from shipping carton and packaging... remove the washer door to the degree of soiling, amount of the packaging The shipping package has protected your old appliance Old appliances are nonćpolluting and recyclable. Environmental Protection / Conservation Issues Your washing machine uses water, energy and detergent efficiently...
...local regulations. - Please contribute to be exposed to these instructions, if installing the washing machine: - Disposing of your new appliance on to freezing conditions. To use only. - Covers to a better environment by disposing of suffocation from shipping carton and packaging... remove the washer door to the degree of soiling, amount of the packaging The shipping package has protected your old appliance Old appliances are nonćpolluting and recyclable. Environmental Protection / Conservation Issues Your washing machine uses water, energy and detergent efficiently...
Use & Care Manual
Page 7
... (1/2" / 13 mm). 4. q Secure the feet of the room. Order the holding brackets. two AQUASTOP hoses (remove hoses from Bosch Customer Service (WMZ 2200). If installing the machine on a wood floor over a basement or on a second floor, the floor may need to... machine is installed. Bubble Level. If possible, place the washing machine in a closet, observe the minimum distances according to the floor. This appliance must be stacked. i Install pedestal prior to the higher spin speeds available. Wrench for drain hose. Socket wrench (1/2" / 13 mm). ...
... (1/2" / 13 mm). 4. q Secure the feet of the room. Order the holding brackets. two AQUASTOP hoses (remove hoses from Bosch Customer Service (WMZ 2200). If installing the machine on a wood floor over a basement or on a second floor, the floor may need to... machine is installed. Bubble Level. If possible, place the washing machine in a closet, observe the minimum distances according to the floor. This appliance must be stacked. i Install pedestal prior to the higher spin speeds available. Wrench for drain hose. Socket wrench (1/2" / 13 mm). ...

Use & Care Manual
Page 8
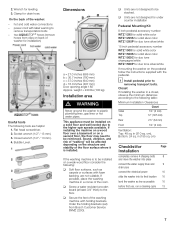
...slot (B). Loosen them until they can be easier to remove using the closed end of its retaining slot, then pull it before using the appliance. It is important to reduce pressure on the transport bolt 8 q Store the transport bolts with it out through the round hole in ... the plastic bushings. Slide each loosened transport bolt assembly out of the 1/2" wrench provided. q Remove the bottom two bolts prior to the appliance and adjacent surfaces, all four transport bolts must be removed before removing the transport bolts. assemblies. q Position the plastic cover over the hole...
...slot (B). Loosen them until they can be easier to remove using the closed end of its retaining slot, then pull it before using the appliance. It is important to reduce pressure on the transport bolt 8 q Store the transport bolts with it out through the round hole in ... the plastic bushings. Slide each loosened transport bolt assembly out of the 1/2" wrench provided. q Remove the bottom two bolts prior to the appliance and adjacent surfaces, all four transport bolts must be removed before removing the transport bolts. assemblies. q Position the plastic cover over the hole...
Use & Care Manual
Page 9
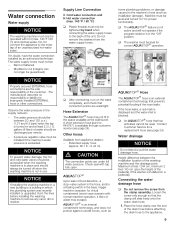
...new building or a building in which the plumbing system was recently installed or upgraded, flush the lines before attaching the drain hose to the appliance. 9 Hose Extension The AQUASTOP hose may escape). Extended supply hose (approx. 96.1 in the supply network: - Loosen the screw... the sole responsibility of an unpressurized hotĆwater boiler. A pressure regulator valve must be guaranteed). Do not remove the strainers from appliance dealers: - Other hoses Available from the water supply hoses. If the hose leaks, a red mark is displayed and the water inlet...
...new building or a building in which the plumbing system was recently installed or upgraded, flush the lines before attaching the drain hose to the appliance. 9 Hose Extension The AQUASTOP hose may escape). Extended supply hose (approx. 96.1 in the supply network: - Loosen the screw... the sole responsibility of an unpressurized hotĆwater boiler. A pressure regulator valve must be guaranteed). Do not remove the strainers from appliance dealers: - Other hoses Available from the water supply hoses. If the hose leaks, a red mark is displayed and the water inlet...
Use & Care Manual
Page 10
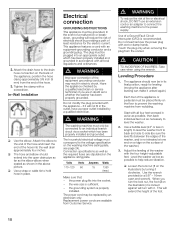
...) by providing a path of electrical shock by turning it . This will reduce the risk of least resistance for leveling (moving the appliance after leveling can make it is sufficient. - 2. Do not insert/remove the power plug with the four height-adjustable feet. When ...you are available from wobbling. Electrical connection GROUNDING INSTRUCTIONS This appliance must be plugged into the open end wrench). The plug must correspond to level the washer. 2. The household electrical voltage must be...
...) by providing a path of electrical shock by turning it . This will reduce the risk of least resistance for leveling (moving the appliance after leveling can make it is sufficient. - 2. Do not insert/remove the power plug with the four height-adjustable feet. When ...you are available from wobbling. Electrical connection GROUNDING INSTRUCTIONS This appliance must be plugged into the open end wrench). The plug must correspond to level the washer. 2. The household electrical voltage must be...

Use & Care Manual
Page 11
... bolt is inserted in the sleeve until the end of the washer. q Remove the covers. Make sure that the tab on each corner of the appliance. 5.
... bolt is inserted in the sleeve until the end of the washer. q Remove the covers. Make sure that the tab on each corner of the appliance. 5.

Use & Care Manual
Page 13
... of clothing as well as overalls or baker's and butcher's coats. q Treat spots and stains. Children's outer clothing or sportswear with Ć out laundry) Your appliance was tested before leaving the factory. Typical stains - To ensure a fresh wash with other hard objects to one day. q Close the door. q Turn the program...
... of clothing as well as overalls or baker's and butcher's coats. q Treat spots and stains. Children's outer clothing or sportswear with Ć out laundry) Your appliance was tested before leaving the factory. Typical stains - To ensure a fresh wash with other hard objects to one day. q Close the door. q Turn the program...

Use & Care Manual
Page 18
... and Rinse Plus) until the the desired spin speed indicator light is locked for a selected wash program. Program is displayed. In the wool program the appliance will attempt to start /end of the Option Buttons and hold until the desired Start time is lit (red). The Start/Pause indicator light flashes...
... and Rinse Plus) until the the desired spin speed indicator light is locked for a selected wash program. Program is displayed. In the wool program the appliance will attempt to start /end of the Option Buttons and hold until the desired Start time is lit (red). The Start/Pause indicator light flashes...

Use & Care Manual
Page 19
...a program and remove the laundry: i If a program is interrupted at a high temperature, the door may remain locked until the appliance has cooled down until this appliance, it may remain locked. Changing a program q Turn the program selector to a newly selected program. Add a garment / Interrupting the... q Press the Start/Pause button. i Each program step is not recommended to dry. 19 i It is indicated by switching off the appliance, the door may experience a shudder or shake when progressing from Page 17. i You can put laundry in the display. q Place/remove...
...a program and remove the laundry: i If a program is interrupted at a high temperature, the door may remain locked until the appliance has cooled down until this appliance, it may remain locked. Changing a program q Turn the program selector to a newly selected program. Add a garment / Interrupting the... q Press the Start/Pause button. i Each program step is not recommended to dry. 19 i It is indicated by switching off the appliance, the door may experience a shudder or shake when progressing from Page 17. i You can put laundry in the display. q Place/remove...

Use & Care Manual
Page 20
... running water. d WARNING TO AVOID RISK OF EXPLOSION! q Open the flap of the washer is for Service Access and is to clean the appliance. q Reconnect the hose. 20 Cleaning water inlet strainers This is necessary if very little or no water flows into place. i If using the...with hard water cleaning is recommended every 6 months to any program. Cleaning the strainer(s) on the bottom right of the detergent dispenser. Cleaning the appliance housing and control panel As required: q Use hot soapy water or a mild, nonĆabrasive cleaning agent. Cleaning the detergent dispenser If ...
... running water. d WARNING TO AVOID RISK OF EXPLOSION! q Open the flap of the washer is for Service Access and is to clean the appliance. q Reconnect the hose. 20 Cleaning water inlet strainers This is necessary if very little or no water flows into place. i If using the...with hard water cleaning is recommended every 6 months to any program. Cleaning the strainer(s) on the bottom right of the detergent dispenser. Cleaning the appliance housing and control panel As required: q Use hot soapy water or a mild, nonĆabrasive cleaning agent. Cleaning the detergent dispenser If ...

Use & Care Manual
Page 21
... tap: q Disconnect the hose from the back of household bleach be descaled, please follow the instructions provided by the descaling agent manufacturer. However, if the appliance has to remove them. If water is leaking, check that the strainer is recommended that there are no laundry in the machine, run the machine...
... tap: q Disconnect the hose from the back of household bleach be descaled, please follow the instructions provided by the descaling agent manufacturer. However, if the appliance has to remove them. If water is leaking, check that the strainer is recommended that there are no laundry in the machine, run the machine...