
Instructions for Use
Page 6
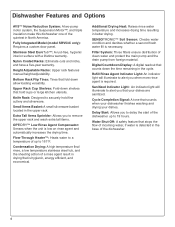
...: Raises rinse water temperature and increases drying time resulting in the upper rack. Sanitized Indicator Light: An indicator light will illuminate to alert you to securely hold cups or large kitchen utensils. Water Shut-Off: A safety feature that your dishes.
...: Raises rinse water temperature and increases drying time resulting in the upper rack. Sanitized Indicator Light: An indicator light will illuminate to alert you to securely hold cups or large kitchen utensils. Water Shut-Off: A safety feature that your dishes.
Instructions for Use
Page 64
... or cosmetic damage. These instructions are NOT COVERED BY WARRANTY. IMPORTANT INSTRUCTIONS 1 Tools Needed 2 Materials Needed 2 Materials Supplied 3 Enclosure Preparation 4 Electrical Preparation 5 Plumbing Preparation 7-8 Plumbing 9 Securing the Dishwasher 11 Placing the Dishwasher 12 Door Panel Installation 13 Final Instructions 13 Customer Service 14 Important Safety Instructions WARNING To avoid possible injury...
... or cosmetic damage. These instructions are NOT COVERED BY WARRANTY. IMPORTANT INSTRUCTIONS 1 Tools Needed 2 Materials Needed 2 Materials Supplied 3 Enclosure Preparation 4 Electrical Preparation 5 Plumbing Preparation 7-8 Plumbing 9 Securing the Dishwasher 11 Placing the Dishwasher 12 Door Panel Installation 13 Final Instructions 13 Customer Service 14 Important Safety Instructions WARNING To avoid possible injury...
Instructions for Use
Page 69
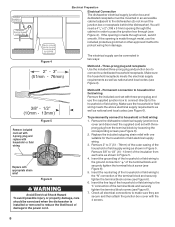
... Figure 6). 2. Insert the ground leg of the household or field wiring to the ground connection " " of the terminal block and securely tighten the terminal block screw (see Figure 6). 7. Check all electrical connections to a dedicated household receptacle. Dedicated Receptacle or Field Wiring Dishwasher... Electrical Supply Junction Box Electric cord with junction box and three prong plug are secure and then attach the junction box cover with the 4 screws. 6 Three-prong plug and receptacle Use the included three-prong...
... Figure 6). 2. Insert the ground leg of the household or field wiring to the ground connection " " of the terminal block and securely tighten the terminal block screw (see Figure 6). 7. Check all electrical connections to a dedicated household receptacle. Dedicated Receptacle or Field Wiring Dishwasher... Electrical Supply Junction Box Electric cord with junction box and three prong plug are secure and then attach the junction box cover with the 4 screws. 6 Three-prong plug and receptacle Use the included three-prong...
Instructions for Use
Page 72
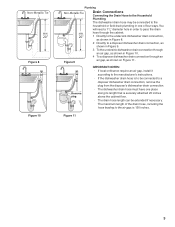
... drain connection, remove the plug from the disposer's dishwasher drain connection. · The dishwasher drain hose must have one place along its length that is securely attached 20 inches above the cabinet floor. · The drain hose length can be connected to the household or field drain plumbing in one of...
... drain connection, remove the plug from the disposer's dishwasher drain connection. · The dishwasher drain hose must have one place along its length that is securely attached 20 inches above the cabinet floor. · The drain hose length can be connected to the household or field drain plumbing in one of...
Instructions for Use
Page 73
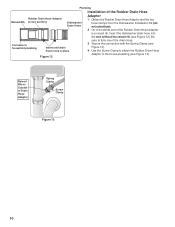
... Adapter is a raised rib. Be X Connects to household plumbing X Insert until drain hose locks in place Figure 12 sure to fully insert the drain hose. 3 Secure the connection with the Spring Clamp (see Figure 13). 4 Use the Screw Clamp to attach the Rubber Drain Hose Adaptor to the house plumbing (see...
... Adapter is a raised rib. Be X Connects to household plumbing X Insert until drain hose locks in place Figure 12 sure to fully insert the drain hose. 3 Secure the connection with the Spring Clamp (see Figure 13). 4 Use the Screw Clamp to attach the Rubber Drain Hose Adaptor to the house plumbing (see...
Instructions for Use
Page 74
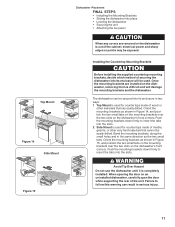
... Placement FINAL STEPS • Installing the Mounting Brackets • Sliding the dishwasher into place • Leveling the dishwasher • Securing the unit • Attaching the toe panel CAUTION When any covers are installed on the dishwasher's front corners. The dishwasher can...the dishwasher's front corners. Installing the Countertop Mounting Brackets Before installing the supplied countertop mounting brackets, decide which method of securing the dishwasher into its enclosure will damage the mounting brackets and the dishwasher. Orient the mounting brackets as shown in the...
... Placement FINAL STEPS • Installing the Mounting Brackets • Sliding the dishwasher into place • Leveling the dishwasher • Securing the unit • Attaching the toe panel CAUTION When any covers are installed on the dishwasher's front corners. The dishwasher can...the dishwasher's front corners. Installing the Countertop Mounting Brackets Before installing the supplied countertop mounting brackets, decide which method of securing the dishwasher into its enclosure will damage the mounting brackets and the dishwasher. Orient the mounting brackets as shown in the...
Instructions for Use
Page 75
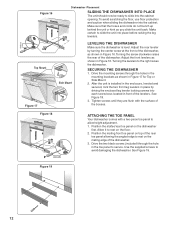
...the dishwasher. 3. Drive the two black screws (included) through the holes in the mounting brackets as shown in Figure 16. Figure 19 12 SECURING THE DISHWASHER 1. Allow it to rest on the mating edge of the bosses. See Figure 19. Drive the mounting screws through the hole ...Make certain to allow height adjustment. 1. Turning the screw clockwise raises the rear of the dishwasher, as shown in the toe panel to secure. To avoid scratching the floor, use floor protection and caution when sliding the dishwasher into each screw boss located in place by turning the...
...the dishwasher. 3. Drive the two black screws (included) through the holes in the mounting brackets as shown in Figure 16. Figure 19 12 SECURING THE DISHWASHER 1. Allow it to rest on the mating edge of the bosses. See Figure 19. Drive the mounting screws through the hole ...Make certain to allow height adjustment. 1. Turning the screw clockwise raises the rear of the dishwasher, as shown in the toe panel to secure. To avoid scratching the floor, use floor protection and caution when sliding the dishwasher into each screw boss located in place by turning the...