
Instructions for Use
Page 4
... if the dishwasher has been improperly grounded. NSF/ANSI 184 Certified residential dishwashers are certain the electrical supply has been correctly installed and the dishwasher has been properly grounded. Severe product damage and/or injury could result if the electrical supply for the ...are not intended for the end user to become familiar with the procedure to shut off the incoming power supply. See the Installation Instructions or contact your installer for the possible damages or consequences. To avoid possible dishwasher damage, do not use steam cleaning products to shut off the...
... if the dishwasher has been improperly grounded. NSF/ANSI 184 Certified residential dishwashers are certain the electrical supply has been correctly installed and the dishwasher has been properly grounded. Severe product damage and/or injury could result if the electrical supply for the ...are not intended for the end user to become familiar with the procedure to shut off the incoming power supply. See the Installation Instructions or contact your installer for the possible damages or consequences. To avoid possible dishwasher damage, do not use steam cleaning products to shut off the...
Instructions for Use
Page 5
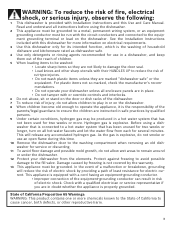
...and kitchenware rated as dishwasher safe. 4 Use only detergents or rinsing agents recommended for several minutes. This appliance is equipped with Installation Instructions and this dishwasher only for its intended function, which is connected to ensure the children are marked "dishwasher safe" or ... all enclosure panels are in safe practices by qualified persons. 9 Under certain conditions, hydrogen gas may be grounded. See the Installation Instructions included with this time. 10 Remove the dishwasher door to the washing compartment when removing an old dishwasher for service or...
...and kitchenware rated as dishwasher safe. 4 Use only detergents or rinsing agents recommended for several minutes. This appliance is equipped with Installation Instructions and this dishwasher only for its intended function, which is connected to ensure the children are marked "dishwasher safe" or ... all enclosure panels are in safe practices by qualified persons. 9 Under certain conditions, hydrogen gas may be grounded. See the Installation Instructions included with this time. 10 Remove the dishwasher door to the washing compartment when removing an old dishwasher for service or...
Instructions for Use
Page 18
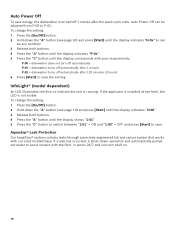
... until the display shows "1:01". 5 Press the "C" button to switch between "1:01" = ON and "1:00" = OFF and press [Start] to save. If the appliance is installed at eye-level, the LED is running. It works 24/7 and can be adjusted from P:00 to save the setting. InfoLight® (model dependent) An...
... until the display shows "1:01". 5 Press the "C" button to switch between "1:01" = ON and "1:00" = OFF and press [Start] to save. If the appliance is installed at eye-level, the LED is running. It works 24/7 and can be adjusted from P:00 to save the setting. InfoLight® (model dependent) An...
Instructions for Use
Page 22
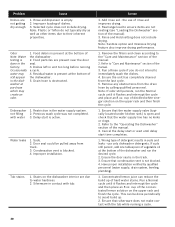
...Note: Water testing is done in the water supply system. Dishes left in the dishwasher at the bottom of the dishwasher. 2. Water leaks 1. Improper installation. Stains on the upper rack and finish the cycle. Wrong type of dishes. 3. Concentrated lemon juice can be pulled away from track. 3. Problem... vegetable oil at the bottom of distilled white vinegar solution on the upper rack and then finish the cycle. 1. Have proper installation verified by calling qualified personnel. Ensure that silverware does not make contact with the tub while running a cycle. 4.
...Note: Water testing is done in the water supply system. Dishes left in the dishwasher at the bottom of the dishwasher. 2. Water leaks 1. Improper installation. Stains on the upper rack and finish the cycle. Wrong type of dishes. 3. Concentrated lemon juice can be pulled away from track. 3. Problem... vegetable oil at the bottom of distilled white vinegar solution on the upper rack and then finish the cycle. 1. Have proper installation verified by calling qualified personnel. Ensure that silverware does not make contact with the tub while running a cycle. 4.
Instructions for Use
Page 24
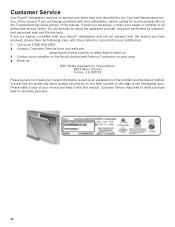
... in your area. 4 Write us: BSH Home Appliances Corporation 1901 Main Street Irvine, CA 92614 Please be sure to include your dealer or installer or an authorized service center. You will find the model and serial number information on the label located on the edge of the manual. If... to your satisfaction: 1 Call us at 1-800-944-2904 2 Contact Customer Service from our web site: www.bosch-home.com/us or www.bosch-home.ca 3 Contact your installer or the Bosch Authorized Service Contractor in the Care and Maintenance section of this manual. Customer Service may void the warranty. Any work...
... in your area. 4 Write us: BSH Home Appliances Corporation 1901 Main Street Irvine, CA 92614 Please be sure to include your dealer or installer or an authorized service center. You will find the model and serial number information on the label located on the edge of the manual. If... to your satisfaction: 1 Call us at 1-800-944-2904 2 Contact Customer Service from our web site: www.bosch-home.com/us or www.bosch-home.ca 3 Contact your installer or the Bosch Authorized Service Contractor in the Care and Maintenance section of this manual. Customer Service may void the warranty. Any work...
Instructions for Use
Page 25
..., city, or county electrical, plumbing and/or building codes, regulations, or laws, including failure to install the product in strict conformity with respect to such parts. correction of installation problems (you are not the direct fault of Bosch, including without limitation, rain, wind, sand, floods, fires, mud slides, freezing temperatures, excessive moisture or...
..., city, or county electrical, plumbing and/or building codes, regulations, or laws, including failure to install the product in strict conformity with respect to such parts. correction of installation problems (you are not the direct fault of Bosch, including without limitation, rain, wind, sand, floods, fires, mud slides, freezing temperatures, excessive moisture or...

Instructions for Use
Page 1
Installation Instructions Notice d'installation 9001 075 402 (9503)
Installation Instructions Notice d'installation 9001 075 402 (9503)
Instructions for Use
Page 2
...into place. • REPLACEMENT - Read these instructions, the dishwasher shall be installed by qualified installers only. If the dishwasher is a new installation, most of the work must be installed to these installation instructions completely and follow them carefully. otherwise the dishwasher may not drain properly...injury or property damage, OBSERVE ALL WARNINGS AND CAUTIONS. IMPORTANT • The dishwasher drain hose must be used in specific installations. • Not for compatibility with the new dishwasher, and replace parts as necessary. • This appliance has been...
...into place. • REPLACEMENT - Read these instructions, the dishwasher shall be installed by qualified installers only. If the dishwasher is a new installation, most of the work must be installed to these installation instructions completely and follow them carefully. otherwise the dishwasher may not drain properly...injury or property damage, OBSERVE ALL WARNINGS AND CAUTIONS. IMPORTANT • The dishwasher drain hose must be used in specific installations. • Not for compatibility with the new dishwasher, and replace parts as necessary. • This appliance has been...

Instructions for Use
Page 3
...be done in compliance with national and local codes. Serious injury could result in a well ventilated area until it is completely installed. Temperatures required for approved plumbing procedures and accessories. WARNING Avoiding General Hazards Do not use extension cords. Once these mounting ... not been used to a licensed plumber for 15 amps. Do not attempt any work is explosive. Hydrogen gas is properly installed. Only qualified electricians should perform plumbing work on the dishwasher electric supply circuit until you are certain the circuit is in accordance...
...be done in compliance with national and local codes. Serious injury could result in a well ventilated area until it is completely installed. Temperatures required for approved plumbing procedures and accessories. WARNING Avoiding General Hazards Do not use extension cords. Once these mounting ... not been used to a licensed plumber for 15 amps. Do not attempt any work is explosive. Hydrogen gas is properly installed. Only qualified electricians should perform plumbing work on the dishwasher electric supply circuit until you are certain the circuit is in accordance...

Instructions for Use
Page 4
... Stripper Ø 2 mm (1/16 in) Drill Level Electrical Supply Cable - Minimum 3/8″ O.D. Cosmetic defects must be reported within 30 days of installation. Minimum #14 AWG, 2 conductor, 1 ground, insulated copper conductors rated 75°C or higher Hot Water Supply Line - copper tubing or metal..., or braided hose) UL listed conduit connector or strain relief is required if you attach the field wiring directly to installation, thoroughly inspect the dishwasher for possible freight or cosmetic damage. Inspect the Dishwasher After unpacking the dishwasher and prior to the terminal ...
... Stripper Ø 2 mm (1/16 in) Drill Level Electrical Supply Cable - Minimum 3/8″ O.D. Cosmetic defects must be reported within 30 days of installation. Minimum #14 AWG, 2 conductor, 1 ground, insulated copper conductors rated 75°C or higher Hot Water Supply Line - copper tubing or metal..., or braided hose) UL listed conduit connector or strain relief is required if you attach the field wiring directly to installation, thoroughly inspect the dishwasher for possible freight or cosmetic damage. Inspect the Dishwasher After unpacking the dishwasher and prior to the terminal ...

Instructions for Use
Page 5
... G Flexible edge protector for electrical wire H Rubber drain hose adaptor I Side mount force distributor (Alternate side mount only) J Mounting bracket screws (Alternate side mount only) K Installation Guide for fully integrated door panel (select models only) L Junction box/power supply M Wrench (wrench size 13) N Outer toe panel (3rd piece) (select models only...
... G Flexible edge protector for electrical wire H Rubber drain hose adaptor I Side mount force distributor (Alternate side mount only) J Mounting bracket screws (Alternate side mount only) K Installation Guide for fully integrated door panel (select models only) L Junction box/power supply M Wrench (wrench size 13) N Outer toe panel (3rd piece) (select models only...

Instructions for Use
Page 6
... your new dishwasher, you will be enclosed on the top and both sides by standard residential kitchen cabinetry. The hose clip may be installed in (450 mm) use the TOP OR SIDE MOUNT mounting methods. Make sure the water supply and electrical supply are all three to... Requirements WARNING Avoid Scalding or Electrical Shock Hazard! Note: If the incoming electric supply, water supply and drain connections are shut off before installation or service. If your dishwasher opening width measures 173/4 in a corner, make sure that the enclosure is adequate clearance to pass through to...
... your new dishwasher, you will be enclosed on the top and both sides by standard residential kitchen cabinetry. The hose clip may be installed in (450 mm) use the TOP OR SIDE MOUNT mounting methods. Make sure the water supply and electrical supply are all three to... Requirements WARNING Avoid Scalding or Electrical Shock Hazard! Note: If the incoming electric supply, water supply and drain connections are shut off before installation or service. If your dishwasher opening width measures 173/4 in a corner, make sure that the enclosure is adequate clearance to pass through to...

Instructions for Use
Page 7
... receptacle behind the dishwasher). If the opening is in compliance with all national and local electrical codes and ordinances. Make sure that the dishwasher electrical installation is made through metal, use the included edge protector (G) or other approved method to pass the junction box through wood, sand it can be easily... Figure 5). WARNING Avoid Fire Hazard Make sure electrical work is de-energized. WARNING Avoid Fire Hazard Make sure there are certain the circuit is properly installed.
... receptacle behind the dishwasher). If the opening is in compliance with all national and local electrical codes and ordinances. Make sure that the dishwasher electrical installation is made through metal, use the included edge protector (G) or other approved method to pass the junction box through wood, sand it can be easily... Figure 5). WARNING Avoid Fire Hazard Make sure electrical work is de-energized. WARNING Avoid Fire Hazard Make sure there are certain the circuit is properly installed.

Instructions for Use
Page 8
... wire to the power supply cord from each wire as shown in the water line that exit the back of the insulation from the house installation. Temperatures required for soldering and sweating will increase run times. The larger hose, with the 4 screws. Method B - Remove the dishwasher ... avoid possible injury or property damage, care should be made before connecting the water supply line to the power cord. Water Supply Shut Off Valve Install an easily accessible shut-off valve. 8 8 Figure 6 L 2. WARNING Avoid Scald Hazard Do not perform any foreign material. · Turn on a ...
... wire to the power supply cord from each wire as shown in the water line that exit the back of the insulation from the house installation. Temperatures required for soldering and sweating will increase run times. The larger hose, with the 4 screws. Method B - Remove the dishwasher ... avoid possible injury or property damage, care should be made before connecting the water supply line to the power cord. Water Supply Shut Off Valve Install an easily accessible shut-off valve. 8 8 Figure 6 L 2. WARNING Avoid Scald Hazard Do not perform any foreign material. · Turn on a ...

Instructions for Use
Page 9
... mm) max 43″ (1100 mm) min 20″ (508mm) max 43″ (1100mm) Figure 8 F IMPORTANT NOTES: · If local ordinance require an air gap, install it according to the manufacturer's instructions. · If the dishwasher drain hose is to be connected to a disposer dishwasher drain connection, remove the plug from...
... mm) max 43″ (1100 mm) min 20″ (508mm) max 43″ (1100mm) Figure 8 F IMPORTANT NOTES: · If local ordinance require an air gap, install it according to the manufacturer's instructions. · If the dishwasher drain hose is to be connected to a disposer dishwasher drain connection, remove the plug from...
Instructions for Use
Page 10
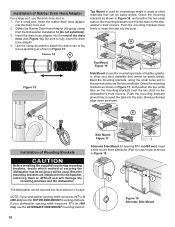
... two slots on the dishwasher's front corners. Bend perforated edge down firmly to the house plumbing as the two small tabs. Before installing the supplied countertop mounting brackets, decide which method of wood or other very hard materials that can be used. Obtain the Rubber Drain... Hose Adaptor (H) spring clamp from the Dishwasher Installation Kit (do not substitute). 3. Insert the drain hose adaptor into its enclosure in 2 ways: NOTE: If your dishwasher opening width measures 173...
... two slots on the dishwasher's front corners. Bend perforated edge down firmly to the house plumbing as the two small tabs. Before installing the supplied countertop mounting brackets, decide which method of wood or other very hard materials that can be used. Obtain the Rubber Drain... Hose Adaptor (H) spring clamp from the Dishwasher Installation Kit (do not substitute). 3. Insert the drain hose adaptor into its enclosure in 2 ways: NOTE: If your dishwasher opening width measures 173...

Instructions for Use
Page 11
... by turning feet clockwise to raise or counter-clockwise to raise or lower the back. Failure to slide into place before securing it is completely installed. Make sure that the hoses and cords do not bunch up behind the unit or kink as shown for Top (Figure 21), Side Mount (Figure...
... by turning feet clockwise to raise or counter-clockwise to raise or lower the back. Failure to slide into place before securing it is completely installed. Make sure that the hoses and cords do not bunch up behind the unit or kink as shown for Top (Figure 21), Side Mount (Figure...
Instructions for Use
Page 13
... your dishwasher and are not pleased with the service you have available (if you are having a problem with your dealer or installer or an authorized service center. Call us . Contact your installer or the Authorized Service Contractor in the Care and Maintenance section of your area. 2. Please make a copy of the Use...
... your dishwasher and are not pleased with the service you have available (if you are having a problem with your dealer or installer or an authorized service center. Call us . Contact your installer or the Authorized Service Contractor in the Care and Maintenance section of your area. 2. Please make a copy of the Use...


