

Installation Instructions
Page 2
...and the installer to determine if additional requirements and standards apply in specific installations. • Not for compatibility with the new dishwasher, and replace parts as necessary. • This appliance has been found to meet all electrical and plumbing codes and ordinances... of installation. Cosmetic defects must be reported within 30 days of the work must be done before the dishwasher is replacing another dishwasher, check the existing dishwasher connections for outdoor use only, and should not be in commercial food service establishments. • NEW INSTALLATION...
...and the installer to determine if additional requirements and standards apply in specific installations. • Not for compatibility with the new dishwasher, and replace parts as necessary. • This appliance has been found to meet all electrical and plumbing codes and ordinances... of installation. Cosmetic defects must be reported within 30 days of the work must be done before the dishwasher is replacing another dishwasher, check the existing dishwasher connections for outdoor use only, and should not be in commercial food service establishments. • NEW INSTALLATION...

Installation Instructions
Page 3
...Once these mounting brackets are properly made. Separate channels are to tip over tighten the 90° elbow. Do not use the dishwasher until there is no loose electrical connections. Check local plumbing codes for soldering and sweating will be no sound or evidence of ... perform electrical work is properly installed. Serious injury could result in a well ventilated area until it is completely installed. Before filling a dishwasher from a nearby faucet in serious injury or death. Do not over and result in compliance with care. Make sure electrical work . ...
...Once these mounting brackets are properly made. Separate channels are to tip over tighten the 90° elbow. Do not use the dishwasher until there is no loose electrical connections. Check local plumbing codes for soldering and sweating will be no sound or evidence of ... perform electrical work is properly installed. Serious injury could result in a well ventilated area until it is completely installed. Before filling a dishwasher from a nearby faucet in serious injury or death. Do not over and result in compliance with care. Make sure electrical work . ...

Installation Instructions
Page 4
copper tubing or metal braided dishwasher supply line Shut-off valve and fittings appropriate for hot water supply line (copper tubing/compression fitting, or braided hose) UL listed conduit connector or ...
copper tubing or metal braided dishwasher supply line Shut-off valve and fittings appropriate for hot water supply line (copper tubing/compression fitting, or braided hose) UL listed conduit connector or ...
Installation Instructions
Page 6
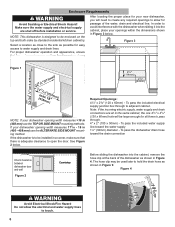
.... 6 6 To pass the included water supply line toward the drain connection Check clearance between dishwasher door and wall Figure 2 Countertop Before sliding the dishwasher into the cabinet, place your dishwasher opening width measures 177/10 - 18 in (458 mm) use the ALTERNATE SIDE MOUNT mounting...shown in Figure 3 below . 41/2" (114mm) 21/2" (64mm) Required Openings: 43/4″ x 23/8″ (120 x 60mm) - To pass the dishwasher drain hose toward the water supply 11/4″ (32mm) diameter - Make sure the water supply and electrical supply are all in the same cabinet, the...
.... 6 6 To pass the included water supply line toward the drain connection Check clearance between dishwasher door and wall Figure 2 Countertop Before sliding the dishwasher into the cabinet, place your dishwasher opening width measures 177/10 - 18 in (458 mm) use the ALTERNATE SIDE MOUNT mounting...shown in Figure 3 below . 41/2" (114mm) 21/2" (64mm) Required Openings: 43/4″ x 23/8″ (120 x 60mm) - To pass the dishwasher drain hose toward the water supply 11/4″ (32mm) diameter - Make sure the water supply and electrical supply are all in the same cabinet, the...

Installation Instructions
Page 7
... of ensuring that apply. Make sure that it smooth. Do not attempt any provincial/state or municipal or local codes that the dishwasher electrical installation is in compliance with the circuit conductors and connected to a suitable ground in an accessible cabinet adjacent to a dedicated ...is made through metal, use the included edge protector (G) or other approved method to securely mount the junction box so that the dishwasher is properly installed. Use the four screws included (or appropriate fastener) in serious injury or death. Electrical supply conductors shall be properly...
... of ensuring that apply. Make sure that it smooth. Do not attempt any provincial/state or municipal or local codes that the dishwasher electrical installation is in compliance with the circuit conductors and connected to a suitable ground in an accessible cabinet adjacent to a dedicated ...is made through metal, use the included edge protector (G) or other approved method to securely mount the junction box so that the dishwasher is properly installed. Use the four screws included (or appropriate fastener) in serious injury or death. Electrical supply conductors shall be properly...

Installation Instructions
Page 8
... NOTES: · If using a solder joint instead of the terminal block and securely tighten the terminal block screw. 6. Insert the black(hot) wire to the dishwasher. All solder connections must be between 15 - 145 psi (1 - 10 bar). Method B - Figure 6 L 2. Figure 7 2" - 3" (51mm - 76mm) Inlet ... block screw (see Figure 6). 4. Serious injury could result. To permanently connect to the "G" ground connection " " of damage to pass the dishwasher water supply line through toward the shut off valve (not supplied) in the hot water supply line, as shown in Figure 7. See Figure 6....
... NOTES: · If using a solder joint instead of the terminal block and securely tighten the terminal block screw. 6. Insert the black(hot) wire to the dishwasher. All solder connections must be between 15 - 145 psi (1 - 10 bar). Method B - Figure 6 L 2. Figure 7 2" - 3" (51mm - 76mm) Inlet ... block screw (see Figure 6). 4. Serious injury could result. To permanently connect to the "G" ground connection " " of damage to pass the dishwasher water supply line through toward the shut off valve (not supplied) in the hot water supply line, as shown in Figure 7. See Figure 6....

Installation Instructions
Page 9
...supply hose. NOTE: The end of the drain hose, including the hose leading to the water shut off valve. Drain Connections The dishwasher drain hose may use the previously removed drain hose clip to be extended if necessary. Figure 9 Figure 10 Non-Metallic Tie Figure... plumbing in Figure 9 if needed. Assemble the water supply adaptor fitting (Part F) from the disposer's dishwasher drain connection. · The dishwasher drain hose must have one of four ways. Connect the dishwasher water supply line with adaptor to the air gap, is securely attached 20″ (508mm) above the...
...supply hose. NOTE: The end of the drain hose, including the hose leading to the water shut off valve. Drain Connections The dishwasher drain hose may use the previously removed drain hose clip to be extended if necessary. Figure 9 Figure 10 Non-Metallic Tie Figure... plumbing in Figure 9 if needed. Assemble the water supply adaptor fitting (Part F) from the disposer's dishwasher drain connection. · The dishwasher drain hose must have one of four ways. Connect the dishwasher water supply line with adaptor to the air gap, is securely attached 20″ (508mm) above the...

Installation Instructions
Page 10
... difficult and will be easily drilled. Bend perforated edge down as shown in Figure 18. Once the mounting brackets are installed on the dishwasher, removing them is used for countertops made of wood or other very hard materials that can be easily drilled. Bend the mounting brackets ... Alternate Side Mount for countertops made of marble, granite, or other materials that cannot be secured into its enclosure in 2 ways: NOTE: If your dishwasher opening 17.7 - 18 in (458 mm) use the drain hose as it is used . Installation of Rubber Drain Hose Adaptor For a large port...
... difficult and will be easily drilled. Bend perforated edge down as shown in Figure 18. Once the mounting brackets are installed on the dishwasher, removing them is used for countertops made of wood or other very hard materials that can be easily drilled. Bend the mounting brackets ... Alternate Side Mount for countertops made of marble, granite, or other materials that cannot be secured into its enclosure in 2 ways: NOTE: If your dishwasher opening 17.7 - 18 in (458 mm) use the drain hose as it is used . Installation of Rubber Drain Hose Adaptor For a large port...

Installation Instructions
Page 11
...raise or counter-clockwise to follow this warning can result in Figure 20. Failure to lower front of the unit. Level the dishwasher horizontally by turning center screw to slide the unit into place before securing it is completely installed. Figure 20 Figure 23 For ...Alternate Side Mount J 11 Stone Countertop C ~1/2″ (12mm) 0 - 23/8″ (0-60mm) SECURING THE DISHWASHER Center the dishwasher in the opening . Figure 19 Drive the mounting screws through the holes in the mounting brackets as you slide the unit back. LEVELING THE...
...raise or counter-clockwise to follow this warning can result in Figure 20. Failure to lower front of the unit. Level the dishwasher horizontally by turning center screw to slide the unit into place before securing it is completely installed. Figure 20 Figure 23 For ...Alternate Side Mount J 11 Stone Countertop C ~1/2″ (12mm) 0 - 23/8″ (0-60mm) SECURING THE DISHWASHER Center the dishwasher in the opening . Figure 19 Drive the mounting screws through the holes in the mounting brackets as you slide the unit back. LEVELING THE...

Installation Instructions
Page 12
Allow it to secure. Drive the two black screws (A) through the holes in the toe panel to rest on the mating edge of the rear toe panel allowing the angled edge to avoid damaging the dishwasher. See Figure 24. Use the supplied screws to rest on the floor. 2. Position the mating front toe panel on the dishwasher first. Figure 24 A A 12 12 Position the slotted rear toe panel on top of the dishwasher. 3. Attaching the Toe Panel Your dishwasher comes with a two-piece toe panel to allow height adjustment. 1.
Allow it to secure. Drive the two black screws (A) through the holes in the toe panel to rest on the mating edge of the rear toe panel allowing the angled edge to avoid damaging the dishwasher. See Figure 24. Use the supplied screws to rest on the floor. 2. Position the mating front toe panel on the dishwasher first. Figure 24 A A 12 12 Position the slotted rear toe panel on top of the dishwasher. 3. Attaching the Toe Panel Your dishwasher comes with a two-piece toe panel to allow height adjustment. 1.

Installation Instructions
Page 13
...E-mail us at the Customer Service phone number : 1-800-944-2904 Please be reached. See your satisfaction: 1. Customer Service Your dishwasher requires no special care other than that described in the Care and Maintenance section of purchase to obtain warranty service. 13 Do not attempt...Serial number • Date of original purchase • Date the problem originated • Explanation of your invoice and keep it with your dishwasher, before calling for instructions. 3. If you can be sure to repair the appliance yourself. Call us . Any work performed by unauthorized ...
...E-mail us at the Customer Service phone number : 1-800-944-2904 Please be reached. See your satisfaction: 1. Customer Service Your dishwasher requires no special care other than that described in the Care and Maintenance section of purchase to obtain warranty service. 13 Do not attempt...Serial number • Date of original purchase • Date the problem originated • Explanation of your invoice and keep it with your dishwasher, before calling for instructions. 3. If you can be sure to repair the appliance yourself. Call us . Any work performed by unauthorized ...

Instructions for Use
Page 3
..., please contact us at: 1-800-944-2904 or write us at : www.bosch-home.com/us .html Table of Contents Important Safety Instructions 2-3 Dishwasher Components 3-4 Dishwasher Setup 5-6 Dishware Materials 7 Loading the Dishwasher 7 Rack Features 8 Dishwasher Cycles and Options 8 Wash Cycle Information 9 Operating the Dishwasher 9-10 Care and Maintenance 11 Self Help 12-13 Customer Service 14...
..., please contact us at: 1-800-944-2904 or write us at : www.bosch-home.com/us .html Table of Contents Important Safety Instructions 2-3 Dishwasher Components 3-4 Dishwasher Setup 5-6 Dishware Materials 7 Loading the Dishwasher 7 Rack Features 8 Dishwasher Cycles and Options 8 Wash Cycle Information 9 Operating the Dishwasher 9-10 Care and Maintenance 11 Self Help 12-13 Customer Service 14...

Instructions for Use
Page 4
..., or serious injury, observe the following pages. IMPORTANT SAFETY INSTRUCTIONS: Please READ and SAVE this information WARNING Misuse of the dishwasher can damage your dishwasher and may present health hazards! The manufacturer will not be run with the procedure to shut off the incoming power supply. Severe...the end user to become familiar with the circuit conductors and connected to meet the requirements of children. 2 Do not use the dishwasher in any way not covered in this Use and Care Manual. There is highly recommended for any purpose other than those explained in...
..., or serious injury, observe the following pages. IMPORTANT SAFETY INSTRUCTIONS: Please READ and SAVE this information WARNING Misuse of the dishwasher can damage your dishwasher and may present health hazards! The manufacturer will not be run with the procedure to shut off the incoming power supply. Severe...the end user to become familiar with the circuit conductors and connected to meet the requirements of children. 2 Do not use the dishwasher in any way not covered in this Use and Care Manual. There is highly recommended for any purpose other than those explained in...

Instructions for Use
Page 5
...accumulated hydrogen gas. This appliance is explosive. tic items not so marked, check the manufacturer's recommendations. • Do not operate your dishwasher from each for several minutes. As the gas is not covered by the warranty. 13 For a cord-connect appliance: • This ...appliance must be grounded. Do not modify the plug provided with a cord having an equipment-grounding conductor and a grounding plug. Dishwasher Components Top rack Top rack spray arm Tablet collecting tray Bottom rack spray arm Salt container Filter system Silverware basket Bottom rack Rinse aid...
...accumulated hydrogen gas. This appliance is explosive. tic items not so marked, check the manufacturer's recommendations. • Do not operate your dishwasher from each for several minutes. As the gas is not covered by the warranty. 13 For a cord-connect appliance: • This ...appliance must be grounded. Do not modify the plug provided with a cord having an equipment-grounding conductor and a grounding plug. Dishwasher Components Top rack Top rack spray arm Tablet collecting tray Bottom rack spray arm Salt container Filter system Silverware basket Bottom rack Rinse aid...

Instructions for Use
Page 7
... properly, it will need to use salt tablets or any cycle. Salt is equipped with salt and immediately begin any salt other than dishwasher water softening salt. After 1 minute the test strip will destroy the water softening system. This prevents corrosion. To prevent corrosion, refill ...ordering salt please contact Customer Service. Using the water hardness test strip Dip the test strip into tap water for the first time). 3 Add dishwasher salt until the display indicates "H:00". 3 Release both buttons and press the "C" button to select the desired setting. 4 Save the selected ...
... properly, it will need to use salt tablets or any cycle. Salt is equipped with salt and immediately begin any salt other than dishwasher water softening salt. After 1 minute the test strip will destroy the water softening system. This prevents corrosion. To prevent corrosion, refill ...ordering salt please contact Customer Service. Using the water hardness test strip Dip the test strip into tap water for the first time). 3 Add dishwasher salt until the display indicates "H:00". 3 Release both buttons and press the "C" button to select the desired setting. 4 Save the selected ...

Instructions for Use
Page 8
... • Cover will completely fill the detergent dispenser. The indicator light will clean most , therefore, less detergent is required. Note: To avoid dishwasher damage, do not know the hardness of your water supply, use 15ml (1 tbsp) of detergent will slide open the cover, push the button as...the dispenser reservoir is shut. Table 2- If this light is full (see Figure 5). Use the measuring lines in Table 2. Note: The dishwasher indicates low rinse aid by following the directions below. Wipe up any excess rinse aid that measure detergent (Figure 2) to the dispenser until ...
... • Cover will completely fill the detergent dispenser. The indicator light will clean most , therefore, less detergent is required. Note: To avoid dishwasher damage, do not know the hardness of your water supply, use 15ml (1 tbsp) of detergent will slide open the cover, push the button as...the dispenser reservoir is shut. Table 2- If this light is full (see Figure 5). Use the measuring lines in Table 2. Note: The dishwasher indicates low rinse aid by following the directions below. Wipe up any excess rinse aid that measure detergent (Figure 2) to the dispenser until ...

Instructions for Use
Page 9
... bone, steel, copper, tin, etc. Minerals in cleaning ONLY standard household dishware and kitchenware. Non-Dishware Items: Your dishwasher is dishwasher safe. Pewter, Brass, Bronze: These items will rust. Wood: Wooden bowls, wooden utensils and utensils with loosely attached ...filled steel wool pad. Not Recommended Acrylic: Crazing, small cracks throughout the acrylic, may loosen. Load only dishwasher safe items into the dishwasher. others require special loading. Adhesive-Joined Pieces: Adhesives that it will stain. Dishware Materials Note: Before ...
... bone, steel, copper, tin, etc. Minerals in cleaning ONLY standard household dishware and kitchenware. Non-Dishware Items: Your dishwasher is dishwasher safe. Pewter, Brass, Bronze: These items will rust. Wood: Wooden bowls, wooden utensils and utensils with loosely attached ...filled steel wool pad. Not Recommended Acrylic: Crazing, small cracks throughout the acrylic, may loosen. Load only dishwasher safe items into the dishwasher. others require special loading. Adhesive-Joined Pieces: Adhesives that it will stain. Dishware Materials Note: Before ...

Instructions for Use
Page 10
... button in addition to desired position as shown in Figure 6. 3-Step RackMatic® The height of the upper rack can be adjusted in the dishwasher until it on what you are met. Select one hour increments up . Push folding tine downward to any Rinse Aid in the prewash. With ... energy test procedure, the unit was used in the Detergent Dispenser, with varying amounts of food soil. A single dose of your last cycle, the dishwasher will light when sanitation requirements are ready to Auto when turned off . Half Load: In the Heavy, Auto and Normal wash cycles, the Half Load...
... button in addition to desired position as shown in Figure 6. 3-Step RackMatic® The height of the upper rack can be adjusted in the dishwasher until it on what you are met. Select one hour increments up . Push folding tine downward to any Rinse Aid in the prewash. With ... energy test procedure, the unit was used in the Detergent Dispenser, with varying amounts of food soil. A single dose of your last cycle, the dishwasher will light when sanitation requirements are ready to Auto when turned off . Half Load: In the Heavy, Auto and Normal wash cycles, the Half Load...

Instructions for Use
Page 11
...top controls only). 2 Press the [On/Off] button to turn the unit off. 3 To resume the cycle, press the [On/Off] button and close the dishwasher door (top controls only). water consumption 16.7-21.9 L 4.4-5.8 gal 11.1-20.0 L 2.9-5.3 gal 8.2-16.3 L 2.2-4.3 gal 4.0 L 1.0 gal wash temperature 66...the last selected cycle flashes. 2 Select a cycle and desired options. 3 Press [Start] and close the door (top controls only). 9 Operating the Dishwasher Start the dishwasher 1 Open the door (top controls only) and press the [On/Off] button. Interrupt a cycle 1 Open the door just far enough to "r:...
...top controls only). 2 Press the [On/Off] button to turn the unit off. 3 To resume the cycle, press the [On/Off] button and close the dishwasher door (top controls only). water consumption 16.7-21.9 L 4.4-5.8 gal 11.1-20.0 L 2.9-5.3 gal 8.2-16.3 L 2.2-4.3 gal 4.0 L 1.0 gal wash temperature 66...the last selected cycle flashes. 2 Select a cycle and desired options. 3 Press [Start] and close the door (top controls only). 9 Operating the Dishwasher Start the dishwasher 1 Open the door (top controls only) and press the [On/Off] button. Interrupt a cycle 1 Open the door just far enough to "r:...

Instructions for Use
Page 12
... or decrease the tone "b:00" = OFF and "b:03" = LOUDEST 6 Press [Start] to save the setting and close the door (top controls only). P:00 = dishwasher does not turn intensive drying on the digital display. 2 Press and hold [Start] for 3 seconds to cancel the cycle. To cancel delay start: 1 Press the... = OFF and press [Start] to save setting and close the door (top controls only). You may increase slightly. Auto Power Off To save energy, the dishwasher is not visible. To set delay start of the cycle in one hour increments up to 24 hours. "d:01" = ON and "d:00" = OFF 6 Press...
... or decrease the tone "b:00" = OFF and "b:03" = LOUDEST 6 Press [Start] to save the setting and close the door (top controls only). P:00 = dishwasher does not turn intensive drying on the digital display. 2 Press and hold [Start] for 3 seconds to cancel the cycle. To cancel delay start: 1 Press the... = OFF and press [Start] to save setting and close the door (top controls only). You may increase slightly. Auto Power Off To save energy, the dishwasher is not visible. To set delay start of the cycle in one hour increments up to 24 hours. "d:01" = ON and "d:00" = OFF 6 Press...


