
Installation Instructions
Page 3
... to meet all electrical and plumbing codes and ordinances (both national and local). IMPORTANT x The dishwasher drain hose must be used in specific installations. If the dishwasher is moved into place. These instructions are intended for indoor residential use only, and should not be...749. x This appliance has been found to be reported within 30 days of the owner and the installer to ensure safety and optimum dishwasher performance. x Not for outdoor use by a qualified service technician or installer. x REPLACEMENT - Important Safety Instructions To avoid possible injury...
... to meet all electrical and plumbing codes and ordinances (both national and local). IMPORTANT x The dishwasher drain hose must be used in specific installations. If the dishwasher is moved into place. These instructions are intended for indoor residential use only, and should not be...749. x This appliance has been found to be reported within 30 days of the owner and the installer to ensure safety and optimum dishwasher performance. x Not for outdoor use by a qualified service technician or installer. x REPLACEMENT - Important Safety Instructions To avoid possible injury...

Installation Instructions
Page 4
... Shock/Fire Hazards Do not allow the electrical and water supply lines to a licensed plumber for soldering and sweating will damage the dishwasher's water inlet valve. Only qualified electricians should perform plumbing work. Ensure all national and local electrical codes and ordinances. This appliance ...must be connected to follow this warning can form in serious injury. Only qualified plumber should perform electrical work on an uninstalled dishwasher, carefully open the door while supporting the rear of the unit. Temperatures required for water supply, defer to touch. If ...
... Shock/Fire Hazards Do not allow the electrical and water supply lines to a licensed plumber for soldering and sweating will damage the dishwasher's water inlet valve. Only qualified electricians should perform plumbing work. Ensure all national and local electrical codes and ordinances. This appliance ...must be connected to follow this warning can form in serious injury. Only qualified plumber should perform electrical work on an uninstalled dishwasher, carefully open the door while supporting the rear of the unit. Temperatures required for water supply, defer to touch. If ...

Installation Instructions
Page 5
... Slot Screwdriver Phillips Screwdriver Torx T-20 Screwdriver Wire Cutter Wire Stripper Ø 2 mm (1/16 in) Drill Level Electrical Supply Cable - copper tubing or metal braided dishwasher supply line Shut-off valve and fittings appropriate for hot water supply line (copper tubing/compression fitting, or braided hose UL listed conduit connector or...
... Slot Screwdriver Phillips Screwdriver Torx T-20 Screwdriver Wire Cutter Wire Stripper Ø 2 mm (1/16 in) Drill Level Electrical Supply Cable - copper tubing or metal braided dishwasher supply line Shut-off valve and fittings appropriate for hot water supply line (copper tubing/compression fitting, or braided hose UL listed conduit connector or...

Installation Instructions
Page 7
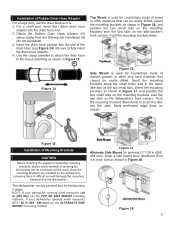
...within the dimensions shown in (458 mm) use the ALTERNATE SIDE MOUNT mount-ing method. Figure 4 5 NOTE: This dishwasher is adequate clearance to avoid interference with the dishwasher when sliding it into the cabinet, remove the hose clip at the back of the water, drain and electrical line. ... the drain hose as shown in Figure 1. Figure 2 WARNING Avoid Electrical Shock/Fire Hazard! After locating the proper place for passage of the dishwasher as possible for all in a corner, make sure that the enclosure is square and has the dimensions shown in Figure 9. To pass the...
...within the dimensions shown in (458 mm) use the ALTERNATE SIDE MOUNT mount-ing method. Figure 4 5 NOTE: This dishwasher is adequate clearance to avoid interference with the dishwasher when sliding it into the cabinet, remove the hose clip at the back of the water, drain and electrical line. ... the drain hose as shown in Figure 1. Figure 2 WARNING Avoid Electrical Shock/Fire Hazard! After locating the proper place for passage of the dishwasher as possible for all in a corner, make sure that the enclosure is square and has the dimensions shown in Figure 9. To pass the...

Installation Instructions
Page 8
...Make sure electrical work is de-energized. Electrical supply conductors shall be connected in two ways: WARNING Avoid Fire Hazard! Electrical Connection The dishwasher electrical supply junction box (L) and dedicated receptacle must be easily accessed (see Figure 5). You will need a 43/4Ǝ x 23/8&#.... Make sure that apply. Electrical Supply The customer has the responsibility of 120V, 60 Hz, AC, connected to a dishwasher-dedicated, properly grounded electrical circuit with the circuit conductors and connected to protect wiring from damage. Make sure all national and...
...Make sure electrical work is de-energized. Electrical supply conductors shall be connected in two ways: WARNING Avoid Fire Hazard! Electrical Connection The dishwasher electrical supply junction box (L) and dedicated receptacle must be easily accessed (see Figure 5). You will need a 43/4Ǝ x 23/8&#.... Make sure that apply. Electrical Supply The customer has the responsibility of 120V, 60 Hz, AC, connected to a dishwasher-dedicated, properly grounded electrical circuit with the circuit conductors and connected to protect wiring from damage. Make sure all national and...

Installation Instructions
Page 9
...as shown in Figure 8. x Before connecting the water supply line to pass the dish-washer water supply line through the cabinet to the dishwasher, flush the incoming water line for leaks after connections are made before connecting the water supply line to be set to deliver approximately 120&#... field supply wiring as shown in Figure 7. Do not perform any foreign material. CAUTION Temperatures required for soldering and sweating will damage the dishwasher. Connecting the Hot Water Supply There are no sharp bends or kinks in the water line that is shut off valve (not supplied) ...
...as shown in Figure 8. x Before connecting the water supply line to pass the dish-washer water supply line through the cabinet to the dishwasher, flush the incoming water line for leaks after connections are made before connecting the water supply line to be set to deliver approximately 120&#... field supply wiring as shown in Figure 7. Do not perform any foreign material. CAUTION Temperatures required for soldering and sweating will damage the dishwasher. Connecting the Hot Water Supply There are no sharp bends or kinks in the water line that is shut off valve (not supplied) ...

Installation Instructions
Page 10
... to the air gap, is to be supported. x The drain hose length can be connected to a disposer dishwasher drain connection, remove the plug from the parts bag onto the dishwasher water supply hose. IMPORTANT NOTES: x If local ordinance require an air gap, install it according to kink or... supply line with the correct fittings for leaks. 1. You may be extended if necessary. To the under the sink dishwasher drain connection, as shown in Figure 8. 4. x If the dishwasher drain hose is 150Ǝ (3800 mm). The maximum length of four ways. Figure 10 Figure 11 Figure 9 8 ...
... to the air gap, is to be supported. x The drain hose length can be connected to a disposer dishwasher drain connection, remove the plug from the parts bag onto the dishwasher water supply hose. IMPORTANT NOTES: x If local ordinance require an air gap, install it according to kink or... supply line with the correct fittings for leaks. 1. You may be extended if necessary. To the under the sink dishwasher drain connection, as shown in Figure 8. 4. x If the dishwasher drain hose is 150Ǝ (3800 mm). The maximum length of four ways. Figure 10 Figure 11 Figure 9 8 ...
Installation Instructions
Page 11
...15 Installation of Mounting Brackets CAUTION Before installing the supplied countertop mounting brackets, decide which method of securing the dishwasher into its enclosure in 2 ways: NOTE: If your dishwasher opening width measures 17.7 - 18 in (458 mm) use the TOP OR SIDE MOUNT mounting methods. ...mounting brackets as shown in Figure 16, and position the two small tabs on the mounting brackets over the two slots on the dishwasher's front corners. Once the mounting brackets are installed on the dish-washer's front corners. Orient the mounting brackets as shown in Figure...
...15 Installation of Mounting Brackets CAUTION Before installing the supplied countertop mounting brackets, decide which method of securing the dishwasher into its enclosure in 2 ways: NOTE: If your dishwasher opening width measures 17.7 - 18 in (458 mm) use the TOP OR SIDE MOUNT mounting methods. ...mounting brackets as shown in Figure 16, and position the two small tabs on the mounting brackets over the two slots on the dishwasher's front corners. Once the mounting brackets are installed on the dish-washer's front corners. Orient the mounting brackets as shown in Figure...

Installation Instructions
Page 12
...to raise or counter-clockwise to slide into the cabinet. Failure to raise or lower the back. When opening the door on an uninstalled dishwasher, carefully open the door while supporting the rear of the unit. Make certain to your cabinet or countertop as shown in serious injury.... Do not use floor protection and caution when sliding the dishwasher into the cabinet opening before raising the leg levelers. Figure 21 Figure 19 SECURING THE DISHWASHER Center the dishwasher in the mounting brackets as you slide the unit back. Make sure that the ...
...to raise or counter-clockwise to slide into the cabinet. Failure to raise or lower the back. When opening the door on an uninstalled dishwasher, carefully open the door while supporting the rear of the unit. Make certain to your cabinet or countertop as shown in serious injury.... Do not use floor protection and caution when sliding the dishwasher into the cabinet opening before raising the leg levelers. Figure 21 Figure 19 SECURING THE DISHWASHER Center the dishwasher in the mounting brackets as you slide the unit back. Make sure that the ...

Installation Instructions
Page 13
Use the supplied screws to rest on top of the dishwasher. 3. Position the mating front toe panel on the mating edge of the rear toe panel allowing the angled edge to avoid damaging the dishwasher. See Figure 24. Drive the two black screws (A) through the holes in the toe panel to rest on the dishwasher first. Allow it to secure. Attaching the Toe Panel Your dishwasher comes with a two-piece toe panel to al-low height adjustment. 1. Figure 24 11 Position the slotted rear toe panel on the floor. 2.
Use the supplied screws to rest on top of the dishwasher. 3. Position the mating front toe panel on the mating edge of the rear toe panel allowing the angled edge to avoid damaging the dishwasher. See Figure 24. Drive the two black screws (A) through the holes in the toe panel to rest on the dishwasher first. Allow it to secure. Attaching the Toe Panel Your dishwasher comes with a two-piece toe panel to al-low height adjustment. 1. Figure 24 11 Position the slotted rear toe panel on the floor. 2.
Installation Instructions
Page 14
... Model number x Serial number x Date of original purchase x Date the problem originated x Explanation of your invoice and keep it with your dishwasher and are calling), the following steps (in the Use and Care Manual. If service is corrected to obtain warranty service. 12 Contact your ... below : BSH Home Appliances Corporation 1901 Main Street Irvine, CA 92614 4. Do not attempt to repair the appliance yourself. Customer Service Your dishwasher requires no special care other than that described in your area. 2. Please make a copy of the problem x Daytime phone number where you...
... Model number x Serial number x Date of original purchase x Date the problem originated x Explanation of your invoice and keep it with your dishwasher and are calling), the following steps (in the Use and Care Manual. If service is corrected to obtain warranty service. 12 Contact your ... below : BSH Home Appliances Corporation 1901 Main Street Irvine, CA 92614 4. Do not attempt to repair the appliance yourself. Customer Service Your dishwasher requires no special care other than that described in your area. 2. Please make a copy of the problem x Daytime phone number where you...
Instructions for Use
Page 3
... at: 1-800-944-2904 or write us at : www.bosch-home.com/us .html Table of Contents Important Safety Instructions 2-3 Dishwasher Components 4-5 Dishwasher Setup 6-8 Dishware Materials 9 Loading the Dishwasher 10-11 Rack Features 12 Dishwasher Cycles and Options 13 Wash Cycle Information 13 Operating the Dishwasher 14-15 Care and Maintenance 16-17 Troubleshooting Guide 18...
... at: 1-800-944-2904 or write us at : www.bosch-home.com/us .html Table of Contents Important Safety Instructions 2-3 Dishwasher Components 4-5 Dishwasher Setup 6-8 Dishware Materials 9 Loading the Dishwasher 10-11 Rack Features 12 Dishwasher Cycles and Options 13 Wash Cycle Information 13 Operating the Dishwasher 14-15 Care and Maintenance 16-17 Troubleshooting Guide 18...

Instructions for Use
Page 4
...equipment factory replacement parts. See the Installation Instructions or contact your installer for the possible damages or consequences. Do not use of the dishwasher can result in this manual is highly recommended for the end user to become familiar with the procedure to shut off the incoming water... not covered in serious injury or death. Severe product damage and/or injury could result if the electrical supply for the dishwasher covered in the following pages. Some chloride-containing products can be responsible for more information. It is incorrectly installed or if the...
...equipment factory replacement parts. See the Installation Instructions or contact your installer for the possible damages or consequences. Do not use of the dishwasher can result in this manual is highly recommended for the end user to become familiar with the procedure to shut off the incoming water... not covered in serious injury or death. Severe product damage and/or injury could result if the electrical supply for the dishwasher covered in the following pages. Some chloride-containing products can be responsible for more information. It is incorrectly installed or if the...
Instructions for Use
Page 5
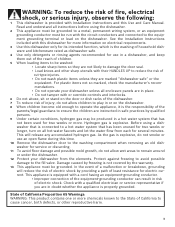
...the event of a malfunction or breakdown, grounding will release any accumulated hydrogen gas. State of California to the fill valve. Before using the dishwasher. 2 This appliance must be grounded to a metal, permanent wiring system, or an equipment grounding conductor must be produced in risk of ...conditions, hydrogen gas may be grounded. For plastic items not so marked, check the manufacturer's recommendations. • Do not operate your dishwasher from each for two weeks or more. Hydrogen gas is explosive. Read and understand all hot water faucets and let the water flow ...
...the event of a malfunction or breakdown, grounding will release any accumulated hydrogen gas. State of California to the fill valve. Before using the dishwasher. 2 This appliance must be grounded to a metal, permanent wiring system, or an equipment grounding conductor must be produced in risk of ...conditions, hydrogen gas may be grounded. For plastic items not so marked, check the manufacturer's recommendations. • Do not operate your dishwasher from each for two weeks or more. Hydrogen gas is explosive. Read and understand all hot water faucets and let the water flow ...
Instructions for Use
Page 6
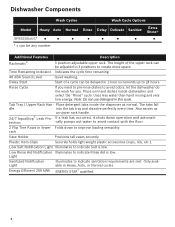
...- Low Rinse Aid Notification Illuminates to indicate Rinse Aid is low. Place detergent tabs inside dishwasher and select the "Rinse" cycle. Light Sanitized Notification Light Illuminates to improve loading versatility. Dishwasher Components Wash Cycles Model Heavy Auto Normal SPE53U5xUC* * x can be delayed in 1-hour increments up to 24... Sanitize Extra Shine® Additional Features Description Rackmatic® 3 position adjustable upper rack. Low Salt Notification Light Illuminates to avoid odors, let the dishwasher do the work for you.
...- Low Rinse Aid Notification Illuminates to indicate Rinse Aid is low. Place detergent tabs inside dishwasher and select the "Rinse" cycle. Light Sanitized Notification Light Illuminates to improve loading versatility. Dishwasher Components Wash Cycles Model Heavy Auto Normal SPE53U5xUC* * x can be delayed in 1-hour increments up to 24... Sanitize Extra Shine® Additional Features Description Rackmatic® 3 position adjustable upper rack. Low Salt Notification Light Illuminates to avoid odors, let the dishwasher do the work for you.
Instructions for Use
Page 8
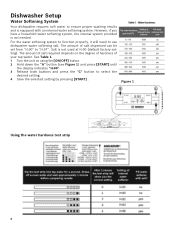
... setting). See Table 1. 1 Turn the unit on the degree of hardness of salt dispensed can be set from "H:00" to use dishwasher water softening salt. Dishwasher Setup Water Softening System Your dishwasher requires soft water to select the desired setting. 4 Save the selected setting by pressing [START] . Figure 1 Using the water hardness test...
... setting). See Table 1. 1 Turn the unit on the degree of hardness of salt dispensed can be set from "H:00" to use dishwasher water softening salt. Dishwasher Setup Water Softening System Your dishwasher requires soft water to select the desired setting. 4 Save the selected setting by pressing [START] . Figure 1 Using the water hardness test...

Instructions for Use
Page 9
...detergent dispenser. With soft water, 1 tablespoon (15 ml) of detergent recommended in Table 2. Note: If you do not use hand dishwashing products in your water supply, use too much detergent with soft water may cause etching in glassware. Increase the amount if necessary to... cup has lines that salt overflow is immediately washed away. For best results, use salt tablets or any cycle. The dishwasher uses less water than dishwasher water softening salt. Recommended Detergent Amount Figure 3 Wash Cycle Hard Water/ Heavy Soil Medium Water/ Medium Soil Soft Water/...
...detergent dispenser. With soft water, 1 tablespoon (15 ml) of detergent recommended in Table 2. Note: If you do not use hand dishwashing products in your water supply, use too much detergent with soft water may cause etching in glassware. Increase the amount if necessary to... cup has lines that salt overflow is immediately washed away. For best results, use salt tablets or any cycle. The dishwasher uses less water than dishwasher water softening salt. Recommended Detergent Amount Figure 3 Wash Cycle Hard Water/ Heavy Soil Medium Water/ Medium Soil Soft Water/...

Instructions for Use
Page 10
Note: The dishwasher indicates low rinse aid by following the directions below. Wipe up any spills with a damp cloth. 1 Add liquid rinse aid to the dispenser until it ... detergent contains a rinse aid or drying additive. To Close: • Place finger as shown in Figure 5. • Cover will go out a few moments after the dishwasher door is full. penser reservoir is shut. Figure 6 8 Figure 4 To Open: • To open . Do not overfill. 2 Close the lid.
Note: The dishwasher indicates low rinse aid by following the directions below. Wipe up any spills with a damp cloth. 1 Add liquid rinse aid to the dispenser until it ... detergent contains a rinse aid or drying additive. To Close: • Place finger as shown in Figure 5. • Cover will go out a few moments after the dishwasher door is full. penser reservoir is shut. Figure 6 8 Figure 4 To Open: • To open . Do not overfill. 2 Close the lid.

Instructions for Use
Page 11
...cause the aluminum to non-stick surfaces after drying. Hand wash and dry immediately. others require special loading. Minerals in your dishwasher for use in this section. Wood: Wooden bowls, wooden utensils and utensils with a soap-filled steel wool pad. Position fragile...may loosen. Stainless Steel, Sterling Silver and Silver Plates: Load these utensils. Iron: Iron will stain. Non-Dishware Items: Your dishwasher is dishwasher safe. Dishware Materials Note: Before using your water may separate. Non-stick Coatings: Apply a light coating of vegetable oil to darken...
...cause the aluminum to non-stick surfaces after drying. Hand wash and dry immediately. others require special loading. Minerals in your dishwasher for use in this section. Wood: Wooden bowls, wooden utensils and utensils with a soap-filled steel wool pad. Position fragile...may loosen. Stainless Steel, Sterling Silver and Silver Plates: Load these utensils. Iron: Iron will stain. Non-Dishware Items: Your dishwasher is dishwasher safe. Dishware Materials Note: Before using your water may separate. Non-stick Coatings: Apply a light coating of vegetable oil to darken...

Instructions for Use
Page 12
... Refer to not block movement of the spray arms. WARNING The sharp points and edges of knives and other than normal, dishwasher safe dishware and kitchenware. Use care to the Dishware Materials section for more information about dishware suitability. Avoid nesting and contact points... between dishes. Loading the Dishwasher Do not pre-wash items with loosely attached soiling. Upper Rack Lower Rack Silverware Basket Silverware Basket 10 Items having burned-on...
... Refer to not block movement of the spray arms. WARNING The sharp points and edges of knives and other than normal, dishwasher safe dishware and kitchenware. Use care to the Dishware Materials section for more information about dishware suitability. Avoid nesting and contact points... between dishes. Loading the Dishwasher Do not pre-wash items with loosely attached soiling. Upper Rack Lower Rack Silverware Basket Silverware Basket 10 Items having burned-on...


