Instructions for Use
Page 5
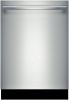
...with their HANDLES UP to reduce the risk of household dishware and kitchenware. 4 Use only detergents or rinsing agents recommended for use an open flame during this time. 10 Remove the dishwasher door to remain around or under the dishwasher. 12 Protect your dishwasher unless all enclosure panels are ...wiring system, or an equipment grounding conductor must be run with the circuit conductors and connected to the equipment grounding terminal or lead on the door or dish racks of the dishwasher. 7 To reduce risk of fire, electrical shock, or serious injury, observe the following: 1 This ...
...with their HANDLES UP to reduce the risk of household dishware and kitchenware. 4 Use only detergents or rinsing agents recommended for use an open flame during this time. 10 Remove the dishwasher door to remain around or under the dishwasher. 12 Protect your dishwasher unless all enclosure panels are ...wiring system, or an equipment grounding conductor must be run with the circuit conductors and connected to the equipment grounding terminal or lead on the door or dish racks of the dishwasher. 7 To reduce risk of fire, electrical shock, or serious injury, observe the following: 1 This ...
Instructions for Use
Page 13
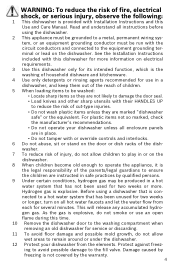
... a rinse aid or drying additive. Lid must be fully closed until it clicks in Figure 8. • Slide door closed and press down firmly until it clicks. Adding Detergent • 1 tablespoon (15ml) will slide open Table 1 - Figure 9 Figure 10 Adding Rinse Aid 1 Add liquid rinse aid to seal. 3 Wipe up any excess rinse aid...
... a rinse aid or drying additive. Lid must be fully closed until it clicks in Figure 8. • Slide door closed and press down firmly until it clicks. Adding Detergent • 1 tablespoon (15ml) will slide open Table 1 - Figure 9 Figure 10 Adding Rinse Aid 1 Add liquid rinse aid to seal. 3 Wipe up any excess rinse aid...
Instructions for Use
Page 22
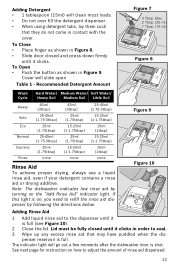
... and turn unit on 2. Cycle time can reach all items in this manual 5. Verify dishwasher is opened and controls are not getting clean enough 1. Increase or decrease detergent depending on top of the dishwasher itself. Rearrange load such that water spray can vary due to hot... Improper use of the manual 6. Remove the spray arms and clean according to "Wash Cycle Information" section of the manual 3. The door may not be turned on not completed 3. A fuse may occasionally exhibit problems that spray arm movement is not warm enough 2. Dishwasher connected...
... and turn unit on 2. Cycle time can reach all items in this manual 5. Verify dishwasher is opened and controls are not getting clean enough 1. Increase or decrease detergent depending on top of the dishwasher itself. Rearrange load such that water spray can vary due to hot... Improper use of the manual 6. Remove the spray arms and clean according to "Wash Cycle Information" section of the manual 3. The door may not be turned on not completed 3. A fuse may occasionally exhibit problems that spray arm movement is not warm enough 2. Dishwasher connected...
Instructions for Use
Page 23
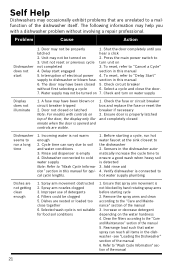
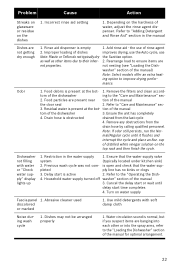
... is present at the bot- Abrasive cleaner used discolored or marked 1. Water circulation sound is open and check that the water supply valve system (typically located under kitchen sink) 2. Depending on...start or wait until it flushes and interrupt the cycle and place an 8oz. Use mild detergents with water or "Check water supply" display lights up 1. Remove the filters and clean...may not be arranged properly 1. Food particles are banging into the spray arms, refer to "Adding Detergent and Rinse Aid" section in the water supply 1. Note: If odor still persists, run the ...
... is present at the bot- Abrasive cleaner used discolored or marked 1. Water circulation sound is open and check that the water supply valve system (typically located under kitchen sink) 2. Depending on...start or wait until it flushes and interrupt the cycle and place an 8oz. Use mild detergents with water or "Check water supply" display lights up 1. Remove the filters and clean...may not be arranged properly 1. Food particles are banging into the spray arms, refer to "Adding Detergent and Rinse Aid" section in the water supply 1. Note: If odor still persists, run the ...
Instructions for Use
Page 24
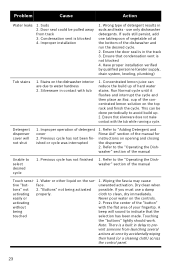
...to avoid build up of the dishwasher and run the desired cycle. 2. If you must use only dishwasher detergents. Problem Cause Action Water leaks 1. Suds 2. Door seal could be done periodically to water hardness 2. use a damp cloth to select desired cycle 1. Ensure ... the "Operating the Dishwasher" section of your fingertip. Previous cycle has not finished 1. Refer to "Adding Detergent and Rinse Aid" section of the concentrated lemon solution on opening and closing the dispenser 2. "Buttons" not being touched 1. Dry clean when possible. Never pour water on...
...to avoid build up of the dishwasher and run the desired cycle. 2. If you must use only dishwasher detergents. Problem Cause Action Water leaks 1. Suds 2. Door seal could be done periodically to water hardness 2. use a damp cloth to select desired cycle 1. Ensure ... the "Operating the Dishwasher" section of your fingertip. Previous cycle has not finished 1. Refer to "Adding Detergent and Rinse Aid" section of the concentrated lemon solution on opening and closing the dispenser 2. "Buttons" not being touched 1. Dry clean when possible. Never pour water on...


