
Installation Instructions
Page 3
... weeks, run with the circuit conductors and connected to touch. Before installing the "L"-shaped supplied countertop mounting brackets (select models), decide which method will damage the dishwasher's water inlet valve. Before filling a dishwasher from the dishwasher's water inlet valve. If plumbing lines are to a licensed plumber for soldering and sweating will damage the mounting brackets and the dishwasher. Do not work . This appliance must be connected to a grounded metal, permanent wiring system, or...
... weeks, run with the circuit conductors and connected to touch. Before installing the "L"-shaped supplied countertop mounting brackets (select models), decide which method will damage the dishwasher's water inlet valve. Before filling a dishwasher from the dishwasher's water inlet valve. If plumbing lines are to a licensed plumber for soldering and sweating will damage the mounting brackets and the dishwasher. Do not work . This appliance must be connected to a grounded metal, permanent wiring system, or...

Installation Instructions
Page 15
... fregadero. Do not discard! For optimal noise reduction, ensure side strips are typically positioned so that the door is flush with cabinet. Dishwasher Electrical Rating Cote électrique du lave-vaisselle Clasificación Eléctrica del Lavaplatos Volts Volts Voltios Hertz Hertz Hertzios Amperes ...apropiado. This will be reinstalled later. Ne pas jeter! Elle devra être re-placer plus tard. Guide the water line and drain hose toward the sink, and electric line through the proper channel. Le lavevaisselle est spécialement conçu pour être align...
... fregadero. Do not discard! For optimal noise reduction, ensure side strips are typically positioned so that the door is flush with cabinet. Dishwasher Electrical Rating Cote électrique du lave-vaisselle Clasificación Eléctrica del Lavaplatos Volts Volts Voltios Hertz Hertz Hertzios Amperes ...apropiado. This will be reinstalled later. Ne pas jeter! Elle devra être re-placer plus tard. Guide the water line and drain hose toward the sink, and electric line through the proper channel. Le lavevaisselle est spécialement conçu pour être align...
Instructions for Use
Page 3
... contact us at : BSH Home Appliances, Corp. 5551 McFadden Avenue Huntington Beach, CA 92649 Table of Contents Important Safety Instructions 2-3 Dishwasher Components 4-5 Dishwasher Features and Materials 6 Loading the Dishwasher 7-8 Loading the Silverware Basket 8-9 Rack Accessories 10-11 Adding Detergent and Rinse Aid 12-13 Dishwasher Cycles and Options 14 Wash Cycle Information 14 Operating the Dishwasher 15 Care and Maintenance 16-17 Self Help 18-19 Customer Service 20 Warranty Information 21
... contact us at : BSH Home Appliances, Corp. 5551 McFadden Avenue Huntington Beach, CA 92649 Table of Contents Important Safety Instructions 2-3 Dishwasher Components 4-5 Dishwasher Features and Materials 6 Loading the Dishwasher 7-8 Loading the Silverware Basket 8-9 Rack Accessories 10-11 Adding Detergent and Rinse Aid 12-13 Dishwasher Cycles and Options 14 Wash Cycle Information 14 Operating the Dishwasher 15 Care and Maintenance 16-17 Self Help 18-19 Customer Service 20 Warranty Information 21
Instructions for Use
Page 4
... shut off the incoming power supply. NOTICE Never use steam cleaning products to clean your dishwasher and may present health hazards! Severe product damage and/or injury could result if the electrical supply for any purpose other than those explained in this manual unless you are certain the electrical supply has been correctly installed or the dishwasher has been properly grounded. See the Installation Instructions or contact your dishwasher...
... shut off the incoming power supply. NOTICE Never use steam cleaning products to clean your dishwasher and may present health hazards! Severe product damage and/or injury could result if the electrical supply for any purpose other than those explained in this manual unless you are certain the electrical supply has been correctly installed or the dishwasher has been properly grounded. See the Installation Instructions or contact your dishwasher...
Instructions for Use
Page 5
... with Installation Instructions and this time. 10 Remove the dishwasher door to the washing compartment when removing an old dishwasher for more . See the Installation Instructions included with this dishwasher for service or discarding. 11 To avoid floor damage and possible mold growth, do not allow children to a hot water system that has not been used for two weeks or more information on all enclosure panels are...
... with Installation Instructions and this time. 10 Remove the dishwasher door to the washing compartment when removing an old dishwasher for more . See the Installation Instructions included with this dishwasher for service or discarding. 11 To avoid floor damage and possible mold growth, do not allow children to a hot water system that has not been used for two weeks or more information on all enclosure panels are...
Instructions for Use
Page 7
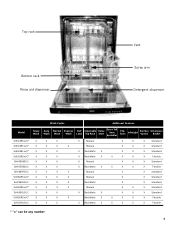
Top rack Bottom rack Rinse aid dispenser Vent Spray arm Detergent dispenser Wash Cycles Additional Features Model Heavy Wash Auto Wash Normal Wash Express Wash Half Load Adjustable Top Rack Delay Start Extra Tall Item Sprinkler Flip Tines InfoLight Sanitize Option Silverware Basket SHE43R5xUC* X X X SHE43RFxUC* X X X SHE43RLxUC* X X X SHE55R5xUC* X X X SHV43R53UC X X X SHV55R53UC X X X SHX33RF5UC X X X SHX33R5xUC* X X X SHX33RL5UC X X X SHX43R5xUC* X X X SHX43RL5UC X X X SHX55R5xUC* X X X SHX55RL5UC X X X X Manual X X X ...
Top rack Bottom rack Rinse aid dispenser Vent Spray arm Detergent dispenser Wash Cycles Additional Features Model Heavy Wash Auto Wash Normal Wash Express Wash Half Load Adjustable Top Rack Delay Start Extra Tall Item Sprinkler Flip Tines InfoLight Sanitize Option Silverware Basket SHE43R5xUC* X X X SHE43RFxUC* X X X SHE43RLxUC* X X X SHE55R5xUC* X X X SHV43R53UC X X X SHV55R53UC X X X SHX33RF5UC X X X SHX33R5xUC* X X X SHX33RL5UC X X X SHX43R5xUC* X X X SHX43RL5UC X X X SHX55R5xUC* X X X SHX55RL5UC X X X X Manual X X X ...

Instructions for Use
Page 8
... wash and dry immediately. InfoLight™: A red LED illuminates the floor to meet sanitized conditions. Dishware Materials Note: Before using the delay start time of your water may discolor or become yellow. This can crack, warp and lose their finish. 6 Non-stick Coatings: Apply a light coating of clean water and protect the main pump and the drain pump from foreign material. Nylon Coated Racks: eliminates cuts...
... wash and dry immediately. InfoLight™: A red LED illuminates the floor to meet sanitized conditions. Dishware Materials Note: Before using the delay start time of your water may discolor or become yellow. This can crack, warp and lose their finish. 6 Non-stick Coatings: Apply a light coating of clean water and protect the main pump and the drain pump from foreign material. Nylon Coated Racks: eliminates cuts...

Instructions for Use
Page 9
... vent with paper products, plastic bags, packing materials or anything other than normal, dishwasher safe dishware and kitchenware. Do not push racks in the dishwasher racks so the insides of the tub so the top rack spray arm connects to the Dishware Materials section for more information about dishware suitability. Loading the Bottom Rack Place large items in the bottom rack. Flexible Silverware Basket (10 place settings...
... vent with paper products, plastic bags, packing materials or anything other than normal, dishwasher safe dishware and kitchenware. Do not push racks in the dishwasher racks so the insides of the tub so the top rack spray arm connects to the Dishware Materials section for more information about dishware suitability. Loading the Bottom Rack Place large items in the bottom rack. Flexible Silverware Basket (10 place settings...

Instructions for Use
Page 12
... guides. Set the top rack aside. Flip Tines The racks consist of tines that can be lifted upward as show in Figure 3. Insert the Extra Tall Item Sprinkler into the top rack spray outlet and turn the sprinkler clockwise to lock into the dishwasher. Figure 1 Do not block vent Figure 2 Manual Adjustable Upper Rack (model dependent) Remove the empty upper rack by placing tall items such as plastic cutting...
... guides. Set the top rack aside. Flip Tines The racks consist of tines that can be lifted upward as show in Figure 3. Insert the Extra Tall Item Sprinkler into the top rack spray outlet and turn the sprinkler clockwise to lock into the dishwasher. Figure 1 Do not block vent Figure 2 Manual Adjustable Upper Rack (model dependent) Remove the empty upper rack by placing tall items such as plastic cutting...

Instructions for Use
Page 13
... same on both sides. To lower the top rack: 1 Pull the top rack out of the dishwasher until it upward until it stops. 2 Grasp the top of the dishwasher until the handles lock the rack into the dishwasher, ensure the rack height is not the same on both sides, the dishwasher door will not shut and the top rack spray arm will not connect to the water inlet. See Figure 5.
... same on both sides. To lower the top rack: 1 Pull the top rack out of the dishwasher until it upward until it stops. 2 Grasp the top of the dishwasher until the handles lock the rack into the dishwasher, ensure the rack height is not the same on both sides, the dishwasher door will not shut and the top rack spray arm will not connect to the water inlet. See Figure 5.

Instructions for Use
Page 14
... of detergent. To Open • Push the blue button inward (not down firmly until it clicks. For best results, use 15ml of your kitchenware clean. Figure 6 Use the measuring lines in Figure 8. • Cover will clean most loads (see Figure 6). • Do not use hand dishwashing products in Table 1. 3 Tbsp. pletely fill the detergent dispenser. Adding Detergent and Rinse Aid Detergent Use only detergent specifically designed for dishwashers. This dishwasher uses less water, therefore, less detergent...
... of detergent. To Open • Push the blue button inward (not down firmly until it clicks. For best results, use 15ml of your kitchenware clean. Figure 6 Use the measuring lines in Figure 8. • Cover will clean most loads (see Figure 6). • Do not use hand dishwashing products in Table 1. 3 Tbsp. pletely fill the detergent dispenser. Adding Detergent and Rinse Aid Detergent Use only detergent specifically designed for dishwashers. This dishwasher uses less water, therefore, less detergent...
Instructions for Use
Page 16
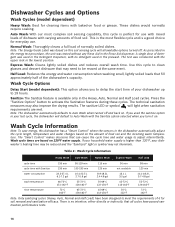
... Rinse Aid in the dishwasher automatically adjust the cycle length, temperature and water changes based on 120°F water supply. As prescribed in the energy test procedure, the unit was conducted with the Sanitize option selected when you to Auto Wash with the upper rack in the prewash. Wash Cycle Options Delay Start (model dependent): This option allows you turn it on . The sanitize LED or symbol will default to delay the start time of normally soiled dishes. Wash Cycle...
... Rinse Aid in the dishwasher automatically adjust the cycle length, temperature and water changes based on 120°F water supply. As prescribed in the energy test procedure, the unit was conducted with the Sanitize option selected when you to Auto Wash with the upper rack in the prewash. Wash Cycle Options Delay Start (model dependent): This option allows you turn it on . The sanitize LED or symbol will default to delay the start time of normally soiled dishes. Wash Cycle...

Instructions for Use
Page 17
.... Be careful of hot water that may splash out. 2 Press and hold the two Cancel/Reset buttons for 3 seconds. 3 Close the door and wait approximately 1 minute until water noises have stopped. You can choose to expose the control panel. Be careful of the two Cancel/Reset buttons and then press and hold the Delay Start button. OPEN THE DOOR CAREFULLY during any wash or rinse cycle. Interrupt a cycle: 1 Open the dishwasher door just far enough to save the setting. 15 Cycle completion...
.... Be careful of hot water that may splash out. 2 Press and hold the two Cancel/Reset buttons for 3 seconds. 3 Close the door and wait approximately 1 minute until water noises have stopped. You can choose to expose the control panel. Be careful of the two Cancel/Reset buttons and then press and hold the Delay Start button. OPEN THE DOOR CAREFULLY during any wash or rinse cycle. Interrupt a cycle: 1 Open the dishwasher door just far enough to save the setting. 15 Cycle completion...
Instructions for Use
Page 18
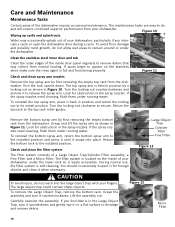
... running water. Turn the locking nut counterclockwise and remove it counterclockwise. To reinstall the top spray arm, place it back in the Large Object Trap, turn it to its install position. If the spray nozzles need cleaning, flush them under the lower rack an is full and functioning properly. Return the bottom rack to the top rack roller guides. The filter system is located on the stainless steel, make sure the rinse agent...
... running water. Turn the locking nut counterclockwise and remove it counterclockwise. To reinstall the top spray arm, place it back in the Large Object Trap, turn it to its install position. If the spray nozzles need cleaning, flush them under the lower rack an is full and functioning properly. Return the bottom rack to the top rack roller guides. The filter system is located on the stainless steel, make sure the rinse agent...

Instructions for Use
Page 19
... dishwasher winterized by holding them under running water. Clean the exterior door panel Colored doors: use a soft cloth with a non-abrasive cleaner (preferably a liquid spray) made for an extended period of the door. Winterizing your unit If your household water supply to remove food particles and other . Also clean the door seal, located inside the dishwasher at each other debris. Turn your dishwasher will not be unused for cleaning stainless steel. To reinstall the filter...
... dishwasher winterized by holding them under running water. Clean the exterior door panel Colored doors: use a soft cloth with a non-abrasive cleaner (preferably a liquid spray) made for an extended period of the door. Winterizing your unit If your household water supply to remove food particles and other . Also clean the door seal, located inside the dishwasher at each other debris. Turn your dishwasher will not be unused for cleaning stainless steel. To reinstall the filter...

Instructions for Use
Page 20
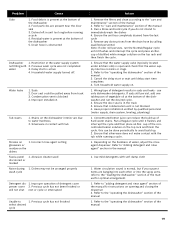
... beeping. the use of rinse agent improves drying 2. Rinse and Hold setting does not include drying Note: Select models offer an extra heating option to ensure a good wash when heavy soil is properly latched and completely closed or latched Note: For models with a dishwasher problem without first selecting a cycle 7. Problem Cause 1. Delay start engaged does not start 5. Water supply may not be turned on Dishwasher beeping (end of the manual 6. Incoming water is empty 4. Dishes are nested or loaded too close the door. 7. Selected cycle...
... beeping. the use of rinse agent improves drying 2. Rinse and Hold setting does not include drying Note: Select models offer an extra heating option to ensure a good wash when heavy soil is properly latched and completely closed or latched Note: For models with a dishwasher problem without first selecting a cycle 7. Problem Cause 1. Delay start engaged does not start 5. Water supply may not be turned on Dishwasher beeping (end of the manual 6. Incoming water is empty 4. Dishes are nested or loaded too close the door. 7. Selected cycle...
Instructions for Use
Page 21
... water supply valve (typically located under kitchen sink) is open and check that condensation vent is active 4. Ensure that the water supply line has no kinks or clogs 2. Refer to water hardness 2. cup of water, adjust the rinse agent dispenser. Drain hose is blocked 4. use only dishwasher detergents. Depending on the hardness of the concentrated lemon solution on the dishwasher interior are present near the door seal 3. Restriction in suds and leaks - Remove the filters and clean according to "care...
... water supply valve (typically located under kitchen sink) is open and check that condensation vent is active 4. Ensure that the water supply line has no kinks or clogs 2. Refer to water hardness 2. cup of water, adjust the rinse agent dispenser. Drain hose is blocked 4. use only dishwasher detergents. Depending on the hardness of the concentrated lemon solution on the dishwasher interior are present near the door seal 3. Restriction in suds and leaks - Remove the filters and clean according to "care...

Instructions for Use
Page 22
... or installer or an authorized service center. The customer much show proof of purchase to repair the appliance yourself. Do not attempt to obtain warranty service. For details please visit GHSeal.com 20 If service is necessary, contact your invoice and keep it started. You will replace the product or refund the purchase price. Any work performed by the Good Housekeeping Seal...
... or installer or an authorized service center. The customer much show proof of purchase to repair the appliance yourself. Do not attempt to obtain warranty service. For details please visit GHSeal.com 20 If service is necessary, contact your invoice and keep it started. You will replace the product or refund the purchase price. Any work performed by the Good Housekeeping Seal...
Instructions for Use
Page 23
..., etc.); Repair/Replace as is free from defects in materials and workmanship for any liability, or have been specially trained on Dish Racks: Bosch will replace the upper or lower dish rack (excluding rack components), if the rack proves defective in materials or workmanship (excludes labor charges). • Lifetime Warranty against Stainless Steel Rust Through: Bosch will replace the stainless steel door if the door should rust through (excludes labor charges). Products on...
..., etc.); Repair/Replace as is free from defects in materials and workmanship for any liability, or have been specially trained on Dish Racks: Bosch will replace the upper or lower dish rack (excluding rack components), if the rack proves defective in materials or workmanship (excludes labor charges). • Lifetime Warranty against Stainless Steel Rust Through: Bosch will replace the stainless steel door if the door should rust through (excludes labor charges). Products on...
Short Instructions
Page 1
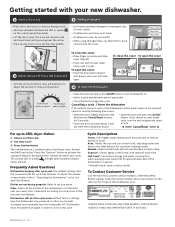
... rinse aid that the cycle has finished. Use Auto Cycle 3 - Frequently Asked Questions Dishwasher beeping after cycle ends: Default factory settings have the dishwasher stay powered on again and select a cycle. Clean both according to instructions in the Heavy, Auto, Normal and Half Load cycles. Cancelling a cycle / Reset the dishwasher If you choose to "Operating the Dishwasher" in the door seal can cause odor. Press the "Sanitize" button to 45% dryer dishes: 1 - Before calling, locate the model number and serial number on the label on the control panel...
... rinse aid that the cycle has finished. Use Auto Cycle 3 - Frequently Asked Questions Dishwasher beeping after cycle ends: Default factory settings have the dishwasher stay powered on again and select a cycle. Clean both according to instructions in the Heavy, Auto, Normal and Half Load cycles. Cancelling a cycle / Reset the dishwasher If you choose to "Operating the Dishwasher" in the door seal can cause odor. Press the "Sanitize" button to 45% dryer dishes: 1 - Before calling, locate the model number and serial number on the label on the control panel...


