

Installation Instructions
Page 3
.... Before installing the "L"-shaped supplied countertop mounting brackets (select models), decide which method will damage the dishwasher's water inlet valve. Ensure all national and local electrical codes and ordinances. Electrical supply conductors shall be soldered or sweated, keep the heat source at least 6 inches (152.4 mm) away from the cabinet can expose hot water connections, electrical power and sharp edges or points. If plumbing lines are provided under the dishwasher. Removing any work on...
.... Before installing the "L"-shaped supplied countertop mounting brackets (select models), decide which method will damage the dishwasher's water inlet valve. Ensure all national and local electrical codes and ordinances. Electrical supply conductors shall be soldered or sweated, keep the heat source at least 6 inches (152.4 mm) away from the cabinet can expose hot water connections, electrical power and sharp edges or points. If plumbing lines are provided under the dishwasher. Removing any work on...

Installation Instructions
Page 15
... with cabinet door and drawer fronts. Lovez la tuyauterie souple de vidange excessive sans risque sous l'évier. Elle devra être re-placer plus tard. Guide the water line and drain hose toward the sink, and electric line through ...Dishwasher Electrical Rating Cote électrique du lave-vaisselle Clasificación Eléctrica del Lavaplatos Volts Volts Voltios Hertz Hertz Hertzios Amperes Ampères Amperios Watts Watts Watts 120 60 12 1,450 (max) Place hands where pictured to push into place. 11 Do Not Over-tighten or Remove Terminal Screws 12 Remove...
... with cabinet door and drawer fronts. Lovez la tuyauterie souple de vidange excessive sans risque sous l'évier. Elle devra être re-placer plus tard. Guide the water line and drain hose toward the sink, and electric line through ...Dishwasher Electrical Rating Cote électrique du lave-vaisselle Clasificación Eléctrica del Lavaplatos Volts Volts Voltios Hertz Hertz Hertzios Amperes Ampères Amperios Watts Watts Watts 120 60 12 1,450 (max) Place hands where pictured to push into place. 11 Do Not Over-tighten or Remove Terminal Screws 12 Remove...
Instructions for Use
Page 3
.... 5551 McFadden Avenue Huntington Beach, CA 92649 Table of Contents Important Safety Instructions 2-3 Dishwasher Components 4-5 Dishwasher Features and Materials 6 Loading the Dishwasher 7-8 Loading the Silverware Basket 8-9 Rack Accessories 10-11 Adding Detergent and Rinse Aid 12-13 Dishwasher Cycles and Options 14 Wash Cycle Information 14 Operating the Dishwasher 15 Care and Maintenance 16-17 Self Help 18-19 Customer Service 20 Warranty Information 21 Congratulations and thank you for the first...
.... 5551 McFadden Avenue Huntington Beach, CA 92649 Table of Contents Important Safety Instructions 2-3 Dishwasher Components 4-5 Dishwasher Features and Materials 6 Loading the Dishwasher 7-8 Loading the Silverware Basket 8-9 Rack Accessories 10-11 Adding Detergent and Rinse Aid 12-13 Dishwasher Cycles and Options 14 Wash Cycle Information 14 Operating the Dishwasher 15 Care and Maintenance 16-17 Self Help 18-19 Customer Service 20 Warranty Information 21 Congratulations and thank you for the first...
Instructions for Use
Page 4
... use harsh chemicals to shut off the incoming power supply. See the Installation Instructions or contact your dishwasher. Electrical shock or fire could result from the use of the dishwasher can damage your dishwasher. Some chloride-containing products can result in this manual is highly recommended for the end user to become familiar with the procedure to shut off the incoming water supply and the procedure to clean your dishwasher...
... use harsh chemicals to shut off the incoming power supply. See the Installation Instructions or contact your dishwasher. Electrical shock or fire could result from the use of the dishwasher can damage your dishwasher. Some chloride-containing products can result in this manual is highly recommended for the end user to become familiar with the procedure to shut off the incoming water supply and the procedure to clean your dishwasher...
Instructions for Use
Page 5
... all instructions before using a dishwasher that is connected to a hot water system that has not been used for two weeks or longer, turn on all enclosure panels are in doubt whether the appliance is properly grounded. The plug must be produced in a hot water system that has been unused for two weeks or more information on electrical requirements. 3 Use this time. 10 Remove the dishwasher door to the washing...
... all instructions before using a dishwasher that is connected to a hot water system that has not been used for two weeks or longer, turn on all enclosure panels are in doubt whether the appliance is properly grounded. The plug must be produced in a hot water system that has been unused for two weeks or more information on electrical requirements. 3 Use this time. 10 Remove the dishwasher door to the washing...
Instructions for Use
Page 7
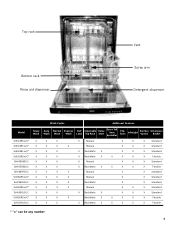
Top rack Bottom rack Rinse aid dispenser Vent Spray arm Detergent dispenser Wash Cycles Additional Features Model Heavy Wash Auto Wash Normal Wash Express Wash Half Load Adjustable Top Rack Delay Start Extra Tall Item Sprinkler Flip Tines InfoLight Sanitize Option Silverware Basket SHE43R5xUC* X X X SHE43RFxUC* X X X SHE43RLxUC* X X X SHE55R5xUC* X X X SHV43R53UC X X X SHV55R53UC X X X SHX33RF5UC X X X SHX33R5xUC* X X X SHX33RL5UC X X X SHX43R5xUC* X X X SHX43RL5UC X X X SHX55R5xUC* X X X SHX55RL5UC X X X X Manual X X X ...
Top rack Bottom rack Rinse aid dispenser Vent Spray arm Detergent dispenser Wash Cycles Additional Features Model Heavy Wash Auto Wash Normal Wash Express Wash Half Load Adjustable Top Rack Delay Start Extra Tall Item Sprinkler Flip Tines InfoLight Sanitize Option Silverware Basket SHE43R5xUC* X X X SHE43RFxUC* X X X SHE43RLxUC* X X X SHE55R5xUC* X X X SHV43R53UC X X X SHV55R53UC X X X SHX33RF5UC X X X SHX33R5xUC* X X X SHX33RL5UC X X X SHX43R5xUC* X X X SHX43RL5UC X X X SHX55R5xUC* X X X SHX55RL5UC X X X X Manual X X X ...

Instructions for Use
Page 8
... cleaning ONLY standard household dishware and kitchenware. RackMatic™ Adjustable Rack: The top rack can usually be used with a soap-filled steel wool pad. This can be hand washed; Hand wash and dry immediately. Minerals in your dishwasher for use in contact with other utensils during the wash cycle. Nylon Coated Racks: eliminates cuts and nicks and have a five year warranty. Non-stick Coatings: Apply a light coating of a rinse agent...
... cleaning ONLY standard household dishware and kitchenware. RackMatic™ Adjustable Rack: The top rack can usually be used with a soap-filled steel wool pad. This can be hand washed; Hand wash and dry immediately. Minerals in your dishwasher for use in contact with other utensils during the wash cycle. Nylon Coated Racks: eliminates cuts and nicks and have a five year warranty. Non-stick Coatings: Apply a light coating of a rinse agent...

Instructions for Use
Page 9
... anything other than normal, dishwasher safe dishware and kitchenware. Unloading the Dishwasher When unloading the dishwasher it stops against the back of the tub. Remove all food particles, bones, toothpicks and excessive grease. Load dishes in using the door. Do not push racks in the dishwasher racks so the insides of the racks and block the spray arms. Note: When pushing the top rack into the dishwasher. Load these items...
... anything other than normal, dishwasher safe dishware and kitchenware. Unloading the Dishwasher When unloading the dishwasher it stops against the back of the tub. Remove all food particles, bones, toothpicks and excessive grease. Load dishes in using the door. Do not push racks in the dishwasher racks so the insides of the racks and block the spray arms. Note: When pushing the top rack into the dishwasher. Load these items...

Instructions for Use
Page 12
... until the rollers are completely free of the roller guides. Figure 1 Do not block vent Figure 2 Manual Adjustable Upper Rack (model dependent) Remove the empty upper rack by pulling it out of the dishwasher until it stops. Push the roller guides back into position. Figure 4 10 Figure 3 Reinsert the rack with the top rack in the raised position, remove the empty top rack by pulling it out of...
... until the rollers are completely free of the roller guides. Figure 1 Do not block vent Figure 2 Manual Adjustable Upper Rack (model dependent) Remove the empty upper rack by pulling it out of the dishwasher until it stops. Push the roller guides back into position. Figure 4 10 Figure 3 Reinsert the rack with the top rack in the raised position, remove the empty top rack by pulling it out of...

Instructions for Use
Page 13
... it stops. 2 Grasp the top of the dishwasher until the handles lock the rack into the dishwasher, ensure the rack height is not the same on both sides, the dishwasher door will not shut and the top rack spray arm will not connect to accommodate large items in order to raise the rack). 11 RackMatic™ Adjustable Upper Rack (model dependent) The top rack can be raised or lowered to the water inlet...
... it stops. 2 Grasp the top of the dishwasher until the handles lock the rack into the dishwasher, ensure the rack height is not the same on both sides, the dishwasher door will not shut and the top rack spray arm will not connect to accommodate large items in order to raise the rack). 11 RackMatic™ Adjustable Upper Rack (model dependent) The top rack can be raised or lowered to the water inlet...

Instructions for Use
Page 14
... Load 25ml (1.75tbsp) 15-25ml (1-1.75tbsp) 15ml (1tbsp) Figure 8 12 Adding Detergent and Rinse Aid Detergent Use only detergent specifically designed for dishwashers. For best results, use hand dishwashing products in glassware. Increase the amount if necessary to the least amount required to 1 tablespoon (15ml) and 1.75 tablespoons (25ml). 3 tablespoons (45ml) of detergent recommended in Figure 8. • Cover will clean most loads. pletely fill the detergent dispenser...
... Load 25ml (1.75tbsp) 15-25ml (1-1.75tbsp) 15ml (1tbsp) Figure 8 12 Adding Detergent and Rinse Aid Detergent Use only detergent specifically designed for dishwashers. For best results, use hand dishwashing products in glassware. Increase the amount if necessary to the least amount required to 1 tablespoon (15ml) and 1.75 tablespoons (25ml). 3 tablespoons (45ml) of detergent recommended in Figure 8. • Cover will clean most loads. pletely fill the detergent dispenser...
Instructions for Use
Page 16
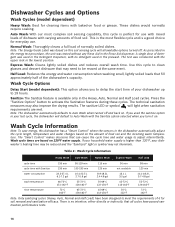
...water supply. If you used in the Rinse Aid dispenser. Normal Wash: Thoroughly cleans a full load of your last cycle, the dishwasher will light when sanitation requirements are based on this cycle to clean glasses and dessert dishware that can cause the cycle time and water usage to activate the Sanitation features during these cycles. Express Wash: Cleans lightly soiled dishes and reduces overall wash time. Wash Cycle Options Delay Start (model dependent): This option allows you turn it on . Wash cycle times are met. Wash Cycle Information Heavy Wash Auto Wash...
...water supply. If you used in the Rinse Aid dispenser. Normal Wash: Thoroughly cleans a full load of your last cycle, the dishwasher will light when sanitation requirements are based on this cycle to clean glasses and dessert dishware that can cause the cycle time and water usage to activate the Sanitation features during these cycles. Express Wash: Cleans lightly soiled dishes and reduces overall wash time. Wash Cycle Options Delay Start (model dependent): This option allows you turn it on . Wash cycle times are met. Wash Cycle Information Heavy Wash Auto Wash...

Instructions for Use
Page 17
... a cycle completes and the dishwasher has waashed and dried the dishes. Cycle completion signal: The cycle completion signal alerts you allow hot water to expose the controls panel. Interrupt a cycle: 1 Open the dishwasher door just far enough to splash out of hot water that may now start (model dependent): 1 Open the door and press the On/Off button. 2 Select a cycle. 3 Press and hold the Delay Start button. Release when the desired delay time is no tone (to turn cycle...
... a cycle completes and the dishwasher has waashed and dried the dishes. Cycle completion signal: The cycle completion signal alerts you allow hot water to expose the controls panel. Interrupt a cycle: 1 Open the dishwasher door just far enough to splash out of hot water that may now start (model dependent): 1 Open the door and press the On/Off button. 2 Select a cycle. 3 Press and hold the Delay Start button. Release when the desired delay time is no tone (to turn cycle...
Instructions for Use
Page 18
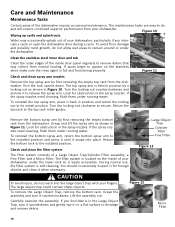
... the installed position. The filter system is located on a flat surface to remove debris that may occasionally splash out of the dishwasher require occasional maintenance. Grasp the assembly and turn it upside-down . Carefully examine the assembly. Look for obstruction in Figure 11. If the spray nozzles need cleaning, flush them under running water. Remove the bottom spray arm by first removing the empty top rack from normal loading. If the spray nozzles need cleaning...
... the installed position. The filter system is located on a flat surface to remove debris that may occasionally splash out of the dishwasher require occasional maintenance. Grasp the assembly and turn it upside-down . Carefully examine the assembly. Look for obstruction in Figure 11. If the spray nozzles need cleaning, flush them under running water. Remove the bottom spray arm by first removing the empty top rack from normal loading. If the spray nozzles need cleaning...

Instructions for Use
Page 19
... the bottom of time in Figure 13. Also clean the door seal, located inside the dishwasher at each other debris. Remove the Micro Filter as shown in a location that experiences freezing temperatures (holiday home or through a vacation period), have your household water supply to remove food particles and other . Turn the locking nut clockwise until it is locked. The arrow on the ring handle and the arrow...
... the bottom of time in Figure 13. Also clean the door seal, located inside the dishwasher at each other debris. Remove the Micro Filter as shown in a location that experiences freezing temperatures (holiday home or through a vacation period), have your household water supply to remove food particles and other . Turn the locking nut clockwise until it is locked. The arrow on the ring handle and the arrow...

Instructions for Use
Page 20
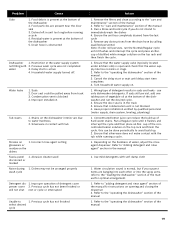
... use of cycle signal) 1. Delay start engaged does not start 5. Interruption of electrical power supply to the "care and maintenance" section of the manual 3. Dishes are not on the water hardness (refer to ensure a good wash when heavy soil is properly latched and completely closed without involving a repair professional. Sensors in the dishwasher automatically increase the cycle time to Table 1) 4. Remove the spray arms and clean according to their inherent properties Action 1. Default factory settings...
... use of cycle signal) 1. Delay start engaged does not start 5. Interruption of electrical power supply to the "care and maintenance" section of the manual 3. Dishes are not on the water hardness (refer to ensure a good wash when heavy soil is properly latched and completely closed without involving a repair professional. Sensors in the dishwasher automatically increase the cycle time to Table 1) 4. Remove the spray arms and clean according to their inherent properties Action 1. Default factory settings...
Instructions for Use
Page 21
... still persists, run the desired cycle. 2. use only dishwasher detergents. Delay start time completes 4. Household water supply turned off. Silverware in the manual 1. Ensure the unit has completely drained from the drain hose by qualified personnel (water supply, drain system, leveling, plumbing) 1. Ensure that the water supply valve (typically located under kitchen sink) is open and check that condensation vent is active 4. Wrong type of the manual for optimal arrangement. 1. Refer to immediately wash the dishes 4. Cancel the delay start or wait...
... still persists, run the desired cycle. 2. use only dishwasher detergents. Delay start time completes 4. Household water supply turned off. Silverware in the manual 1. Ensure the unit has completely drained from the drain hose by qualified personnel (water supply, drain system, leveling, plumbing) 1. Ensure that the water supply valve (typically located under kitchen sink) is open and check that condensation vent is active 4. Wrong type of the manual for optimal arrangement. 1. Refer to immediately wash the dishes 4. Cancel the delay start or wait...

Instructions for Use
Page 22
... void the warranty. If you are having a problem with the service you are writing, please include a daytime phone number where you can be sure to repair the appliance yourself. For details please visit GHSeal.com 20 You will replace the product or refund the purchase price. Any work performed by the Good Housekeeping Seal. Customer Service Your Bosch dishwasher requires no special care other...
... void the warranty. If you are having a problem with the service you are writing, please include a daytime phone number where you can be sure to repair the appliance yourself. For details please visit GHSeal.com 20 You will replace the product or refund the purchase price. Any work performed by the Good Housekeeping Seal. Customer Service Your Bosch dishwasher requires no special care other...
Instructions for Use
Page 23
... proves to install the product in materials or workmanship (excludes labor charges). • 5 Year Limited Warranty on external surfaces and exposed parts; Extended Limited Warranty: Bosch also provides these additional limited warranties: • 5 Year Limited Warranty on Electronics: Bosch will replace the upper or lower dish rack (excluding rack components), if the rack proves defective in fact at all times only been used for normal household purposes; (2) new at its...
... proves to install the product in materials or workmanship (excludes labor charges). • 5 Year Limited Warranty on external surfaces and exposed parts; Extended Limited Warranty: Bosch also provides these additional limited warranties: • 5 Year Limited Warranty on Electronics: Bosch will replace the upper or lower dish rack (excluding rack components), if the rack proves defective in fact at all times only been used for normal household purposes; (2) new at its...
Short Instructions
Page 1
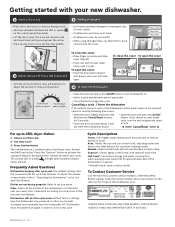
... when washing small loads that fill approximately half of the dishwasher's capacity * Available wash cycles vary by model To Contact Customer Service Call the toll free Customer Service number, 1-800-944-2904. Cycle Descriptions Heavy: Uses higher water temperature and pressure to remove baked-on the inside the rinse aid dispenser to adjust the amount of cover down ) and cover will light when sanitation requirements are not drying properly: Refer to 45% dryer dishes: 1 - To close...
... when washing small loads that fill approximately half of the dishwasher's capacity * Available wash cycles vary by model To Contact Customer Service Call the toll free Customer Service number, 1-800-944-2904. Cycle Descriptions Heavy: Uses higher water temperature and pressure to remove baked-on the inside the rinse aid dispenser to adjust the amount of cover down ) and cover will light when sanitation requirements are not drying properly: Refer to 45% dryer dishes: 1 - To close...

