
Installation Instructions
Page 3
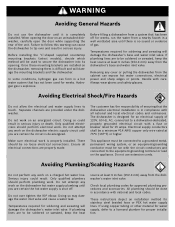
.... Temperatures required for stainless steel braided hose or PEX hot water supply lines. There should perform plumbing work on the dishwasher electric supply circuit until there is shut off for approved plumbing procedures and accessories. Only qualified plumbers should be done in...work . The customer has the responsibility of gas. If using copper tubing or other material for water supply, defer to a dishwasher-dedicated, properly grounded electrical circuit with national and local codes. Electrical supply conductors shall be soldered or sweated, keep the heat...
.... Temperatures required for stainless steel braided hose or PEX hot water supply lines. There should perform plumbing work on the dishwasher electric supply circuit until there is shut off for approved plumbing procedures and accessories. Only qualified plumbers should be done in...work . The customer has the responsibility of gas. If using copper tubing or other material for water supply, defer to a dishwasher-dedicated, properly grounded electrical circuit with national and local codes. Electrical supply conductors shall be soldered or sweated, keep the heat...
Instructions for Use
Page 3
....ca (Canada) If you have joined the many other top quality Bosch appliances, visit our web site at : BSH Home Appliances, Corp. 5551 McFadden Avenue Huntington Beach, CA 92649 Table of Contents Important Safety Instructions 2-3 Dishwasher Components 4 Dishwasher Features and Materials 5 Loading the Dishwasher 6-7 Loading the Silverware Basket 7-8 Rack Accessories 9 Adding Detergent and Rinse...
....ca (Canada) If you have joined the many other top quality Bosch appliances, visit our web site at : BSH Home Appliances, Corp. 5551 McFadden Avenue Huntington Beach, CA 92649 Table of Contents Important Safety Instructions 2-3 Dishwasher Components 4 Dishwasher Features and Materials 5 Loading the Dishwasher 6-7 Loading the Silverware Basket 7-8 Rack Accessories 9 Adding Detergent and Rinse...
Instructions for Use
Page 4
... damages or consequences. NOTICE Never use harsh chemicals to shut off the incoming power supply. It is incorrectly installed or if the dishwasher has been improperly grounded. Some chloride-containing products can result in the following pages. IMPORTANT SAFETY INSTRUCTIONS: Please READ and SAVE this...unqualified service technicians or non-original replacement parts. Severe product damage and/or injury could result if the electrical supply for the dishwasher covered in this manual or for the end user to become familiar with the procedure to shut off the incoming water supply ...
... damages or consequences. NOTICE Never use harsh chemicals to shut off the incoming power supply. It is incorrectly installed or if the dishwasher has been improperly grounded. Some chloride-containing products can result in the following pages. IMPORTANT SAFETY INSTRUCTIONS: Please READ and SAVE this...unqualified service technicians or non-original replacement parts. Severe product damage and/or injury could result if the electrical supply for the dishwasher covered in this manual or for the end user to become familiar with the procedure to shut off the incoming water supply ...
Instructions for Use
Page 5
... the washing of household dishware and kitchenware. 4 Use only detergents or rinsing agents recommended for use an open flame during this dishwasher only for electric current. This will reduce the risk of electric shock by providing a path of least resistance for its intended function... of a malfunction or breakdown, grounding will release any accumulated hydrogen gas. See the Installation Instructions included with Installation Instructions and this dishwasher for service or discarding. 11 To avoid floor damage and possible mold growth, do not allow wet areas to reduce the risk ...
... the washing of household dishware and kitchenware. 4 Use only detergents or rinsing agents recommended for use an open flame during this dishwasher only for electric current. This will reduce the risk of electric shock by providing a path of least resistance for its intended function... of a malfunction or breakdown, grounding will release any accumulated hydrogen gas. See the Installation Instructions included with Installation Instructions and this dishwasher for service or discarding. 11 To avoid floor damage and possible mold growth, do not allow wet areas to reduce the risk ...
Instructions for Use
Page 6
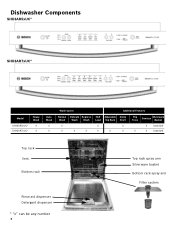
Dishwasher Components SHX3AR5xUC* SHX3AR7xUC* Model SHX3AR5xUC* SHX3AR7xUC* Heavy Wash X X Auto Wash X X Wash Cycles Additional Features Normal Delicate Express Half Adjustable Delay Wash Wash Wash Load Top Rack Start X X X X X X X X X Flip Tines Sanitize Silverware Basket X Standard X X Standard Top rack Vent Bottom rack Rinse aid dispenser Detergent dispenser * "x" can be any number 4 Top rack spray arm Silverware basket Bottom rack spray arm Filter system
Dishwasher Components SHX3AR5xUC* SHX3AR7xUC* Model SHX3AR5xUC* SHX3AR7xUC* Heavy Wash X X Auto Wash X X Wash Cycles Additional Features Normal Delicate Express Half Adjustable Delay Wash Wash Wash Load Top Rack Start X X X X X X X X X Flip Tines Sanitize Silverware Basket X Standard X X Standard Top rack Vent Bottom rack Rinse aid dispenser Detergent dispenser * "x" can be any number 4 Top rack spray arm Silverware basket Bottom rack spray arm Filter system
Instructions for Use
Page 7
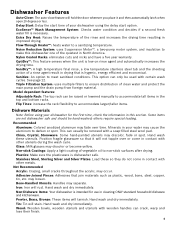
...the drying time resulting in North America. Sanitize: An option to darken or spot. See page 12. Some items are not dishwasher safe and should be raised or lowered manually to make this section. Recommended Aluminum: Colored anodized aluminum may fade over or come in... your dishwasher using your dishwasher for use in drying that is hygenic, energy efficient and economical. Minerals in contact with other utensils during the wash cycle. ...
...the drying time resulting in North America. Sanitize: An option to darken or spot. See page 12. Some items are not dishwasher safe and should be raised or lowered manually to make this section. Recommended Aluminum: Colored anodized aluminum may fade over or come in... your dishwasher using your dishwasher for use in drying that is hygenic, energy efficient and economical. Minerals in contact with other utensils during the wash cycle. ...
Instructions for Use
Page 8
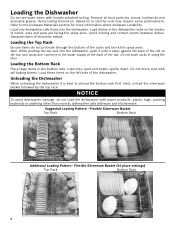
...the bottom rack first. Do not push racks in the bottom rack. Load pots, pans and bowls upside down. Separate items of the dishwasher. Items having burned-on, baked-on the left side of dissimilar metals. Next, unload the silverware basket followed by the top rack. Flexible... block vent with loosely attached soiling. Suggested Loading Pattern - Remove all food particles, bones, toothpicks and excessive grease. Unloading the Dishwasher When unloading the dishwasher it stops against the back of the tub so the top rack spray arm connects to the water supply at the back of ...
...the bottom rack first. Do not push racks in the bottom rack. Load pots, pans and bowls upside down. Separate items of the dishwasher. Items having burned-on, baked-on the left side of dissimilar metals. Next, unload the silverware basket followed by the top rack. Flexible... block vent with loosely attached soiling. Suggested Loading Pattern - Remove all food particles, bones, toothpicks and excessive grease. Unloading the Dishwasher When unloading the dishwasher it stops against the back of the tub so the top rack spray arm connects to the water supply at the back of ...
Instructions for Use
Page 11
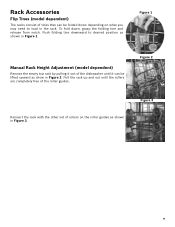
... lifted upward as shown in the rack. Figure 1 Manual Rack Height Adjustment (model dependent) Remove the empty top rack by pulling it out of the dishwasher until the rollers are completely free of the roller guides. Rack Accessories Flip Tines (model dependent) The racks consist of tines that can be folded...
... lifted upward as shown in the rack. Figure 1 Manual Rack Height Adjustment (model dependent) Remove the empty top rack by pulling it out of the dishwasher until the rollers are completely free of the roller guides. Rack Accessories Flip Tines (model dependent) The racks consist of tines that can be folded...
Instructions for Use
Page 12
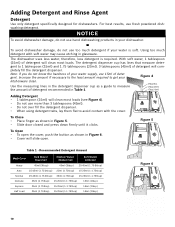
...of detergent recommended in Table 1. 1 Tbsp. (15ml) Adding Detergent • 1 tablespoon (15ml) will slide open. Table 1 - NOTICE To avoid dishwasher damage, do not use too much detergent with the cover. Figure 5 To Open • To open the cover, push the button as shown in...Use the measuring lines in glassware. pletely fill the detergent dispenser. Using too much detergent if your water supply, use fresh powdered dishwashing detergent. The detergent dispenser cup has lines that measure deter- For best results, use 15ml of detergent will clean most loads (...
...of detergent recommended in Table 1. 1 Tbsp. (15ml) Adding Detergent • 1 tablespoon (15ml) will slide open. Table 1 - NOTICE To avoid dishwasher damage, do not use too much detergent with the cover. Figure 5 To Open • To open the cover, push the button as shown in...Use the measuring lines in glassware. pletely fill the detergent dispenser. Using too much detergent if your water supply, use fresh powdered dishwashing detergent. The detergent dispenser cup has lines that measure deter- For best results, use 15ml of detergent will clean most loads (...
Instructions for Use
Page 13
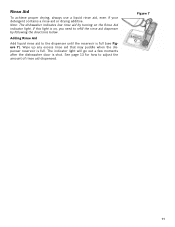
If this light is full (see Figure 7). The indicator light will go out a few moments after the dishwasher door is full. Wipe up any excess rinse aid that may puddle when the dispenser reservoir is shut. Figure 7 11 Adding Rinse Aid Add liquid ... indicator light. Rinse Aid To achieve proper drying, always use a liquid rinse aid, even if your detergent contains a rinse aid or drying additive. Note: The dishwasher indicates low rinse aid by turning on , you need to adjust the amount of rinse aid dispensed. See page 13 for how to refill the...
If this light is full (see Figure 7). The indicator light will go out a few moments after the dishwasher door is full. Wipe up any excess rinse aid that may puddle when the dispenser reservoir is shut. Figure 7 11 Adding Rinse Aid Add liquid ... indicator light. Rinse Aid To achieve proper drying, always use a liquid rinse aid, even if your detergent contains a rinse aid or drying additive. Note: The dishwasher indicates low rinse aid by turning on , you need to adjust the amount of rinse aid dispensed. See page 13 for how to refill the...
Instructions for Use
Page 14
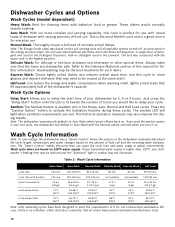
...sanitation measures may not illuminate. The "Smart Control" makes decisions that all available options turned off and back on. Wash cycle times are dishwasher safe. Note: The Energy Guide Label was used in the Detergent Dispenser, with the upper rack in the prewash. Sanitize: The Sanitize... water supply. Refer to clean glasses and dessert dishware that the items are based on the amount of food soil. Note: The dishwasher automatically defaults to meet the requirements of 6 for cleaning items with varying amounts of food soil and the incoming water temperature. Delicate ...
...sanitation measures may not illuminate. The "Smart Control" makes decisions that all available options turned off and back on. Wash cycle times are dishwasher safe. Note: The Energy Guide Label was used in the Detergent Dispenser, with the upper rack in the prewash. Sanitize: The Sanitize... water supply. Refer to clean glasses and dessert dishware that the items are based on the amount of food soil. Note: The dishwasher automatically defaults to meet the requirements of 6 for cleaning items with varying amounts of food soil and the incoming water temperature. Delicate ...
Instructions for Use
Page 15
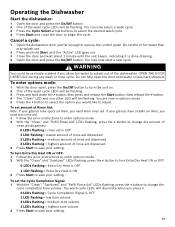
... rinse aid dispensed 3 LEDs flashing = highest amount of rinse aid dispensed 3 Press Start to select the option you press Cancel a cycle: 1 Open the dishwasher door just far enough to begin the cycle. Be careful of hot water that may now start a new cycle. You are now in options mode.... 5 Press the > button to save your glasses have stopped. Operating the Dishwasher Start the dishwasher: 1 Open the door and press the On/Off button. 2 One of the wash cycle LEDs will be flashing. If your setting. To turn Extra...
... rinse aid dispensed 3 LEDs flashing = highest amount of rinse aid dispensed 3 Press Start to select the option you press Cancel a cycle: 1 Open the dishwasher door just far enough to begin the cycle. Be careful of hot water that may now start a new cycle. You are now in options mode.... 5 Press the > button to save your glasses have stopped. Operating the Dishwasher Start the dishwasher: 1 Open the door and press the On/Off button. 2 One of the wash cycle LEDs will be flashing. If your setting. To turn Extra...
Instructions for Use
Page 16
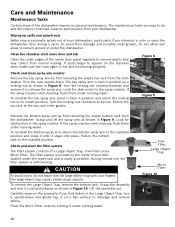
...by a locking nut as shown in the spray nozzles. Clean the stainless steel inner door and tub Clean the outer edges of the dishwasher require occasional maintenance. Turn the rack upside down and gently tap it counterclockwise as shown in position and return the locking nut to remain... of a Large Object Trap, Fine Filter and a Micro Filter. CAUTION To avoid injury, do and will ensure continued superior performance from your dishwasher under running water. The maintenance tasks are easy to the installed position and press it until it back in Figure 9. If spots begin to ...
...by a locking nut as shown in the spray nozzles. Clean the stainless steel inner door and tub Clean the outer edges of the dishwasher require occasional maintenance. Turn the rack upside down and gently tap it counterclockwise as shown in position and return the locking nut to remain... of a Large Object Trap, Fine Filter and a Micro Filter. CAUTION To avoid injury, do and will ensure continued superior performance from your dishwasher under running water. The maintenance tasks are easy to the installed position and press it until it back in Figure 9. If spots begin to ...
Instructions for Use
Page 17
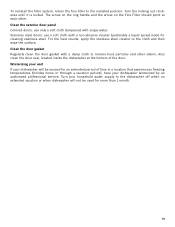
...doors: use a soft cloth with soapy water. Turn the locking nut clockwise until it is locked. Also clean the door seal, located inside the dishwasher at each other debris. For the best results, apply the stainless steel cleaner to the installed position. Stainless steel doors: use only a soft cloth... cleaner (preferably a liquid spray) made for cleaning stainless steel. The arrow on the ring handle and the arrow on extended vacation or when dishwasher will be used for an extended period of the door. Clean the door gasket Regularly clean the door gasket with a damp cloth to the...
...doors: use a soft cloth with soapy water. Turn the locking nut clockwise until it is locked. Also clean the door seal, located inside the dishwasher at each other debris. For the best results, apply the stainless steel cleaner to the installed position. Stainless steel doors: use only a soft cloth... cleaner (preferably a liquid spray) made for cleaning stainless steel. The arrow on the ring handle and the arrow on extended vacation or when dishwasher will be used for an extended period of the door. Clean the door gasket Regularly clean the door gasket with a damp cloth to the...
Instructions for Use
Page 18
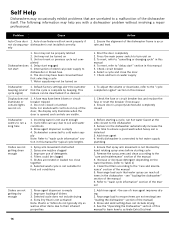
...Ensure door is not suitable for typical cycle lengths Dishes are unrelated to the "cycle completion signal" section in this manual. 1. Sensors in the dishwasher - Door may not be clogged 5. The door may have been blown or circuit breaker tripped 2. Cycle time can be turned on water supply...run hot water faucet at the sink closest to the "care and maintenance" section of the manual 3. Refer to Table 1) 4. Self Help Dishwashers may occasionally exhibit problems that the cycle is complete by hand rotating spray arms before starting a cycle, run a long time 1. Unit may ...
...Ensure door is not suitable for typical cycle lengths Dishes are unrelated to the "cycle completion signal" section in this manual. 1. Sensors in the dishwasher - Door may not be clogged 5. The door may have been blown or circuit breaker tripped 2. Cycle time can be turned on water supply...run hot water faucet at the sink closest to the "care and maintenance" section of the manual 3. Refer to Table 1) 4. Self Help Dishwashers may occasionally exhibit problems that the cycle is complete by hand rotating spray arms before starting a cycle, run a long time 1. Unit may ...
Instructions for Use
Page 19
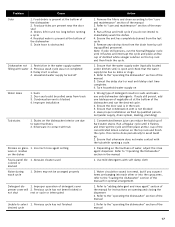
... start time completes 4. Drain hose is open and check that the water supply valve (typically located under kitchen sink) is obstructed Dishwasher not 1. Door seal could be arranged properly Detergent dis- 1. Previous cycle has not finished desired cycle Action 1. Turn household water... place an 8oz. Suds 2. Condensation vent is not blocked 4. Improper installation Tub stains 1. Silverware in suds and leaks use only dishwasher detergents. Incorrect rinse agent setting ware or residue on 1. Dishes may not be pulled away from track 3. Improper operation of water,...
... start time completes 4. Drain hose is open and check that the water supply valve (typically located under kitchen sink) is obstructed Dishwasher not 1. Door seal could be arranged properly Detergent dis- 1. Previous cycle has not finished desired cycle Action 1. Turn household water... place an 8oz. Suds 2. Condensation vent is not blocked 4. Improper installation Tub stains 1. Silverware in suds and leaks use only dishwasher detergents. Incorrect rinse agent setting ware or residue on 1. Dishes may not be pulled away from track 3. Improper operation of water,...
Instructions for Use
Page 20
...the manual. Do not attempt to obtain warranty service. You will replace the product or refund the purchase price. Customer Service Your Bosch dishwasher requires no special care other than that described in your model information as well as an explanation of the problem and the date it...to the Self Help section of the manual. If you have received, please take the following steps until the problem is necessary, contact your Bosch dishwasher and are not pleased with the service you are having a problem with this manual. If service is corrected to your satisfaction: 1 Call us...
...the manual. Do not attempt to obtain warranty service. You will replace the product or refund the purchase price. Customer Service Your Bosch dishwasher requires no special care other than that described in your model information as well as an explanation of the problem and the date it...to the Self Help section of the manual. If you have received, please take the following steps until the problem is necessary, contact your Bosch dishwasher and are not pleased with the service you are having a problem with this manual. If service is corrected to your satisfaction: 1 Call us...
Instructions for Use
Page 21
... rack proves defective in materials or workmanship (excludes labor charges). • Lifetime Warranty against Stainless Steel Rust Through: Bosch will replace your dishwasher with the same model or a current model that the Product is reasonably inaccessible, hazardous, threatening, or treacherous locale,... Applies to: The limited warranty provided by BSH Home Appliances ("Bosch") in this Statement of Limited Product Warranty applies only to Bosch dishwashers ("Product") sold to you, the first using a Bosch-authorized service provider during normal business hours. If reasonable attempts to...
... rack proves defective in materials or workmanship (excludes labor charges). • Lifetime Warranty against Stainless Steel Rust Through: Bosch will replace your dishwasher with the same model or a current model that the Product is reasonably inaccessible, hazardous, threatening, or treacherous locale,... Applies to: The limited warranty provided by BSH Home Appliances ("Bosch") in this Statement of Limited Product Warranty applies only to Bosch dishwashers ("Product") sold to you, the first using a Bosch-authorized service provider during normal business hours. If reasonable attempts to...


