Quick Reference Instructions
Page 1
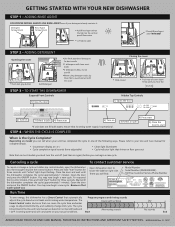
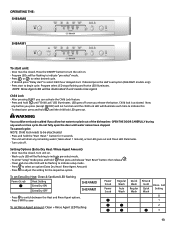
... rinsing sounds Cleaning/Final Rinse Start Alternating sounds Dry No sounds End Always read your detergent already contains it. C anceling a cycle To contact customer service To cancel or change mid-cycle. C• 12/07 Close the door and wait until you will find: • Toll Free Customer Service Phone Number R un Time To save energy, this dishwasher has a Smart Control that incoming water supply is the Cycle Complete? Open dishwasher door to • Model Number locate the label on right side. • Serial Number...
... rinsing sounds Cleaning/Final Rinse Start Alternating sounds Dry No sounds End Always read your detergent already contains it. C anceling a cycle To contact customer service To cancel or change mid-cycle. C• 12/07 Close the door and wait until you will find: • Toll Free Customer Service Phone Number R un Time To save energy, this dishwasher has a Smart Control that incoming water supply is the Cycle Complete? Open dishwasher door to • Model Number locate the label on right side. • Serial Number...
Use & Care Manual
Page 2
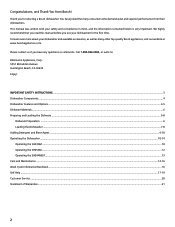
... Preparation ...6 Loading the Dishwasher...7-8 Adding Detergent and Rinse Agent...9-10 Operating the Dishwasher...10-14 Operating the SHX3AM...10 Operating the SHE5AM...12 Operating the SHE4AM0/1...13 Care and Maintenance...14-16 Wash Cycle Information/Sanitized...16 Self Help...17-19 Customer Service...20 Statement of Warranties...21 2 This manual was written with your dishwasher and available accessories, as well as many consumers who demand quiet and superior performance from Bosch! Please...
... Preparation ...6 Loading the Dishwasher...7-8 Adding Detergent and Rinse Agent...9-10 Operating the Dishwasher...10-14 Operating the SHX3AM...10 Operating the SHE5AM...12 Operating the SHE4AM0/1...13 Care and Maintenance...14-16 Wash Cycle Information/Sanitized...16 Self Help...17-19 Customer Service...20 Statement of Warranties...21 2 This manual was written with your dishwasher and available accessories, as well as many consumers who demand quiet and superior performance from Bosch! Please...
Use & Care Manual
Page 3
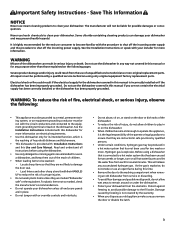
... a hot water system that is not covered by a qualified service technician using the dishwasher. • Use only detergents or rinsing agents recommended for more information. Important Safety Instructions - Damage caused by freezing is connected to reduce the risk of fire, electrical shock, or serious injury, observe the following pages. Some chloride-containing cleaning products can result in this time. • Remove the door to shut off the incoming power supply...
... a hot water system that is not covered by a qualified service technician using the dishwasher. • Use only detergents or rinsing agents recommended for more information. Important Safety Instructions - Damage caused by freezing is connected to reduce the risk of fire, electrical shock, or serious injury, observe the following pages. Some chloride-containing cleaning products can result in this time. • Remove the door to shut off the incoming power supply...
Use & Care Manual
Page 4
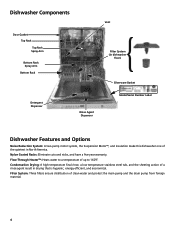
... Drying: A high temperature final rinse, a low temperature stainless steel tub, and the sheeting action of a rinse agent result in North America. Nylon Coated Racks: Eliminate cuts and nicks, and have a five-year warranty. Flow-Through Heater™: Heats water to a temperature of clean water and protect the main pump and the drain pump from foreign material. 4 Dishwasher Components Vent Door Gasket Top Rack Top Rack Spray Arm Bottom Rack Spray Arm Bottom Rack Filter System (in dishwasher floor) Silverware Basket Detergent Dispenser Rinse Agent Dispenser Model/Serial Number...
... Drying: A high temperature final rinse, a low temperature stainless steel tub, and the sheeting action of a rinse agent result in North America. Nylon Coated Racks: Eliminate cuts and nicks, and have a five-year warranty. Flow-Through Heater™: Heats water to a temperature of clean water and protect the main pump and the drain pump from foreign material. 4 Dishwasher Components Vent Door Gasket Top Rack Top Rack Spray Arm Bottom Rack Spray Arm Bottom Rack Filter System (in dishwasher floor) Silverware Basket Detergent Dispenser Rinse Agent Dispenser Model/Serial Number...
Use & Care Manual
Page 5
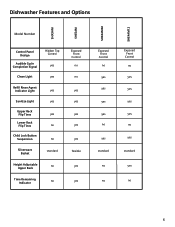
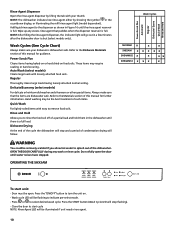
Dishwasher Features and Options SHX3AM SHE5AM SHE4AM02 SHE4AM12 Model Number Control Panel Design Audible Cycle Completion Signal Clean Light Hidden Top Control yes yes Refill Rinse Agent Indicator Light Sanitize Light Upper Rack Flip Tines Lower Rack Flip Tines Child Lock Button Suspension Silverware Basket yes yes yes no no standard Height Adjustable no Upper Rack Time Remaining no Indicator Exposed Front Control no no yes yes yes yes yes flexible yes yes Exposed Front Control no yes yes yes yes...
Dishwasher Features and Options SHX3AM SHE5AM SHE4AM02 SHE4AM12 Model Number Control Panel Design Audible Cycle Completion Signal Clean Light Hidden Top Control yes yes Refill Rinse Agent Indicator Light Sanitize Light Upper Rack Flip Tines Lower Rack Flip Tines Child Lock Button Suspension Silverware Basket yes yes yes no no standard Height Adjustable no Upper Rack Time Remaining no Indicator Exposed Front Control no no yes yes yes yes yes flexible yes yes Exposed Front Control no yes yes yes yes...
Use & Care Manual
Page 6
... removed by using your water may loosen. Glass: Milk glass may separate. may cause the aluminum to non-stick surfaces after drying. Wood: Wooden bowls, wooden utensils, and wood-handled utensils can usually be hand-washed; Plastics: Make sure the piece is intended for the top rack. Loading the Dishwasher Check the Materials section of the racks and block the spray arms...
... removed by using your water may loosen. Glass: Milk glass may separate. may cause the aluminum to non-stick surfaces after drying. Wood: Wooden bowls, wooden utensils, and wood-handled utensils can usually be hand-washed; Plastics: Make sure the piece is intended for the top rack. Loading the Dishwasher Check the Materials section of the racks and block the spray arms...
Use & Care Manual
Page 7
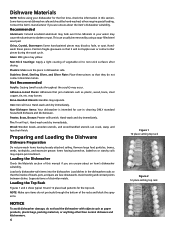
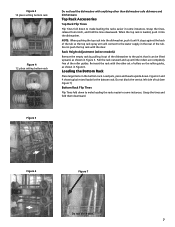
... rack with the door. Load pots, pans and bowls upside-down to make loading the racks easier in some instances. Top Rack Accessories Top Rack Flip Tines Flip Tines fold down . Rack Height Adjustment (select models) Remove the empty rack by pulling it out of the dishwasher to the water supply in the rear of the tub. Figure 3 10 place setting bottom rack Figure 4 12 place setting bottom rack...
... rack with the door. Load pots, pans and bowls upside-down to make loading the racks easier in some instances. Top Rack Accessories Top Rack Flip Tines Flip Tines fold down . Rack Height Adjustment (select models) Remove the empty rack by pulling it out of the dishwasher to the water supply in the rear of the tub. Figure 3 10 place setting bottom rack Figure 4 12 place setting bottom rack...
Use & Care Manual
Page 9
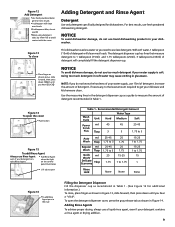
... until you need to get your water supply, use 15ml of detergent recommended in Table 1. (See Figure 12 for additional information.) To close This dishwasher uses less water so you hear a *click*. Adding Rinse Agents To achieve proper drying, always use Rinse Agent even if your dishwasher. Using too much detergent if your detergent contains a rinse agent or drying additive. 9 Recommended Detergent Amount Wash Cycle Unit Hard Water Type Medium Soft Power ml 45 Scrub Plus Tbsp 3 45...
... until you need to get your water supply, use 15ml of detergent recommended in Table 1. (See Figure 12 for additional information.) To close This dishwasher uses less water so you hear a *click*. Adding Rinse Agents To achieve proper drying, always use Rinse Agent even if your dishwasher. Using too much detergent if your detergent contains a rinse agent or drying additive. 9 Recommended Detergent Amount Wash Cycle Unit Hard Water Type Medium Soft Power ml 45 Scrub Plus Tbsp 3 45...
Use & Care Manual
Page 10
... countdown display, or illuminating the refill rinse agent light (model dependent). NOTE: After filling the rinse agent dispenser, the indicator light will stop flashing). - These items may be open the door until the rinse agent reservoir is dishwasher safe. Rinse and Hold Allows you allow hot water to indicate pre-select mode. - Dishware Drying At the end of the cycle the dishwasher will go out in the dishwasher until there is a full load. OPERATING THE SHX3AM Wash Cycles Power Scrub Plus Automatic...
... countdown display, or illuminating the refill rinse agent light (model dependent). NOTE: After filling the rinse agent dispenser, the indicator light will stop flashing). - These items may be open the door until the rinse agent reservoir is dishwasher safe. Rinse and Hold Allows you allow hot water to indicate pre-select mode. - Dishware Drying At the end of the cycle the dishwasher will go out in the dishwasher until there is a full load. OPERATING THE SHX3AM Wash Cycles Power Scrub Plus Automatic...
Use & Care Manual
Page 11
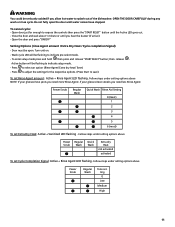
... dishwasher. Power Scrub Regular Wash Quick Wash Rinse Aid Setting 0 (least) 1 2 3 4 5 6 (most) To set Rinse Agent amount: Active + Rinse Agent LED flashing. Follow steps under setting options above NOTE: If your glasses have streaks you allow hot water to save) To set Extra Dry Heat: Active + Sanitized LED flashing . Door must be open the door until water noises have spots you hear the buzzer (if active) - Turn unit on. - Active button will be flashing to indicate setup mode. - If your glasses have stopped. OPEN...
... dishwasher. Power Scrub Regular Wash Quick Wash Rinse Aid Setting 0 (least) 1 2 3 4 5 6 (most) To set Rinse Agent amount: Active + Rinse Agent LED flashing. Follow steps under setting options above NOTE: If your glasses have streaks you allow hot water to save) To set Extra Dry Heat: Active + Sanitized LED flashing . Door must be open the door until water noises have spots you hear the buzzer (if active) - Turn unit on. - Active button will be flashing to indicate setup mode. - If your glasses have stopped. OPEN...
Use & Care Manual
Page 12
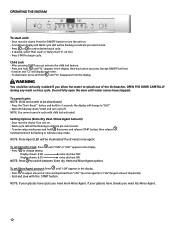
... Setting Options (Extra Dry Heat / Rinse Agent Amount) - Turn unit on . - Press the "Start Reset " button and hold until "d:00" or "d:01" appear in the display. Sanitized LED will be flashing to indicate setup mode. Press to turn unit off. Press the ON/OFF button to adjust amount of the dishwasher. Press START to select desired wash cycle. - Child Lock - To deactivate: press and hold for 3 seconds. To cancel cycle: NOTE: Child lock needs to "0:01" - Press to change...
... Setting Options (Extra Dry Heat / Rinse Agent Amount) - Turn unit on . - Press the "Start Reset " button and hold until "d:00" or "d:01" appear in the display. Sanitized LED will be flashing to indicate setup mode. Press to turn unit off. Press the ON/OFF button to adjust amount of the dishwasher. Press START to select desired wash cycle. - Child Lock - To deactivate: press and hold for 3 seconds. To cancel cycle: NOTE: Child lock needs to "0:01" - Press to change...
Use & Care Manual
Page 13
...set Rinse Agent amount: Clean + Rinse Agent LED flashing Power Scrub Power Scrub Regular Wash Auto Wash Quick Wash Regular Wash Rinse & Hold Quick Wash Rinse Aid Setting 0 1 2 3 13 WARNING You could be seriously scalded if you release the button. Turn unit on . - If desired press the Half Load option (SHE4AM1 models only) - Child Lock - Press and hold until water noises have stopped. Turn unit off once you allow hot water to indicate this - Press START to select an option (Extra Dry Heat / Rinse Agent Amount) - If desired press "Delay start . Child...
...set Rinse Agent amount: Clean + Rinse Agent LED flashing Power Scrub Power Scrub Regular Wash Auto Wash Quick Wash Regular Wash Rinse & Hold Quick Wash Rinse Aid Setting 0 1 2 3 13 WARNING You could be seriously scalded if you release the button. Turn unit on . - If desired press the Half Load option (SHE4AM1 models only) - Child Lock - Press and hold until water noises have stopped. Turn unit off once you allow hot water to indicate this - Press START to select an option (Extra Dry Heat / Rinse Agent Amount) - If desired press "Delay start . Child...

Use & Care Manual
Page 14
... Stainless Steel Inner Door and Tub • Check/Clean the Spray Arm Nozzles • Check/Clean the Filter System • Clean the Exterior Door Panel • Clean the Door Gasket Winterizing Your Dishwasher If your dishwasher will ensure continued superior performance from normal loading. Check/Clean the Stainless Steel Inner Door and Tub Clean the outer edges of time in a location that might collect there from your dishwasher. Unload the silverware basket(s). The maintenance tasks are easily removed...
... Stainless Steel Inner Door and Tub • Check/Clean the Spray Arm Nozzles • Check/Clean the Filter System • Clean the Exterior Door Panel • Clean the Door Gasket Winterizing Your Dishwasher If your dishwasher will ensure continued superior performance from normal loading. Check/Clean the Stainless Steel Inner Door and Tub Clean the outer edges of time in a location that might collect there from your dishwasher. Unload the silverware basket(s). The maintenance tasks are easily removed...
Use & Care Manual
Page 15
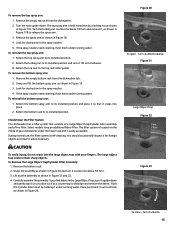
... dishwasher under running water. Turn the locking nut counter-clockwise 1/8 turn and remove it counter clockwise 1/4 turn clockwise. 3. To reinstall the top spray arm: 1. The filter system is easily accessible. You should occasionally inspect it for foreign objects and clean it 1/8 turn . 3. Flush the Cylinder Filter clean by a locking nut as shown in Figure 23. If the spray nozzles need cleaning, flush them under running water. Return the top rack to its installed...
... dishwasher under running water. Turn the locking nut counter-clockwise 1/8 turn and remove it counter clockwise 1/4 turn clockwise. 3. To reinstall the top spray arm: 1. The filter system is easily accessible. You should occasionally inspect it for foreign objects and clean it 1/8 turn . 3. Flush the Cylinder Filter clean by a locking nut as shown in Figure 23. If the spray nozzles need cleaning, flush them under running water. Return the top rack to its installed...
Use & Care Manual
Page 16
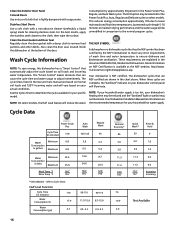
Clean the Door Gasket and Door Seal Regularly clean the door gasket with a damp cloth to the normal program cycles. More information on the recommended temperature for the Power Scrub Plus, Auto, Regular and Delicate cycles on select models. The cycle times listed in the Use and Care manual are complete, the "Sanitized" indicator on your dishwasher control panel will be selected for your specific model. This reduces energy consumption approximately 10% due to lower main wash and final rinse temperatures...
Clean the Door Gasket and Door Seal Regularly clean the door gasket with a damp cloth to the normal program cycles. More information on the recommended temperature for the Power Scrub Plus, Auto, Regular and Delicate cycles on select models. The cycle times listed in the Use and Care manual are complete, the "Sanitized" indicator on your dishwasher control panel will be selected for your specific model. This reduces energy consumption approximately 10% due to lower main wash and final rinse temperatures...
Use & Care Manual
Page 17
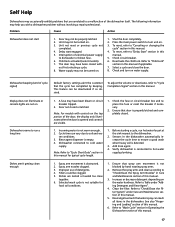
... hot water supply plumbing. 1. Child lock activated (select models). 7. Dishwasher beeping (end of this manual. Verify dishwasher is obstructed. 2. Spray arm movement is connected to "Check/Clean the Spray Arm Nozzles" in this manual for food soil condtions. 1. Delay start 1. Note: Refer to "Cycle Chart Data" section in the dishwasher automatically increase the cycle time to dishwasher or blown fuse. 6. Improper use of the door, the display only illuminates when the door is not blocked by beeping. Ensure that water spray can be turned...
... hot water supply plumbing. 1. Child lock activated (select models). 7. Dishwasher beeping (end of this manual. Verify dishwasher is obstructed. 2. Spray arm movement is connected to "Check/Clean the Spray Arm Nozzles" in this manual for food soil condtions. 1. Delay start 1. Note: Refer to "Cycle Chart Data" section in the dishwasher automatically increase the cycle time to dishwasher or blown fuse. 6. Improper use of the door, the display only illuminates when the door is not blocked by beeping. Ensure that water spray can be turned...
Use & Care Manual
Page 18
... drying cycle, Note: Select models offer an extra heating options to hardness of this manual. 3. Remove the filters and clean according to the "Delay Start" section of water. 2. Run a Rinse/Hold cycle if you do not typically dry as completely as other items due to avoid build up of the dishwasher. 5. Suds 2. cup of the dishwasher. 2. Ensure that the water supply line has no kinks and clogs. 2. Use only dishwasher detergents. Have proper installation...
... drying cycle, Note: Select models offer an extra heating options to hardness of this manual. 3. Remove the filters and clean according to the "Delay Start" section of water. 2. Run a Rinse/Hold cycle if you do not typically dry as completely as other items due to avoid build up of the dishwasher. 5. Suds 2. cup of the dishwasher. 2. Ensure that the water supply line has no kinks and clogs. 2. Use only dishwasher detergents. Have proper installation...
Use & Care Manual
Page 19
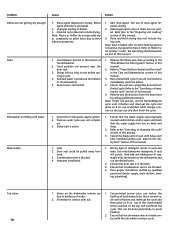
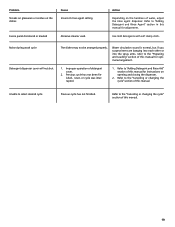
Problem Streaks on glassware or residue on opening and closing the dispenser. 2. Action Depending on the hardness of this manual. 19 Refer to the "Canceling or changing the cycle" section of water, adjust the rinse agent dispenser. Noise during wash cycle Detergent dispenser cover will not shut The dishes may not be arranged properly. Refer to "Adding Detergent and Rinse Agent" section in this manual for optimal arrangement. 1. Use mild detergents with soft damp cloth. Refer to...
Problem Streaks on glassware or residue on opening and closing the dispenser. 2. Action Depending on the hardness of this manual. 19 Refer to the "Canceling or changing the cycle" section of water, adjust the rinse agent dispenser. Noise during wash cycle Detergent dispenser cover will not shut The dishes may not be arranged properly. Refer to "Adding Detergent and Rinse Agent" section in this manual for optimal arrangement. 1. Use mild detergents with soft damp cloth. Refer to...

Use & Care Manual
Page 20
... are not pleased with this manual. The customer must show proof of purchase to repair the appliance yourself. Figure 25 Model and Serial Number Label Serial Number Model Number 20 Contact your installer or the Bosch Authorized Service Contractor in the Care and Maintenance section. You will find the model and serial number information on the label located on the right edge of the dishwasher door as an explanation of your...
... are not pleased with this manual. The customer must show proof of purchase to repair the appliance yourself. Figure 25 Model and Serial Number Label Serial Number Model Number 20 Contact your installer or the Bosch Authorized Service Contractor in the Care and Maintenance section. You will find the model and serial number information on the label located on the right edge of the dishwasher door as an explanation of your...
Use & Care Manual
Page 21
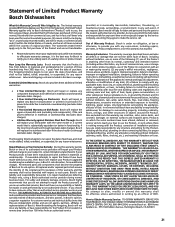
... replace your dishwasher with the same model or a current model that the Product was purchased: (1) for your normal, household (non-commercial) use, and has in fact at all times only been used for normal household purposes; (2) new at retail (not a display, "as Your Exclusive Remedy: During this warranty period, Bosch or one or more than 100 miles from an authorized service provider) or is to repair...
... replace your dishwasher with the same model or a current model that the Product was purchased: (1) for your normal, household (non-commercial) use, and has in fact at all times only been used for normal household purposes; (2) new at retail (not a display, "as Your Exclusive Remedy: During this warranty period, Bosch or one or more than 100 miles from an authorized service provider) or is to repair...

