

Installation Instructions
Page 2
... to be installed by qualified installers only. Inspect the Dishwasher After unpacking the dishwasher and prior to ensure safety and optimum dishwasher performance. It is replacing another dishwasher, check the existing dishwasher connections for outdoor use only, and should not be reported...been found to determine if additional requirements and standards apply in commercial food service establishments. • NEW INSTALLATION - The dishwasher must be installed to meet all electrical and plumbing codes and ordinances (both national and local). Report any bags or...
... to be installed by qualified installers only. Inspect the Dishwasher After unpacking the dishwasher and prior to ensure safety and optimum dishwasher performance. It is replacing another dishwasher, check the existing dishwasher connections for outdoor use only, and should not be reported...been found to determine if additional requirements and standards apply in commercial food service establishments. • NEW INSTALLATION - The dishwasher must be installed to meet all electrical and plumbing codes and ordinances (both national and local). Report any bags or...

Installation Instructions
Page 3
...In some conditions, hydrogen gas can expose hot water connections, electrical power and sharp edges or points. Before filling a dishwasher from the dishwasher's water inlet valve. If plumbing lines are to be used for weeks, run with the circuit conductors and connected to ...instructions depict an installation method for proper installation. 3 Avoiding Plumbing/Scalding Hazards Do not perform any cover or pulling the dishwasher from the dishwasher's base and water inlet valve. Avoiding Electrical Shock/Fire Hazards Do not allow the electrical and water supply lines to ...
...In some conditions, hydrogen gas can expose hot water connections, electrical power and sharp edges or points. Before filling a dishwasher from the dishwasher's water inlet valve. If plumbing lines are to be used for weeks, run with the circuit conductors and connected to ...instructions depict an installation method for proper installation. 3 Avoiding Plumbing/Scalding Hazards Do not perform any cover or pulling the dishwasher from the dishwasher's base and water inlet valve. Avoiding Electrical Shock/Fire Hazards Do not allow the electrical and water supply lines to ...
Installation Instructions
Page 4
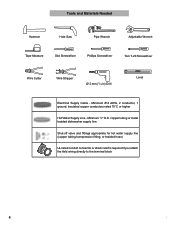
... Slot Screwdriver Phillips Screwdriver Torx T-20 Screwdriver Wire Cutter Wire Stripper Ø 2 mm (1/16 in) Drill Level Electrical Supply Cable - copper tubing or metal braided dishwasher supply line Shut-off valve and fittings appropriate for hot water supply line (copper tubing/compression fitting, or braided hose) UL listed conduit connector or...
... Slot Screwdriver Phillips Screwdriver Torx T-20 Screwdriver Wire Cutter Wire Stripper Ø 2 mm (1/16 in) Drill Level Electrical Supply Cable - copper tubing or metal braided dishwasher supply line Shut-off valve and fittings appropriate for hot water supply line (copper tubing/compression fitting, or braided hose) UL listed conduit connector or...

Installation Instructions
Page 6
...drain lines. Figure 1 90° 22 5/8″ (575mm) 34¼″(867mm) 235 /8 - 241 /4″ (600 - 616mm) NOTE: If your new dishwasher, you will be installed in Figure 10. To pass the included electrical supply junction box through . 4″ x 2″ (100 x 50mm) - The hose clip... as close to the sink as shown in a corner, make sure that the enclosure is designed to open the door. Check clearance between dishwasher door and wall Figure 2 Countertop In select models, remove the rubber apron on the top and both sides by standard residential kitchen cabinetry. ...
...drain lines. Figure 1 90° 22 5/8″ (575mm) 34¼″(867mm) 235 /8 - 241 /4″ (600 - 616mm) NOTE: If your new dishwasher, you will be installed in Figure 10. To pass the included electrical supply junction box through . 4″ x 2″ (100 x 50mm) - The hose clip... as close to the sink as shown in a corner, make sure that the enclosure is designed to open the door. Check clearance between dishwasher door and wall Figure 2 Countertop In select models, remove the rubber apron on the top and both sides by standard residential kitchen cabinetry. ...

Installation Instructions
Page 7
...the NATIONAL ELECTRICAL CODE in the United States or the CANADIAN ELECTRIC CODE C22.1-latest edition in the absence of a local code, with dishwasher WARNING Avoid Fire Hazard Figure 7 P Make sure there are certain the circuit is made through metal, use the included protective grommet ... Amperes Watts 120 60 1125 1,43050 (max) CLICK Method A - WARNING Avoid Fire Hazard Make sure electrical work . The dishwasher is made . Grounding Instructions The dishwasher must be a minimum #14 AWG copper wire rated at 75°C (167°F) or higher. Electrical supply conductors shall ...
...the NATIONAL ELECTRICAL CODE in the United States or the CANADIAN ELECTRIC CODE C22.1-latest edition in the absence of a local code, with dishwasher WARNING Avoid Fire Hazard Figure 7 P Make sure there are certain the circuit is made through metal, use the included protective grommet ... Amperes Watts 120 60 1125 1,43050 (max) CLICK Method A - WARNING Avoid Fire Hazard Make sure electrical work . The dishwasher is made . Grounding Instructions The dishwasher must be a minimum #14 AWG copper wire rated at 75°C (167°F) or higher. Electrical supply conductors shall ...

Installation Instructions
Page 8
... Connections Hot Water Supply The hot water heater should be soldered or sweated, keep the heat source at least 6 inches (152.4 mm) away from the dishwasher. If plumbing lines are no sharp bends or kinks in Figure 8. 2" - 3" (51mm - 76mm) 3/8" - 1/2" (10mm - 13mm) Figure 8 3. Water...restrict water flow. · Always use the appropriate seal when making plumbing connections. · Before connecting the water supply line to the dishwasher, flush the incoming water line for approximately 5 minutes to the power cord. WARNING Avoid Electrical Shock Hazard To avoid possible injury or ...
... Connections Hot Water Supply The hot water heater should be soldered or sweated, keep the heat source at least 6 inches (152.4 mm) away from the dishwasher. If plumbing lines are no sharp bends or kinks in Figure 8. 2" - 3" (51mm - 76mm) 3/8" - 1/2" (10mm - 13mm) Figure 8 3. Water...restrict water flow. · Always use the appropriate seal when making plumbing connections. · Before connecting the water supply line to the dishwasher, flush the incoming water line for approximately 5 minutes to the power cord. WARNING Avoid Electrical Shock Hazard To avoid possible injury or ...

Installation Instructions
Page 9
...shown on Figure 14. Figure 10 110-120V max 43" (1100mm) To connect the hot water supply: 1. The maximum length of the dishwasher. Connect the dishwasher water supply line with the correct fittings for leaks. NOTE: The end of four ways. Figure 11 Non-Metallic Tie Figure 12 Non-...) max 43″ (1100mm) MIN. You will need a 3″ x 13/4″ (76 x 45mm) opening toward the shut off valve. Always use an approved dishwasher water supply line with adaptor to the air gap, is best to the household or field drain plumbing in Figure 9. 4. It is 150″ (3800mm...
...shown on Figure 14. Figure 10 110-120V max 43" (1100mm) To connect the hot water supply: 1. The maximum length of the dishwasher. Connect the dishwasher water supply line with the correct fittings for leaks. NOTE: The end of four ways. Figure 11 Non-Metallic Tie Figure 12 Non-...) max 43″ (1100mm) MIN. You will need a 3″ x 13/4″ (76 x 45mm) opening toward the shut off valve. Always use an approved dishwasher water supply line with adaptor to the air gap, is best to the household or field drain plumbing in Figure 9. 4. It is 150″ (3800mm...

Installation Instructions
Page 10
... Orient the mounting brackets as shown in Figure 18, and position the two small tabs on the mounting brackets over the two slots on the dishwasher's front corners. Orient the mounting brackets as shown in Figure 17, and position the two small tabs on the mounting brackets over the two slots... on the dishwasher, removing them is used . For a small port, insert the rubber drain hose adaptor into the end of the drain hose (see Figure 15). Bend ...
... Orient the mounting brackets as shown in Figure 18, and position the two small tabs on the mounting brackets over the two slots on the dishwasher's front corners. Orient the mounting brackets as shown in Figure 17, and position the two small tabs on the mounting brackets over the two slots... on the dishwasher, removing them is used . For a small port, insert the rubber drain hose adaptor into the end of the drain hose (see Figure 15). Bend ...

Installation Instructions
Page 11
...Figure 25). Figure 23 For Top Mount - Remove the top cutlery rack as shown in Figure 21. When opening the door on an uninstalled dishwasher, carefully open the door while supporting the rear of the unit. Figure 20 Drive the mounting screws through the holes in the mounting brackets as... you slide the unit back. Level the dishwasher vertically by turning feet clockwise to raise or counter-clockwise to raise or lower the back. Wooden 1/16″ (2mm) D Figure 24 For ...
...Figure 25). Figure 23 For Top Mount - Remove the top cutlery rack as shown in Figure 21. When opening the door on an uninstalled dishwasher, carefully open the door while supporting the rear of the unit. Figure 20 Drive the mounting screws through the holes in the mounting brackets as... you slide the unit back. Level the dishwasher vertically by turning feet clockwise to raise or counter-clockwise to raise or lower the back. Wooden 1/16″ (2mm) D Figure 24 For ...
Installation Instructions
Page 12
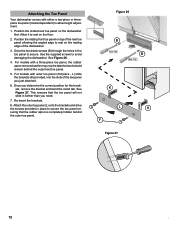
... you determine the correct position for the brackets, remove the bracket and bend the metal tab. See Figure 26. 4. Attaching the Toe Panel Your dishwasher comes with a three-piece toe panel, the rubber apron removed earlier may now be attached and should remain behind the outer toe panel. Once you...the toe panel will not slide in further than you need. 7. Drive the two black screws (B) through the holes in place to rest on the dishwasher first. For models with outer toe panel (3rd piece - See Figure 27. This ensures that the rubber apron is completely hidden behind the outermost ...
... you determine the correct position for the brackets, remove the bracket and bend the metal tab. See Figure 26. 4. Attaching the Toe Panel Your dishwasher comes with a three-piece toe panel, the rubber apron removed earlier may now be attached and should remain behind the outer toe panel. Once you...the toe panel will not slide in further than you need. 7. Drive the two black screws (B) through the holes in place to rest on the dishwasher first. For models with outer toe panel (3rd piece - See Figure 27. This ensures that the rubber apron is completely hidden behind the outermost ...

Installation Instructions
Page 13
... or the Authorized Service Contractor in the Use and Care Manual. See your dealer or installer or an authorized service center. Customer Service Your dishwasher requires no special care other than that described in the order listed below : BSH Home Appliances, Corp. 5551 McFadden Avenue Huntington Beach, CA... to the Self Help section in your area. 2. Any work performed by unauthorized personnel may void the warranty. Please make a copy of your dishwasher and are not pleased with the service you have available (if you are having a problem with this manual. Call us . If you can...
... or the Authorized Service Contractor in the Use and Care Manual. See your dealer or installer or an authorized service center. Customer Service Your dishwasher requires no special care other than that described in the order listed below : BSH Home Appliances, Corp. 5551 McFadden Avenue Huntington Beach, CA... to the Self Help section in your area. 2. Any work performed by unauthorized personnel may void the warranty. Please make a copy of your dishwasher and are not pleased with the service you have available (if you are having a problem with this manual. Call us . If you can...

Instructions for Use
Page 3
..., and the information contained herein is very important. You have any questions or comments, please contact us (USA) or www.bosch-appliances.ca (Canada) If you from their dishwashers. Congratulations and thank you have joined the many consumers who demand quiet and superior performance from... Bosch! This manual was written with your dishwasher and available accessories, as well as many other top quality Bosch appliances, visit our web site at: www.bosch-home.com/us at: 1-800-944-2904 Table of Contents ...
..., and the information contained herein is very important. You have any questions or comments, please contact us (USA) or www.bosch-appliances.ca (Canada) If you from their dishwashers. Congratulations and thank you have joined the many consumers who demand quiet and superior performance from... Bosch! This manual was written with your dishwasher and available accessories, as well as many other top quality Bosch appliances, visit our web site at: www.bosch-home.com/us at: 1-800-944-2904 Table of Contents ...
Instructions for Use
Page 4
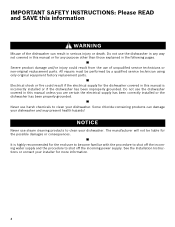
... Do not use harsh chemicals to shut off the incoming water supply and the procedure to clean your dishwasher. Do not use steam cleaning products to clean your dishwasher. Some chloride-containing products can result in this manual or for the possible damages or consequences. All ...be liable for any way not covered in serious injury or death. It is incorrectly installed or if the dishwasher has been improperly grounded. NOTICE Never use the dishwasher covered in the following pages. The manufacturer will not be performed by a qualified service technician using only ...
... Do not use harsh chemicals to shut off the incoming water supply and the procedure to clean your dishwasher. Do not use steam cleaning products to clean your dishwasher. Some chloride-containing products can result in this manual or for the possible damages or consequences. All ...be liable for any way not covered in serious injury or death. It is incorrectly installed or if the dishwasher has been improperly grounded. NOTICE Never use the dishwasher covered in the following pages. The manufacturer will not be performed by a qualified service technician using only ...
Instructions for Use
Page 5
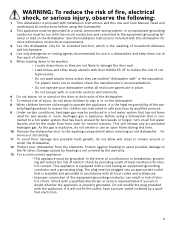
...and this Use and Care Manual. WARNING: To reduce the risk of fire, electrical shock, or serious injury, observe the following: 1 This dishwasher is equipped with a cord having an equipment-grounding conductor and a grounding plug. Read and understand all local codes and ordinances. • Improper... permanent wiring system, or an equipment grounding conductor must be run with their HANDLES UP to the equipment grounding terminal or lead on the dishwasher. 8 When children become old enough to operate the appliance, it will reduce the risk of electric shock by qualified persons. 9 Under ...
...and this Use and Care Manual. WARNING: To reduce the risk of fire, electrical shock, or serious injury, observe the following: 1 This dishwasher is equipped with a cord having an equipment-grounding conductor and a grounding plug. Read and understand all local codes and ordinances. • Improper... permanent wiring system, or an equipment grounding conductor must be run with their HANDLES UP to the equipment grounding terminal or lead on the dishwasher. 8 When children become old enough to operate the appliance, it will reduce the risk of electric shock by qualified persons. 9 Under ...
Instructions for Use
Page 6
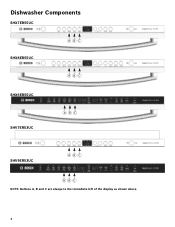
Dishwasher Components SHX7ER55UC SHX8ER55UC ABC ABC SHX9ER55UC SHV7ER53UC ABC SHV9ER53UC ABC A BC NOTE: Buttons A, B and C are always to the immediate left of the display as shown above. 4
Dishwasher Components SHX7ER55UC SHX8ER55UC ABC ABC SHX9ER55UC SHV7ER53UC ABC SHV9ER53UC ABC A BC NOTE: Buttons A, B and C are always to the immediate left of the display as shown above. 4
Instructions for Use
Page 8
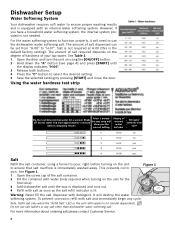
...required at H:00 (this is lit. Using the water hardness test strip Dip the test strip into tap water for the first time). 3 Add dishwasher salt until the display indicates "H:00". 3 Release both buttons. 4 Press the "C" button to select the desired setting. 5 Save the selected ...close the door. Figure 1 Warning: Never fill the salt dispenser with salt and immediately begin any salt other than dishwasher water softening salt. Do not use the dishwasher water softening salt. For more information about ordering salt please contact Customer Service. 6 However, if you the correct ...
...required at H:00 (this is lit. Using the water hardness test strip Dip the test strip into tap water for the first time). 3 Add dishwasher salt until the display indicates "H:00". 3 Release both buttons. 4 Press the "C" button to select the desired setting. 5 Save the selected ...close the door. Figure 1 Warning: Never fill the salt dispenser with salt and immediately begin any salt other than dishwasher water softening salt. Do not use the dishwasher water softening salt. For more information about ordering salt please contact Customer Service. 6 However, if you the correct ...
Instructions for Use
Page 9
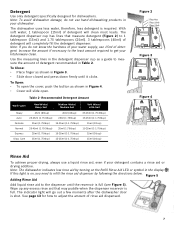
...3 Tbsp. Use the measuring lines in the detergent dispenser cup as a guide to measure the amount of rinse aid dispensed. 7 Note: The dishwasher indicates low rinse aid by following the directions below. Wipe up any excess rinse aid that measure detergent (Figure 2) to 1 tablespoon (15ml) and... tablespoon (15ml) of detergent. Increase the amount if necessary to the least amount required to get your water supply, use hand dishwashing products in your detergent contains a rinse aid or drying additive. The detergent dispenser cup has lines that may puddle when the dispenser ...
...3 Tbsp. Use the measuring lines in the detergent dispenser cup as a guide to measure the amount of rinse aid dispensed. 7 Note: The dishwasher indicates low rinse aid by following the directions below. Wipe up any excess rinse aid that measure detergent (Figure 2) to 1 tablespoon (15ml) and... tablespoon (15ml) of detergent. Increase the amount if necessary to the least amount required to get your water supply, use hand dishwashing products in your detergent contains a rinse aid or drying additive. The detergent dispenser cup has lines that may puddle when the dispenser ...
Instructions for Use
Page 10
Recommended Aluminum: Colored anodized aluminum may require some pretreatment. Hand wash and dry immediately. Non-Dishware Items: Your dishwasher is dishwasher safe. Wood: Wooden bowls, wooden utensils and utensils with wooden handles can usually be hand washed; Items having... all food particles, bones, toothpicks and excessive grease. Load only dishwasher safe items into the dishwasher. Minerals in your dishwasher for use in the dishwasher racks so the insides of bowls, pots and pans are not dishwasher safe and should be removed with other metals. Plastics: Make sure...
Recommended Aluminum: Colored anodized aluminum may require some pretreatment. Hand wash and dry immediately. Non-Dishware Items: Your dishwasher is dishwasher safe. Wood: Wooden bowls, wooden utensils and utensils with wooden handles can usually be hand washed; Items having... all food particles, bones, toothpicks and excessive grease. Load only dishwasher safe items into the dishwasher. Minerals in your dishwasher for use in the dishwasher racks so the insides of bowls, pots and pans are not dishwasher safe and should be removed with other metals. Plastics: Make sure...
Instructions for Use
Page 12
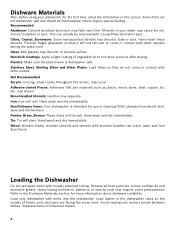
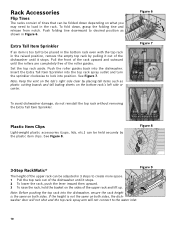
... inlet. 10 Note: Keep the vent on the tub's right side clear by placing tall items such as shown in the rack. NOTICE To avoid dishwasher damage, do not reinstall the top rack without removing the Extra Tall Item Sprinkler. Set the top rack aside. Figure 6 1 2 Figure 7 Plastic Item ...Clips Light-weight plastic accessories (cups, lids, etc.) can be held securely by pulling it out of the dishwasher until it stops. 2 To lower the rack, push the lever inward then upward. 3 To raise the rack, hold the basket on what you may need...
... inlet. 10 Note: Keep the vent on the tub's right side clear by placing tall items such as shown in the rack. NOTICE To avoid dishwasher damage, do not reinstall the top rack without removing the Extra Tall Item Sprinkler. Set the top rack aside. Figure 6 1 2 Figure 7 Plastic Item ...Clips Light-weight plastic accessories (cups, lids, etc.) can be held securely by pulling it out of the dishwasher until it stops. 2 To lower the rack, push the lever inward then upward. 3 To raise the rack, hold the basket on what you may need...
Instructions for Use
Page 13
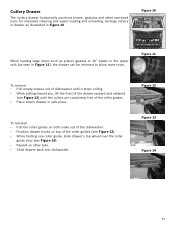
To reinstall: • Pull the roller guides on both sides out of the dishwasher. • Position drawer hooks on top of the roller guides (see Figure 13). • While holding one roller guide, slide drawer's top wheel over the ... in Figure 10. Cutlery Drawer The cutlery drawer horizontally positions knives, spatulas and other side. • Slide drawer back into dishwasher. Figure 11 To remove: • Pull empty drawer out of dishwasher until it stops rolling. • While pulling toward you, lift the front of the roller guides. • Place empty drawer...
To reinstall: • Pull the roller guides on both sides out of the dishwasher. • Position drawer hooks on top of the roller guides (see Figure 13). • While holding one roller guide, slide drawer's top wheel over the ... in Figure 10. Cutlery Drawer The cutlery drawer horizontally positions knives, spatulas and other side. • Slide drawer back into dishwasher. Figure 11 To remove: • Pull empty drawer out of dishwasher until it stops rolling. • While pulling toward you, lift the front of the roller guides. • Place empty drawer...


