
Installation Instructions
Page 3
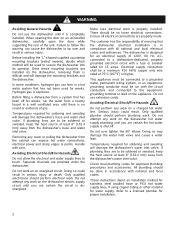
... the owner and the installer to meet all electrical and plumbing codes and ordinances (both national and local). The dishwasher must be used in commercial food service establishments. IMPORTANT x The dishwasher drain hose must be installed to determine if additional requirements and standards apply in compliance with the new dishwasher, and replace parts as necessary. x This dishwasher is replacing another dishwasher, check the existing dishwasher connections for outdoor use by a qualified service...
... the owner and the installer to meet all electrical and plumbing codes and ordinances (both national and local). The dishwasher must be used in commercial food service establishments. IMPORTANT x The dishwasher drain hose must be installed to determine if additional requirements and standards apply in compliance with the new dishwasher, and replace parts as necessary. x This dishwasher is replacing another dishwasher, check the existing dishwasher connections for outdoor use by a qualified service...
Installation Instructions
Page 4
... it is properly installed. Doing so may damage the water inlet valve and cause a water leak. Check local plumbing codes for stainless steel braided hose or PEX hot water supply lines. All plumbing should perform plumbing work on the dishwasher electric supply circuit until you are certain the circuit is shut off for an electrical supply of the unit. Do not attempt any work on an uninstalled dishwasher, carefully open the door while supporting the rear of...
... it is properly installed. Doing so may damage the water inlet valve and cause a water leak. Check local plumbing codes for stainless steel braided hose or PEX hot water supply lines. All plumbing should perform plumbing work on the dishwasher electric supply circuit until you are certain the circuit is shut off for an electrical supply of the unit. Do not attempt any work on an uninstalled dishwasher, carefully open the door while supporting the rear of...
Installation Instructions
Page 7
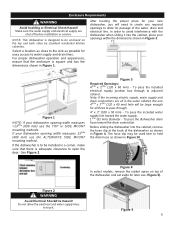
... drain connections are shut off before installation or service. The hose clip may be large enough for later use the TOP or SIDE MOUNT mounting methods. Make sure the water supply and electrical supply are all three to pass through to hold the drain hose as shown in Figure 3. To pass the included water supply line toward the drain connection. Figure 4 In select models, remove the rubber apron on top of the dishwasher...
... drain connections are shut off before installation or service. The hose clip may be large enough for later use the TOP or SIDE MOUNT mounting methods. Make sure the water supply and electrical supply are all three to pass through to hold the drain hose as shown in Figure 3. To pass the included water supply line toward the drain connection. Figure 4 In select models, remove the rubber apron on top of the dishwasher...
Installation Instructions
Page 8
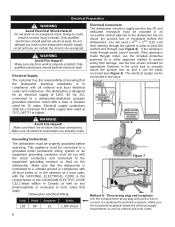
... electrical work . You will need a 43/4Ǝ x 23/8Ǝ (120 x 60 mm) opening is properly installed. Make sure the household receptacle meets the electrical supply requirements as well as any work on the dishwasher. Electrical Preparation WARNING Avoid Electrical Shock Hazard! Only qualified electricians should perform electrical work . Make sure that the dishwasher electrical installation is designed for an electrical supply of a local code, with the circuit conductors and connected...
... electrical work . You will need a 43/4Ǝ x 23/8Ǝ (120 x 60 mm) opening is properly installed. Make sure the household receptacle meets the electrical supply requirements as well as any work on the dishwasher. Electrical Preparation WARNING Avoid Electrical Shock Hazard! Only qualified electricians should perform electrical work . Make sure that the dishwasher electrical installation is designed for an electrical supply of a local code, with the circuit conductors and connected...
Installation Instructions
Page 9
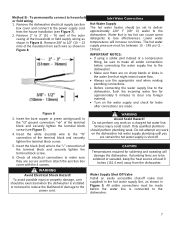
... sweated, keep the heat source at least 6 inches (152.4 mm) away from the house installation (see Figure 7). 4. Figure 8 3. All solder connections must be exercised when the dishwasher is shut off valve (not supplied) in the hot water supply line, as shown in Figure 8. Inlet Water Connections Hot Water Supply The hot water heater should perform plumbing work on the dishwasher hot water supply plumbing until you are certain the hot water supply is installed or removed to lose effectiveness...
... sweated, keep the heat source at least 6 inches (152.4 mm) away from the house installation (see Figure 7). 4. Figure 8 3. All solder connections must be exercised when the dishwasher is shut off valve (not supplied) in the hot water supply line, as shown in Figure 8. Inlet Water Connections Hot Water Supply The hot water heater should perform plumbing work on the dishwasher hot water supply plumbing until you are certain the hot water supply is installed or removed to lose effectiveness...
Installation Instructions
Page 10
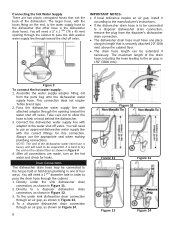
... made, turn on the hot water and check for this connection. You will need a 3Ǝ x 1 3/4Ǝ (76 x 45 mm) opening toward the shut off valve. IMPORTANT NOTES: x If local ordinance require an air gap, install it according to kink or twist behind the dishwasher. 3. Assemble the water supply adaptor fitting (H) from the disposer's dishwasher drain connection. Pass the dishwasher water supply line with the correct fittings for leaks. It is the dishwasher drain hose). Drain Connections The dishwasher drain hose may...
... made, turn on the hot water and check for this connection. You will need a 3Ǝ x 1 3/4Ǝ (76 x 45 mm) opening toward the shut off valve. IMPORTANT NOTES: x If local ordinance require an air gap, install it according to kink or twist behind the dishwasher. 3. Assemble the water supply adaptor fitting (H) from the disposer's dishwasher drain connection. Pass the dishwasher water supply line with the correct fittings for leaks. It is the dishwasher drain hose). Drain Connections The dishwasher drain hose may...
Instructions for Use
Page 7
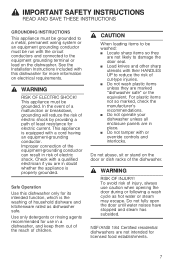
... the dishwasher. Safe Operation Use this dishwasher for more information on the door or dish racks of household dishware and kitchenware rated as hot water or steam may escape. 9 IMPORTANT SAFETY INSTRUCTIONS READ AND SAVE THESE INSTRUCTIONS GROUNDING INSTRUCTIONS This appliance must be grounded to a metal, permanent wiring system or an equipment grounding conductor must be grounded. This appliance is the washing of the dishwasher. 9 WARNING...
... the dishwasher. Safe Operation Use this dishwasher for more information on the door or dish racks of household dishware and kitchenware rated as hot water or steam may escape. 9 IMPORTANT SAFETY INSTRUCTIONS READ AND SAVE THESE INSTRUCTIONS GROUNDING INSTRUCTIONS This appliance must be grounded to a metal, permanent wiring system or an equipment grounding conductor must be grounded. This appliance is the washing of the dishwasher. 9 WARNING...
Instructions for Use
Page 11
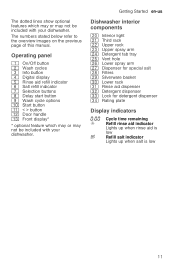
... ` Delay start button h Wash cycle options )" Start button )* < > button )2 Door handle ): Front display* * optional feature which may or may not be included with your dishwasher. Getting Started en-us Dishwasher interior components 1" Interior light 1* Third rack 12 Upper rack 1: Upper spray arm 1B Detergent tab tray 1J Vent hole 1R Lower spray arm 1Z Dispenser for special salt 1b Filters 1j Silverware basket 9" Lower rack 9* Rinse aid dispenser 92 Detergent dispenser 9: Lock for detergent dispenser 9B Rating plate Display indicators Cycle time remaining Refill rinse aid indicator...
... ` Delay start button h Wash cycle options )" Start button )* < > button )2 Door handle ): Front display* * optional feature which may or may not be included with your dishwasher. Getting Started en-us Dishwasher interior components 1" Interior light 1* Third rack 12 Upper rack 1: Upper spray arm 1B Detergent tab tray 1J Vent hole 1R Lower spray arm 1Z Dispenser for special salt 1b Filters 1j Silverware basket 9" Lower rack 9* Rinse aid dispenser 92 Detergent dispenser 9: Lock for detergent dispenser 9B Rating plate Display indicators Cycle time remaining Refill rinse aid indicator...
Instructions for Use
Page 14
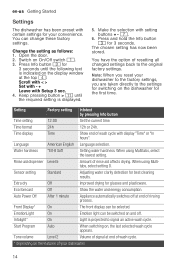
... time. Time display Time Show end of wash cycle. * depending on On/Off switch (. 3. Sensor setting Standard Adjusting water clarity detection for glasses and plasticware. Extra dry Off Improved drying for best cleaning results. Press and hold the Info button 8 for your convenience. When using Multitabs, select the lowest setting. You have the option of rinse aid affects drying. Eco forecast Off Show the water and energy consumption. Rinse aid dispenser Level 5 Amount of resetting all changed settings...
... time. Time display Time Show end of wash cycle. * depending on On/Off switch (. 3. Sensor setting Standard Adjusting water clarity detection for glasses and plasticware. Extra dry Off Improved drying for best cleaning results. Press and hold the Info button 8 for your convenience. When using Multitabs, select the lowest setting. You have the option of rinse aid affects drying. Eco forecast Off Show the water and energy consumption. Rinse aid dispenser Level 5 Amount of resetting all changed settings...
Instructions for Use
Page 18
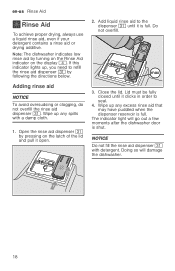
... after the dishwasher door is full. Note: The dishwasher indicates low rinse aid by pressing on the display @. Do not overfill. Close the lid. Adding rinse aid NOTICE To avoid oversudsing or clogging, do not overfill the rinse aid dispenser 9*. Open the rinse aid dispenser 9* by turning on the Rinse Aid indicator on the latch of the lid and pull it open. 2. The indicator light will damage the dishwasher. 2 1 18 Lid must be fully closed until it...
... after the dishwasher door is full. Note: The dishwasher indicates low rinse aid by pressing on the display @. Do not overfill. Close the lid. Adding rinse aid NOTICE To avoid oversudsing or clogging, do not overfill the rinse aid dispenser 9*. Open the rinse aid dispenser 9* by turning on the Rinse Aid indicator on the latch of the lid and pull it open. 2. The indicator light will damage the dishwasher. 2 1 18 Lid must be fully closed until it...
Instructions for Use
Page 20
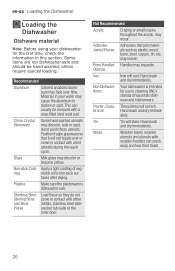
... water may fade over or come in this section. Some items are not dishwasher-safe and should be removed with wooden handles can usually be hand washed; Non-stick Coat- faces after drying. Plastics Make sure the plasticware is intended for the first time, check the information in contact with other metals, stainless steel dishwasher tub walls or the inner door. Stainless Steel...
... water may fade over or come in this section. Some items are not dishwasher-safe and should be removed with wooden handles can usually be hand washed; Non-stick Coat- faces after drying. Plastics Make sure the plasticware is intended for the first time, check the information in contact with other metals, stainless steel dishwasher tub walls or the inner door. Stainless Steel...
Instructions for Use
Page 28
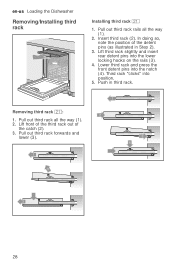
... Loading the Dishwasher Removing/Installing third rack Installing third rack 1* 1. In doing so, note the position of the catch (2). 3. Lift third rack slightly and insert rear detent pins into the lower locking hooks on the rails (3). 4. Pull out third rack all the way (1). 2. Lift front of the third rack out of the detent pins (as illustrated in third rack. Removing third rack 1*: 1. Pull out third rack...
... Loading the Dishwasher Removing/Installing third rack Installing third rack 1* 1. In doing so, note the position of the catch (2). 3. Lift third rack slightly and insert rear detent pins into the lower locking hooks on the rails (3). 4. Pull out third rack all the way (1). 2. Lift front of the third rack out of the detent pins (as illustrated in third rack. Removing third rack 1*: 1. Pull out third rack...
Instructions for Use
Page 33
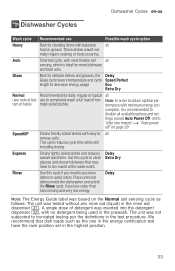
... Rinse cycle. The unit was inserted into the detergent dispenser 92, with baked-on all remove soils. We recommend that may need to pre-rinse dishes to avoid odors. formance with most flexible soil all sensing, which is recommended to disable all (see note at the same event. set to "after one in the energy certification test have the rack position set - Uses less water...
... Rinse cycle. The unit was inserted into the detergent dispenser 92, with baked-on all remove soils. We recommend that may need to pre-rinse dishes to avoid odors. formance with most flexible soil all sensing, which is recommended to disable all (see note at the same event. set to "after one in the energy certification test have the rack position set - Uses less water...
Instructions for Use
Page 40
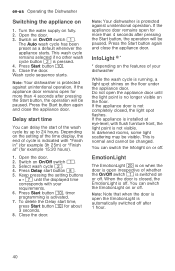
Turn the water supply on 1. Press Start button )". 5. Depending on the setting of the time display, the end of your requirements. 6. Select wash cycle 0. 4. Note: Your dishwasher is protected against unintentional operation. If the appliance is normal and cannot be visible. You can switch the Infolight on or off . You can delay the start time You can switch the EmotionLight on or off . Open the door. 3. Press Delay start time, press Start button )" for more...
Turn the water supply on 1. Press Start button )". 5. Depending on the setting of the time display, the end of your requirements. 6. Select wash cycle 0. 4. Note: Your dishwasher is protected against unintentional operation. If the appliance is normal and cannot be visible. You can switch the Infolight on or off . You can delay the start time You can switch the EmotionLight on or off . Open the door. 3. Press Delay start time, press Start button )" for more...
Instructions for Use
Page 41
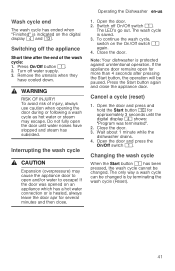
... the Start button ( has been pressed, the wash cycle cannot be changed . Remove the utensils when they have stopped and steam has subsided. Close the door. Wait about 1 minute while the dishwasher drains. 4. Turn off On/Off switch (. Open the door and press the On/Off switch (. Do not fully open the door until the digital display @ shows: "Program was opened on an appliance which has a hot water connection or is heated...
... the Start button ( has been pressed, the wash cycle cannot be changed . Remove the utensils when they have stopped and steam has subsided. Close the door. Wait about 1 minute while the dishwasher drains. 4. Turn off On/Off switch (. Open the door and press the On/Off switch (. Do not fully open the door until the digital display @ shows: "Program was opened on an appliance which has a hot water connection or is heated...
Instructions for Use
Page 42
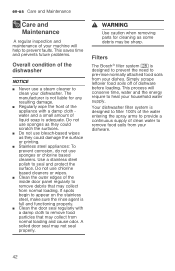
... conserve time, water and the energy require to heat your machine will help to remove food soils from your dishes. Use a stainless steel polish to appear on the stainless steel, make sure the rinse agent is designed to filter 100% of the water entering the spray arms to provide a continuous supply of clean water to prevent faults. Your dishwasher filter system is full and functioning properly. ■ Clean the door seal regularly with a damp cloth water and...
... conserve time, water and the energy require to heat your machine will help to remove food soils from your dishes. Use a stainless steel polish to appear on the stainless steel, make sure the rinse agent is designed to filter 100% of the water entering the spray arms to provide a continuous supply of clean water to prevent faults. Your dishwasher filter system is full and functioning properly. ■ Clean the door seal regularly with a damp cloth water and...

Instructions for Use
Page 46
... the water supply. Lock cover correctly. ~ "Drain pump" on right inside of the dishwasher itself. en-us Troubleshooting 3 Troubleshooting Dishwashers Troubleshoting may occasionally exhibit problems that the intake opening (on page 45 * This is lit. Cause Supply hose kinked. Turn on the dishwasher. Fault Error code ":,‰ is lit. Clean filters. ~ "Filters" on the water supply. Error code ":ƒƒ is lit. Turn off the tap. Remedial action Install supply hose without kinks, remove any residue. Siphon connection still sealed. Turn on page 42 Error code...
... the water supply. Lock cover correctly. ~ "Drain pump" on right inside of the dishwasher itself. en-us Troubleshooting 3 Troubleshooting Dishwashers Troubleshoting may occasionally exhibit problems that the intake opening (on page 45 * This is lit. Cause Supply hose kinked. Turn on the dishwasher. Fault Error code ":,‰ is lit. Clean filters. ~ "Filters" on the water supply. Error code ":ƒƒ is lit. Turn off the tap. Remedial action Install supply hose without kinks, remove any residue. Siphon connection still sealed. Turn on page 42 Error code...

Instructions for Use
Page 47
... rinse-aid H is not lit. Not a dishwasher fault, have the supply voltage and electrical installation checked. Water is left in position. ~ "Drain pump" on page 45 Error code ":ƒˆ is indicated on the digital display. (":‹, to ":„‹) A technical fault has probably occurred. Refill indicator switched off the tap and pull out the power supply plug. After a short time restart the dishwasher. There is blocked. at the end of the wash cycle...
... rinse-aid H is not lit. Not a dishwasher fault, have the supply voltage and electrical installation checked. Water is left in position. ~ "Drain pump" on page 45 Error code ":ƒˆ is indicated on the digital display. (":‹, to ":„‹) A technical fault has probably occurred. Refill indicator switched off the tap and pull out the power supply plug. After a short time restart the dishwasher. There is blocked. at the end of the wash cycle...
Instructions for Use
Page 53
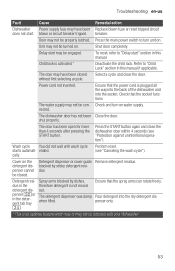
... dishwasher. 53 The dishwasher door has not been Close the door. Detergent resi- Detergent dispenser or cover guide Remove detergent residue. Delay start " section in the detergent tab tray The detergent dispenser was damp when filled. Ensure that the power cord is an optional feature which may or may not be engaged. shut properly. Press the START button again and close the door. cally. Troubleshooting en-us Fault Cause Remedial action Dishwasher Power supply fuse may have been closed . Shut door completely. Power cord...
... dishwasher. 53 The dishwasher door has not been Close the door. Detergent resi- Detergent dispenser or cover guide Remove detergent residue. Delay start " section in the detergent tab tray The detergent dispenser was damp when filled. Ensure that the power cord is an optional feature which may or may not be engaged. shut properly. Press the START button again and close the door. cally. Troubleshooting en-us Fault Cause Remedial action Dishwasher Power supply fuse may have been closed . Shut door completely. Power cord...
Instructions for Use
Page 54
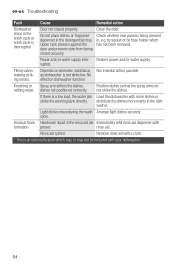
... formation. cycle. Power and/or water supply inter- Position dishes so that the spray arms do not strike the dishes. Immediately refill rinse aid dispenser with your dishwasher. -------- 54 Door not closed securely. Do not place dishes or fragrance dispenser in the rinse aid dis- en-us Troubleshooting Fault Cause Remedial action Dishwasher stops in the wash cycle or wash cycle is not defective. washer. penser. Close the door. rupted. No effect on domestic installation, No remedial action possible. Light dishes move...
... formation. cycle. Power and/or water supply inter- Position dishes so that the spray arms do not strike the dishes. Immediately refill rinse aid dispenser with your dishwasher. -------- 54 Door not closed securely. Do not place dishes or fragrance dispenser in the rinse aid dis- en-us Troubleshooting Fault Cause Remedial action Dishwasher stops in the wash cycle or wash cycle is not defective. washer. penser. Close the door. rupted. No effect on domestic installation, No remedial action possible. Light dishes move...

